

When you are selling products online, one great photo can be the difference between a scroll and a sale. Sharp, well-framed shots that show off your product from the right angles build trust immediately, get more clicks, and help your brand stand out in a marketplace where everyone is competing for the same attention.
The good news is you do not need a studio or an expensive camera to get there. Your smartphone is already more capable than you think. With the right lighting, a clean background, and a few simple habits, you can shoot images from your kitchen counter that hold their own against brands spending thousands on professional shoots.
We'll walk you through the whole process in this guide, like simple ways to know the best lighting, pick good angles, and edit for that pro pop without spending a penny extra using our AI tool, Pixelbin. Also, we'll cover extra tips to make them feature on Shopify or Amazon.
What makes a smartphone good for product photography?
Before jumping to recommendations, it helps to understand what separates a great product photography phone from just a great camera phone. Portrait shots forgive a lot. Product shots don't.
- Resolution and sensor size are where it starts. You need enough detail to show textures, stitching, labels, and surface finishes clearly. Anything under 50MP starts showing its limits when clients zoom in on e-commerce listings.
- Color accuracy is arguably more important than resolution. A customer returning a product because "the color looked different online" is a real problem, and it usually starts with a phone that over-saturates or shifts white balance unpredictably.
- Macro capability matters far more for product work than most reviews acknowledge. Shooting jewelry, skincare packaging, food, or accessories requires getting genuinely close without losing sharpness.
- Manual control, like ISO, shutter speed, and white balance, lets you lock settings across a batch of shots so your images stay consistent, which is essential for catalog work.
- RAW support is non-negotiable if you're editing seriously. The difference between editing a RAW file and a processed JPEG in Lightroom Mobile is night and day when recovering highlights on a glossy product.
Equipment you need for a product photography setup
Getting your product photography setup right starts with having the right equipment. From lighting to backdrops, every tool plays a role in making your products look professional, polished, and sale-ready. Know them more in detail;
1. Camera & Shooting Gear
- Smartphone with RAW support and manual mode (iPhone 17 Pro Max, Samsung Galaxy S26 Ultra)
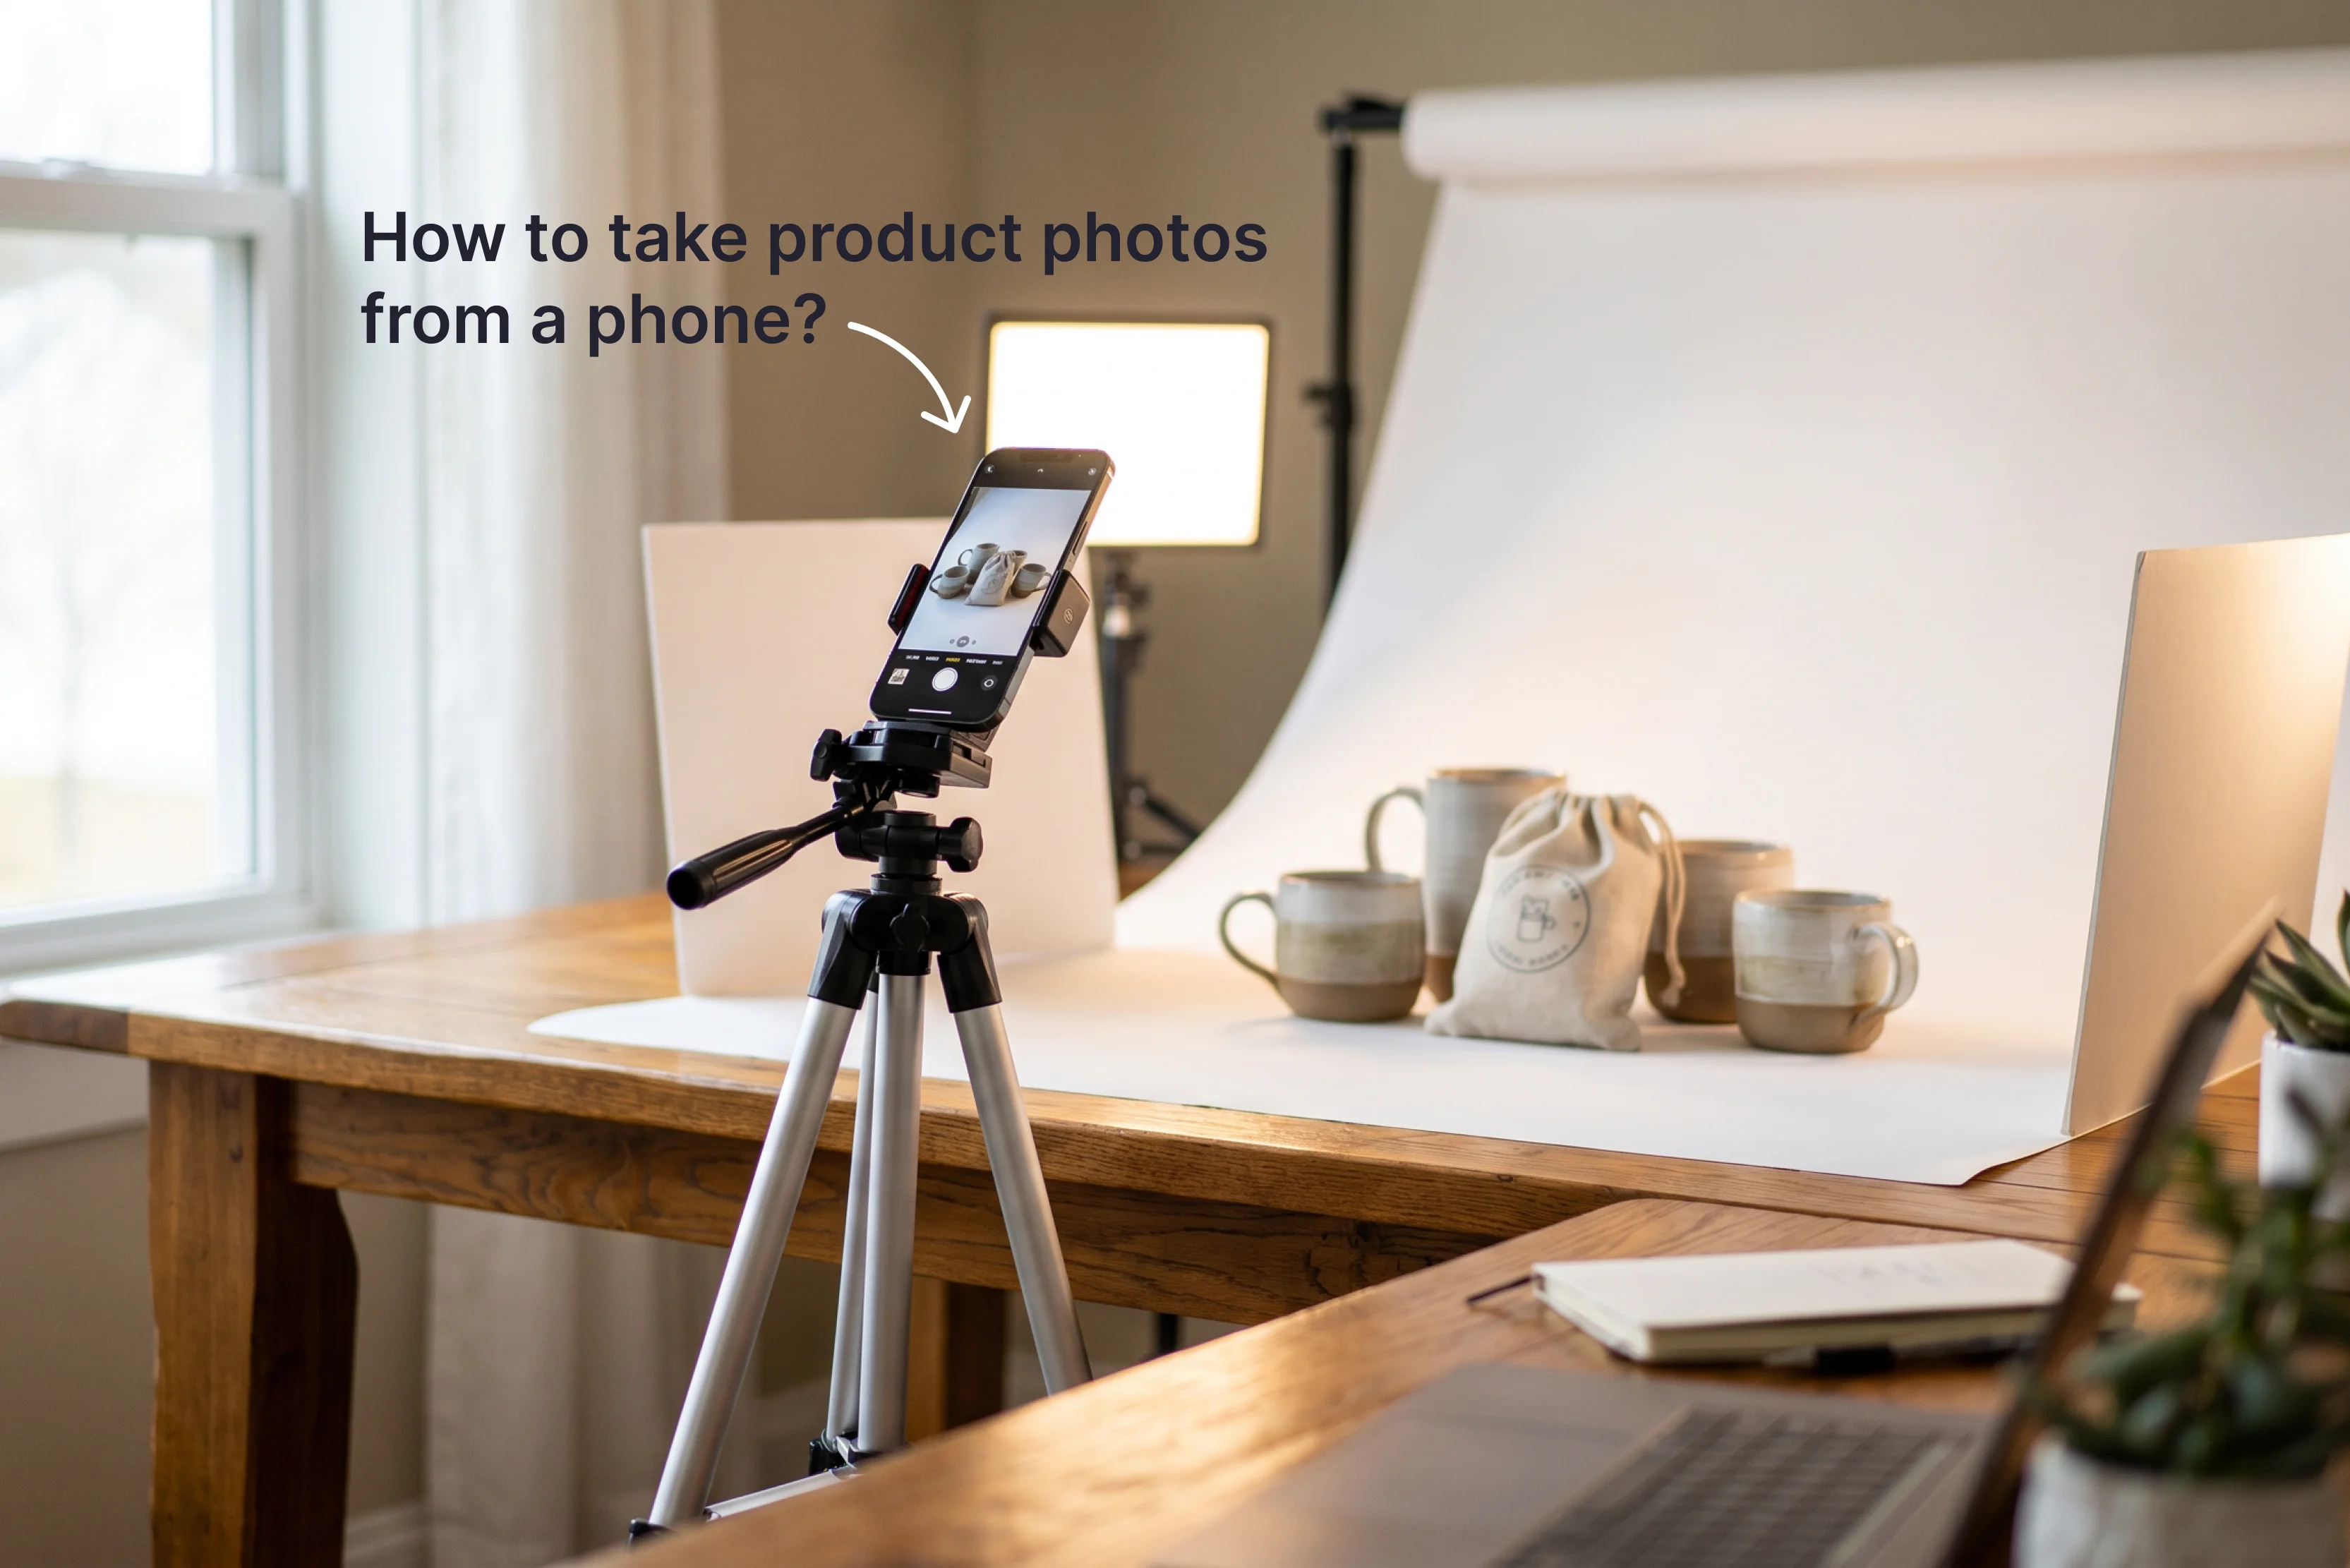
- Tripod or mini desk tripod for sharp, blur-free shots
- Bluetooth remote shutter to avoid camera shake
2. Lighting equipment
- Lightbox or light tent for small to medium products
- Softbox lights or LED panel lights for even, diffused lighting
- Reflector cards (white, silver, gold) to bounce and fill shadows
- Ring light for flat lay and overhead product shots
3. Backdrop & surfaces
- White, black, and grey paper roll backdrops
- Wooden boards or marble sheets for lifestyle product shots
- Foam boards for DIY light bouncing and blocking
4. Editing & accessories
- Lightroom Mobile or Snapseed for RAW editing
- A colour checker card for accurate white balance
- Lens cleaning cloth to avoid smudges on shots
5. Optional but useful
- Lazy Susan turntable for 360-degree product shots
- Macro lens clip-on attachment for extreme close-ups
- Small clamps and tape for positioning products precisely
How to take quality product photos from a phone - Best practices
You don't need a professional studio or expensive camera to shoot product photos that actually sell. With the right habits and a little preparation, your smartphone is more than capable of producing images that look polished and professional. Here's everything you need to know before you start shooting.
1. Clean your lens before every shoot
This sounds obvious, but it's one of the most commonly skipped steps in smartphone product photography. A single fingerprint or water droplet on your lens can completely ruin an otherwise perfect shot. In most cases, a blurry or hazy image caused by a dirty lens simply cannot be fixed in editing.
Before every shoot, wipe your lens with a microfiber cloth and alcohol-based cleaning liquid. Avoid rubbing it on your clothing, as fabric can leave residue and micro-scratches over time. If you accidentally touch the lens mid-shoot, stop and clean it again before continuing.
2. Get your lighting right
Light can make or break a product photo, and that is even more true when shooting on a phone. Smartphone sensors are smaller than those in dedicated cameras, meaning they pick up less light and struggle when conditions are dim or inconsistent.
If you have a window in the room, start there every single time. Place your product at a 90-degree angle to the window so light wraps evenly across the surface. Straight-on light flattens detail and kills texture. Avoid table lamps where possible as a single hard source only covers part of the product and makes imperfections look worse. No natural light available? Use two artificial sources placed on opposite sides for even, shadow-free results.
3. Always shoot in manual mode
Auto mode is convenient, but it is quietly ruining your consistency. Every time you use it, your phone makes its own decisions about exposure, white balance, ISO, and shutter speed. Two photos taken seconds apart can look completely different, which is a serious problem when shooting a product batch.
Switch to manual or pro mode and take full control. Set a low ISO to keep images clean and grain-free. Lock your white balance using a plain white surface so colours stay consistent across every shot. Adjust the exposure until all product detail is visible without blown highlights. Always shoot in RAW over JPEG. Lightroom Mobile and Snapseed are both free and handle RAW files exceptionally well.
4. Shoot from multiple angles
Your customers are making a purchase decision entirely based on your photos, so the more angles you cover, the more confident they will feel before buying. Start with a straight-on front shot as your hero image, then build from there. Add a 45-degree angle to show scale and depth.
Include a back shot if there is any detail or text not visible from the front. A top-down shot works brilliantly for bundled or packaged products. Always include at least one macro shot highlighting the material, texture, or craftsmanship. Close-up detail shots build trust in a way that wide shots cannot. They show customers exactly what they are paying for and reduce abandoned carts significantly.
5. Add lifestyle and in-action shots
Studio shots show what a product looks like. Lifestyle shots show what it feels like to own one. Shooting your product in a real setting adds relatability that plain white background images simply cannot replicate on their own. Lifestyle photography builds brand trust quickly and performs well on social media and home pages.
Shooting indoors? Make sure the space is well-lit with natural light coming from a consistent direction. Shooting outside? Pick a calm, bright day with even light falling across the product. Always keep your product clearly visible and unobstructed throughout the shoot. Props and background elements should support the product, not compete with it. The product is always the main subject.
6. Create flat lays and group shots
Flat lays are photographed from directly above, with products arranged on a styled surface that is clean, editorial, and immediately eye-catching on social media. Group shots arrange multiple products side by side and work well for showcasing a full range or collection.
Both formats are versatile and worth adding to every product shoot. Neither format requires a plain white background. Feel free to introduce props, fabrics, or complementary accessories that add visual context to the products. Think of it as composing a still life where every element in the frame earns its place.
7. Always photograph your packaging
Packaging is part of the product experience, and customers want to know exactly what will arrive at their door. Including shots of your branded packaging adds a layer of professionalism and transparency that builds confidence in first-time buyers.
It also gives your brand an opportunity to make a strong visual impression before the product is even opened. One of the most classic and effective e-commerce formats is simply the product placed next to its box on a clean background.
If your packaging is beautifully designed, give it its own dedicated shot. It is part of your brand identity and deserves to be seen.
8. Keep your visual style consistent
Consistency is what separates a brand from a random collection of product images. Every photo in your store should feel like it belongs to the same family, with the same backdrop, lighting, camera settings, and overall aesthetic.
When customers browse your store, that visual cohesion signals professionalism and builds immediate trust. Inconsistent colors, shifting white balance, or mismatched backdrops across a product range create subtle visual noise that makes buyers hesitant.
Document your exact setup and settings after your first successful shoot so you can replicate them precisely every time. The goal is for every image to look planned and intentional, giving your brand a polished and credible appearance throughout.
How to take quality product photos from a phone using Pixelbin
Getting a great product shot on your phone is only half the work. Even a well-taken photo still needs some finishing before it is ready for a listing or an ad. Backgrounds are rarely perfect, lighting does not always cooperate, and that gap between a decent shot and a polished one can feel genuinely frustrating when you feel like you are doing everything right.
That is where Pixelbin comes in handy. Think of it like having a quick editing assistant on standby. You shoot your product on the kitchen counter, upload the image, and within seconds, you have a clean background, better lighting, and a result that actually looks like it belongs on a proper product page.
It is a free AI product photography tool that takes your phone images and turns them into clean, studio-standard visuals. No design skills needed, no Photoshop, no studio booking. Just upload, describe what you want, and it handles the rest.
Key features of the Pixelbin AI product photography tool?
- Mobile-friendly: Works seamlessly across desktop, tablet, and mobile. Shoot on your phone, edit in your browser, and download without switching devices.
- Multiple formats: Works with all popular image formats your smartphone produces, including JPEG, JPG, PNG, and WEBP. Upload directly from your camera roll without converting anything beforehand.
- No sign-up required: Access the tool immediately without creating an account or sharing any personal information. No registration barrier between you and your finished product photo.
- 1 free trial: Explore different designs, make changes, and experiment freely without any upfront costs. Test the tool fully before committing to anything.
- No watermarks on downloads: Every image you download is completely clean with no watermarks or added text, ready to publish across your website, store, or social media instantly.
- Simple interface: Simple and immediate editing experience with no learning curve. Get started the moment you land on the page.
- Browser-based: Runs in any modern browser, including Chrome, Safari, Edge, and Firefox, with no installations needed whatsoever.
How does Pixelbin AI product photography tool work?
Step 1 - Upload your image: Go to pixelbin.io/ai-tools/ai-product-photography and upload a clear, well-lit photo of your product in any standard format up to 10MB.

Step 2 - Describe what you want: Type out your vision in plain language. Mention the background style, lighting feel, surface, and mood. The more specific you are, the closer the result will be to what you have in mind.
Step 3 - Generate and preview: The AI processes your image in seconds. If something is off, adjust your description and run it again until it looks right.
Step 4 - Download and post: Save your finished image in HD with no watermarks, ready to go live on any platform straight away.
Who should use Pixelbin for product photography? Author’s tip
The Pixelbin tool for product photography is genuinely useful for anyone who shoots product photos on a smartphone and needs professional results without a professional budget.
It works particularly well for small e-commerce sellers who need clean Amazon-compliant images, social media creators who want lifestyle visuals without booking a shoot, independent brands building a consistent visual identity on a tight budget, and dropshippers who need to create realistic product images quickly before committing to stock.
The free plan gives you three credits per month to try the tool without any upfront cost. Additional credits are available on a pay-as-you-go basis for those shooting at higher volume.
Final thoughts
Taking quality product photos from your phone comes down to the habits you build before, during, and after every shoot. Good light, a clean background, steady hands, and consistent camera settings will take you further than any equipment upgrade. Once those fundamentals are in place, your phone becomes a powerful tool for creating images that genuinely sell.
If you want to give your shots a professional finish, Pixelbin's AI Product Generator lets you transform phone photos into studio-quality visuals in seconds with no sign-up needed. Upload and describe your setting, and download a clean HD image ready to represent your brand at its best.
FAQs
Side lighting at a 45-degree angle creates depth and highlights surface texture. Use a low LED panel and reflector cards to fill shadows without flattening detail.
Place your product off-centre using your camera grid. A slight downward 45-degree angle adds depth. Varying front, side, and low angles builds a professional, conversion-ready product story.
Clean your lens before every close-up shoot. Use macro mode with locked manual focus, a tripod, and strong natural light for the crispest possible results.
A lightbox, two foam boards, and a tripod replicate professional shadow-free shots cheaply. Even side lighting and a white backdrop create the clean look e-commerce platforms require.
Yes. Pixelbin's AI Product Generator replaces backgrounds, corrects lighting, and creates studio-quality visuals from phone shots using simple text prompts, with no sign-up and no watermarks.
Pixelbin generates clean backgrounds meeting Shopify and Amazon requirements. Upload your phone photo, describe your setting, and download an HD, watermark-free, listing-ready image instantly.