.webp)

Many CapCut users face a frustrating issue while exporting videos. A visible watermark or automatic "Default ending" clip often appears, especially with templates. This problem affects posts on TikTok, Instagram, and YouTube. While CapCut remains popular for being free, powerful, and user-friendly, these watermarks make professional or branded content look unpolished and amateurish.
This watermark in a video exists for a reason. Like most free apps, CapCut includes subtle branding and default endings to promote its service by adding the watermark. The mark also helps identify template content where third-party elements might carry their own license requirements.
In this guide, you’ll learn official, free ways to remove CapCut using official AI tools like Pixelbin and more. Whether you’re editing for a social media post or a professional project, the methods mentioned below will help you achieve natural results.
How to remove the CapCut watermark from the video
CapCut watermark is used to promote it and identify free exports, but there are many ways to remove it, depending on the watermark type. Below is a beginner-friendly guide that explains each method in a descriptive way.
What is the significance of CapCut watermarks?
CapCut watermarks are mainly added for branding and to identify videos created with templates, rather than to protect intellectual property. However, there are times when you may want to remove a watermark from a video, for instance, if you’ve legally purchased the rights to the video or if you want to use the video for a personal project.
Understanding CapCut watermark types
CapCut uses specific watermarks depending on your editing choices and export settings. Creators need to recognize these to keep videos clean and professional.
- Ending screen watermark: CapCut adds its logo as an automatic outro at the video's end. Free users get this by default on most exports unless they adjust settings first. The clip plays right after your content finishes.
- Template watermark: Many templates place the CapCut logo directly into frames or transitions. This shows up during playback and final export, particularly with free pro-level templates. It stays visible as part of the design.
- Asset watermark: Premium effects, stock clips, or transitions often include a small CapCut badge in the corners. Free accounts see these as locked features until upgraded. A Pro plan clears them for smooth results.
Authorized methods to remove the CapCut watermark
CapCut provides legitimate options to export without a watermark like:
Upgrade to CapCut Pro
This subscription unlocks premium templates, effects, stock resources, and cloud storage for seamless editing. It also removes watermarks from pro assets, though most basic free exports stay clean anyway.
Turn off the default ending
Free users can do this quickly by opening Settings on mobile (gear icon) or Preferences on desktop. Just locate "Add default ending" and toggle it off for clean exports on all new projects.
Choose watermark-free templates
Browse the template library and skip any with a "Watermark included" label. These options deliver professional results without watermarks, even on a free account.
How to remove the CapCut watermark from a video without the pro version?
Many creator pros skip CapCut Pro costs and still get clean video exports. These practical free techniques hide or erase watermarks effectively while protecting your footage quality. They fit perfectly for quick TikTok clips, Instagram Reels, or YouTube Shorts.
1. Crop the watermark from the corners
CapCut watermarks usually stick to frame edges or lower corners. Load your exported clip into a free app like InShot or CapCut itself for a second pass. Adjust the crop tool to cut off that exact area and recenter your main subject.
This keeps the video sharp without black bars or stretched visuals. Check platform ratios like 9:16 upfront to avoid re-edits later.
2. Cut off the ending outro completely
That branded CapCut logo only shows in the final 2-3 seconds of many free exports. Open your project timeline and slide the end marker back to your preferred close. Export again, and the clip finishes clean without any trailing promo.
This simple trim saves time and works every time on basic projects.
3. Layer graphics or stickers on top
Place a shape, emoji, or solid color block directly over the watermark position. Use the eyedropper tool to sample nearby colors for a perfect match. Turn the spot into your own logo area or subtle animation instead.
Blend edges softly so nothing looks patched; viewers notice professional polish right away. Full resolution stays intact just like the original.
4. Test free AI removal websites wisely
Tools like Pixelbin or WatermarkRemover.io scan uploads and smartly replace watermark pixels with matching backgrounds. Process short test clips first to gauge realism on your footage type.
Static logos vanish cleanly, but busy motion areas might need a quick manual cover after. Stick to trusted sites without login demands or added marks of their own. Know them in more detail in the sections below.
Things you cannot do without CapCut Pro
There are limits to the free route, and it’s better to know them upfront:
- No one-click removal: The small export logo in CapCut’s free plan can’t be disabled entirely inside the app unless you subscribe.
- Possible loss of quality: Cropping or repeated exporting may lower the resolution or change your framing.
- Copyright concerns: Erasing third-party template credits or using outside AI removers could violate CapCut’s terms or the template creator’s license.
How to remove CapCut watermarks without blur?
Blurring CapCut watermarks gives a fast fix that most people notice right away. That hazy watermark square pulls focus from sharp video content during playback or full-screen views. Creators posting to YouTube, TikTok, or Instagram need methods that keep footage crisp and professional from start to finish.
1. Crop edges for natural trims
Watermarks often sit right along frame borders or lower corners. Load clips into CapCut or free apps like InShot to zoom the main action slightly. Slice away just the marked strip while keeping subjects centered perfectly.
Switch ratios to 9:16 for vertical posts and preview on phones first. This holds full sharpness without black bars or awkward crops.
2. Add overlays that build brand
Cover the exact spot with custom logos, text strips, or simple shapes. Pick colors from nearby areas using dropper tools for exact matches every time. Feather the borders softly and add gentle animations like pulses to make elements feel designed. Viewers see your style instead of flaws, turning fixes into recognition boosters across all uploads.
3. Rebuild areas with pixel matching
Clone samples from clean nearby frames to fill watermark gaps smoothly. CapCut masks handle static scenes well, while basic clone stamps work fast on short clips. Test blends under zooms and speed changes to ensure realism holds up. Results match the original detail without processing slowdowns or visible seams.
4. CapCut free tools for precision
Stickers, emojis, and shape layers drop right over logos with easy tweaks. Set opacity low, and keyframe paths so that covers blend like planned graphics. Reposition entire video tracks gently until marks slide off visible areas into safe export zones. Scale clips just enough to hide issues without any stretch artifacts.
How to remove the CapCut watermark from a video for free using AI tools?
Struggling with CapCut watermarks on your videos? Learn free the best AI video watermark removers that remove the CapCut logo without a Pro upgrade. Know the top tools to deliver the best results fast for TikTok and Reels.
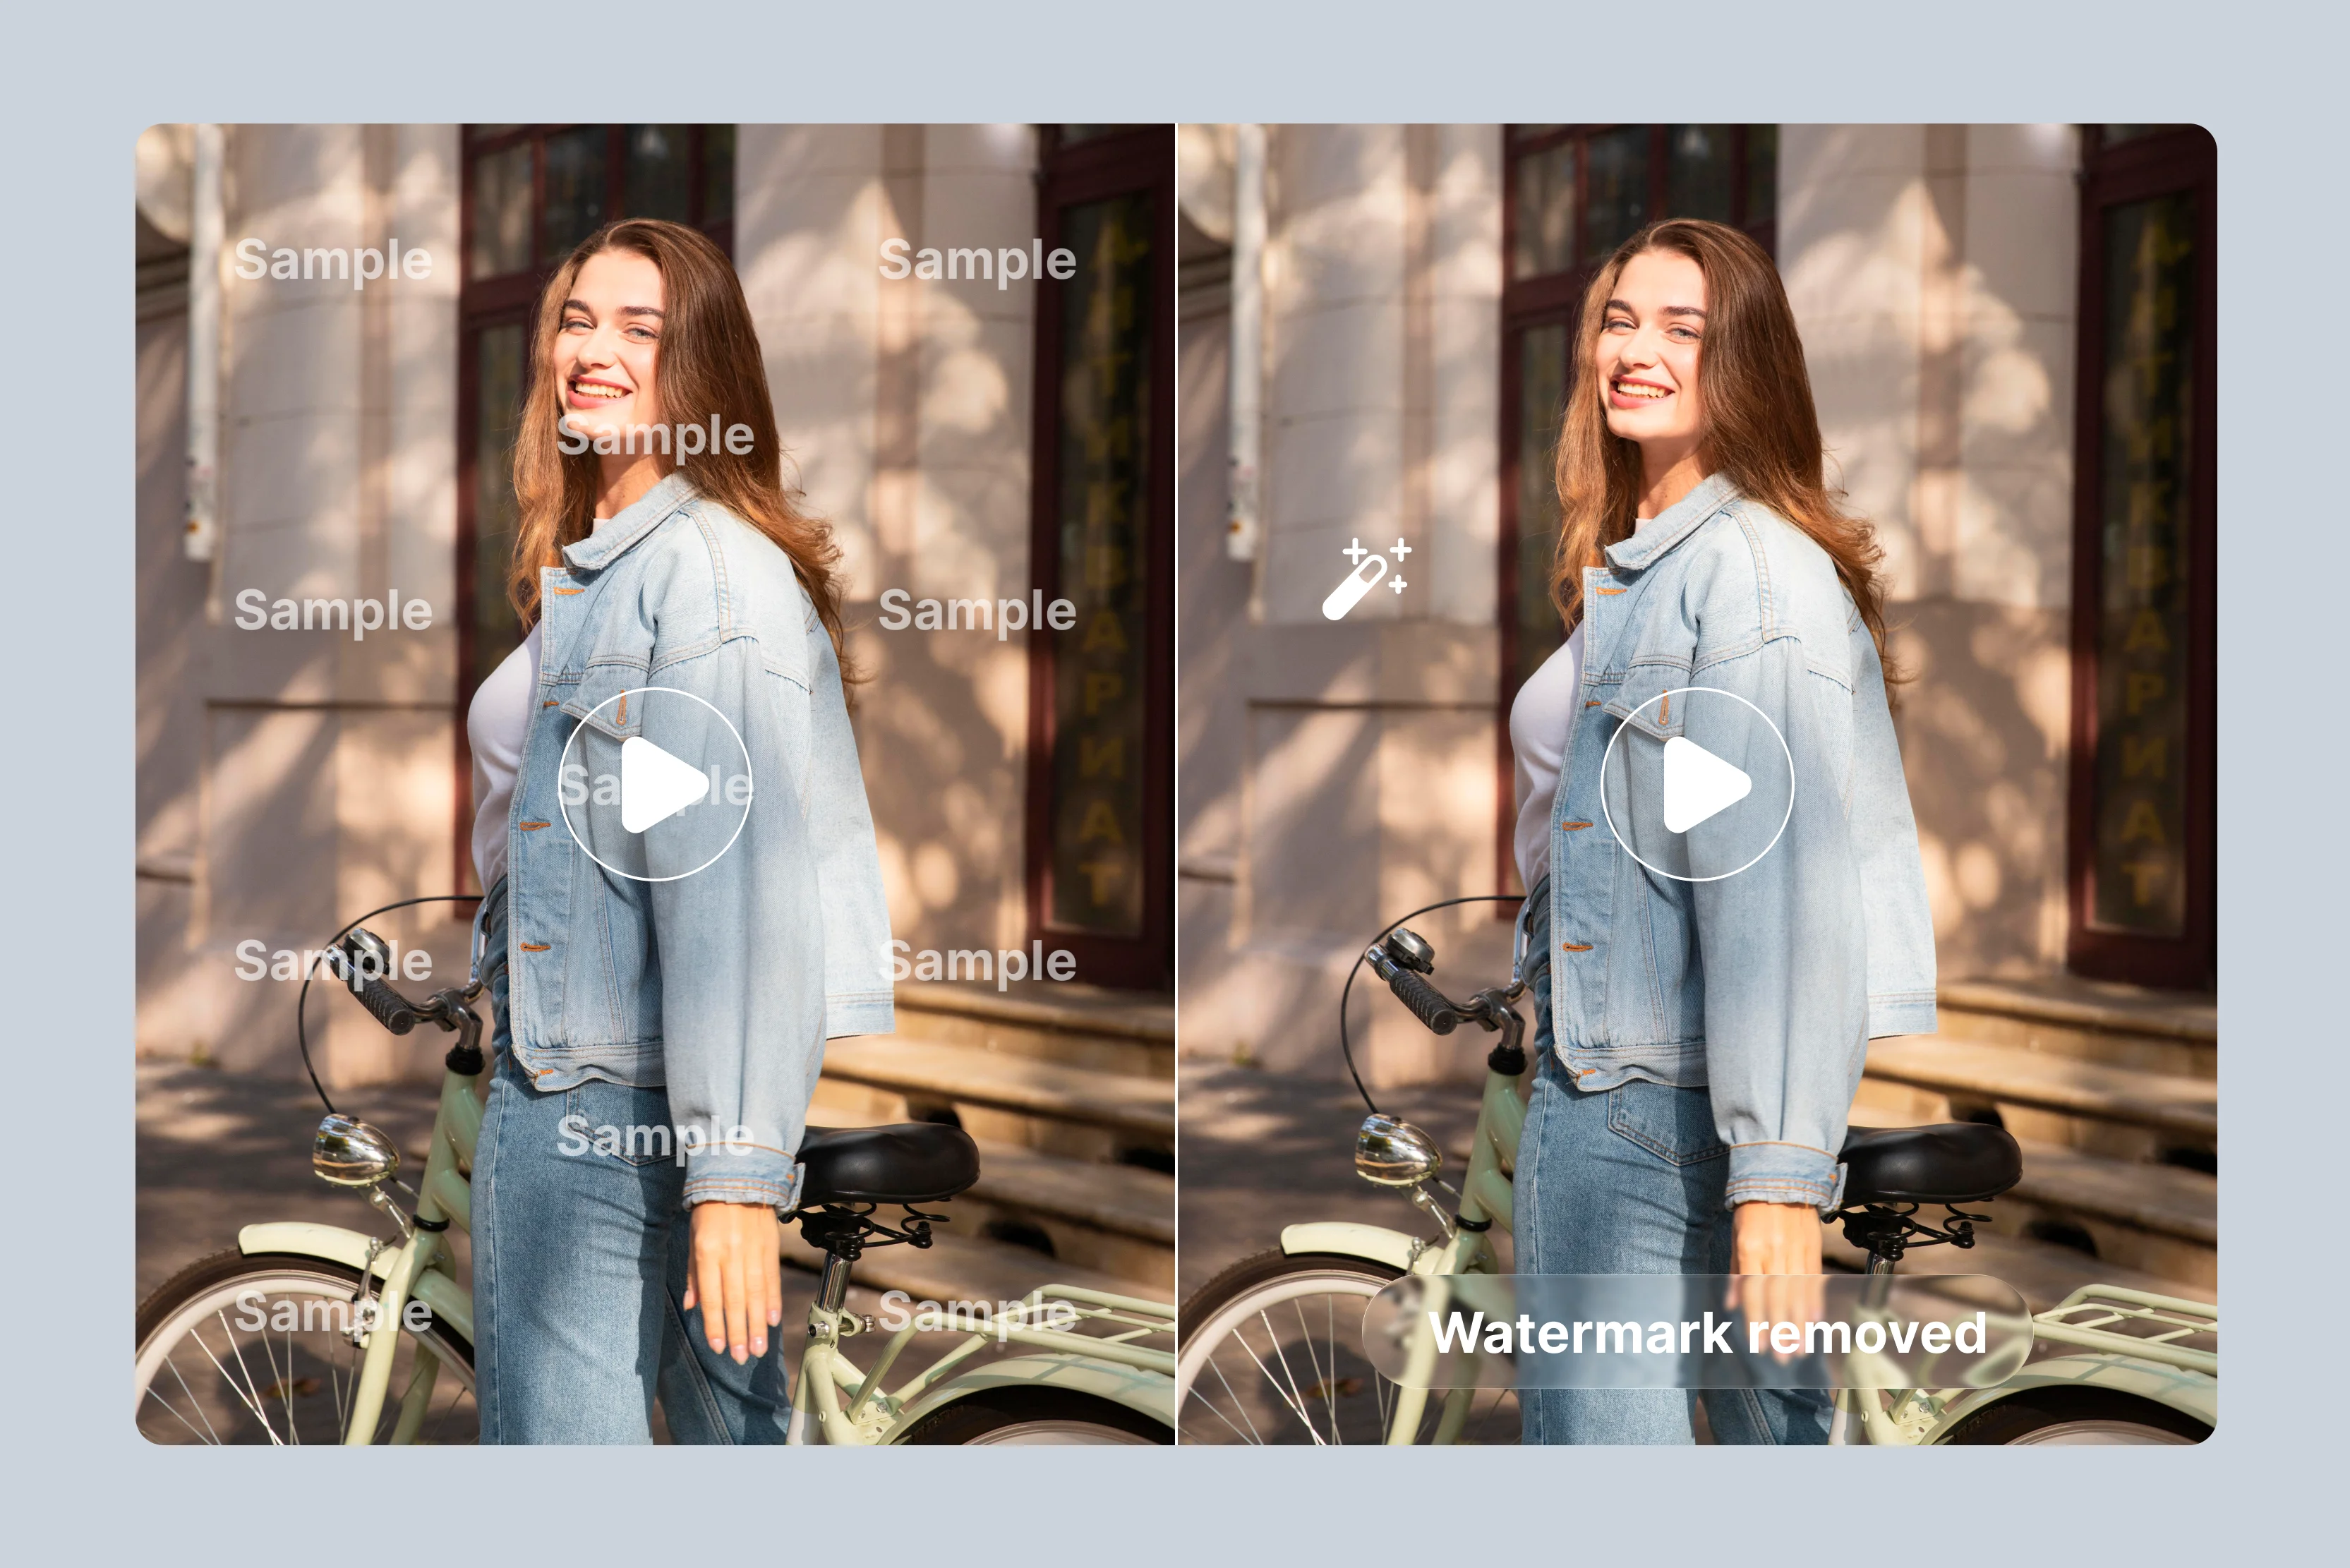
1. Pixelbin video watermark remover

When it comes to watermark removing Pixelbin video watermark remover is the best solution, which includes no software installation or manual adjustments. Users can upload their CapCut video file to the Pixelbin website.
The AI examines each frame to locate logos or text. It then replaces the watermarked areas with matching backgrounds. Processing takes only a few minutes for short videos. The output file maintains original quality and format. Know the steps below:
Step 1: Visit the Pixelbin website
Open your browser and go to Pixelbin.io. The free watermark removal tool loads instantly for video uploads.
Step 2: Upload your CapCut video
Click the upload button and select your file from device storage. Supported formats include MP4, WebM, or MOV.
Step 3: Let AI detect watermarks
Pixelbin scans the video automatically to spot CapCut logos, endings, or template marks. Processing starts right away with no manual setup.
Step 4: AI removes marks cleanly
The tool erases watermarks while filling backgrounds naturally. Original video quality stays sharp with zero blur or artifacts added.
2. WatermarkRemover.io AI watermark eraser & logo remover from video
One of the best tools we will suggest is WatermarkRemover.io, which skips heavy software downloads and manual masking. Just drag your CapCut video into the upload section, and the AI scans every frame to spot logos or timestamps automatically.
It rebuilds backgrounds naturally, so removal looks seamless. Short videos are processed in minutes with no quality loss, perfect for quick social media edits or client deadlines. No subscriptions needed, just some good connectivity for sharp, share-ready files every time. Know the steps below:
Step 1: Upload your CapCut video
Open the homepage and locate the Upload button or drag-and-drop zone. Select your video file from computer storage or phone gallery easily.
Step 2: Mark the watermark area
Preview shows the first frame automatically. Use the brush tool or selection box to highlight CapCut logos, text, or ending clips precisely. Some AI sites detect marks without manual selection.
Step 3: Process for clean removal
Click the Remove or Erase button to start. The tool scans all frames and fills backgrounds naturally so watermarks disappear completely. Processing takes seconds for short clips or minutes for longer videos.
Step 4: Download your final video
Review the processed result carefully, then hit Download. Save the sharp, watermark-free file ready for TikTok, Instagram Reels, or YouTube posts immediately.
Final thoughts
Getting rid of a CapCut watermark isn’t one-size-fits-all. If you value speed and quality, upgrading to CapCut Pro is the cleanest option when you use premium templates or assets, exports remain watermark-free, and every frame stays intact.
Not everyone wants to pay for that, and that’s fine. The free version still gives you workable choices, but for a polished result without any heavy software, Pixelbin video watermark remover is a strong alternative.
This browser-based tool uses AI to track and erase the watermark frame by frame, then lets you download a clean video in minutes. Always edit footage you own and stay within copyright rules.
FAQs
Yes. The free version of CapCut automatically adds a ‘Default Ending’ clip to every new project, which you can remove or disable. A CapCut logo watermark in the corner only appears when you use templates or premium assets.
You can turn off the “Default Ending” in settings and use cropping or overlays to hide the logo without paying. However, completely watermark-free exports require CapCut Pro.
Yes. A Pro subscription lets you export videos without any CapCut logo or ending screen.
Either subscribe to CapCut Pro and export normally, or, in the free version, disable the “Default Ending” and manually crop or cover the logo before exporting.
Check that you’re logged in with the same account that holds the subscription and that the app is updated. Re-export the project after confirming those details.
Removing a watermark from your own footage for personal or commercial use is generally fine, but using it to misrepresent ownership or alter copyrighted material you don’t have rights to can violate CapCut’s terms and local copyright laws.

.webp)