
Summary
AI image editing in 2026 is now focused on fast, prompt-based workflows where users can upload a photo, describe the edit, and get polished results without Photoshop skills. Current tools like Canva, Adobe Express/Firefly, and other AI editors highlight background removal, object cleanup, generative fill, lighting fixes, and product-photo improvement as the most searched use cases. The biggest value for beginners is speed and simplicity, but good results still depend on clear prompts, clean edges, natural lighting, and checking output quality before publishing.
Introduction
This guide answers the question completely: how to edit an image with AI, from choosing the right tool for your task, to writing prompts that actually work, to checking the result before it goes live. Everything here is based on real use, not theoretical capability.
If you have never done this before, you are in the right place. If you have tried it and gotten bad results, the troubleshooting and prompt sections will help you fix that.
What does it mean to edit an image with AI?
When most people hear "AI image editing," they think about generating new images from scratch. Editing an existing image with AI means taking a photo you already have and changing specific parts of it using a text description. You upload the image. You type what you want changed. The AI reads your description, analyzes the photo, and applies the change automatically.
The AI does this by drawing on training across millions of real images. It understands lighting, shadows, object placement, color consistency, and texture well enough to make edits that blend naturally into the original photo. When you tell it to "replace the background with a white studio backdrop," it does not just paste a white rectangle. It separates the subject from the background, removes the original, and fills the space in a way that preserves edge detail and keeps shadows realistic.
This is what makes modern AI photo editing different from older automated filters. It is context-aware. It understands what is in the image and makes changes that fit.
Who is AI image editing actually for?
Based on what people actually search for and what tasks come up most often, the real audience for AI photo editing tools is not professional designers. It is everyone else.
- Ecommerce sellers who need clean product photos without a studio setup.
- Bloggers and content creators who want better visuals without a designer on retainer.
- Social media managers working on tight deadlines who cannot send every image back for revision.
- Small business owners who want their photos to look professional without spending on expensive editing software.
- Marketers who need to resize, relight, or reframe existing assets for different campaigns.
If you fall into any of these groups, AI image editing is built for you.
What can you actually edit with AI?
This is important to cover before tools and steps, because a lot of people assume AI editors only handle simple filters. The reality is much broader.
- Background removal and replacement is the most used feature. You describe the background you want, and the AI swaps it. Clean white backdrops for product photos, blurred outdoor settings for portraits, branded color fills for social media graphics.
- Object removal lets you point to something in the image, describe it, and have the AI delete it and fill the gap naturally. A stray cup on a desk, a person in the background, a distracting shadow, unwanted text on a surface.
- Generative fill goes further. Instead of just removing something, you ask the AI to put something else in its place. Remove a lamp, ask for a plant. Remove a plain wall, ask for a bookshelf.
- Outpainting and image expansion extend the canvas beyond the original edges of the photo. Useful when you have a portrait-oriented shot and need a landscape crop for a banner or header image.
- Upscaling and sharpening use AI to increase resolution and recover detail in blurry or low-quality images. Old compressed photos, screenshots, or images exported at low resolution can often be recovered to a usable quality.
- Lighting and color correction let you describe a mood, a time of day, or a color style, and the AI adjusts the exposure, shadows, highlights, and tones to match.
- Retouching covers surface cleaning on product images, blemish removal on portraits, reflection removal, and smoothing of textures, all without needing to know how to use a healing brush.
Choosing the right AI image editor for your task
Here is a practical breakdown by task, based on what each tool is actually built to do well.
PixelBin deserves a mention here because it is one of the cleaner browser-based options available for everyday editing. You upload a photo, write a prompt, pick a model suited to your task, set the aspect ratio, and download the result in HD. It supports WEBP, JPG, JPEG, and PNG files up to 10MB. There is no installation required, and the interface is genuinely simple enough for first-time users. It is a solid starting point if you want to try AI photo editing online without committing to a paid subscription upfront.
How to edit an image with Pixelbin’s AI image editor
In this example, we will show how you can use Pixelbin’s AI image editor right on your browser. Its workflow is clean and representative of how most prompt-based AI image editors work. If you are using other tools, check the steps on their website. In this example, we have logged in to access all the editing features inside.
Step 1: Log in & upload image
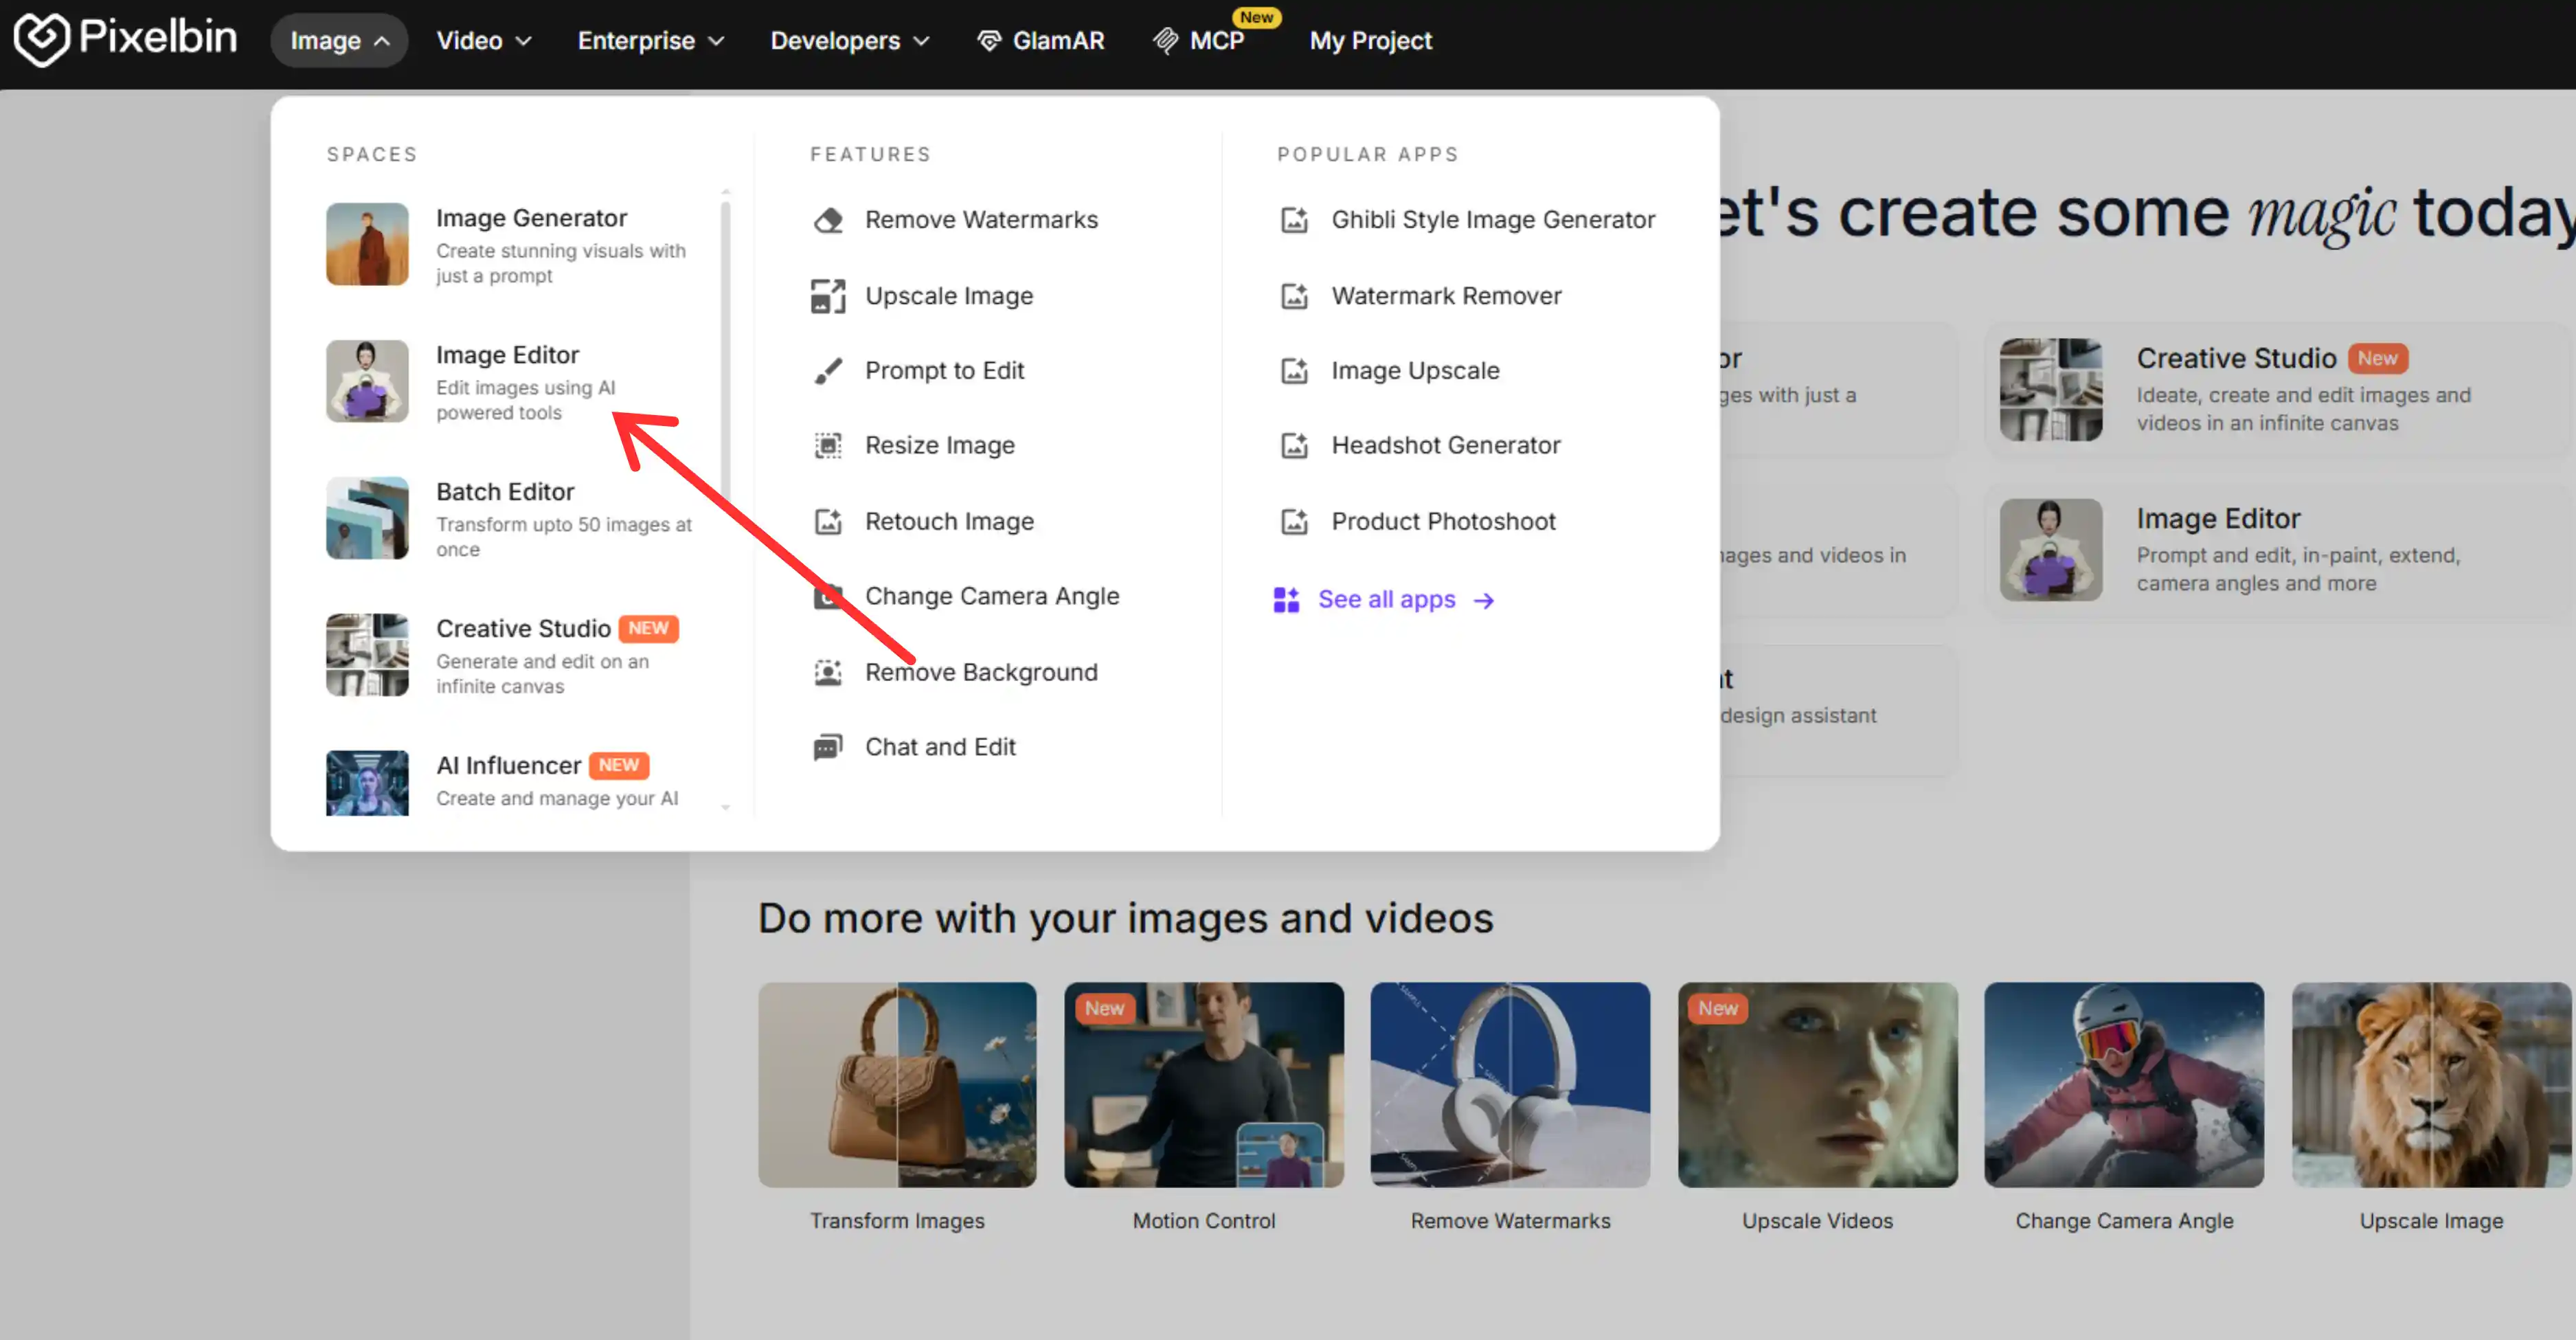
First, Open PixelBin's free AI photo editor online in your browser and log in. Once you are inside, click on “Image” and from the dropdown and then select “Image Editor”.
This is how your dashboard will look. Click to upload or drag and drop your image directly onto the page. Accepted formats: WEBP, JPG, JPEG, PNG. Maximum file size: 10MB. If your image is over 10MB, run it through a free image compressor first.
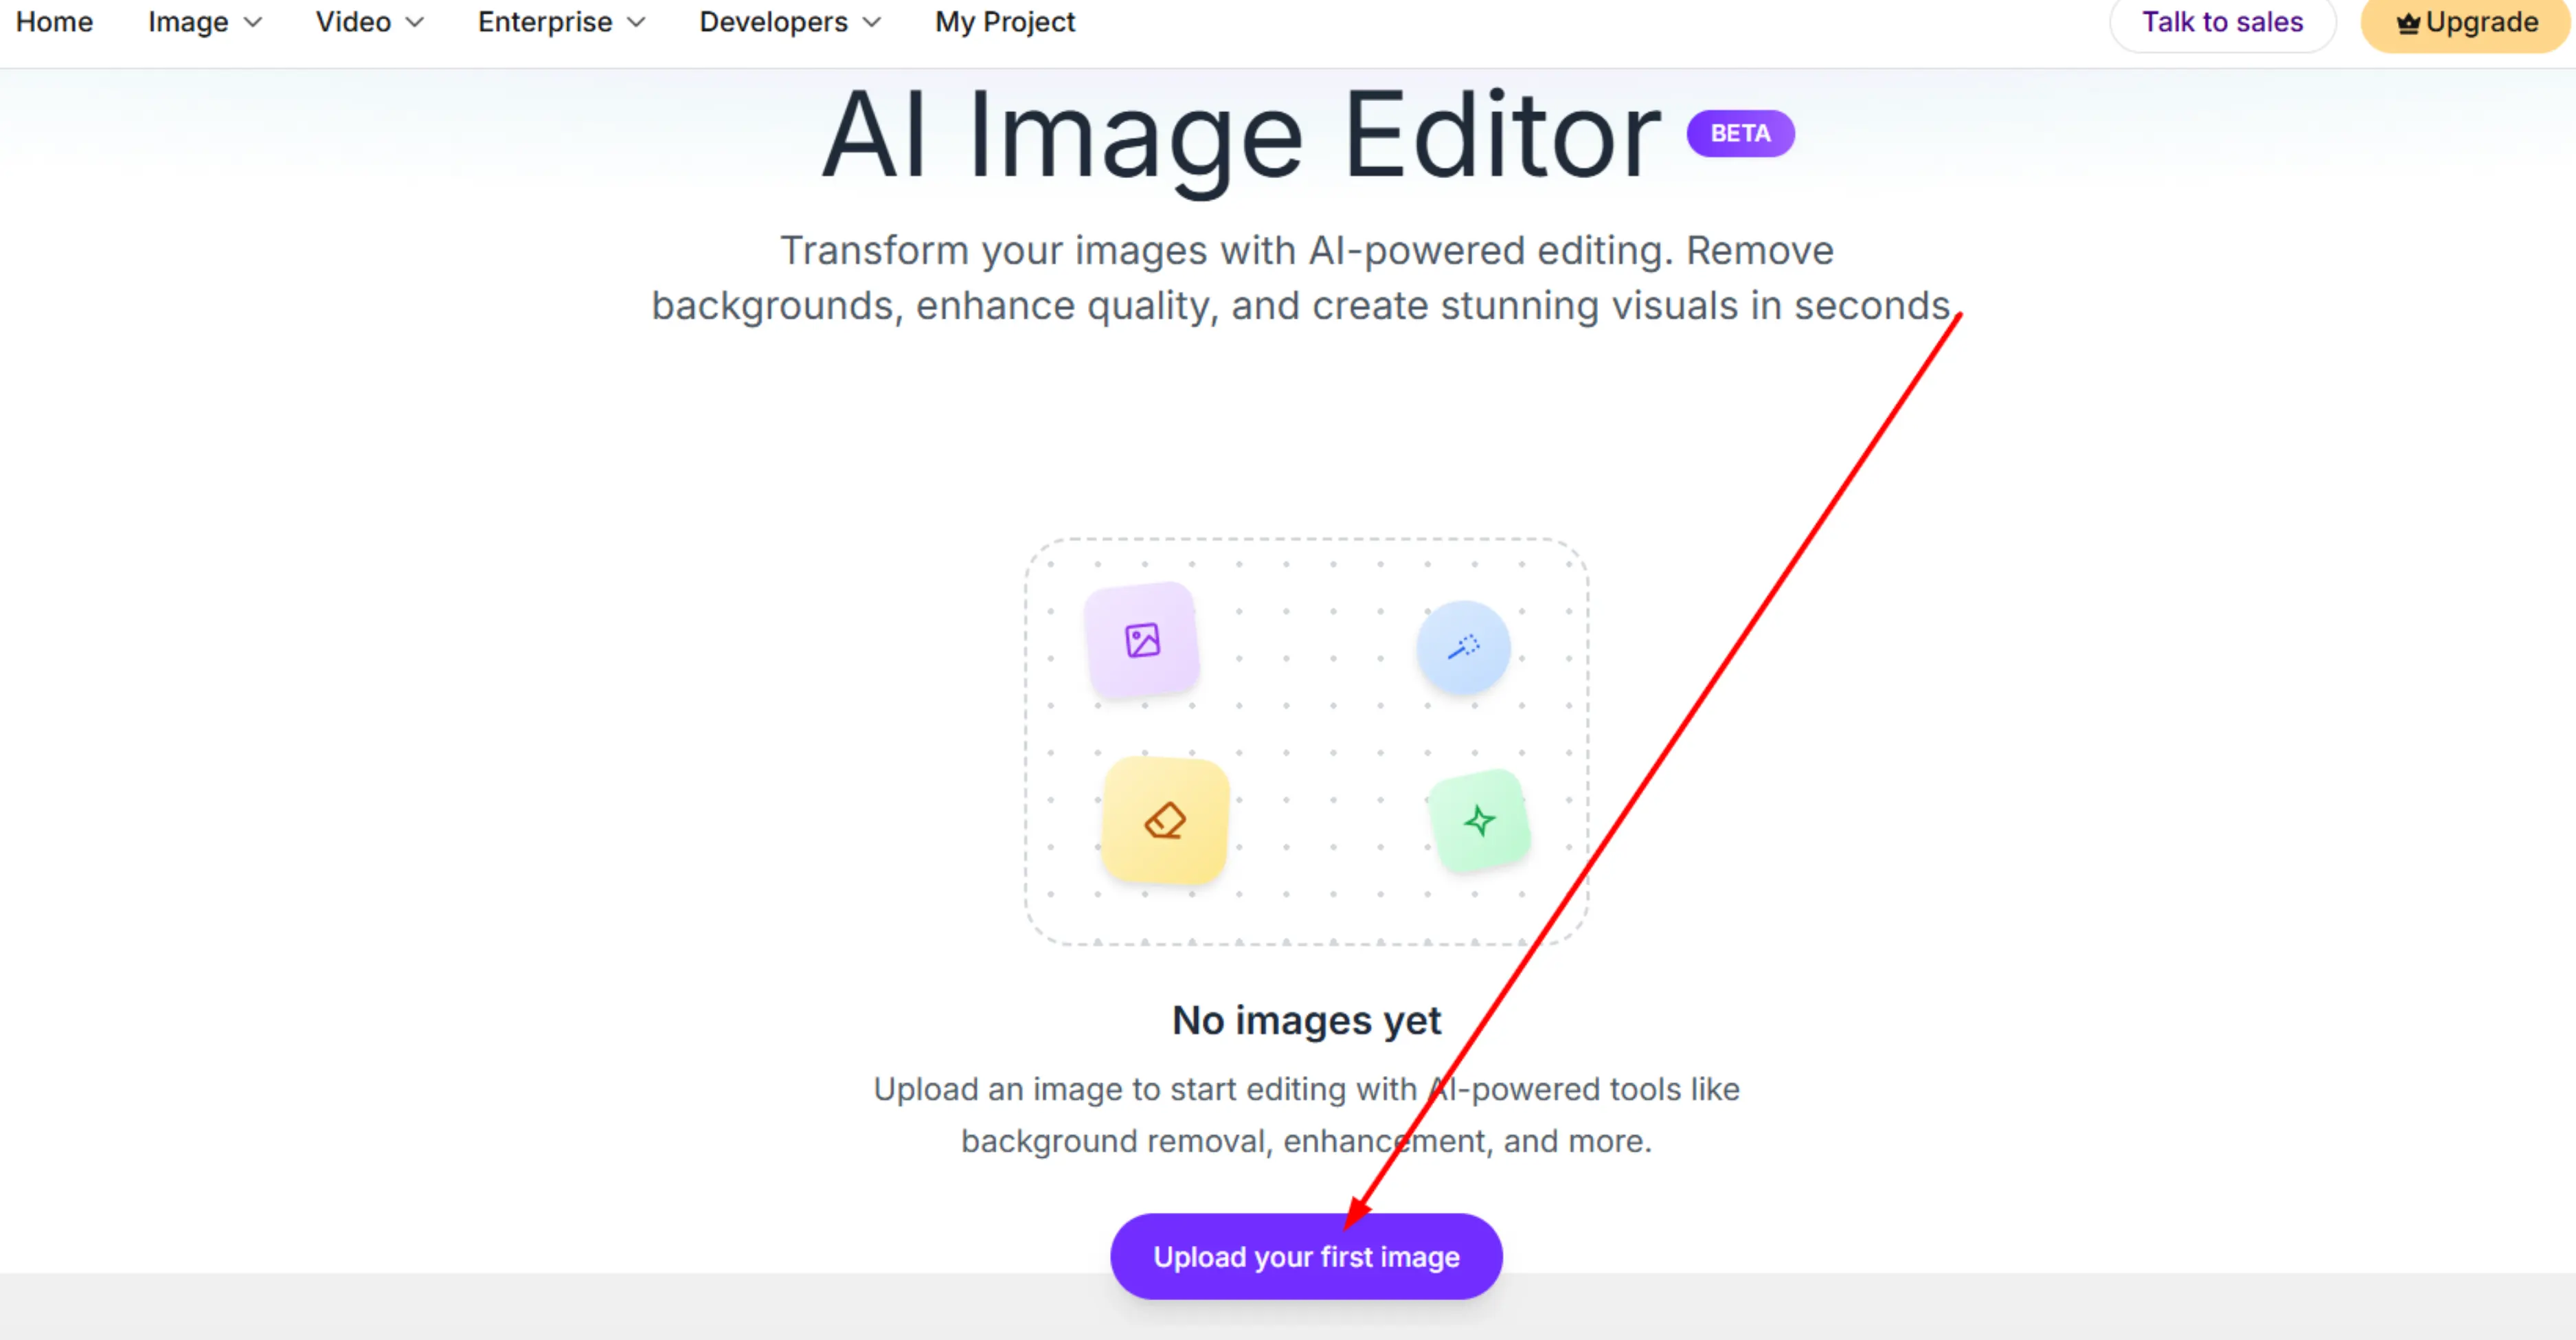
Once uploaded, the image appears in the editing workspace.
Step 2: Choose Your AI model
PixelBin gives you four model options:
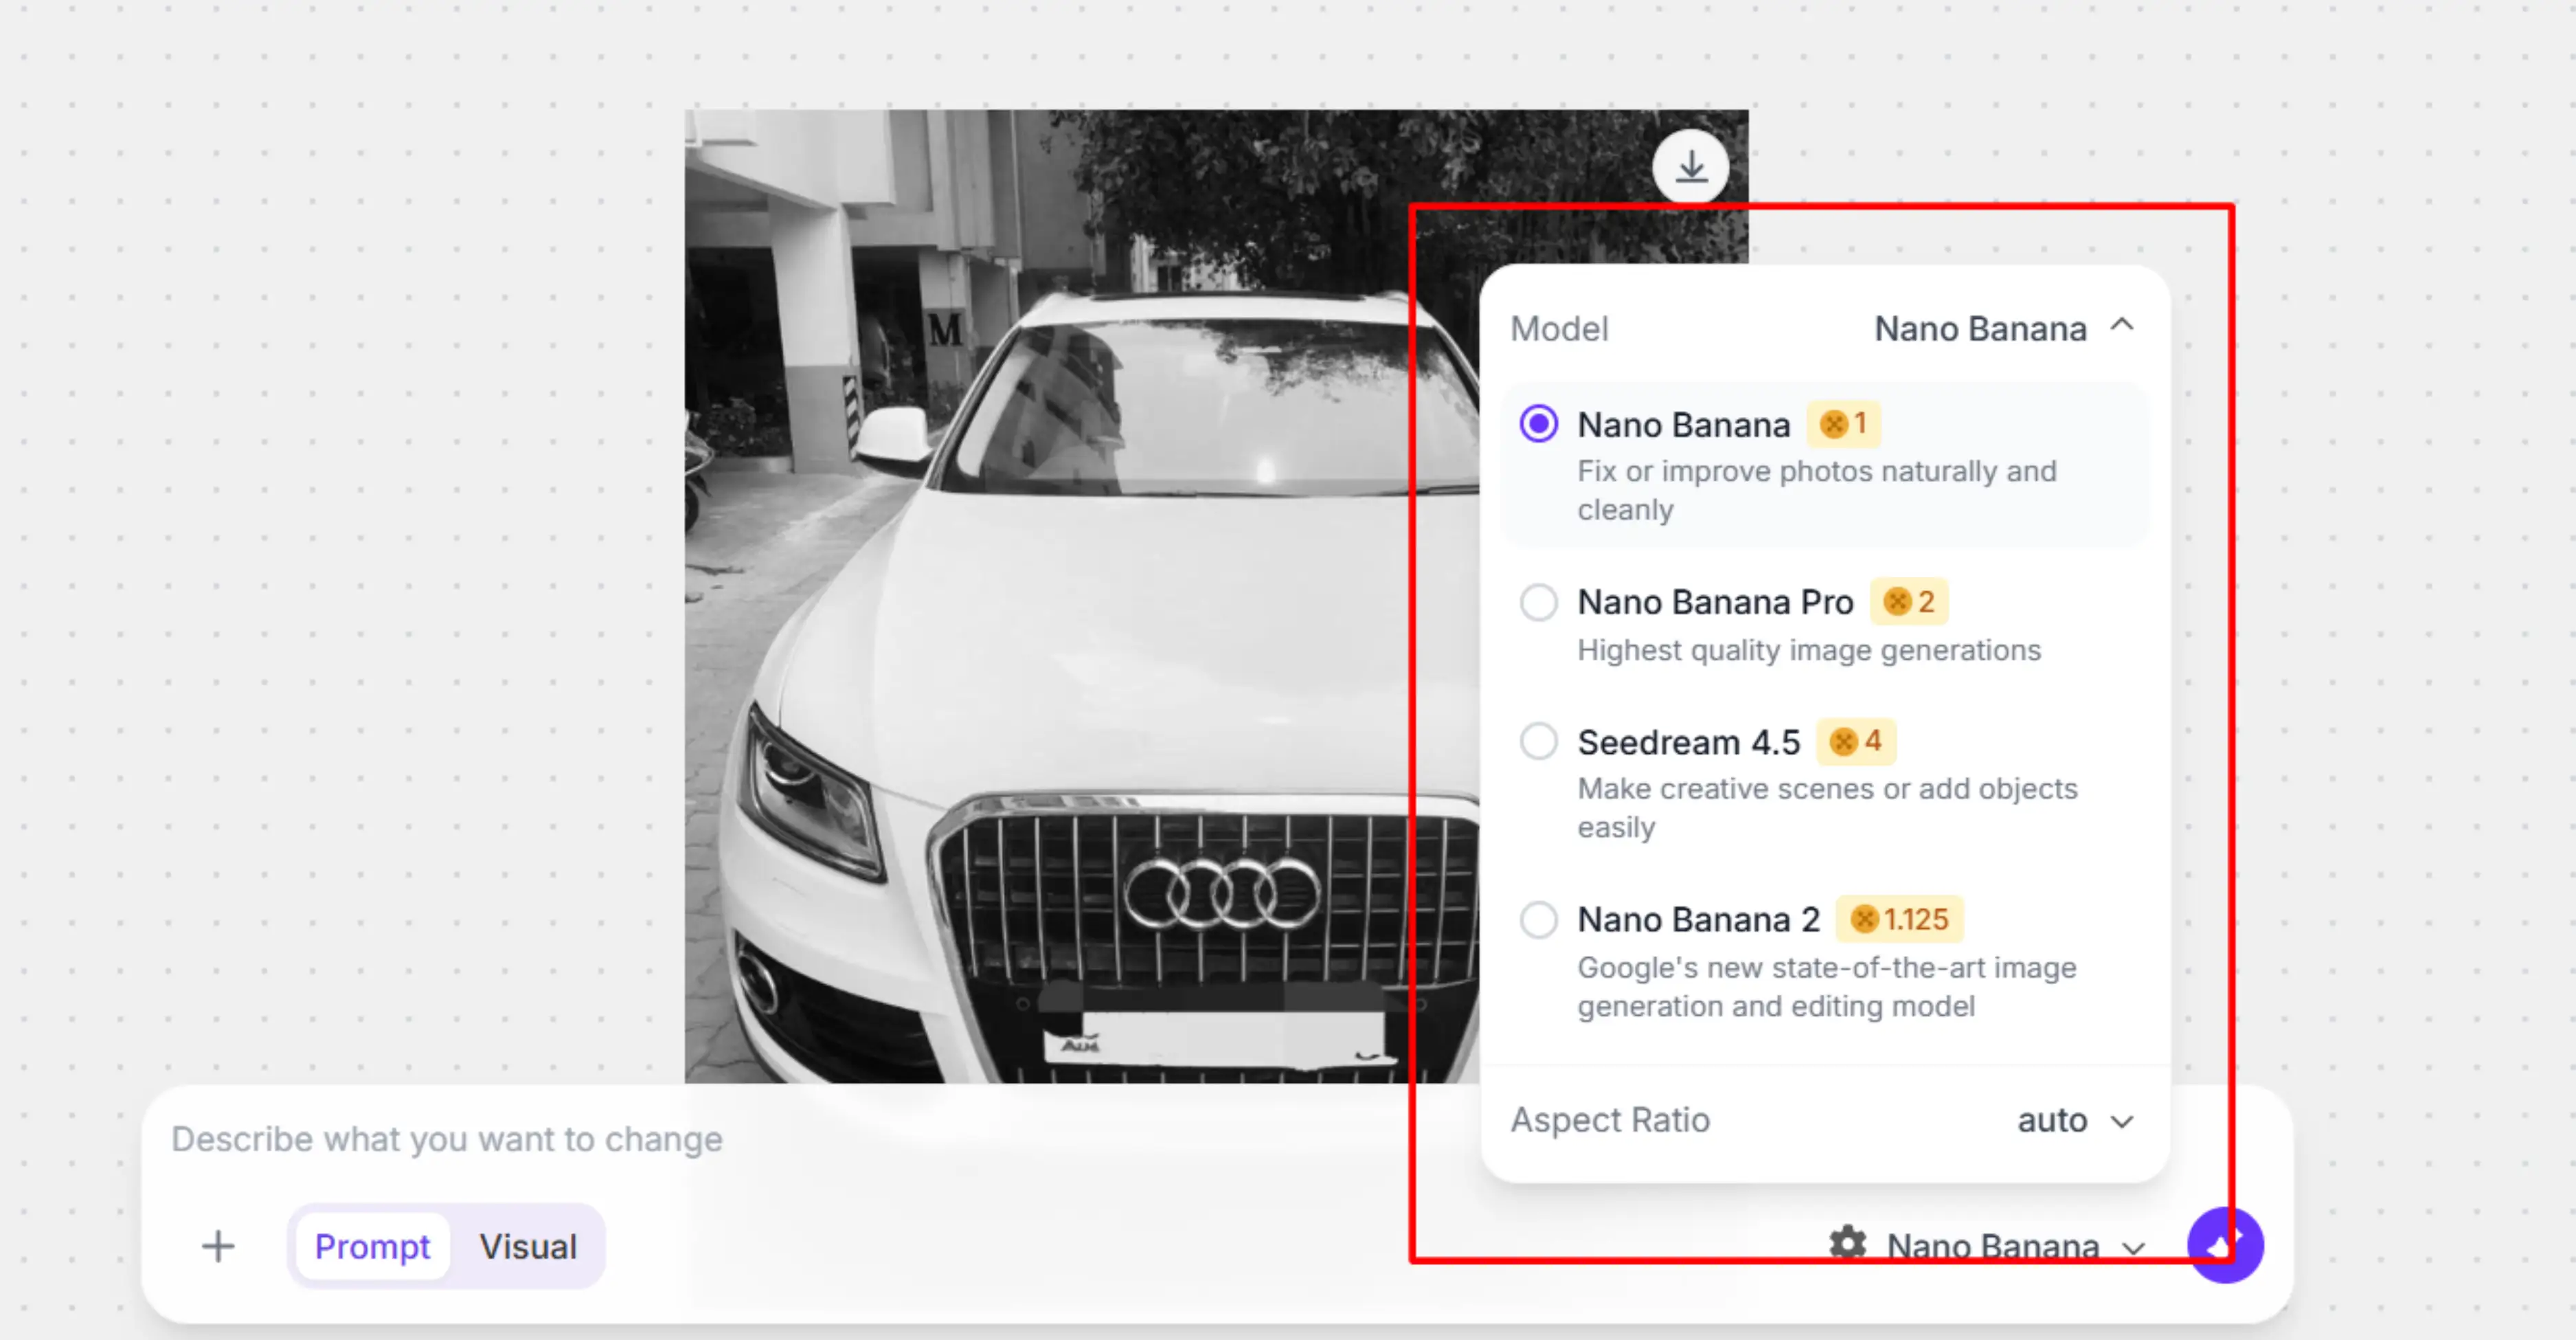
- Nano Banana is the default. It is optimized for fixing and improving existing photos naturally and cleanly. Use this for color correction, background cleanup, lighting adjustments, and any change where you want the output to look realistic rather than generated.
- Nano Banana Pro produces the highest quality image generations available on the platform. Use this when the output is going into professional content where quality matters most.
- Seedream 4.5 is built for creative edits. It is better at making creative scenes or adding objects in ways that feel more stylized or artistic. Use this for more imaginative changes.
- Nano Banana 2 is described as Google's new state-of-the-art image generation and editing model. Use this when you want the most current generation technology for both editing existing images and generating new visual elements.
For most practical tasks like ecommerce photo cleanup, background swaps, or lighting improvement, Nano Banana handles it well. For anything going into professional-grade content, Nano Banana Pro is worth the extra generation cost.
Step 3: Set your aspect ratio
Below the model selector, you will see an aspect ratio setting. The default is auto, which keeps the original dimensions of your image.
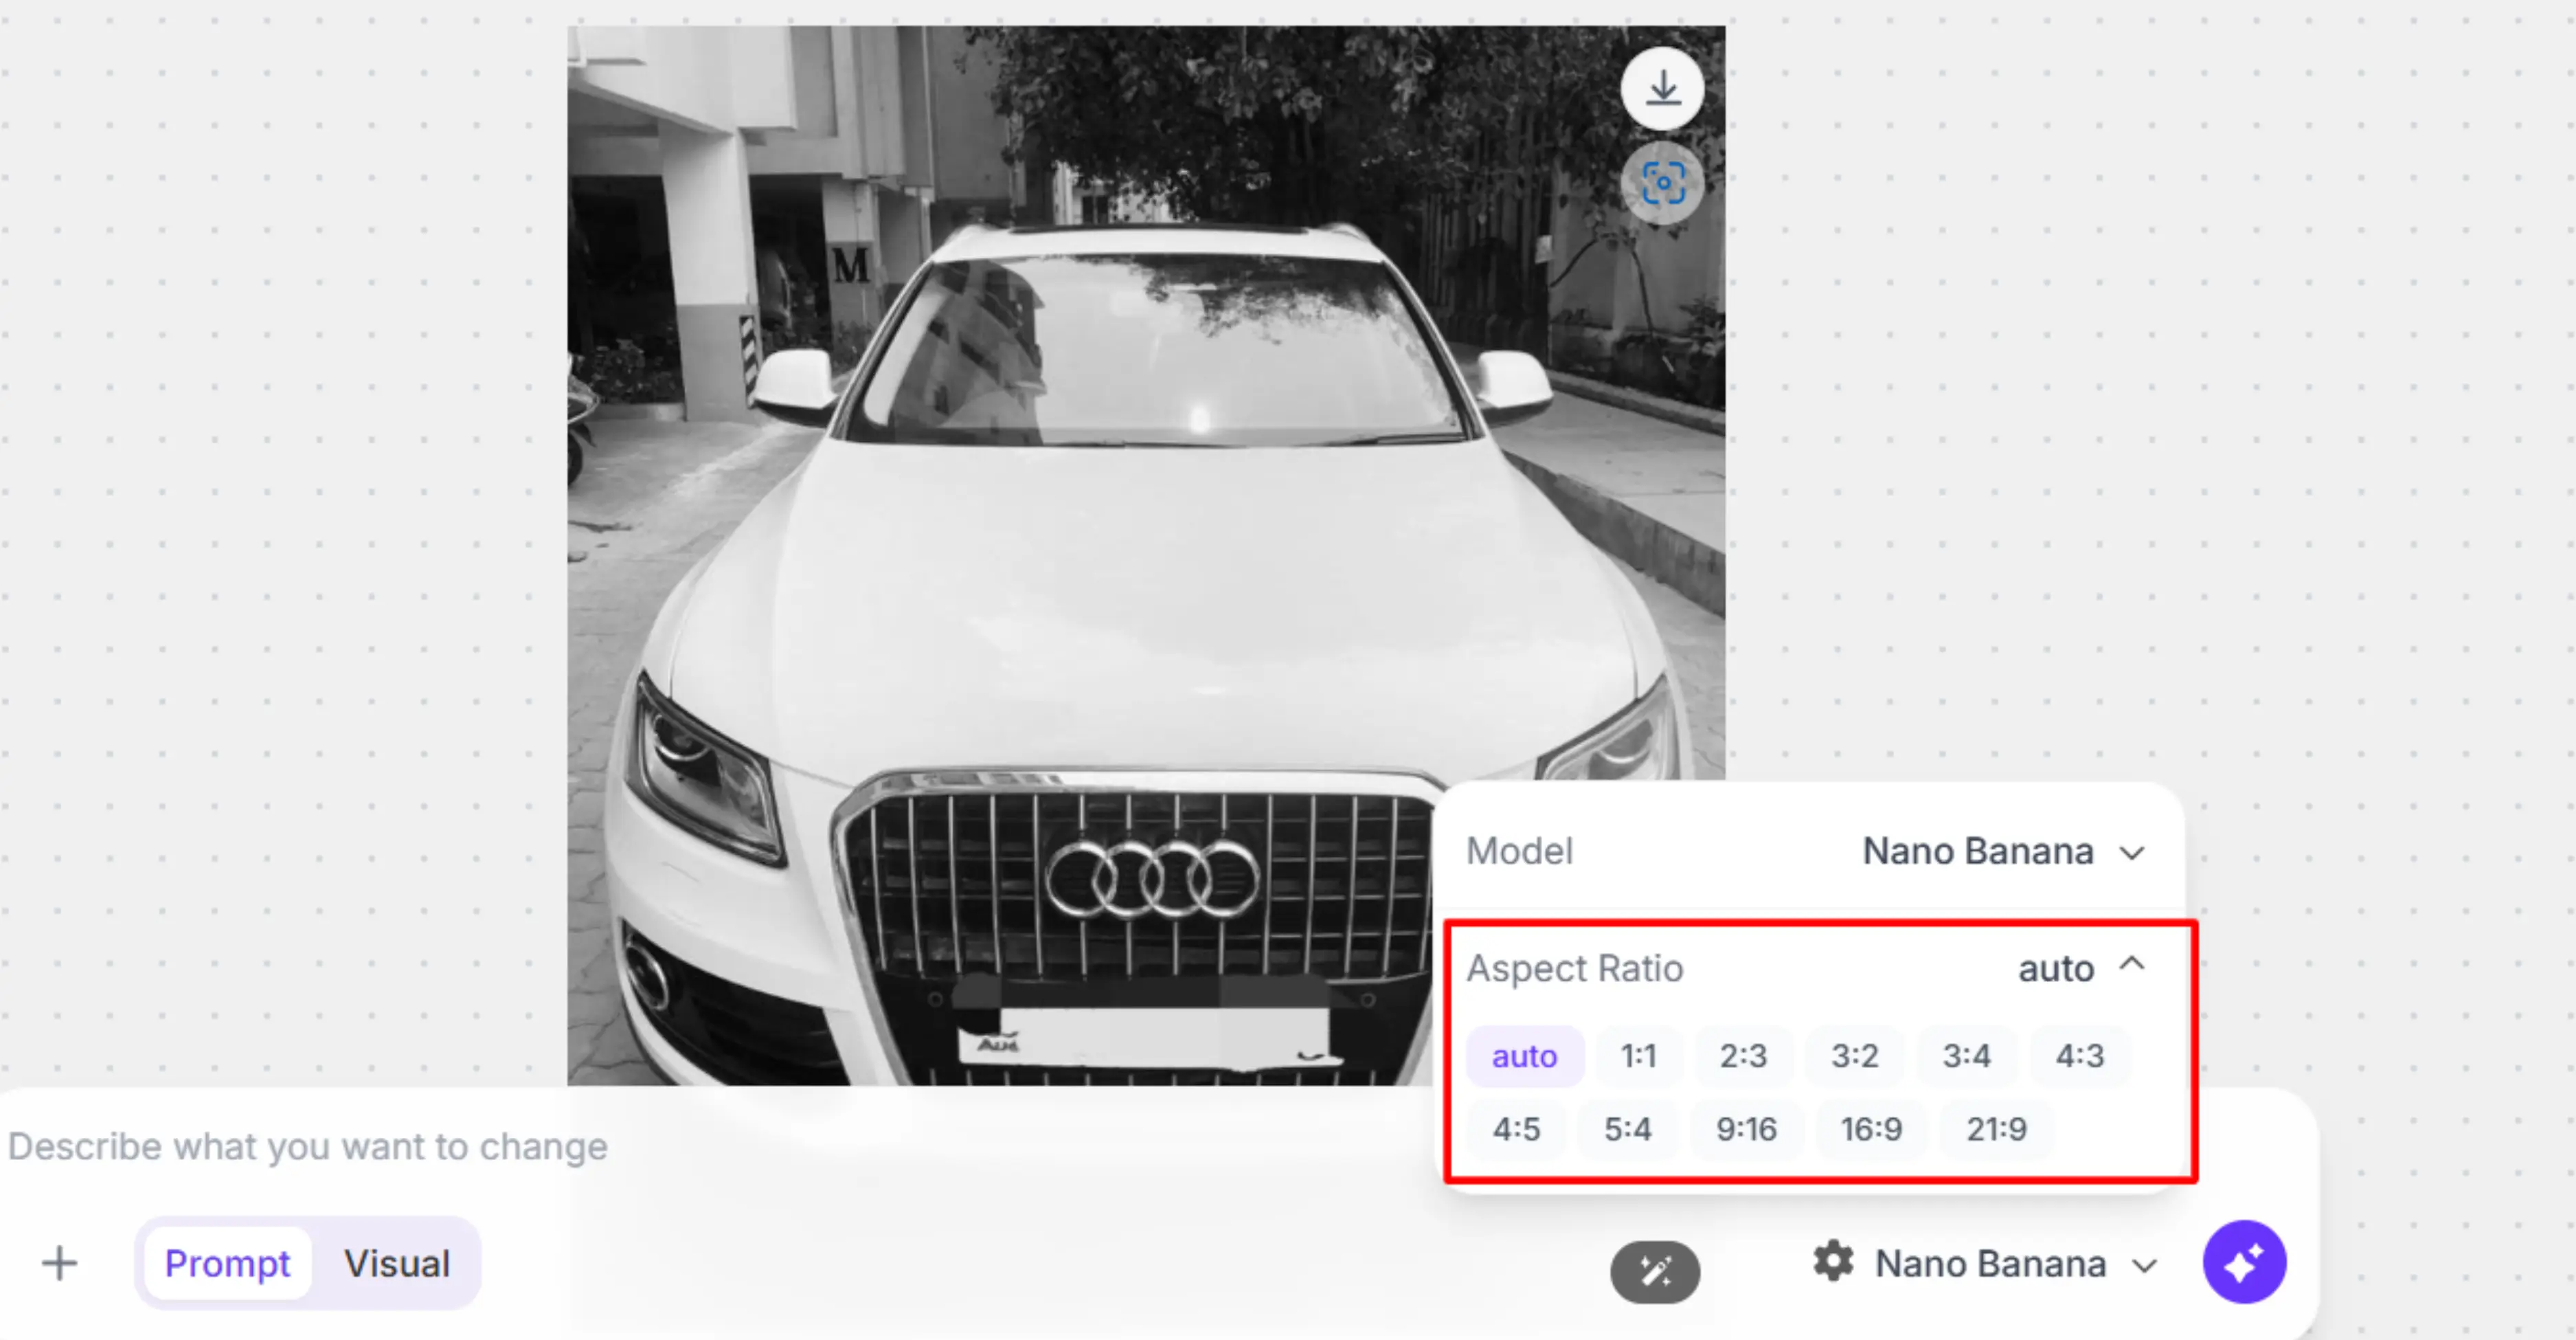
If you are editing for a specific platform, set the ratio before generating. For example:
1:1 for Instagram feed posts. 16:9 for YouTube thumbnails, website banners, and LinkedIn headers. 4:5 for Instagram portrait posts that take up more feed space. 9:16 for Instagram Stories, TikTok, and YouTube Shorts.
Setting this before generating means the AI crops and composes the output correctly for your intended use, rather than you having to crop a finished edit afterwards.
Step 4: Write your prompt
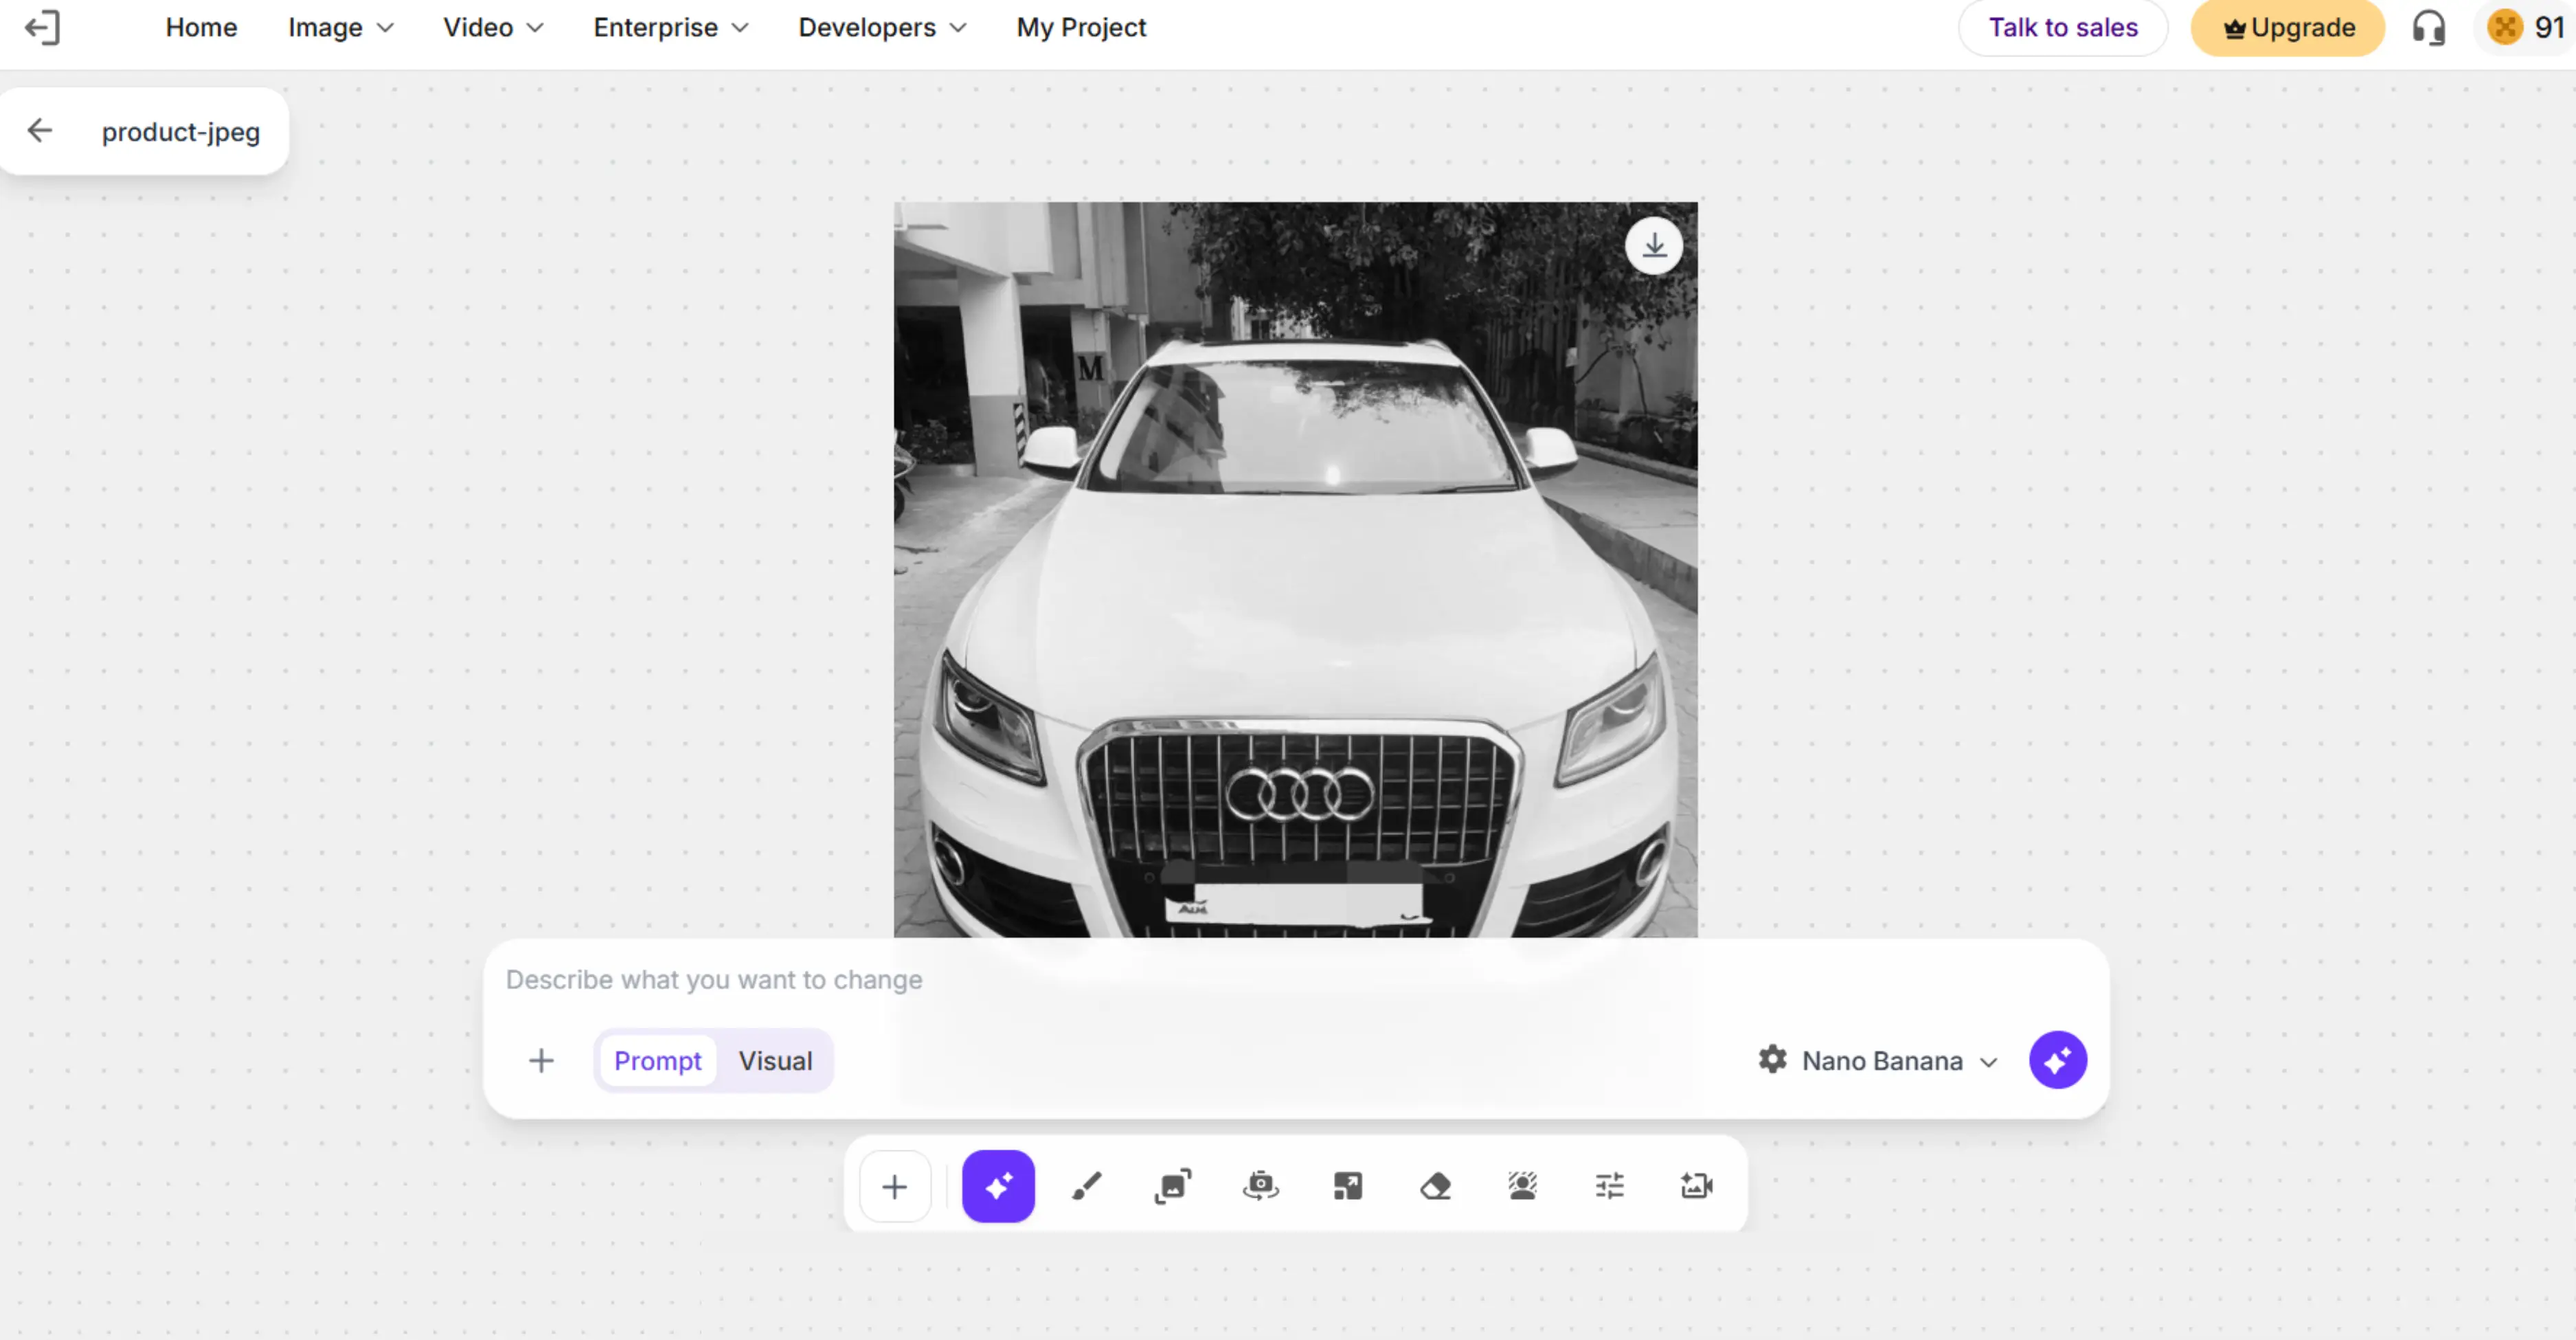
The prompt box says, "Describe what you want to change." That is exactly what you do.
You have two modes available. Prompt mode is text-based. You type a plain-language description of the edit you want. Visual mode lets you use brush or selection tools to mark specific areas of the image, giving the AI a clearer target for localized edits.
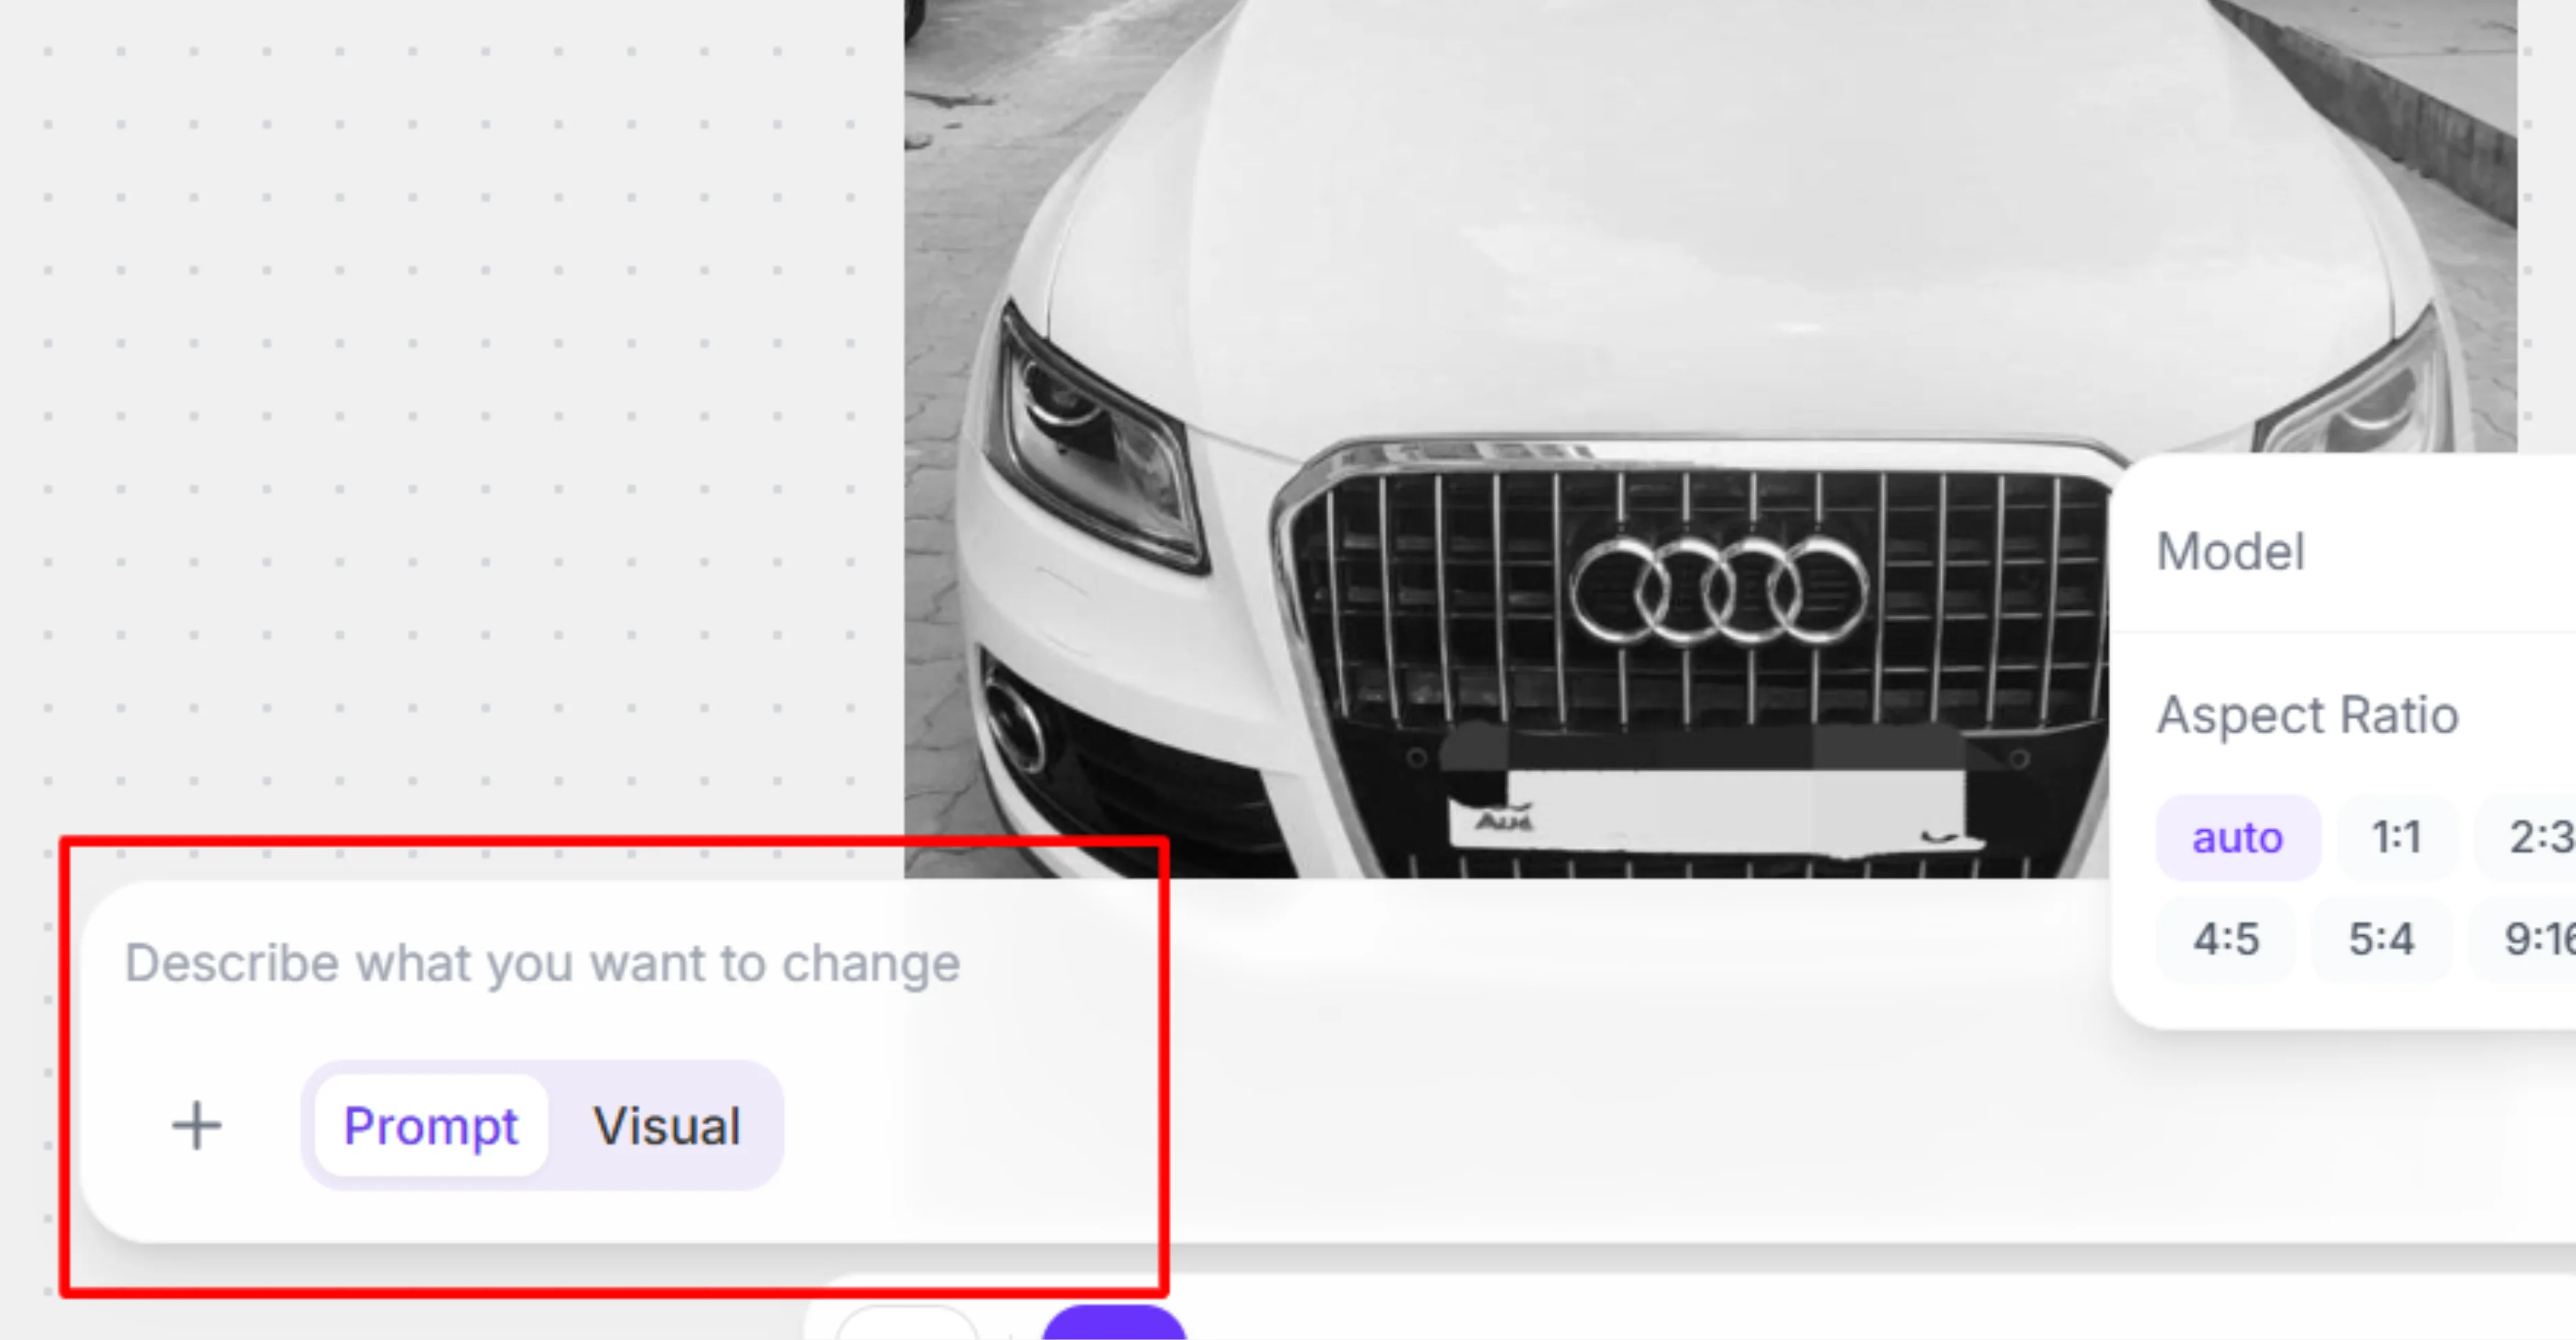
For most tasks, Prompt mode is sufficient. Write a sentence or two describing what should change, what should stay the same, and any style or lighting context that is relevant. Detailed prompts consistently produce better results than vague ones.
Step 5: Generate
Click Generate. PixelBin's AI processes the image and applies the changes based on your description and model selection. The edited preview appears in the workspace.
Take a moment to actually evaluate the result before downloading. Check the edges, the lighting consistency, and any text or logo areas in the image.
Step 6: Modify the image with advanced editing
You can now make further edits to your image with the features shown in the editor toolbar:
.webp)
Step 7: Download in HD
If the result is good, click the download button in the top right of the image preview. You get the edited image in HD, with no watermark and no extra steps.
If the result needs adjustment, refine your prompt, try a different model, or use the visual selection tools to give the AI more specific guidance, then generate again.
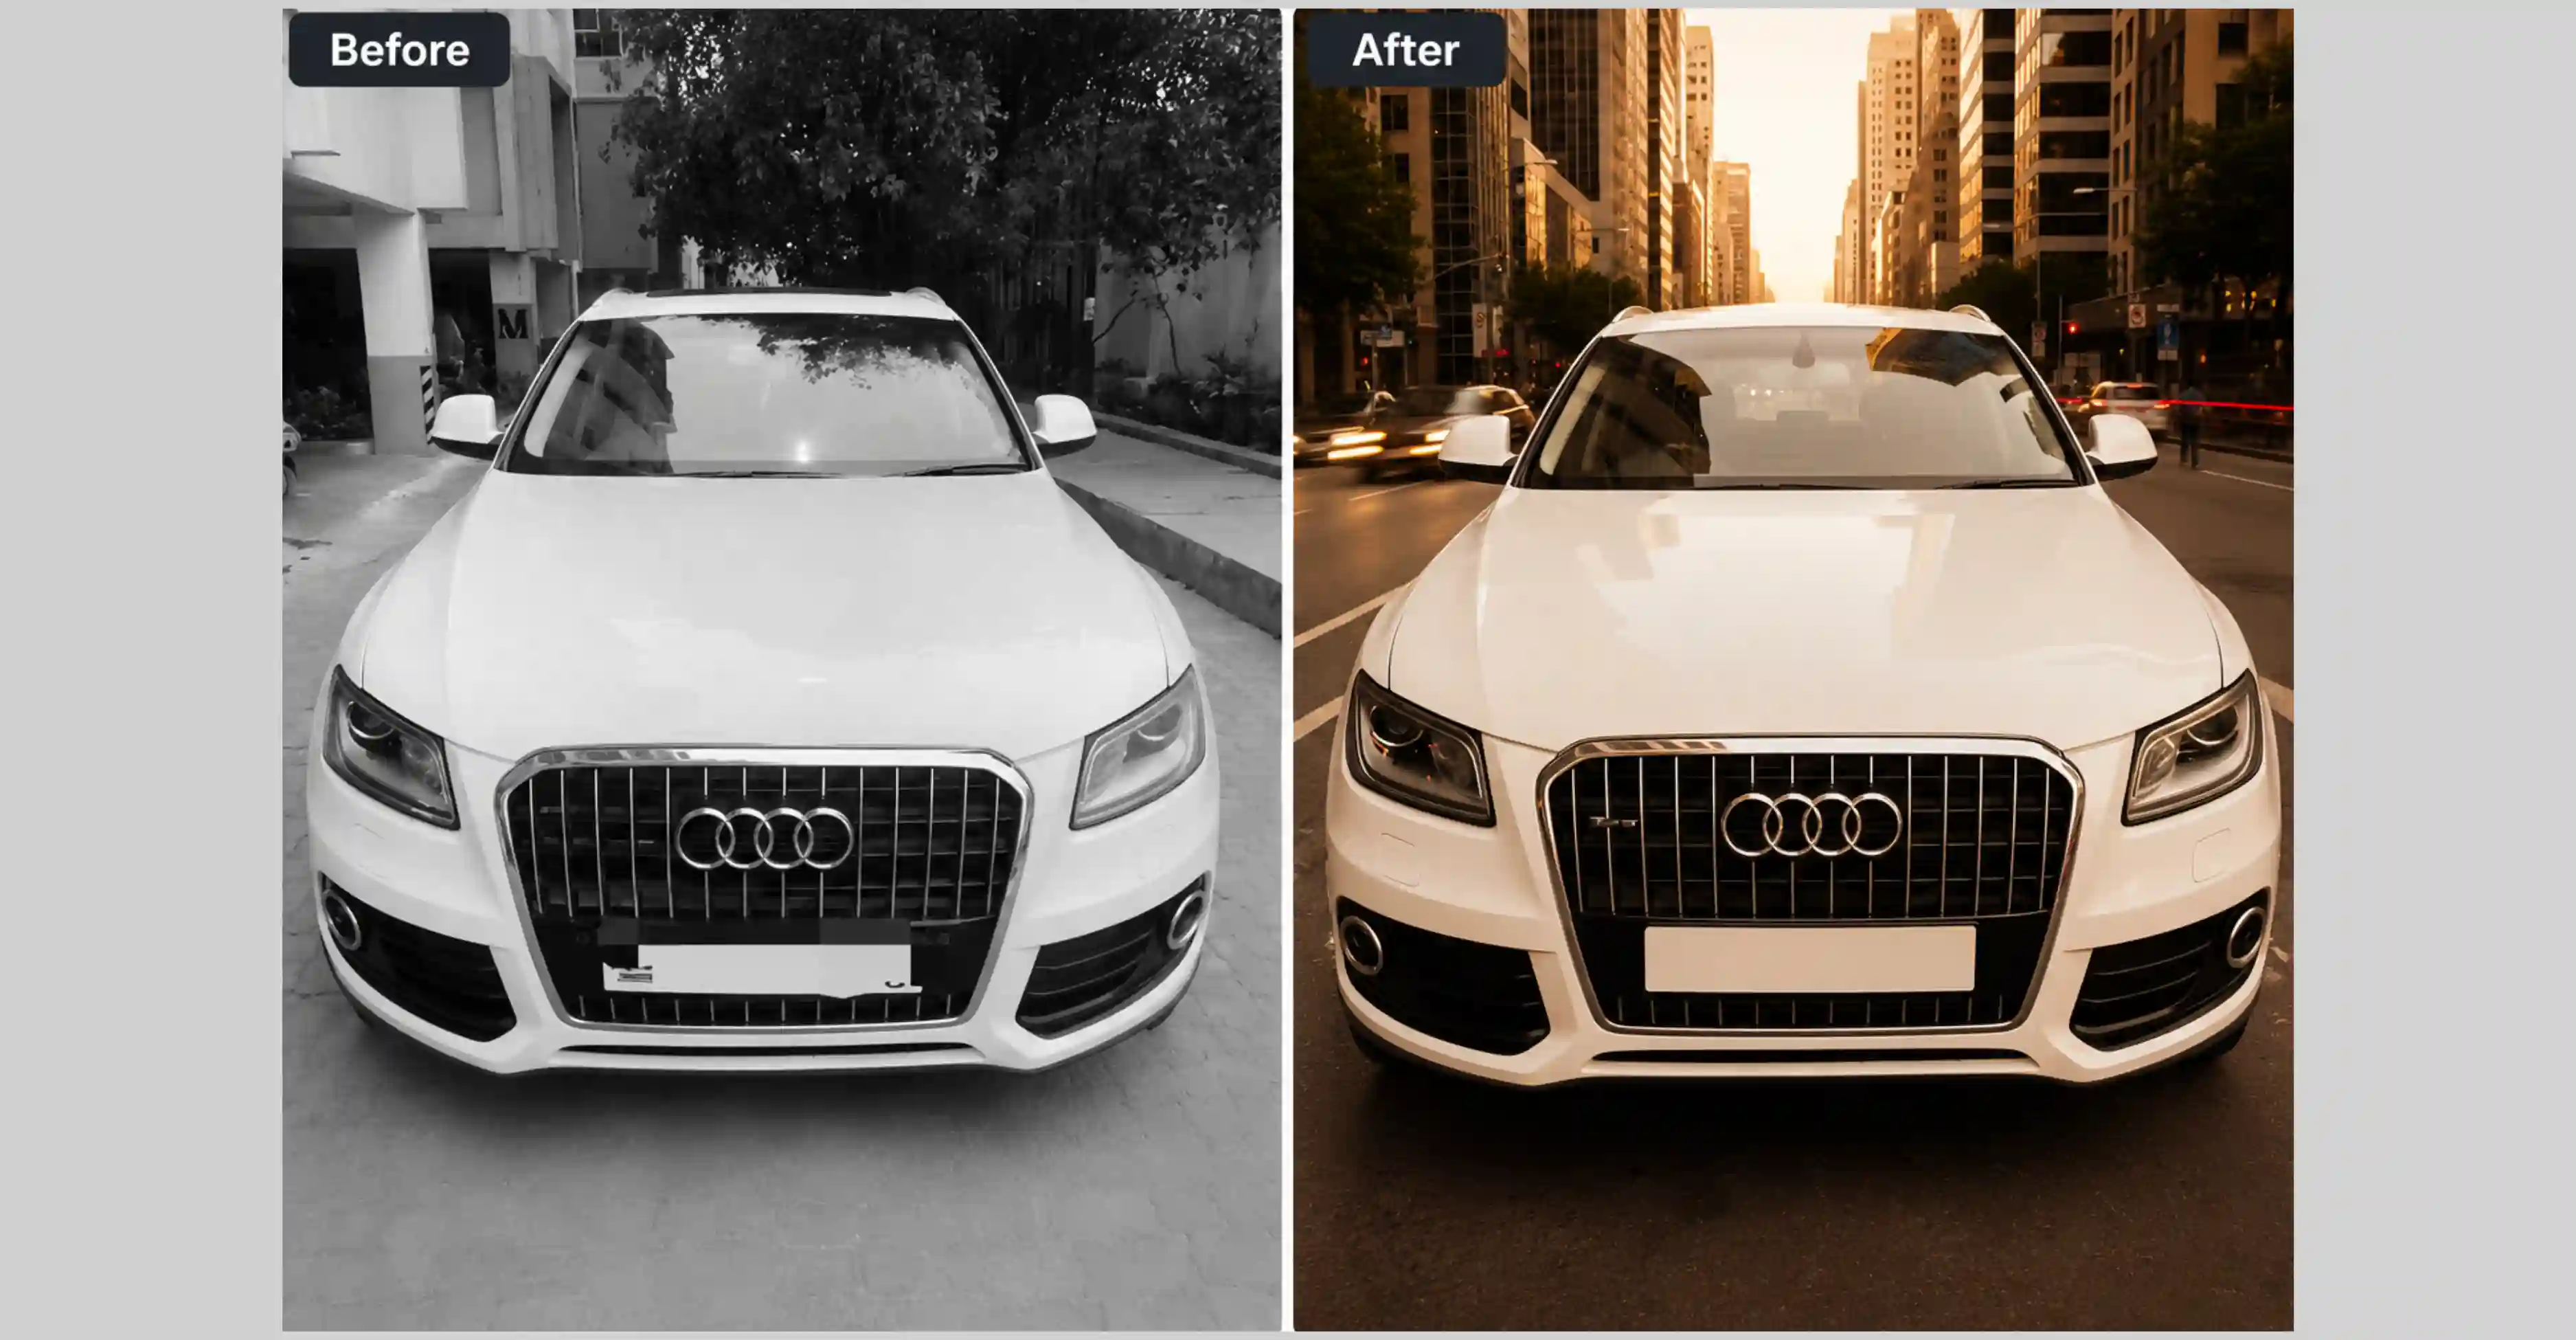
Here’s how the final image looks after applying edits:
AI photo editing prompts that work: Real examples by task
Try the below specific, usable AI photo editing prompts organized by what you want to do. Copy, adjust the details for your image, and use them directly.
1. Background change prompts
"Replace the background with a clean white studio backdrop. Keep the product sharp and in its original position. Make the edges between the subject and background look natural."
"Change the background to a softly blurred outdoor park setting. Use warm afternoon light. Keep the subject completely unchanged."
"Replace the background with a solid light grey surface, similar to a photography studio seamless backdrop. Preserve all product details."
2. Object removal prompts
"Remove the person standing on the left side of the image. Fill the area naturally using the background behind them. Make the fill seamless."
"Remove the water bottle on the desk. Fill the empty space with the desk surface and background, matching the existing texture and lighting."
"Remove the power line crossing the top of the sky. Blend the sky seamlessly so no trace of the line is visible."
3. Lighting and color correction prompts
"Brighten the shadows across the face evenly. Make the lighting look like it was taken near a large north-facing window. Do not change the skin tone or color balance."
"Add a warm golden hour quality to the overall image. Shift the light slightly orange and soft. Keep all objects and subjects the same."
"Correct the blue color cast in this image. Make the whites appear neutral and the overall tone warmer and more natural."
4. Product photo editing prompts
"Place this product on a white marble surface. Add a soft natural shadow underneath it. Light the product from the upper left with diffused daylight."
"Clean the surface of the product. Remove any dust, fingerprints, or scratches visible on the casing. Keep the shape, color, and text on the product completely unchanged."
"Enhance the overall sharpness and color vibrancy of this product photo without making it look artificially processed."
5. Generative fill and outpainting prompts
"Extend the sky upward by about a third of the image height. Fill the new area with the same sky visible in the original, matching cloud texture, tone, and light direction."
"Add a small ceramic mug on the right side of the desk, leaving enough space around it. Match the desk lighting and shadow direction."
"Expand the image on both sides while preserving the existing scene. Continue the background naturally, matching perspective, lighting, colors, and surrounding details."
6. Upscaling and sharpening prompts
"Increase the resolution and sharpness of this image. Make it look crisp and detailed. Do not change the colors, composition, or any element in the image."
"Upscale this image to a higher resolution while preserving natural textures and fine details. Improve clarity and sharpness without altering the original colors, lighting, or composition."
"Enhance the image quality by increasing resolution, reducing blur, and sharpening edges. Keep all objects, colors, proportions, and scene elements exactly as they appear in the original."
How to make AI edited photos look natural
The most common complaint about AI photo editing is that the result looks fake. Here is how to avoid it, based on what actually causes the problem.
- Match the light direction in your prompt to the existing image. If the original photo has light coming from the left, mention that when you ask for a background change or new object. The AI will use that information to make everything fit together realistically.
- Avoid vague perfection language in your prompts. Phrases like "make it look perfect" or "remove all imperfections" push the AI toward over-processing. The result is that plasticky, over-smoothed look that immediately reads as AI-generated. Instead, describe specific improvements: "clean surface," "even lighting," "reduce visible blemishes slightly."
- Check the edges after every background removal. This is the area most likely to show problems. Ghost pixels, hard cutout lines, or blurry halos around the subject are all signs the edge detection was not clean. Zoom in before downloading.
- Use Visual mode for localized edits. When you only want to change one specific part of the image, painting or selecting that area gives the AI a cleaner target and reduces the chance of it altering parts of the image you did not intend to touch.
- Export at original resolution. Do not resize the image inside the editor if you can help it. Download at full resolution and resize externally afterward if needed. This preserves maximum quality in the edited output.
What not to edit with AI: Real limits you should know
Even the best AI image editors have weaknesses. Knowing where AI struggles can save time, reduce rework, and lead to better results.
- AI often struggles with text inside images. If your image contains a label, a sign, a price tag, or any readable text, AI models frequently reshape or scramble those characters. Do not use text prompt edits in areas where readable text is present unless you plan to manually reapply the text afterward.
- Highly expressive faces require a light touch. Heavy AI retouching on faces, especially prompts asking for dramatic changes, can produce the uncanny valley effect where proportions are slightly wrong or the skin texture looks synthetic. Keep face-related prompts minimal and specific.
- Very low-resolution source images have a ceiling. Upscaling AI can recover a lot, but a genuinely tiny image, say 150 by 150 pixels, is mostly guessing work for the model. The result will likely still look soft or artificially textured.
- Complex overlapping subjects are hard to remove cleanly. If the object you want gone is overlapping with your main subject, the fill behind it will often look wrong or incomplete. These cases need more advanced masking than a simple text prompt.
- Medical images, identity documents, and legal records should never be edited with AI. This is not a gray area. Do not use these tools to modify anything where authenticity has real consequences.
Privacy, safety, and commercial use
Before you upload any image to any AI photo editing tool, you need to understand a few things that most guides do not explain.
- Do not upload images of other people without their consent. Even if you technically own the photo, the subject in it has privacy interests. This matters especially if you are editing client work, customer photos, or images of people who did not agree to have their likeness processed by an AI system.
- Read the data policy of any free tool before uploading sensitive images. Some free AI image editors use uploaded images to train future models. Others store uploads temporarily and delete them. A small number retain data indefinitely. If you are uploading unreleased product photos, confidential client work, or anything commercially sensitive, check the privacy policy before you upload. Paid and enterprise plans from reputable tools typically offer stronger data protections.
- AI-edited images are not automatically cleared for commercial use. Every platform has its own licensing terms. Some grant you full commercial rights to the output. Others restrict it. Verify the licensing terms of the specific tool you are using before publishing AI-edited images in ads, product listings, or any paid commercial context.
- Content credentials matter for transparency. Some tools like Adobe Firefly attach metadata to AI-edited images that identifies them as AI-assisted. Depending on your platform, audience, and disclosure requirements, you may want to know whether your exported images carry this kind of metadata.
Quality control checklist: Before you publish any AI-edited image
Run through this before using any AI-edited image in public-facing content.
- Edges are clean. No halo, blur, ghost pixels, or hard cutout lines around the subject.
- Colors match across the image. Any new element should look like it belongs in the same photo, not like it was photographed under different lighting.
- Text and logos are intact. Zoom in to any text areas. Verify they are readable and unchanged.
- Shadows and lighting are consistent. The light source direction should look the same across every element.
- Resolution is sufficient. For web use, 72 to 96 DPI works. For print, 300 DPI minimum.
- Nothing looks over-processed. If surfaces look synthetic or skin looks airbrushed beyond recognition, regenerate with lighter prompt language.
Troubleshooting: When the output does not look right
The result looks obviously AI-generated. The prompt was too vague. Add lighting direction, describe what should stay unchanged, and specify the style. Try a different model.
Background fill looks wrong or mismatched. Use Visual mode to mark the specific area. Try a simpler background first to isolate whether the edge quality is the issue.
Edges are rough after background removal. Regenerate with a prompt that explicitly mentions "clean natural edges" or "seamless boundary." Some tools also have a refinement brush for manual cleanup afterward.
The image looks lower quality after editing. Check your export settings. Always download at the highest resolution available. If the tool offers a quality slider on export, set it to maximum.
The tool rejected the file. Check the format and size. Convert to JPG or PNG if needed. If the file is over 10MB, compress it first.
Final words: The honest picture of ai image editing in 2026
AI photo editing is genuinely useful. It is not magic, and it does not always get it right on the first try, but for the tasks that come up most often in real work, such as background swaps, object removal, lighting fixes, and product photo cleanup, it saves significant time and produces results that are good enough for professional use.
The key is being specific in your prompts, choosing the right model for your task, checking the output before publishing, and understanding the privacy and licensing rules of the tool you are using.
You do not need Photoshop. You do not need design training. You need a clear image, a clear description, and a few minutes. Start with one task. See how fast a good AI image editor can handle it. That experience will tell you everything this guide cannot.
FAQs
Many tools have free tiers. PixelBin offers a free AI photo editor online that works directly in the browser with no installation. Canva's free plan includes AI editing features. Pixlr and Picsart both have free options. Free tiers usually come with limits on the number of generations or on output resolution. Paid plans typically offer more generations, higher quality output, and better privacy protections.
It depends on the tool. Always verify the licensing terms before using AI-edited images in ads, product listings, or paid content. Most established tools spell this out in their terms of service. When in doubt, contact the tool's support team and get a written confirmation.
Use a browser-based tool. PixelBin, Canva, and Pixlr all let you edit photos with AI entirely online without installing anything. Upload your image, write a prompt describing the change, and download the result.
For first-time users, PixelBin and Canva are the most accessible. Both work in the browser, accept drag-and-drop uploads, and let you describe edits in plain language without any prior design knowledge.
Upload your image to a tool that supports object removal. In the prompt box, describe what you want removed and how the area should be filled. For example: "Remove the bag on the left side of the table. Fill the area with the table surface and background, matching the existing texture." Tools like Canva Magic Eraser, Adobe Photoshop Generative Fill, and PixelBin all handle this task well.
Not inherently. The editing process itself does not lower the quality. However, if you export at a low quality setting, the output will be compressed. Always download at the highest resolution the tool offers.
.webp)