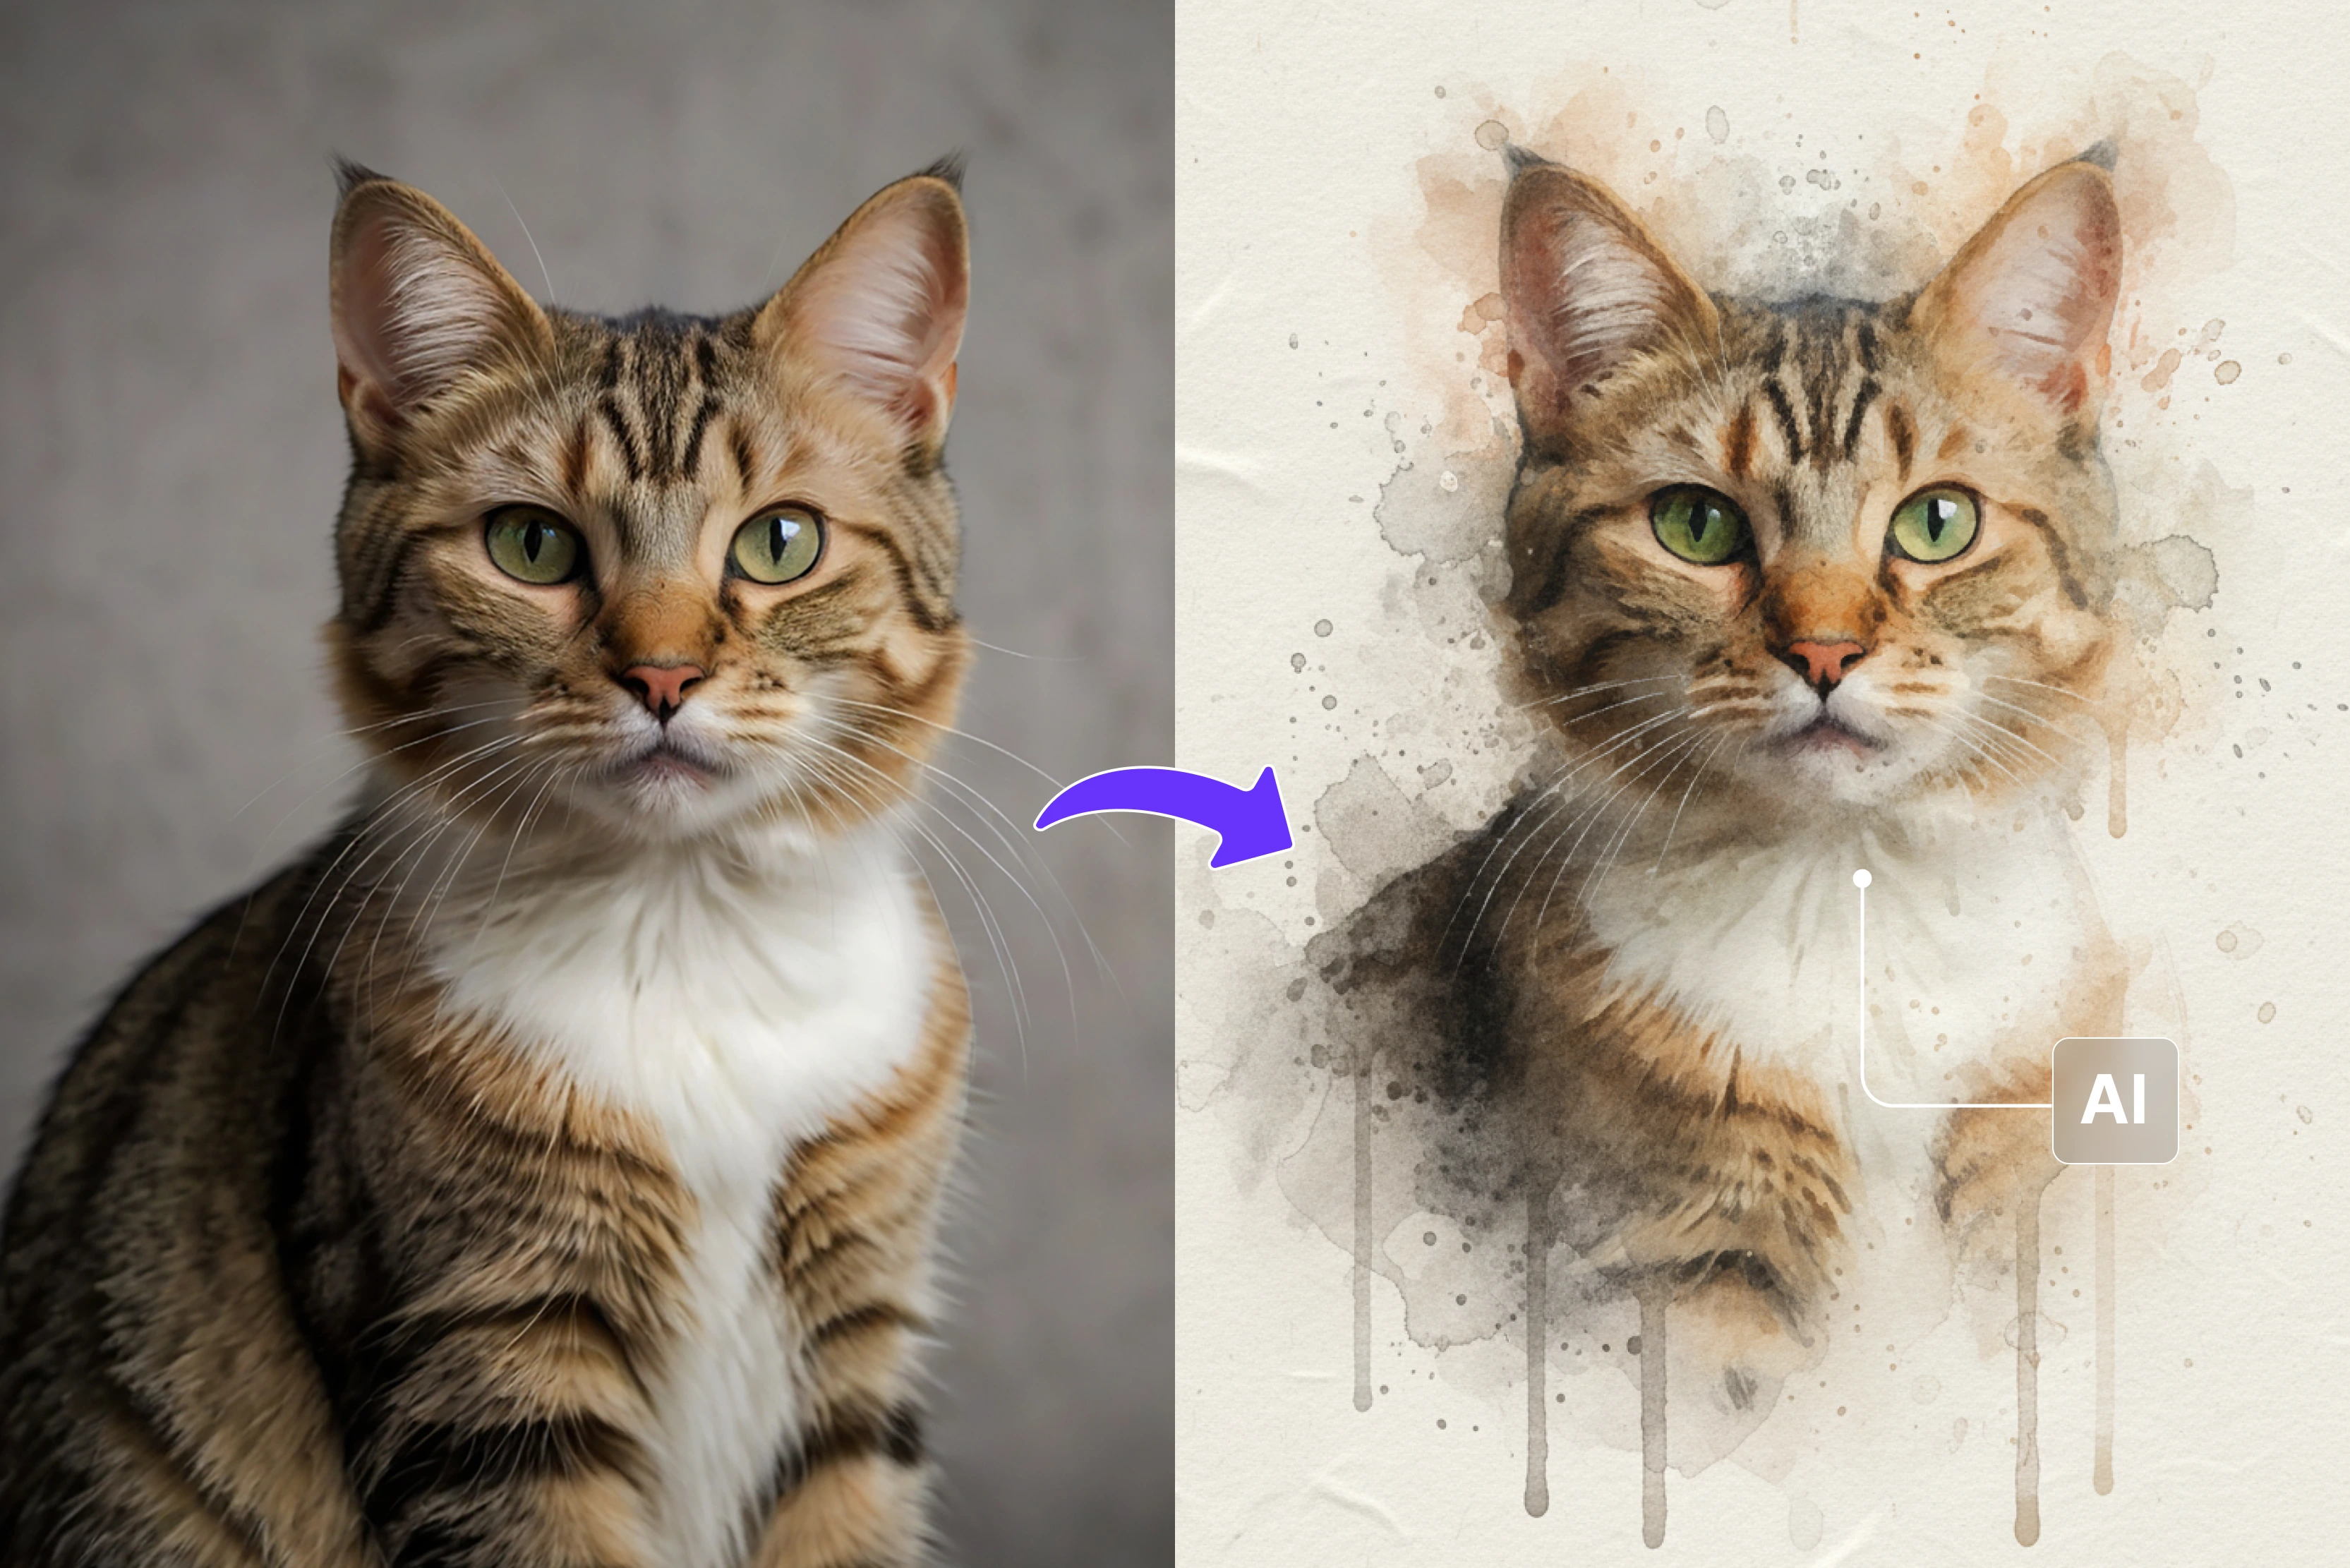

Turning a picture into a painting means making it look like a hand-painted piece of art, like an oil painting, watercolor, sketch, or classic canvas-style art. It's a lovely way to add an artistic touch to photos while keeping the memory alive.
Photo-to-painting effect are popular because they make ordinary moments look special. A normal selfie can look like a royal portrait, a family picture can feel like a memory that will last forever, and even a simple landscape shot can look like something you'd hang on the wall.
These effects make photos feel more emotional and unique by combining nostalgia and creativity. In practical life, people use photo-to-painting conversions for birthdays, anniversaries, home décor, social media posts, or even as thoughtful personalized gifts.
Imagine turning an old photo of your parents into a classic painting—it instantly becomes a treasure. Earlier, creating such artwork required a real painter or advanced editing skills. But today, AI tools have made the process incredibly easy.
In this blog, I will walk you through some of the best tools that can help you turn pictures into painting form art. Also, you will get to know tips to follow to get better results, best AI tools to turn photos into paintings, and how to pick the tool for yourself, and much more. So stay tuned.
Understanding photo-to-painting conversion
It's not enough to just add a filter to a normal photo to make it look like a painting. Modern AI tools look at textures, lighting, colors, and depth to make a new version of the picture in a unique artistic style. It's important to know how different effects work and what makes a photo good for painting in order to get the best results.
Filters vs. artistic styles vs. true painting effects
Filters
- Quick overlays that slightly change colors or textures
- Mostly used for basic enhancements
Artistic styles
- AI applies a painting technique inspired by famous art forms
- Changes brush strokes, highlights, shadows, and overall mood
True painting effects
- AI recreates the entire image as if painted from scratch
- More detailed and expressive compared to simple filters
- Captures depth, lighting, and strokes similar to real artists
Types of popular painting styles
- Oil painting – Rich colors, bold strokes, textured finish
- Watercolor – Soft tones, blended edges, dreamy feel
- Sketch/pencil art – Sharp outlines, monochrome or light-shaded look
- Cartoon style – Defined edges, vibrant colors, playful expression
- Digital art – Clean, modern, highly detailed outputs
Best AI tools to turn photos into paintings
Find out the best tools that can help you turn a simple photo into a different style painting. Below, I have mentioned twelve tools that offer free trials. Explore them and find out which one will give the result as per your expectations. Also, I have shown step-by-step guidance on how to use AI tools to turn photos into paintings.
1. Pixelbin

Using Pixelbin to convert a normal photo into a painting-style image is extremely simple. Just upload your picture, and the AI instantly transforms it into a neat, artistic artwork with smooth textures and natural-looking details. What’s even more impressive is that PixelBin enhances the photo first, giving you an even better final result.
Its AI upscaler, noise remover, and color-correction tools make the picture clearer, with better colors, and ready for high-quality output. You can download the finished painting in high resolution without any watermarks. If you work with a lot of images, the bulk processing and API support make everything go faster and easier.
Steps to convert a photo into a painting using Pixelbin
Step 1: Visit the official website and click on AI tools > See all.
Step 2: In the search bar, search for photo to painting and press enter.
Step 3: Upload the photo.
Step 4: After processing the photo, the tool will convert it into a painting style.
2. Fotor
I’ve used Fotor to turn my photos into painting-style pictures, and it is really easy. You have to upload a photo and pick a style like oil painting, watercolor, sketch, or cartoon. The AI quickly changes the photo into a painting while keeping it clear and natural.
I also like that Fotor has simple editing tools—like adjusting brightness, contrast, colors, adding filters, and fixing small details—so you can make your artwork look even better. It also includes templates for posters, social media graphics, and collages, making it useful for both creative projects and everyday editing.
Steps to convert a photo into a painting using Fotor
Step 1: Visit the official website and sign up. Click on AI photo > Popular tools > AI art effects.
Step 2: Upload the photo.
Step 3: Choose the style of painting.
Step 4: The tool will process the image and generate the result accordingly.
3. BeFunky
I tried BeFunky’s “Photo to Painting/Artsy” tool, and it turned a normal photo into art almost instantly. I uploaded a casual photo, selected an effect—be it oil painting, watercolor, gouache, pointillism, or cartoon—and within seconds it rendered a beautiful, painting‑style version. The brushstrokes, texture, and colors looked impressively realistic.
On top of painting effects, BeFunky offers handy editing tools like background removal, upscaling, contrast, and color correction, and object‑eraser—useful when you want fine‑tuned results. I also used its collage maker and graphic‑design templates to combine several photos or add text, which is perfect for social media, posters, or gifts.
Steps to convert a photo into a painting using BeFunky
Step 1: Visit the official website, scroll down, and click on “Turn photos to art.”
Step 2: Upload the photo.
Step 3: Choose the effect.
Step 4: Here, I have chosen watercolor GFX3.
Step 5: The tool will process the image and generate the result accordingly.
4. Canva
I’ve used Canva to convert ordinary photos into artistic, painting‑like images by applying its built‑in AI filters and effects. You upload a photo, then choose from art‑style filters (like “Art,” “Cartoon,” “Sketch,” or similar creative looks) via the “AI Filter / Edit Photo” feature.
The tool quickly transforms the photo, giving it a stylized, painted, or illustrated vibe. On top of that, Canva offers easy editing controls—brightness, contrast, saturation, and cropping—so you can fine‑tune your image to look just right.
What I also appreciate: Canva lets you add text, graphic elements, frames, or collage layouts—handy if you want to design social‑media posts, posters, or prints from your new artwork. It works fully in a browser (or via mobile), so there’s no need to download heavy software, and it remains easy enough even if you’re not a design expert.
Steps to convert a photo into a painting using Canva
Step 1: Visit the official website and sign up. Click on the three dots on the left and “Apps.”
Step 2: Go to Photo editing > Photo effects > Paintify.
Step 3: Click on “use in new design.”
Step 4: Upload the photo and add custom instructions if you want to.
Step 5: Below, I have uploaded the image and clicked on generate.
Step 6: The tool has processed the image and generated a painted image.
5. Media.io
I was surprised by Media.io's "Photo to Painting / Image Restyle" tool. I just uploaded a normal picture, picked a style like oil painting, watercolor, cartoon, or sketch, and within seconds, I had an artistic version ready to download.
It also has useful features like AI upscaling, background removal, noise reduction, and image enhancement that can make even old or low-quality photos look a lot better. You can use it right in my browser without having to install anything, which makes it really easy to turn my photos into nice-looking art whenever I want to.
Steps to convert a photo into a painting using Media.io
Step 1: Visit the official website and click on AI effects > 2K + effects.
Step 2: Choose the effect.
Step 3: I chose “Ink painting.”
Step 4: Upload the photo and click on generate.
Step 5: The tool processed the image and generated a painted image.
6. Kaze.ai
I uploaded a simple photo to Kaze.ai’s “Photo to Painting/Illustration” tool, and the AI quickly changed it into a colorful, smooth, and artistic-looking painting. I liked how fast and easy the whole process was. I didn't have to do any complicated editing; I just dropped the file and got the art back.
In addition to painting effects, Kaze.ai has a lot of useful tools like removing backgrounds, enlarging images, getting rid of noise, and restoring photos. These are great for cleaning up old photos or improving low-resolution ones.
You can also edit many photos at the same time and choose different styles like comic, anime, sketch, or hand-drawn. This makes it helpful for social media, printing, or any creative work.
Steps to convert a photo into a painting using Kaze.ai
Step 1: Visit the official website. Scroll down and tap on “Turn photo into painting.”
Step 2: Upload the photo.
Step 3: After uploading, choose the effect.
Step 4: Here, I had chosen “Change picture into watercolor painting style.”
7. Flux AI
I used Flux AI to turn a normal photo into a painting, and I was really impressed. It gave me many style options like oil painting, watercolor, sketch, pointillism, pop art, and more. I could easily choose the exact art style I wanted for my picture.
The image-to-image tool lets you upload a photo and apply style transfer or even refine results with text prompts for fine control.
Outputs are fast, high-resolution, and downloadable; Flux AI also provides specialized tools like watercolor and oil-painting converters and supports image fusion and compositing for creative blends. The site emphasizes privacy and browser-based ease, so everything works quickly without installs.
Steps to convert a photo into a painting using Flux AI
Step 1: Visit the official website and click on AI effects > Photo to watercolor painting. You can also choose “Photo to painting.”
Step 2: Upload the photo and add a prompt if you want.
Step 3: The tool has processed the image and generated the watercolor image.
8. Bylo AI
Bylo.ai’s “Photo to Painting” tool transformed my simple photo into artwork quickly. It let me choose from styles like oil painting, watercolor, sketch, cartoon, pop art, and many more. The change happened quickly, and the results were bright, clear, and high-resolution, making them great for printing or posting online.
What I liked most about it was how easy it was to use. I didn't have to make an account; I just uploaded a picture, chose a style, and got my art in a few seconds. It also works with different file types (JPG, PNG, WEBP), on phones and desktops, and lets you export art that is ready to be used on a computer or printed.
Steps to convert a photo into a painting using Bylo AI
Step 1: Visit the official website and click on AI image tools > Photo to painting.
Step 2: Upload the image and choose the painting style.
Step 3: Here, I have uploaded the image and tapped on “Generate.”
Step 4: The tool has processed the image and generated a starry night-style painting of the uploaded photo.
9. LightX editor
I uploaded a basic photo to LightX and clicked on the “AI Photo to Painting/Art” feature. In just a moment, the AI changed my picture into a painting-like artwork, complete with brush-stroke effects and an artistic, stylized look.
Beyond painting effects, LightX offers many editing tools: you can crop, rotate, change background, blur or replace backdrop, add text or stickers, and tweak brightness, contrast, saturation — everything to polish the final artwork.
It’s all browser- or app-based, so I didn’t need complicated software. For quick creative edits, stylized portraits, or experiment-heavy visuals, LightX felt like a mini art studio in my phone.
Steps to convert a photo into a painting using LightX editor
Step 1: Visit the official website and sign up. Click on Tool > Photo editor > See all.
Sep 2: Select “AI photo to painting.”
Step 3: Upload the image.
Step 4: Choose the style and tap on the generate button.
Step 5: The tool will process the image and generate the painted image accordingly.
10. Facewow
I tried Facewow’s “Photo to Painting/Art” converter by uploading a simple photo, and, in a few seconds, it turned into a stylized artwork — oil painting, watercolor, sketch, or even cartoon style. The result looked clean, colorful, and ready to download with no watermark.
What impressed me was how versatile Facewow is beyond just paintings. It lets you enhance images (remove blur, upscale resolution, reduce noise) so old or low-res photos become sharp. You can also use its AI filters for anime, cartoon, or other artistic styles.
Steps to convert a photo into a painting using Facewow
Step 1: Visit the official website and click on AI filter > Photo to painting.
Step 2: Upload your image.
Step 3: Below, you can see the before and after of the uploaded image.
11. Colorcinch
I tried Colorcinch’s “Photo to Painting / Art Effects” tool and simply uploaded a photo; within moments, it transformed into a painting- or sketch-style image with stylized brush strokes or cartoon-like art.
Colorcinch also offers many other helpful tools: you can remove backgrounds, upscale images, restore old or blurry photos, and apply color & exposure adjustments for a polished look. It also supports adding overlays, text, graphics, and frames—so you can turn your art into posters, cards, or social-media graphics easily.
Because it works entirely in the browser (or via its mobile app), I didn’t need to install heavy software. For me, Colorcinch felt like a lightweight digital art studio ready whenever I wanted to turn a photo into art.
Steps to convert a photo into a painting using Colorcinch
Step 1: Visit the official website and sign up. Click on Tools > Filter and effects > Photo to painting.
Step 2: Upload the photo.
Step 3: After uploading the photo, choose the style. Here, I have chosen “Painting.”
Step 4: The tool has processed the image and generated the result.
12. EaseMate
I uploaded a simple photo to EaseMate’s “Photo to Watercolor/Oil Painting” tool, and it quickly turned it into a nice painting-style image. The result had soft brush strokes or detailed textures, depending on the style I picked.
The result looked clean and artistic — ideal for printing, social posts, or gifts. What I appreciate most is EaseMate’s flexibility: besides watercolor or oil-painting filters, it offers background remover, noise reduction, upscaling, and even clay/cartoon-style conversions if you feel playful.
Because it runs entirely online, I didn’t need to install any software. One upload, one click — and I got a polished, art-style output ready to download.
Steps to convert a photo into a painting using EaseMate
Step 1: Visit the official website and sign up. Scroll down and click on “Change photo to hand-made paintings.”
Step 2: Upload the image and choose the style.
Step 3: Once you have uploaded the image and picked the style, click on “Generate.”
Step 4: The tool has processed the image and generated a painted version of it.
Tips to get the best painting effect
Turning your photos into paintings becomes easier when you prepare the image properly. These tips will help you achieve clearer details, improved colors, and a more natural artistic look.
1. Use photos with good lighting.
Good light lets the AI notice all the important details on your face and in the photo, so the painting turns out sharp and realistic.
With poor lighting, the colors can look dull, and the final result may not look as good.
2. Keep the background simple.
A plain background also makes a big difference. The painting may look messy if the background is too busy because the AI might get confused.
A plain wall or a calm scene outside helps the AI pay attention better, especially when taking pictures of people or pets.
3. Avoid low-quality or pixelated images.
AI tools need clear information to make strokes and textures that are correct. Photos with low resolution or pixelation often make the colors look smudged, the outlines look distorted, and the patterns look strange in the painting. A clear, well-focused photo will give you sharper edges and a more polished artistic style.
4. Pick a style that matches your photo’s mood
- Every painting style conveys a different feeling.
- Watercolor works best for soft, dreamy portraits.
- Oil painting suits dramatic, emotional, or high-contrast images.
- Sketch or pencil art is perfect for highlighting details and structure.
- Matching the style to your photo helps the artwork feel more natural and expressive.
5. Don’t over-edit
Doing a lot of pre-editing can make your artwork appear forced or artificial. Strong effects or big color changes might not work well with the style of the painting.
It's better to keep the original picture simple and let the AI add the artistic touches.
Conclusion
Modern AI tools have made it easier than ever to turn a picture into a painting. Picking the right picture and the right art style is very important. You can get a soft watercolor look, a bold oil painting style, or a fun cartoon effect.
The AI can make a cleaner and more natural result with good lighting, clear details, and simple backgrounds. Most importantly, don't edit too much; let the painting style add its own texture and charm.
FAQs
You can upload your photo to an AI photo editor, choose a painting style, and let the AI convert it automatically. Tools like PixelBin, Picsart, Fotor, and Remini can turn your picture into a painting with one click.
For portraits or selfies, styles like oil painting, watercolor, pencil sketch, and classic portrait are the most popular. Oil painting gives a royal look, while watercolor adds softness and a dreamy feel.
High-quality photos give the best results, but most AI tools can improve low-quality images too. They can sharpen faces, fix blur, and enhance colors before applying the painting effect.
Some of the best tools are PixelBin, Picsart, Fotor, Remini, LightX, Prisma, and Canva. They offer multiple painting styles and easy-to-use AI filters.
Yes. Many AI editors let you adjust brush intensity, colors, textures, and details to match your style. Some tools even allow fine-tuning of background and lighting.
Yes, several apps offer free painting filters. Tools like Pixelbin, Prisma, Picsart (free version), Fotor, and some online editors provide free painting effects, though advanced features may require a paid plan.