Removing text from an image is one of those things you end up doing all the time if you work with photos or graphics. Sometimes it’s a logo you don’t need, sometimes it’s an old caption someone forgot to remove, and sometimes it’s just something that’s bugging you.
Whatever the reason, being able to clean it up without messing up the background is a really useful skill. Photoshop has plenty of ways to do it, and they’ve changed over the years.
Older versions rely mostly on manual tools, while the newer ones—especially the most recent releases—include some automatic features that make the job quicker. But honestly, even with all the newer tech, the basics still work great if you know when to use them. Once you understand which tools fit which situation, getting rid of text becomes pretty simple.
Whether you’re working on product shots, graphics, or just fixing a picture for your own use, the process is straightforward once you’ve done it a few times. The ideas I will cover below will be more of practical methods and some things to watch out for when you’re dealing with trickier images.
Techniques for removing text in Photoshop
Removing text in Photoshop is a staple skill for editors, allowing you to clean up images for professional use, documentation, or creative projects using several precise techniques.
Method 1: Clone Stamp tool
If you’ve ever used Photoshop, you’ve probably messed with the Clone Stamp at some point. It basically lets you pick up part of the image and paint it somewhere else, which makes it handy when you’re trying to cover up text. It works best on consistent or repeating textures; for perfectly flat color, try Spot Healing/Content-Aware first.
You’ll usually reach for this tool when the text is sitting on top of a lot of small details, since you can control exactly where you sample from and how it spreads. It takes a little practice to get the strokes to look natural, but once you get the hang of it, it does a really clean job.
Step-by-step guide:
- Select the Clone Stamp Tool from the toolbar.
- Hold Alt/Option and click on a clean area near the text to sample pixels.
- Release Alt/Option and carefully paint over the text area.
- Adjust brush size and hardness for different textures.
- Frequently sample new areas to maintain a natural look.
- Zoom in to work on fine details and seamlessly blend edges.
Method 2: Spot Healing Brush tool
The Spot Healing Brush is basically the quick-fix tool in Photoshop. If there’s a tiny bit of text you want gone, you just swipe over it and Photoshop fills it in for you. You don’t really have to think about it—it grabs whatever is around the spot and blends it together.
It works best when the background isn’t complicated. Flat color, light texture, that kind of thing. For stuff like a small label or a little bit of stray text, it usually cleans it up in a couple of seconds without you having to fiddle with anything.
Step-by-step guide:
- Choose the Spot Healing Brush Tool from the toolbar.
- Set brush size slightly larger than the text height.
- Paint over the text area gently.
- Photoshop fills the area by sampling surrounding pixels and blending.
- Repeat strokes for larger or stubborn areas until the text vanishes naturally.
- Use Zoom to verify that the patching looks seamless.
Method 3: Content-Aware Fill
Content-Aware Fill is basically Photoshop’s “do it for me” button. You select the text, run the tool, and it tries to rebuild whatever should’ve been behind it by looking at the surrounding area. It’s surprisingly good when you’re dealing with bigger chunks of text or backgrounds that aren’t totally plain.
It usually gets you most of the way there without much work, which is nice, but sometimes it guesses a little wrong. When that happens, you just clean up the weird spots with the Clone Stamp or Healing Brush, and it looks fine.
Step-by-step guide:
- Use a selection tool to select the text you want removed (e.g., Lasso Tool).
- Go to Edit > Content-Aware Fill.
- Photoshop opens a workspace showing the fill preview.
- Refine sampling areas or adjustment settings for better results.
- Click OK to apply the fill.
- Clean up edges or details with Healing or Clone Stamp as needed.
Method 4: Patch tool
The Patch tool combines selection and healing by allowing you to select the text area and then drag it over a clean section to replace the unwanted text with matching pixels.
It’s highly useful when you want to maintain texture patterns or deal with irregular backgrounds, providing more control than automated tools.
Step-by-step guide:
- Select the Patch Tool from the toolbar.
- Draw a selection around the text.
- Drag the selection to a nearby clean area with a similar texture.
- Photoshop replaces the text area with pixels from the clean area.
- Deselect and fine-tune with Healing or Clone Stamp if needed.
- Repeat for multiple text blocks for consistent results.
Method 5: Healing Brush tool
The Healing Brush tool is similar to the Clone Stamp, but blends the texture with the surrounding colors and lighting to get a natural result. It is best for removing text while maintaining texture or color transitions in the background.
Step-by-step guide:
- Select the Healing Brush Tool.
- Alt/Option-click to sample an area near the text.
- Paint over the text gently to replace it with a sampled texture.
- Match source areas often for accuracy.
- Adjust brush hardness and size for details and larger areas.
- Use Zoom to ensure edges blend seamlessly.
Removing text from images in different Photoshop versions (Most searched queries)
Removing text from images in different Photoshop versions has evolved with new tools enhancing ease and precision, catering to both beginners and pros across update editions.
How to remove text from an image in Photoshop CS6
Photoshop CS6 might be old at this point, but it still has the stuff you actually need to get rid of text. The Clone Stamp and Healing Brush do most of the heavy lifting, and the Content-Aware Fill in that version is solid enough to handle a lot of textured backgrounds without falling apart.
It doesn’t have all the fancy new auto-features the newer Photoshop versions brag about, but you can still get great results if you mix the automatic fill with a bit of manual cleanup.
Step-by-step guide:
- Open the image and duplicate the background layer.
- Use the Lasso Tool to roughly select the text area to remove.
- Go to Edit > Fill > Content-Aware to fill in the selection.
- Use the Clone Stamp Tool to fix any texture inconsistencies or repeating patterns.
- Apply the Healing Brush for smooth blending around edges.
- Zoom in and fine-tune until the text is completely concealed.
How to remove text from an image in Photoshop CS3
Photoshop CS3 is pretty old, so you don’t get the newer automatic tools. If you want to remove text in that version, you’re basically doing it by hand with the Clone Stamp and the Healing Brush. It takes some careful sampling and a bit of patience, but if you take your time, you can clean up the text just fine.
Step-by-step guide:
- Duplicate your working layer to preserve the original image.
- Select the Clone Stamp Tool and sample an area close to the text by holding Alt and clicking.
- Carefully paint over the text, constantly resampling to avoid pattern repetition.
- Use the Healing Brush to soften any hard edges or color mismatch.
- Zoom to 200% or more for precise correction.
- Save often to avoid losing progress.
How to remove text from an image in Photoshop 7.0
Photoshop 7.0 is pretty bare-bones compared to newer versions, so removing text is mostly a hands-on job. You’ve got the Clone Stamp and the Healing Brush, and that’s about it.
Since there’s no Content-Aware Fill, you just have to clone and heal the area bit by bit. If you use masks to control what you’re doing, it’s a lot easier to keep the background looking natural.
Step-by-step guide:
- Duplicate the image layer to keep an original backup.
- Use the Lasso Tool to create a rough border around the text.
- Carefully clone pixels from a nearby clean area into the text space.
- Heal and blend edges to ensure natural transitions.
- Use Layer Masks where possible to keep edits reversible.
- Check with varying zoom levels for consistency.
How to remove text from an image in Photoshop 2026
Photoshop 2026 makes taking text out of an image a lot easier than the older versions. The newer AI tools do most of the work for you.
The updated Content-Aware Fill is smarter, and the Remove tool usually wipes out text in one pass, even when the background is busy. The Neural Filters can help clean things up if the first try isn’t perfect, but most of the time, you barely have to do anything.
Step-by-step guide:
- Open the image and select the text area using any selection tool (Lasso, Marquee, etc.).
- Activate the Remove Tool or use Edit and then Content-Aware Fill for intelligent background fills.
- Adjust sampling areas and fill settings in the overlay panel for best blending.
- Use Neural Filters for further cleanup if necessary.
- Refine edges with Healing Brush or Clone Stamp if needed.
- Finalize the image by smoothing lighting or texture inconsistencies.
How to remove text from an image in Photoshop 2024
The 2024 version builds on the success of previous releases with updated Content-Aware Fill that allows more control, faster previews, and easier edge refinement. Workflow improvements make the overall process more efficient.
Step-by-step guide:
- Duplicate your working layer.
- Select the text area with the Lasso or Quick Selection Tool.
- Open Content-Aware Fill workspace via the Edit menu.
- Fine-tune the sampling area to exclude problematic sections.
- Preview the fill in real-time and apply when satisfied.
- Touch up with Clone Stamp or Healing Brush on any visible artifacts.
- Save your file with transparency if needed.
How to remove text from an image in Photoshop 2020
Photoshop 2020 contains powerful Content-Aware Fill improvements, including live adjustment previews and quick sampling tools. These features provide users with more precise control when removing text against varied backgrounds.
Step-by-step guide:
- Duplicate the background layer.
- Select the text using guided tools like Object Selection or Lasso.
- Choose Edit > Content-Aware Fill.
- Adjust the fill settings and sampling brush as needed.
- Confirm the fill operation and close the workspace.
- Apply Healing Brush or Patch Tool to polish edges.
- Save your final corrected image.
Troubleshooting pro tips
1. Dealing with complex backgrounds behind text
- Use Lasso or Quick Selection to grab the text roughly.
- Content-Aware Fill can help, but it usually messes up some spots.
- Fix the messed-up spots with Clone Stamp or Healing Brush until it looks natural.
2. Avoiding image distortions during cloning or healing
- Don’t keep copying from the same area; it’ll repeat and look fake.
- Grab samples from nearby clean spots.
- Zoom in, use a soft brush, and go slowly. Build it up little by little.
3. Using multiple tools together
- Start with Content-Aware Fill or the Patch Tool to get rid of the big stuff.
- Then clean up edges with Healing Brush or Clone Stamp.
- Masks are handy for fixing tricky parts without ruining other areas.
4. Handling shadows and gradients
- Work in small sections.
- Match the shadow direction and color.
- Use low-opacity, soft brushes so everything blends gradually.
6. Preserving texture and lighting
- Sample from multiple spots so the texture looks natural.
- Use masks to blend carefully.
- Hide and show the layer every now and then to see if it still looks right.
Best alternative to Photoshop to remove text from an image- Pixelbin Remove Text from Image
If you just want to delete a text from an image quickly and don’t feel like wrestling with layers, masks, or any of Photoshop’s more advanced tools, Pixelbin’s background remover is an easy shortcut.
It runs in your browser, works with both photos and videos, and you don’t have to install or set up anything. If you end up using it a lot, the paid plans let you clear backgrounds from whole batches of images at once. That’s a huge help when you’ve got folders full of product shots or old photos waiting to be cleaned up.
The tool does everything automatically, but the results still look clean and polished. Whether you’re running a small shop, doing design work, or just trying to speed up your workflow, Pixelbin’s remover takes care of the job without any fuss.
Must known features
- AI-powered automatic detection and removal of text, logos, watermarks, and captions.
- Maintains original image resolution and quality after text removal.
- Web-based tool requiring no software installation.
- Supports uploading images up to 10 MB or removal via image URL.
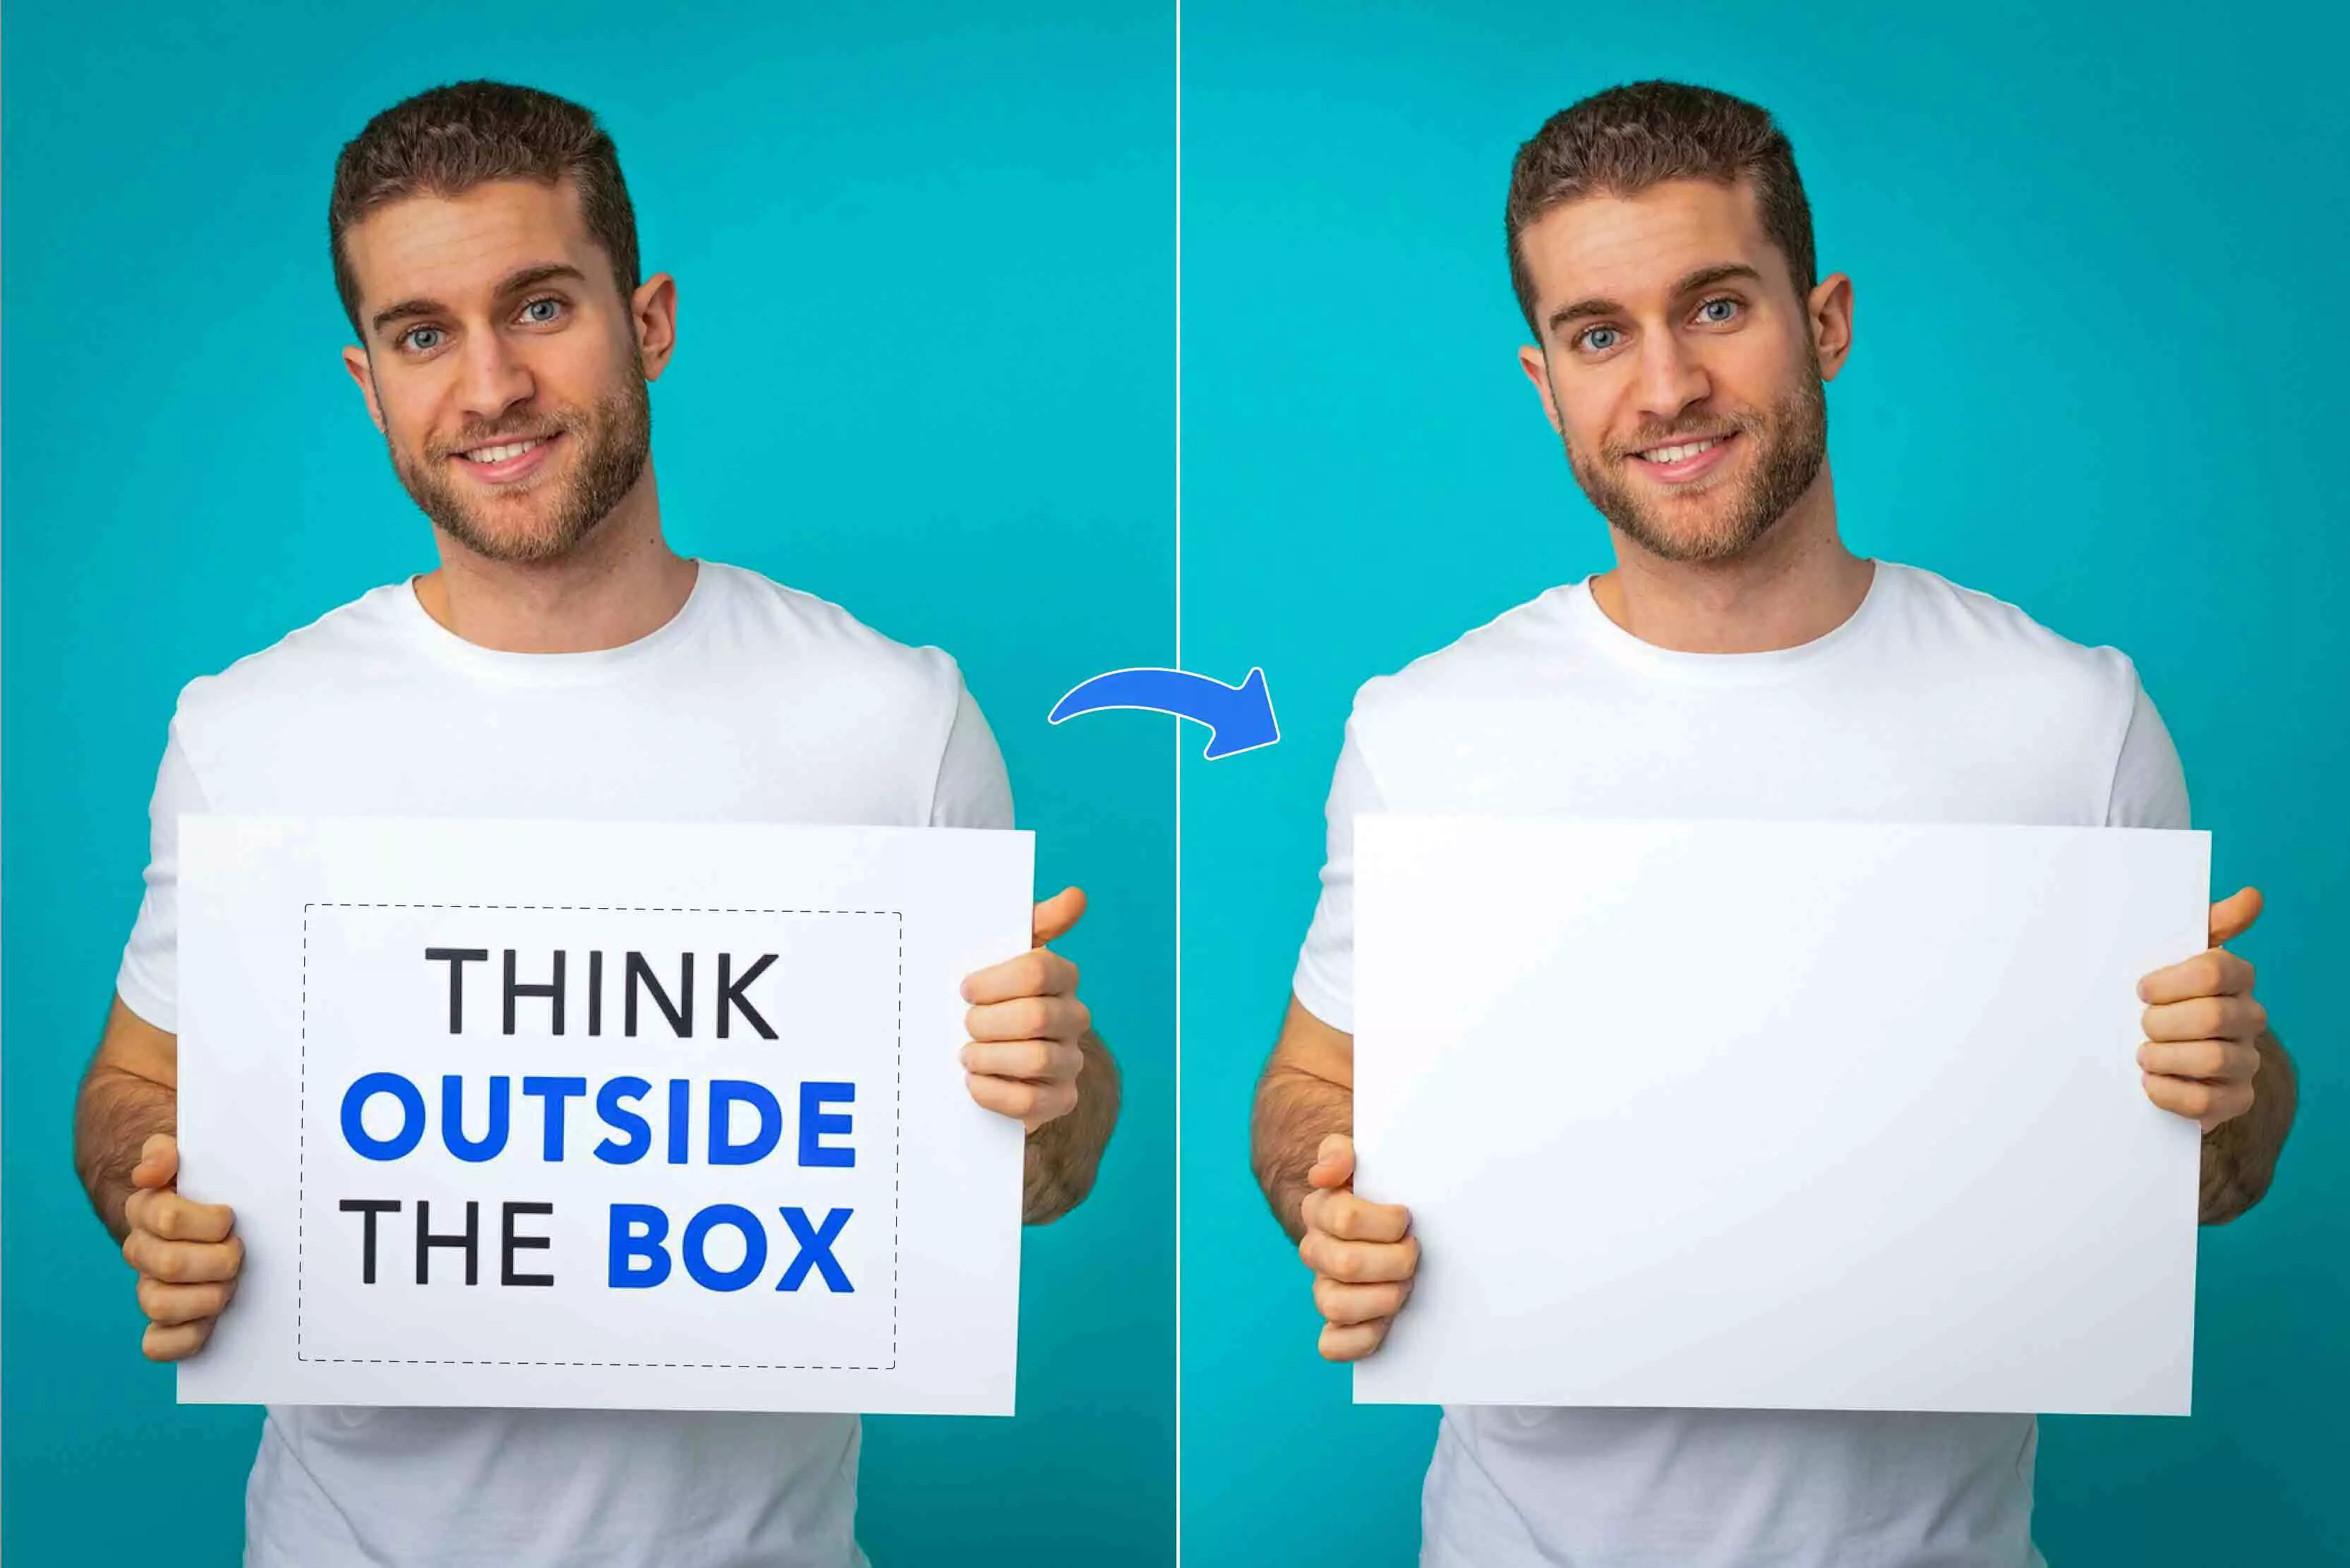
- Provides a side-by-side preview of the original and edited images.
- Fast processing with results in seconds.
- Free three credits with limited monthly text removals without signup.
- Suitable for social media, product photos, memes, and stock images.
How to use Pixelbin for background removal
Step 1: Go to Pixelbin and open the text remover from the image tool.

Step 2: Upload your image by dragging and dropping it into the upload area or browsing your device to select the file. Supported formats include PNG, JPG, JPEG, and WEBP.
Step 3: Once satisfied, download the high-resolution image without any text, ready for eCommerce, marketing, social media, or creative projects.
Final Thoughts
Taking text out of an image can be quick and simple, or it can take a bit more care—it all depends on the photo. Photoshop gives you the control you need when you’re working with tough backgrounds.
On the other hand, tools like Pixelbin’s Text Remover are great when you just want to remove the background without opening a full editing program. Having both options makes the process easier: use Pixelbin for fast cleanups, and switch to Photoshop when you want to have detailed background removal.
FAQs
Content-Aware Fill, combined with the quick use of the Spot Healing Brush, is often the fastest and easiest way for most backgrounds.
Yes, using Clone Stamp and Healing Brush with layer masks preserves surrounding background quality, allowing precise and natural removal.
Newer versions include advanced AI-driven tools like Neural Filters and improved Content-Aware Fill, making removal faster and cleaner, while older versions rely more on manual cloning and healing with less automation.
Use the Healing Brush and clone nearby shadow areas to preserve lighting consistency. Adjustment layers can help correct minor tone changes.
It performs excellently on most textured or simple backgrounds but might require manual refinement on complex or patterned backgrounds to avoid visible artifacts.
Use the Patch Tool and Content-Aware Fill for large or continuous text areas. Spot Healing Brush and Clone Stamp are better for small logos or detailed spots requiring precision.