

Sometimes we end up clicking a blurry photo. Maybe you were trying to capture a friend performing at a concert, or quickly taking a picture of a street scene while walking through a busy market. You don't want to miss these moments, but a moving subject, dim lighting, or a little camera shake can make your shot hazy and soft.
Knowing that the shot could have been flawless is annoying. The good news is that fixing these blurry photos doesn't require you to be an expert in Photoshop. Photoshop provides tools like Shake Reduction, Smart Sharpen, and High Pass Filter that can help you bring back clarity.
Even if you are completely new to editing, following simple steps can significantly improve your photos. Whether it's an impromptu candid photo or a significant trip memory, you can enhance the quality and professionalism of your photos. In this blog, I will take you step-by-step through each method.
By the end, you'll know how to restore the sharpness your photos need by unblurring them from motion, dim lighting, or slight camera shake. Even if you're a novice, these pointers will help you preserve priceless moments and make ordinary photos look professional.
Understanding a blurry image
Before you try to fix a blurry image, it is important to understand why it looks blurry. Knowing the type of blur will help in selecting the appropriate Photoshop tool because blurs can be of different types. Let us first understand the types of blur.
There are three main types of blur:
- Motion blu: It occurs when the subject or the camera moves while the picture is being taken. For example, if you attempt to take a picture of a friend dancing or a moving car, the image may appear stretched or hazy in the direction of movement.
- Gaussian blur: This kind of blur gives the impression that the image is generally smooth and soft, as if it has a slight fog over it. It is a digital effect applied intentionally in image editing. It evenly distributes pixel values using a mathematical Gaussian function, softening edges, lowering noise, and producing a blur that looks natural.
- Out of focus blur: It happens when the camera focuses on the wrong area, leaving the main subject fuzzy. For example, a flower may appear hazy in a close-up if the camera is focused on the background.
Because different Photoshop tools are more effective with different types of blurs, a user should first understand the type of blur. While Gaussian or out-of-focus blur may require the use of a High Pass Filter or Smart Sharpener to enhance clarity, motion blur can frequently be minimized with the Shake Reduction filter.
How to prepare your image in Photoshop
Before you start editing the picture, the first step in Photoshop is to prepare your image properly. Many beginners skip this stage, but setting up your file correctly can help you avoid mistakes and give you more flexibility later on.
This gives a solid foundation and allows you to experiment with filters, adjustments, and effects without fear of destroying your original image. In this section, we will explore three essential steps: opening your image, duplicating the background layer, and (optionally) converting it into a Smart Object.
Although these actions may look small, they have a big impact on maintaining a professional and non-destructive editing process.
Preparing an image in Photoshop
It is very important to set up the image in Photoshop before making any changes to it. By doing so, you get editing flexibility and guarantee that you don't lose the original file. Here's how to do it:
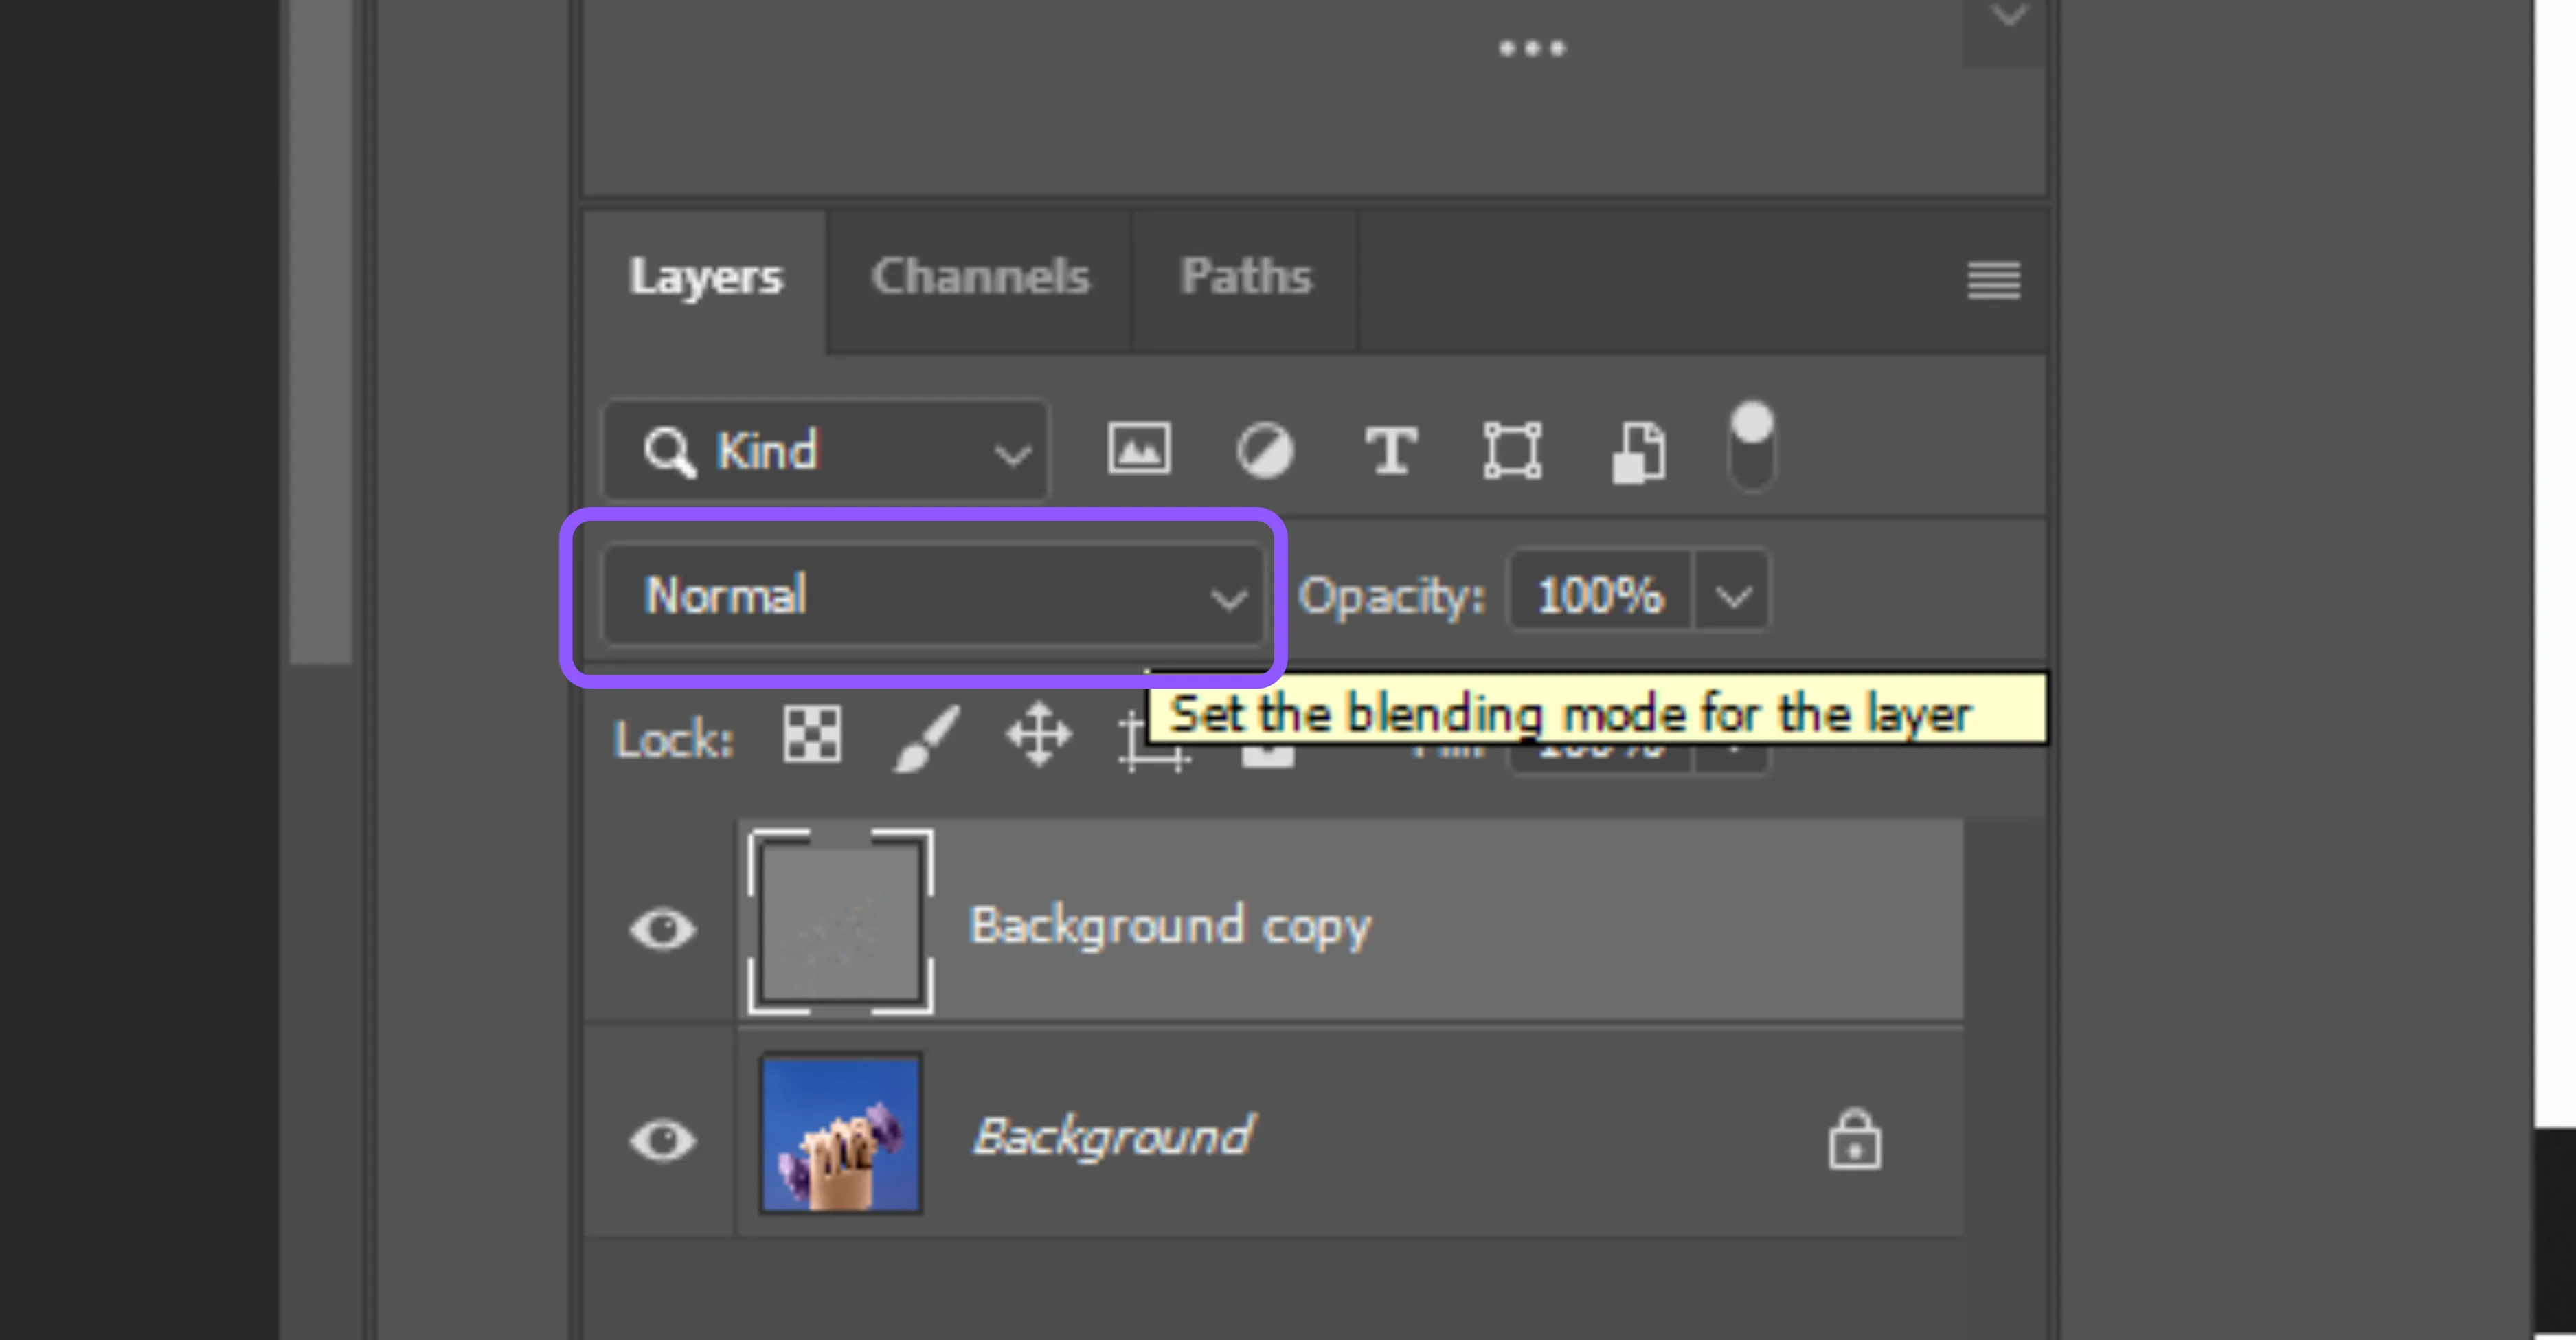
Step 1: Open the image in Photoshop
Open Photoshop and select File > Open, then select the image you want to work with. It will appear in the workspace as the "Background" layer by default when it loads.
Step 2: Duplicate the background layer
Right-click on the Background layer in the Layers panel and select Duplicate Layer. Rename it if you like. In this manner, you can always return to the original image if necessary, and it stays unaltered. Every professional editor uses it as a safety net.
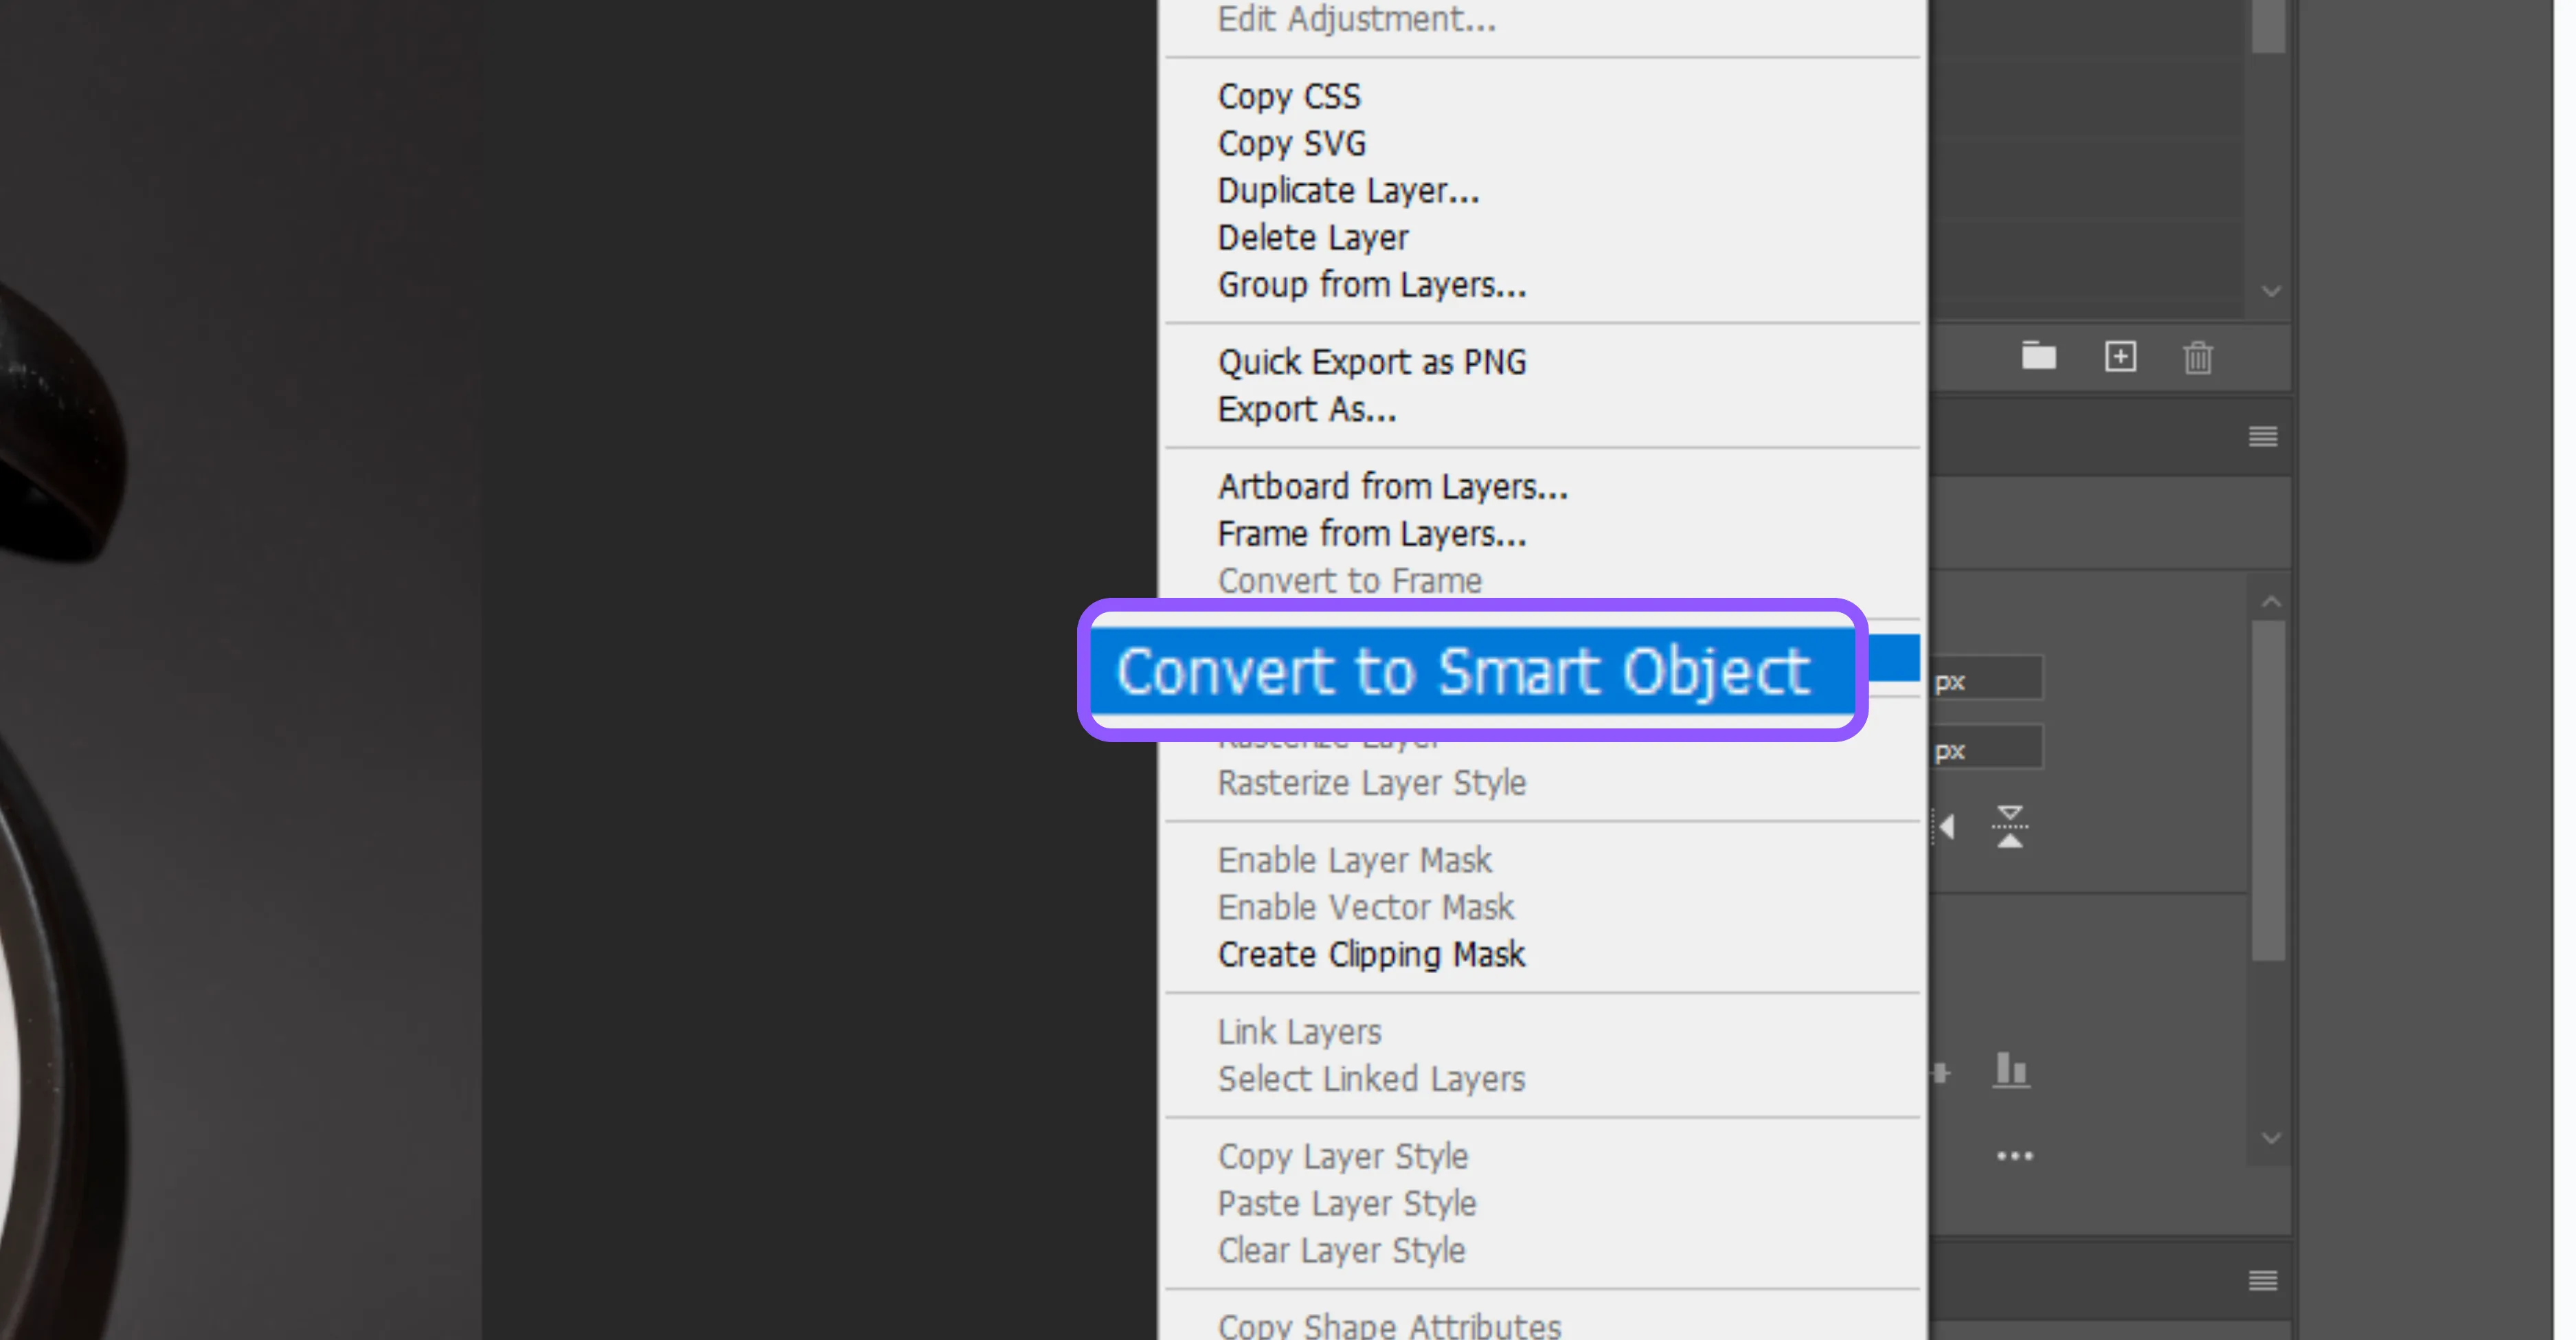
Step 3: Convert the image to a Smart Object.
Right-click on your duplicated layer and select Convert to Smart Object. Non-destructive editing feature of smart object allows you to apply filters, transformations, and adjustments without permanently altering the original pixels is made possible by Smart Objects' non-destructive editing feature. Later on, you can easily adjust or remove an effect if you like.
By following these steps to prepare your image, you'll have a strong basis for editing, maintaining a flexible, expert, and error-proof workflow.
Methods to unblur an image in Photoshop
If your picture looks blurry, don’t worry—Photoshop has a few powerful tools that can help bring back some sharpness. There are three methods you can use to improve most blurry photos.
While you may not always get a perfectly sharp image (especially if it's very out of focus), these Photoshop tools give you the best chance at saving your shot. Let us find out what steps are included in all three easy methods.
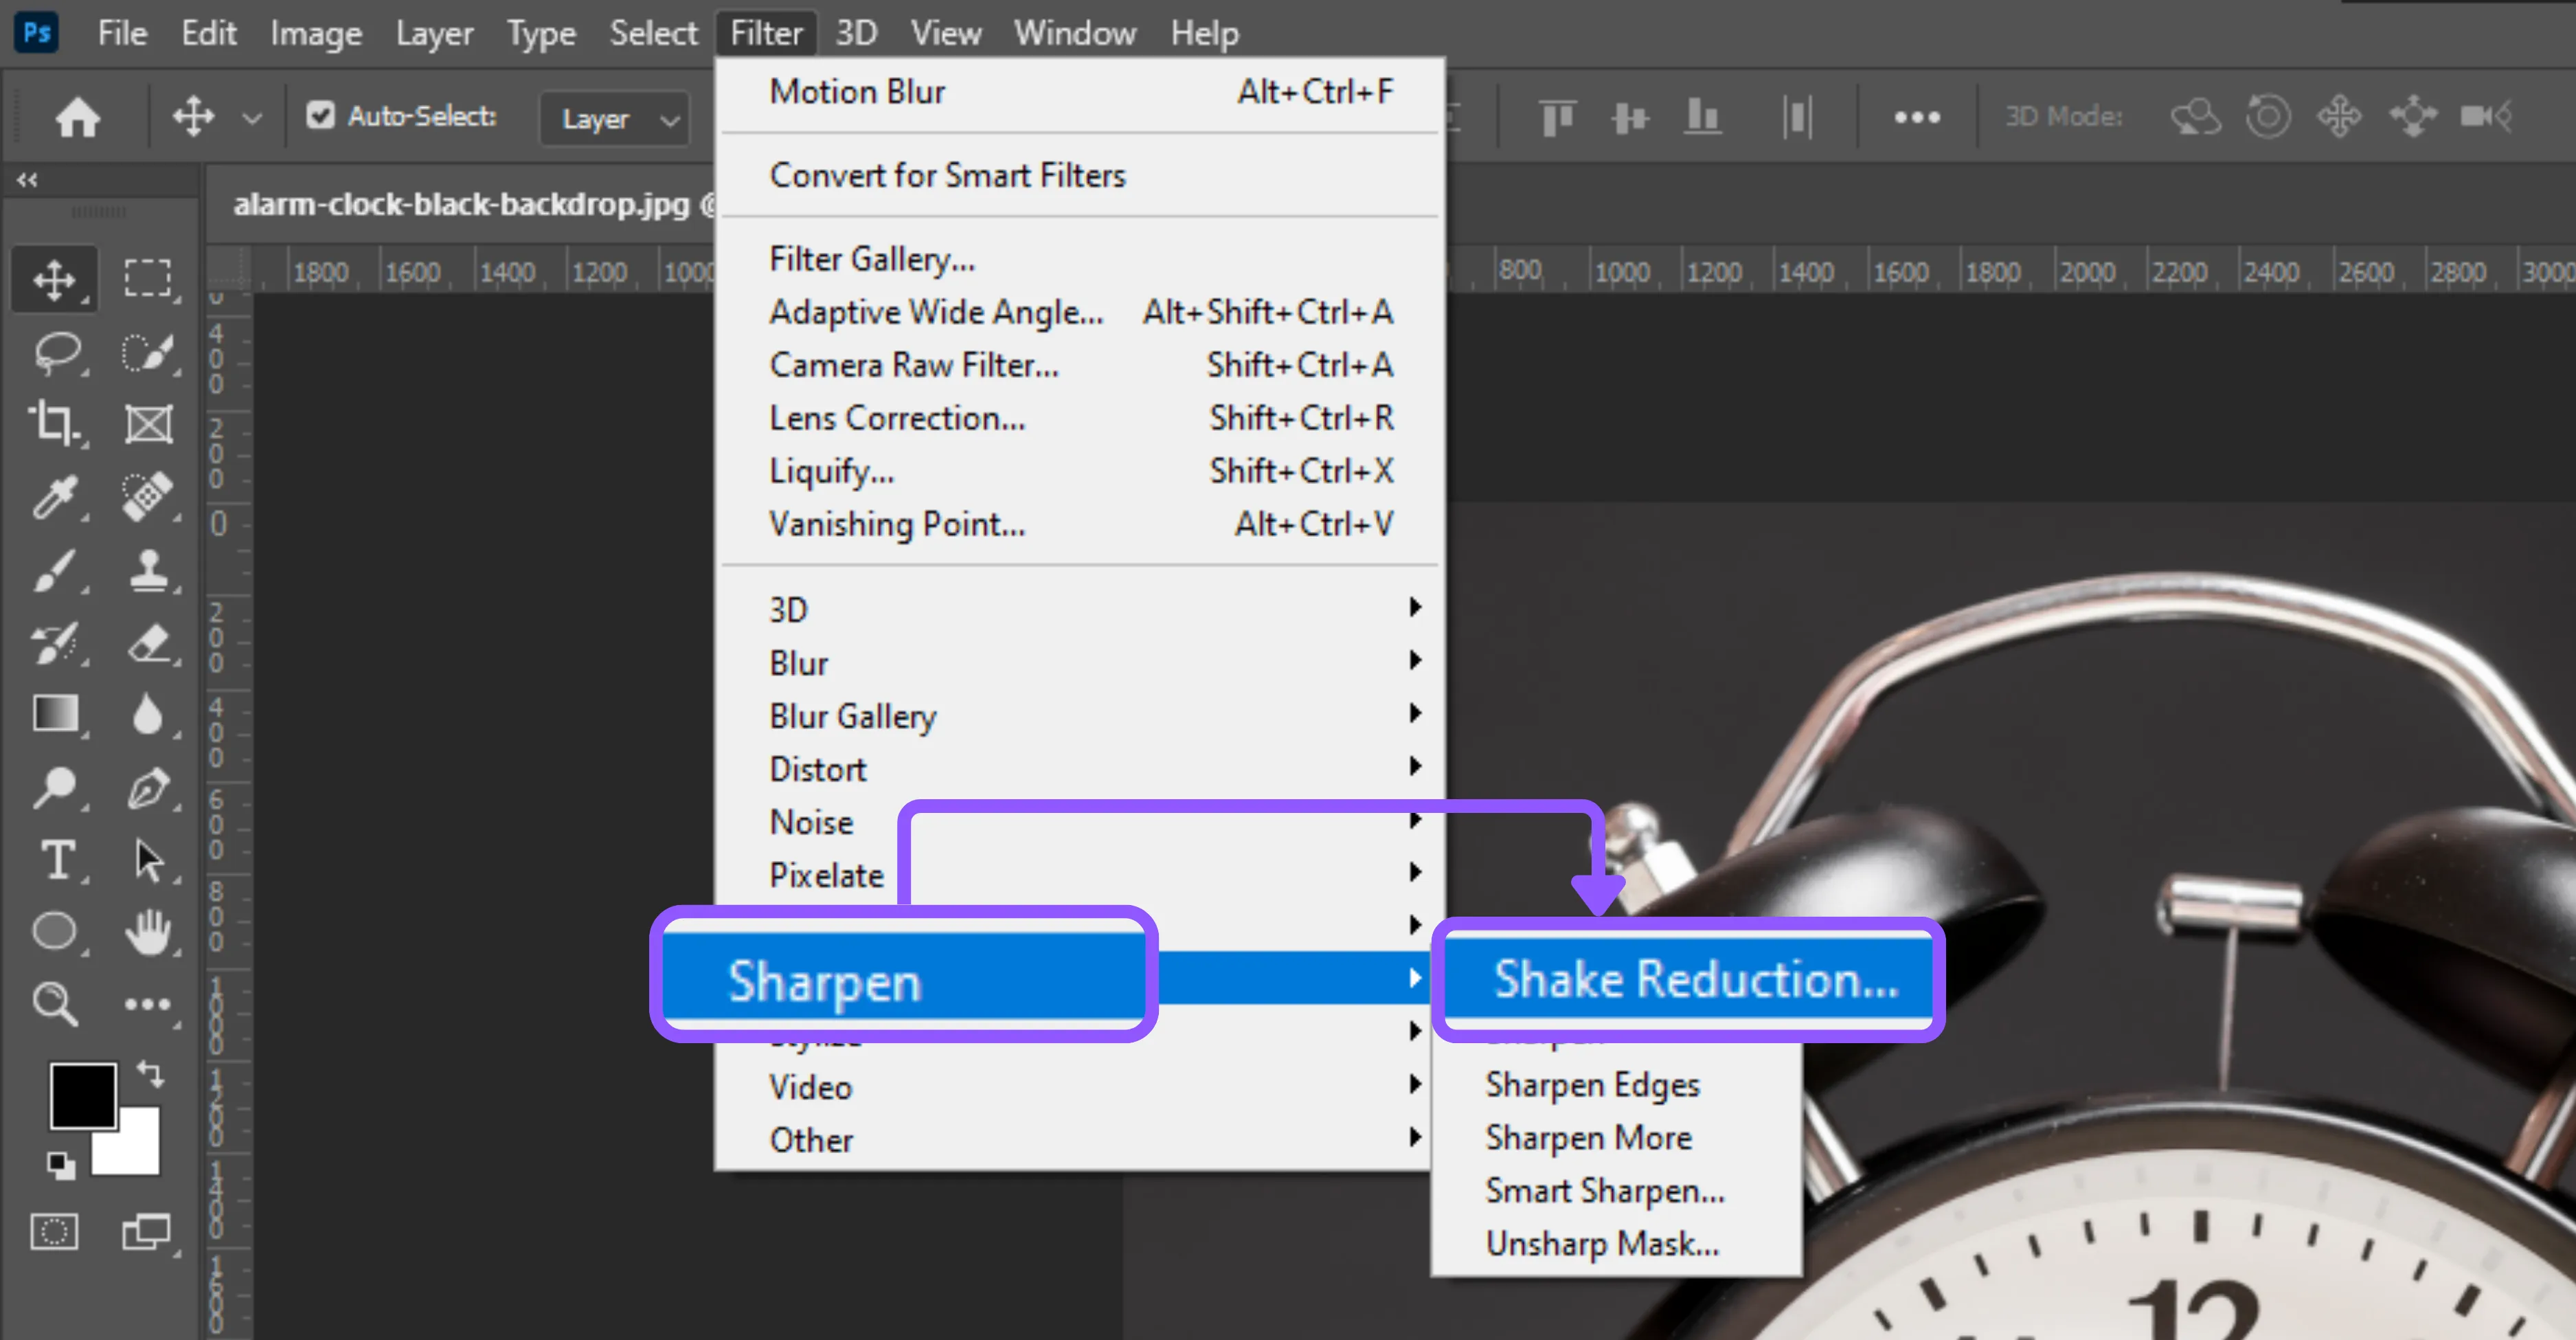
Method 1: Using the shake reduction filter - this tool is designed especially for images blurred due to camera movement.
Step 1: Go to the top menu and click Filter > Sharpen > Shake Reduction.
Step 2: Photoshop will automatically analyze the photo and try to reduce the blur.
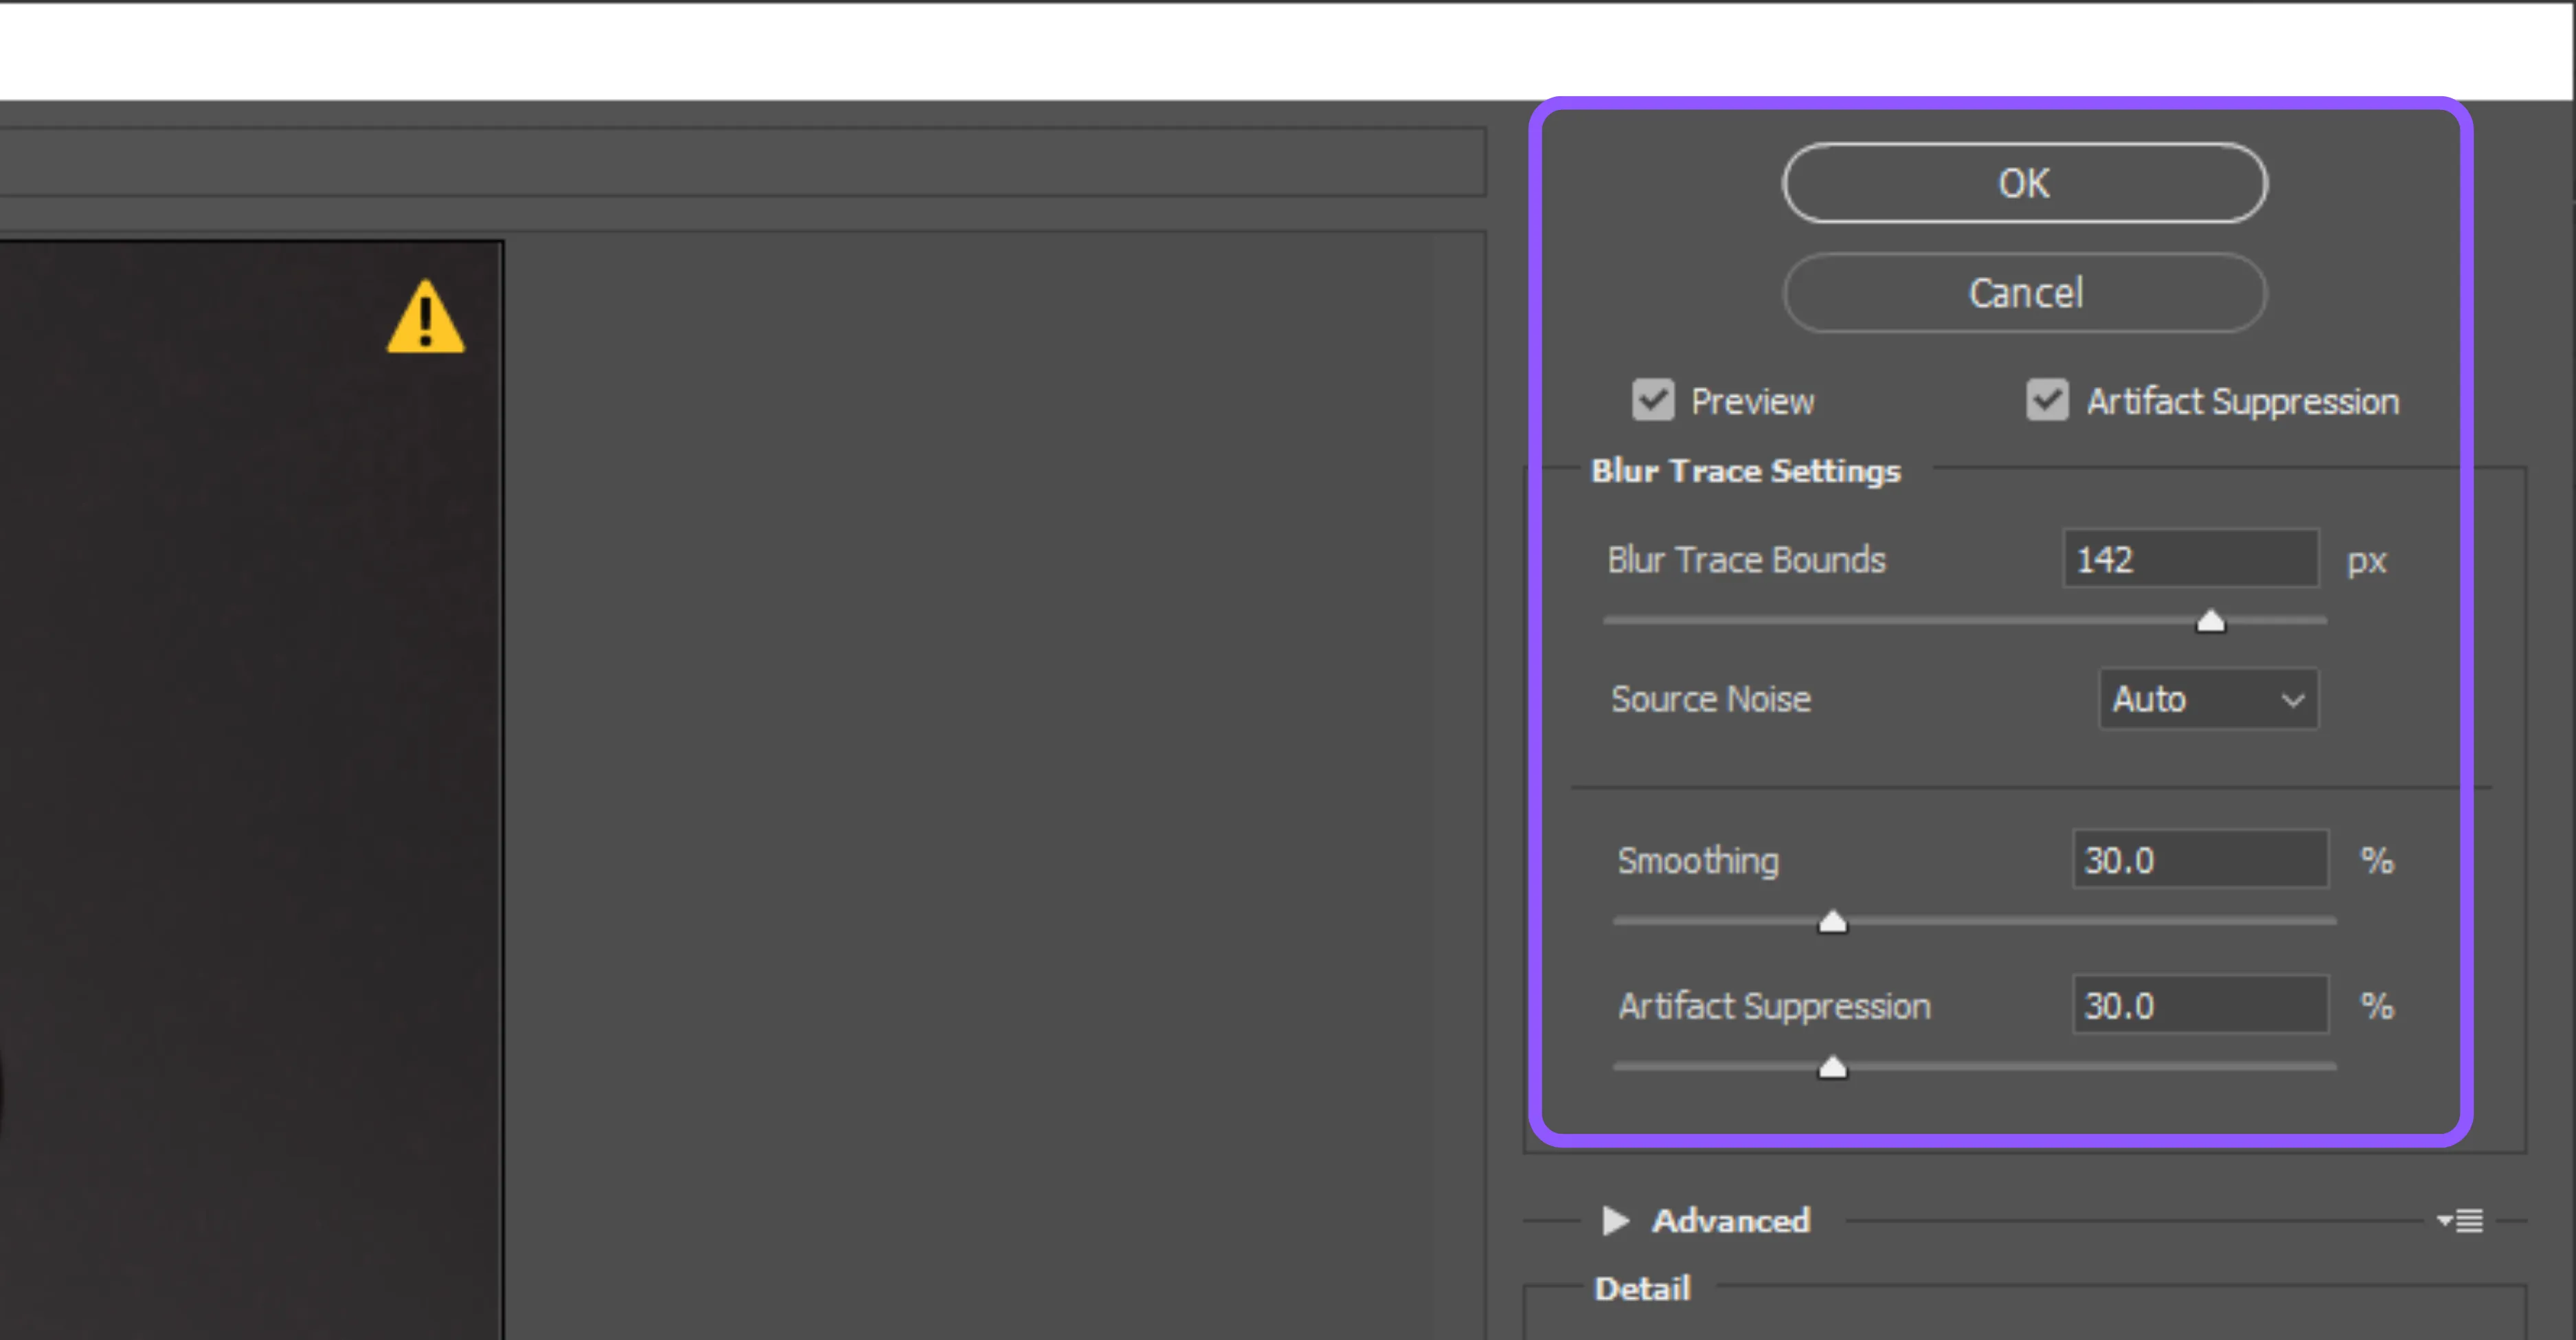
Step 3: A preview window will pop up where you can fine-tune settings like Blur Trace Bounds (how much area Photoshop analyzes) and Smoothing.
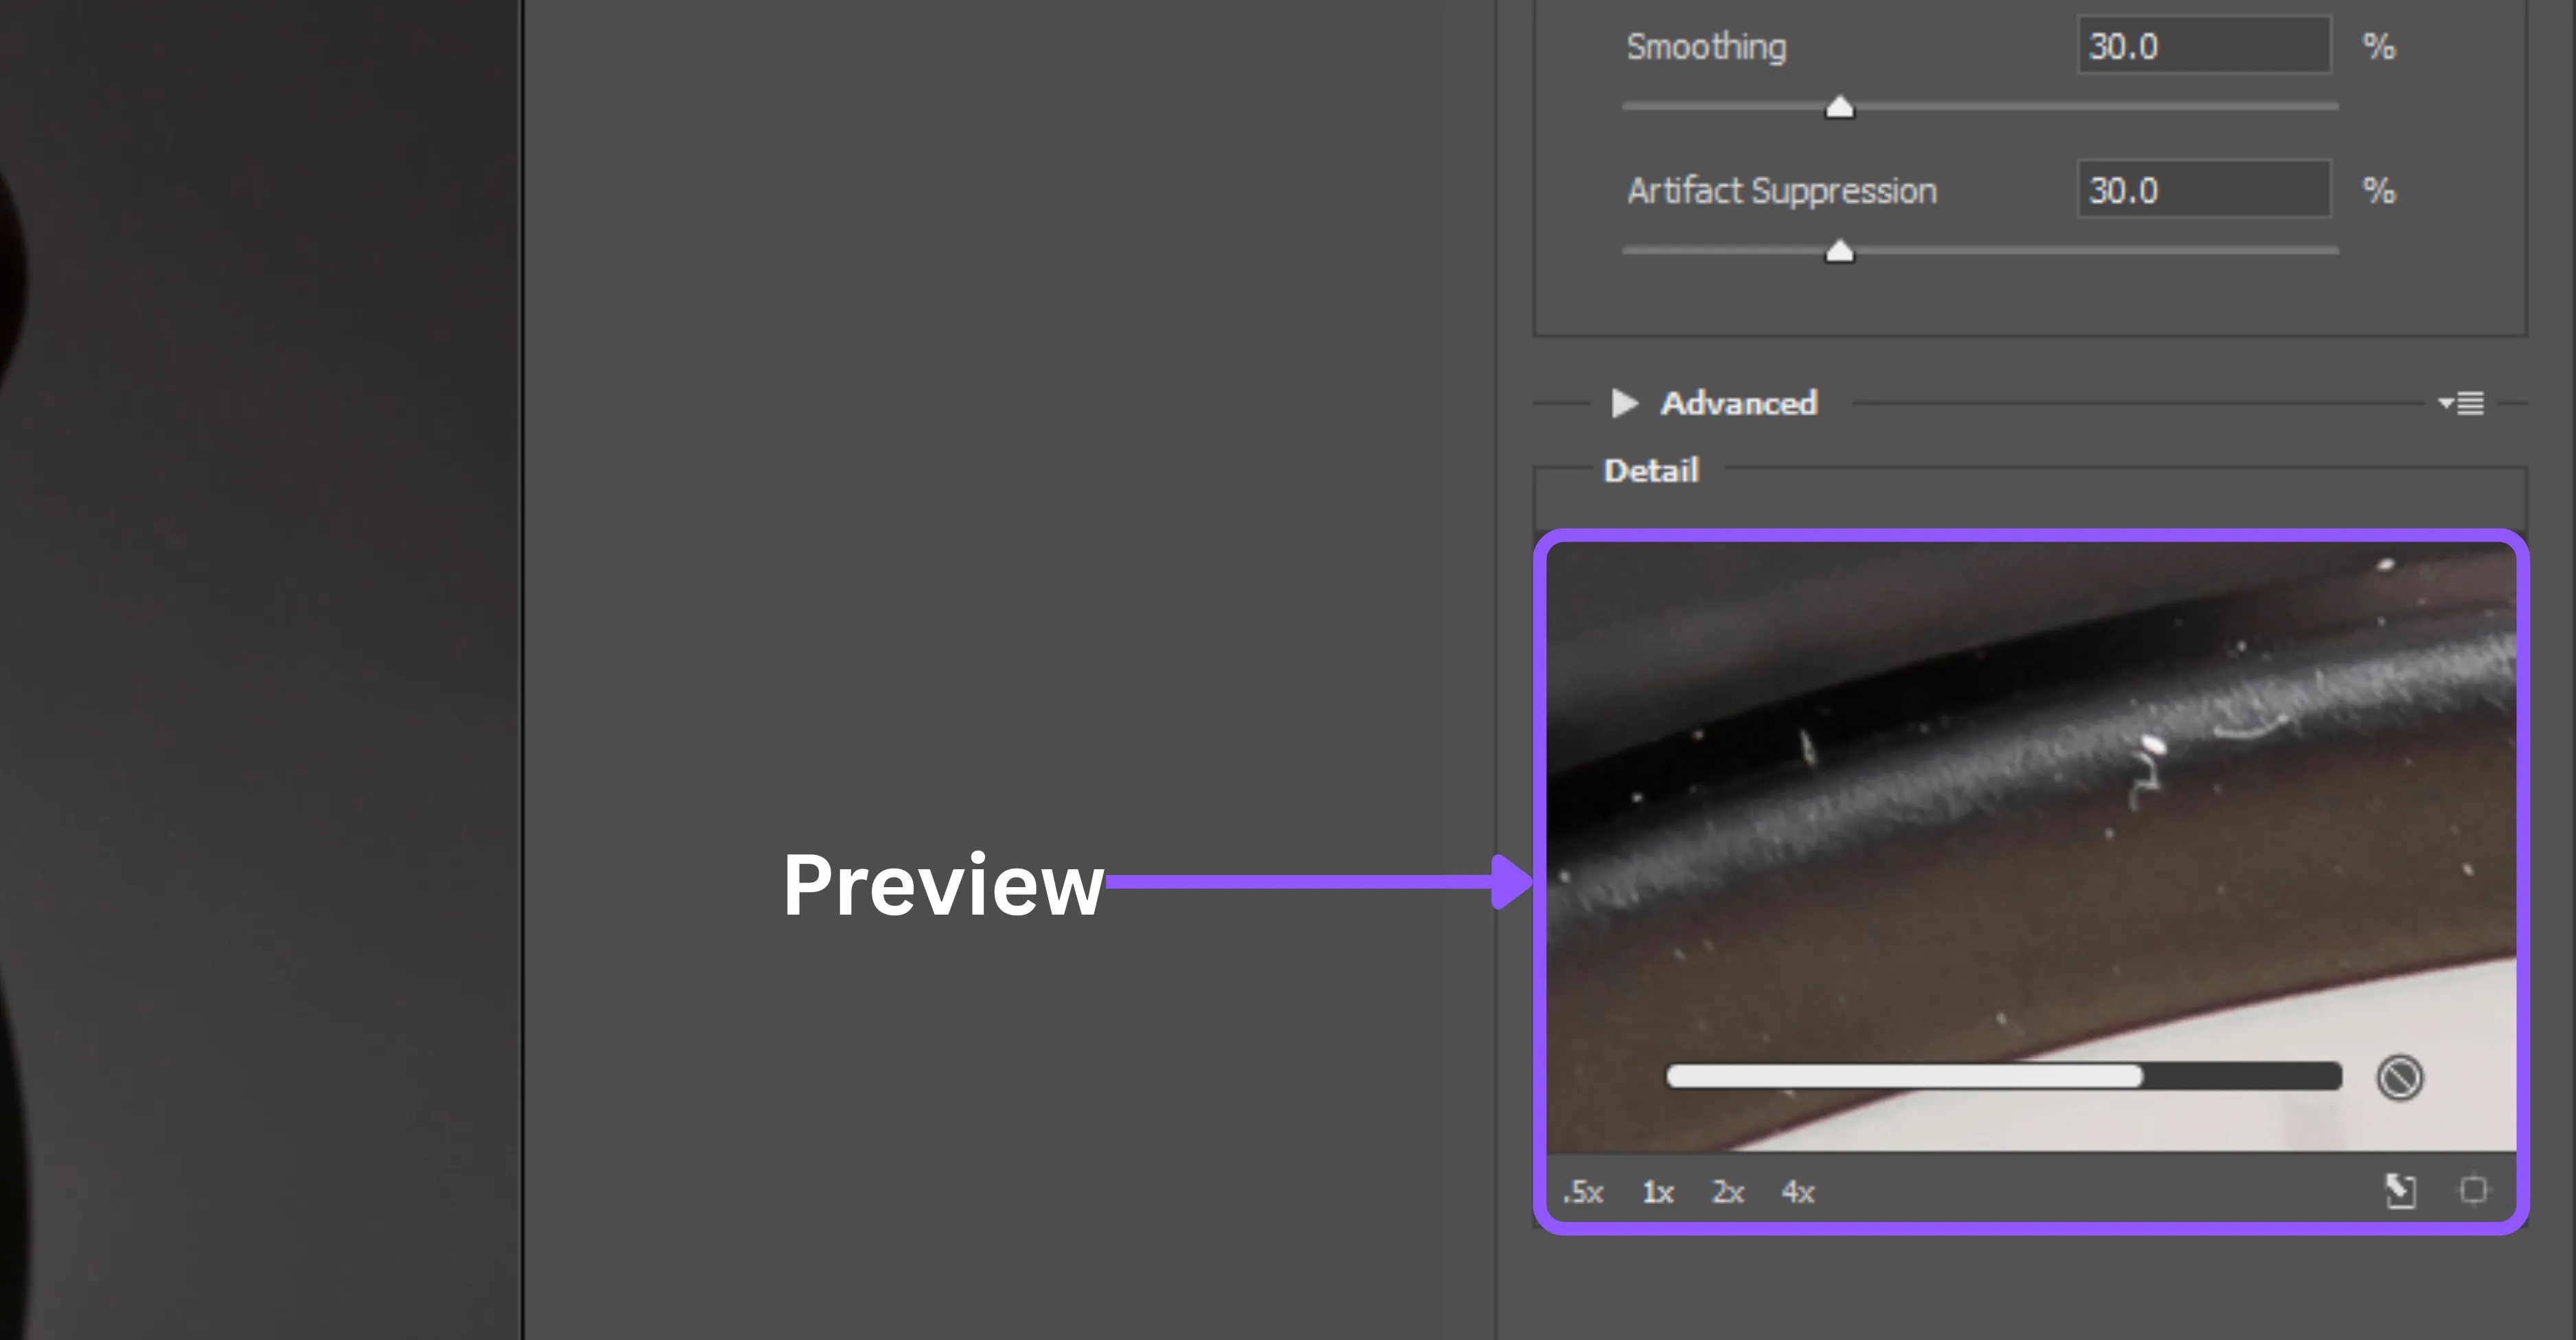
Step 4: Adjust these sliders until the image looks clearer, then hit OK.
NOTE - This works best when the blur is caused by shaky hands or camera shake.
Method 2: Using the Smart Sharpen tool - The Smart Sharpen tool gives you more control over how sharpness is applied.
Step 1: Go to Filter > Sharpen > Smart Sharpen.
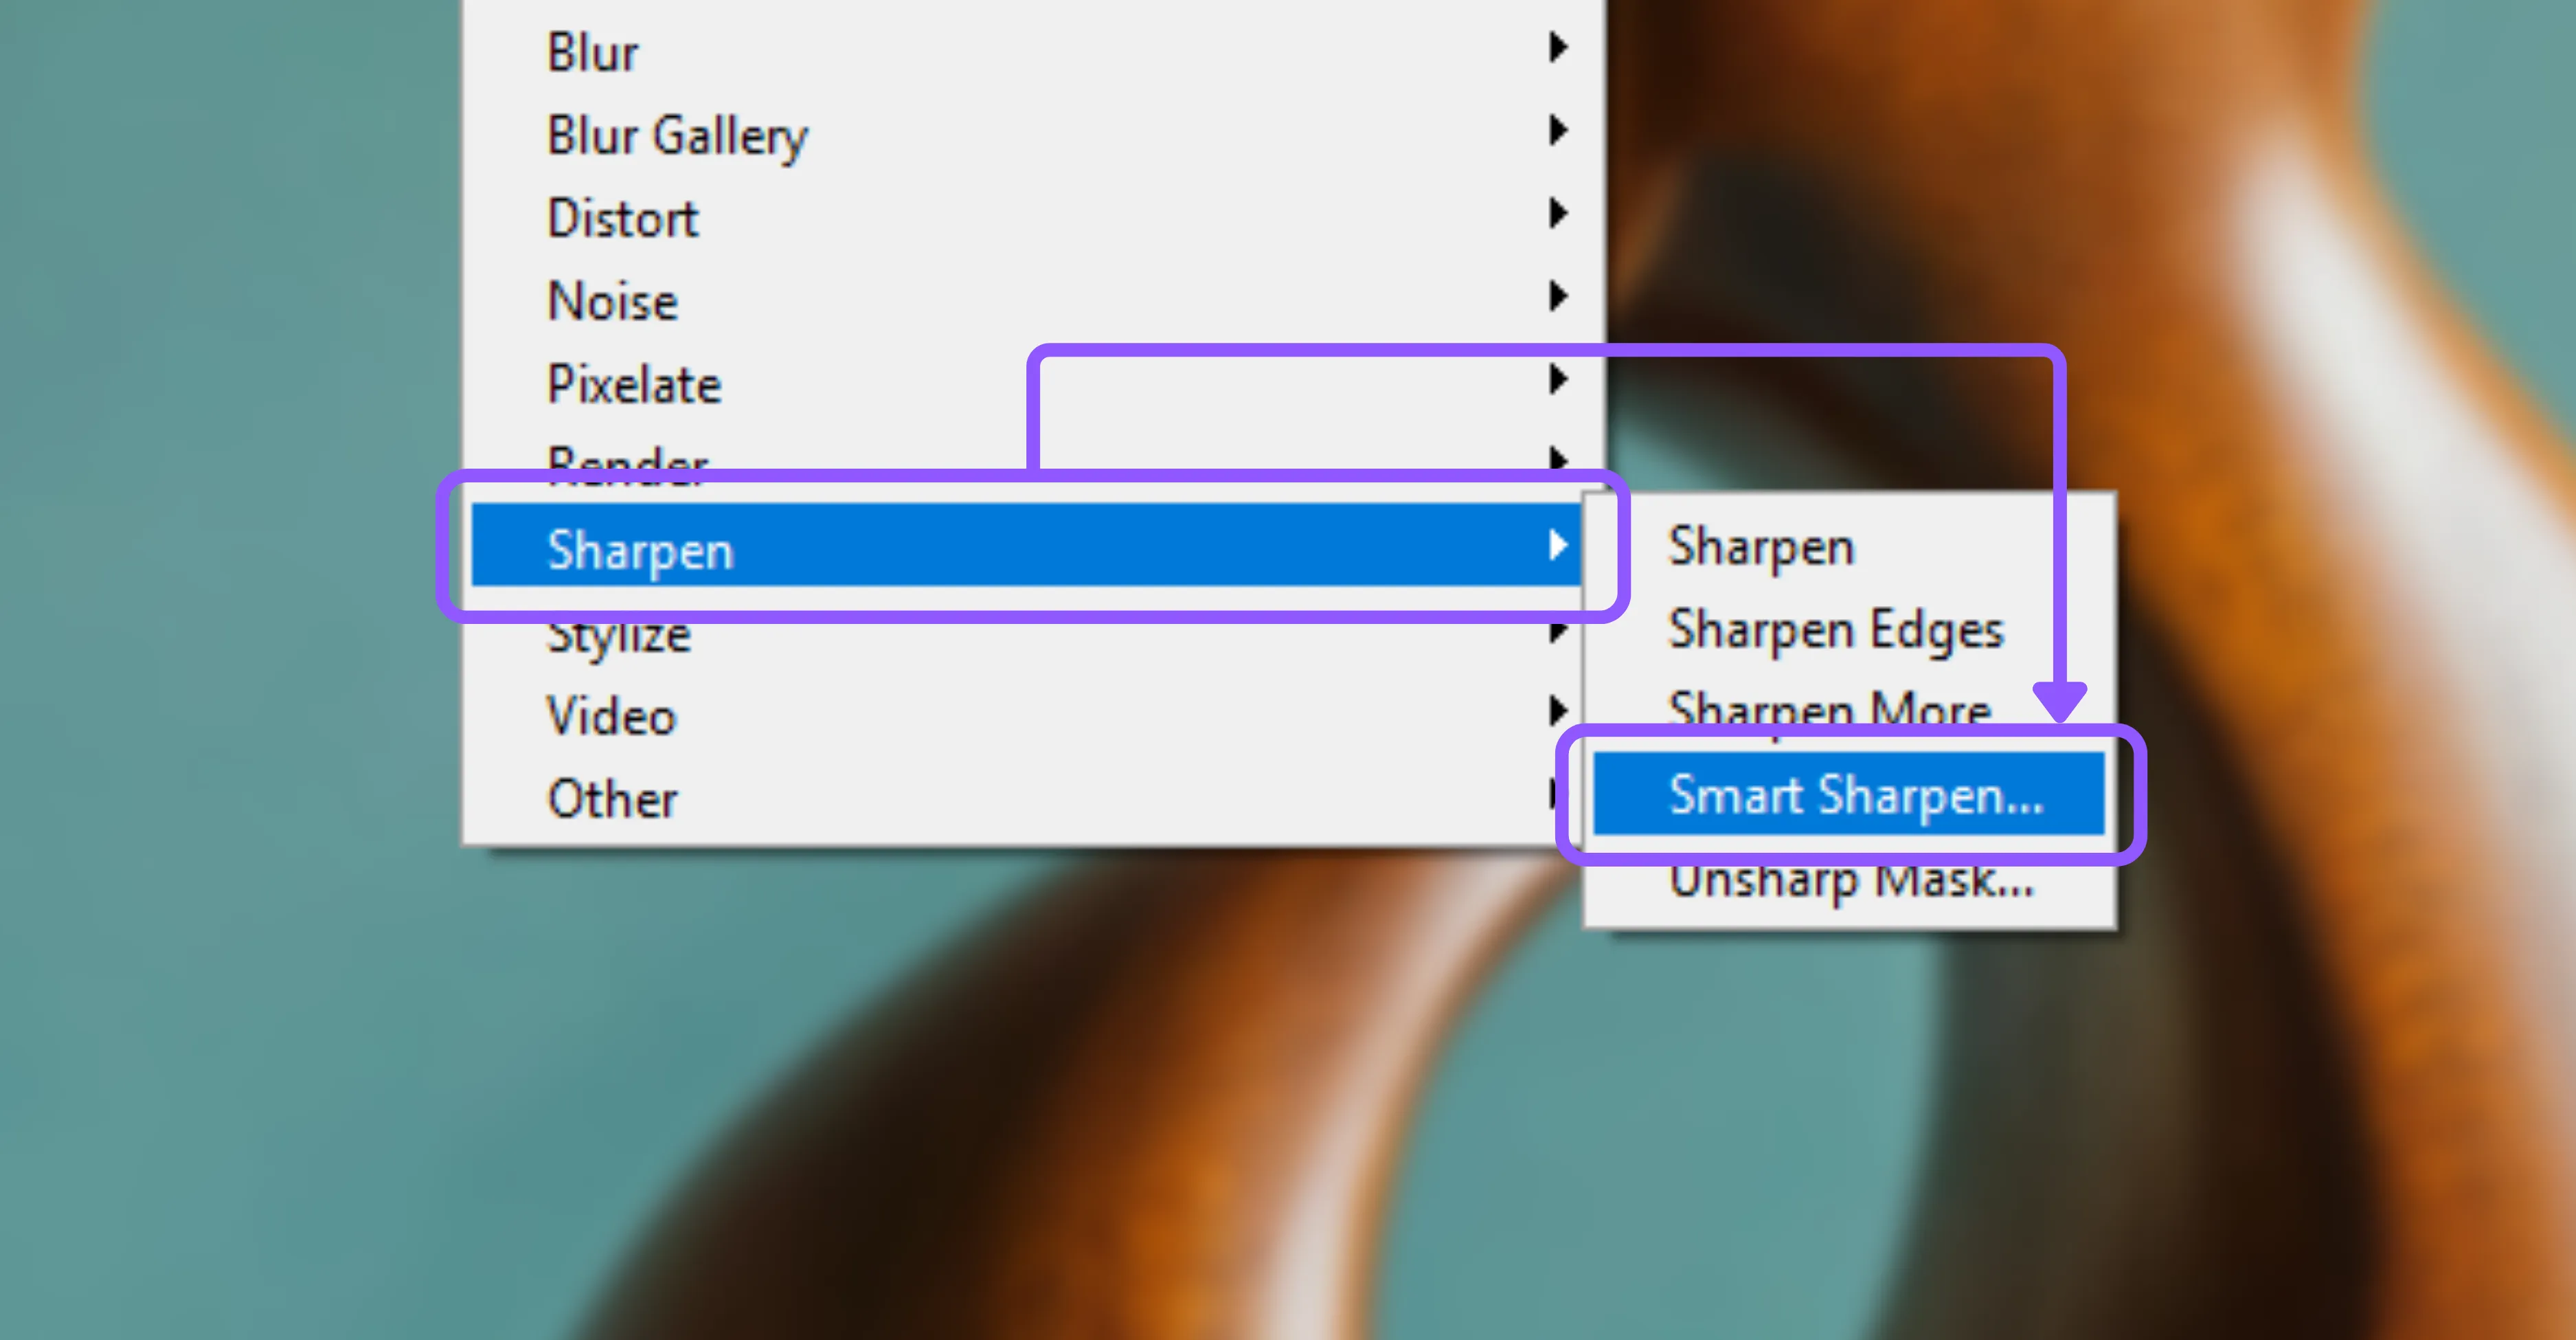
Step 2: In the dialog box, increase the Amount slider (how strong the sharpening is).
Step 3: Adjust the Radius slider (how wide the sharpening effect spreads).

Step 4: Choose Remove: Gaussian Blur/Lens Blur/Motion Blur depending on your photo’s blur type.
Step 5: Check the Preview box to see changes in real time, and when happy, click OK.
NOTE- This method is great for everyday photos that just need a clean, sharper look.
Method 3: Using a high-pass filter for subtle sharpening - the high-pass filter is a classic trick that photographers love. It is subtle but very effective.
Step 1: First, duplicate your image layer (so the original stays safe).
Step 2: Go to Filter > Other > High Pass.
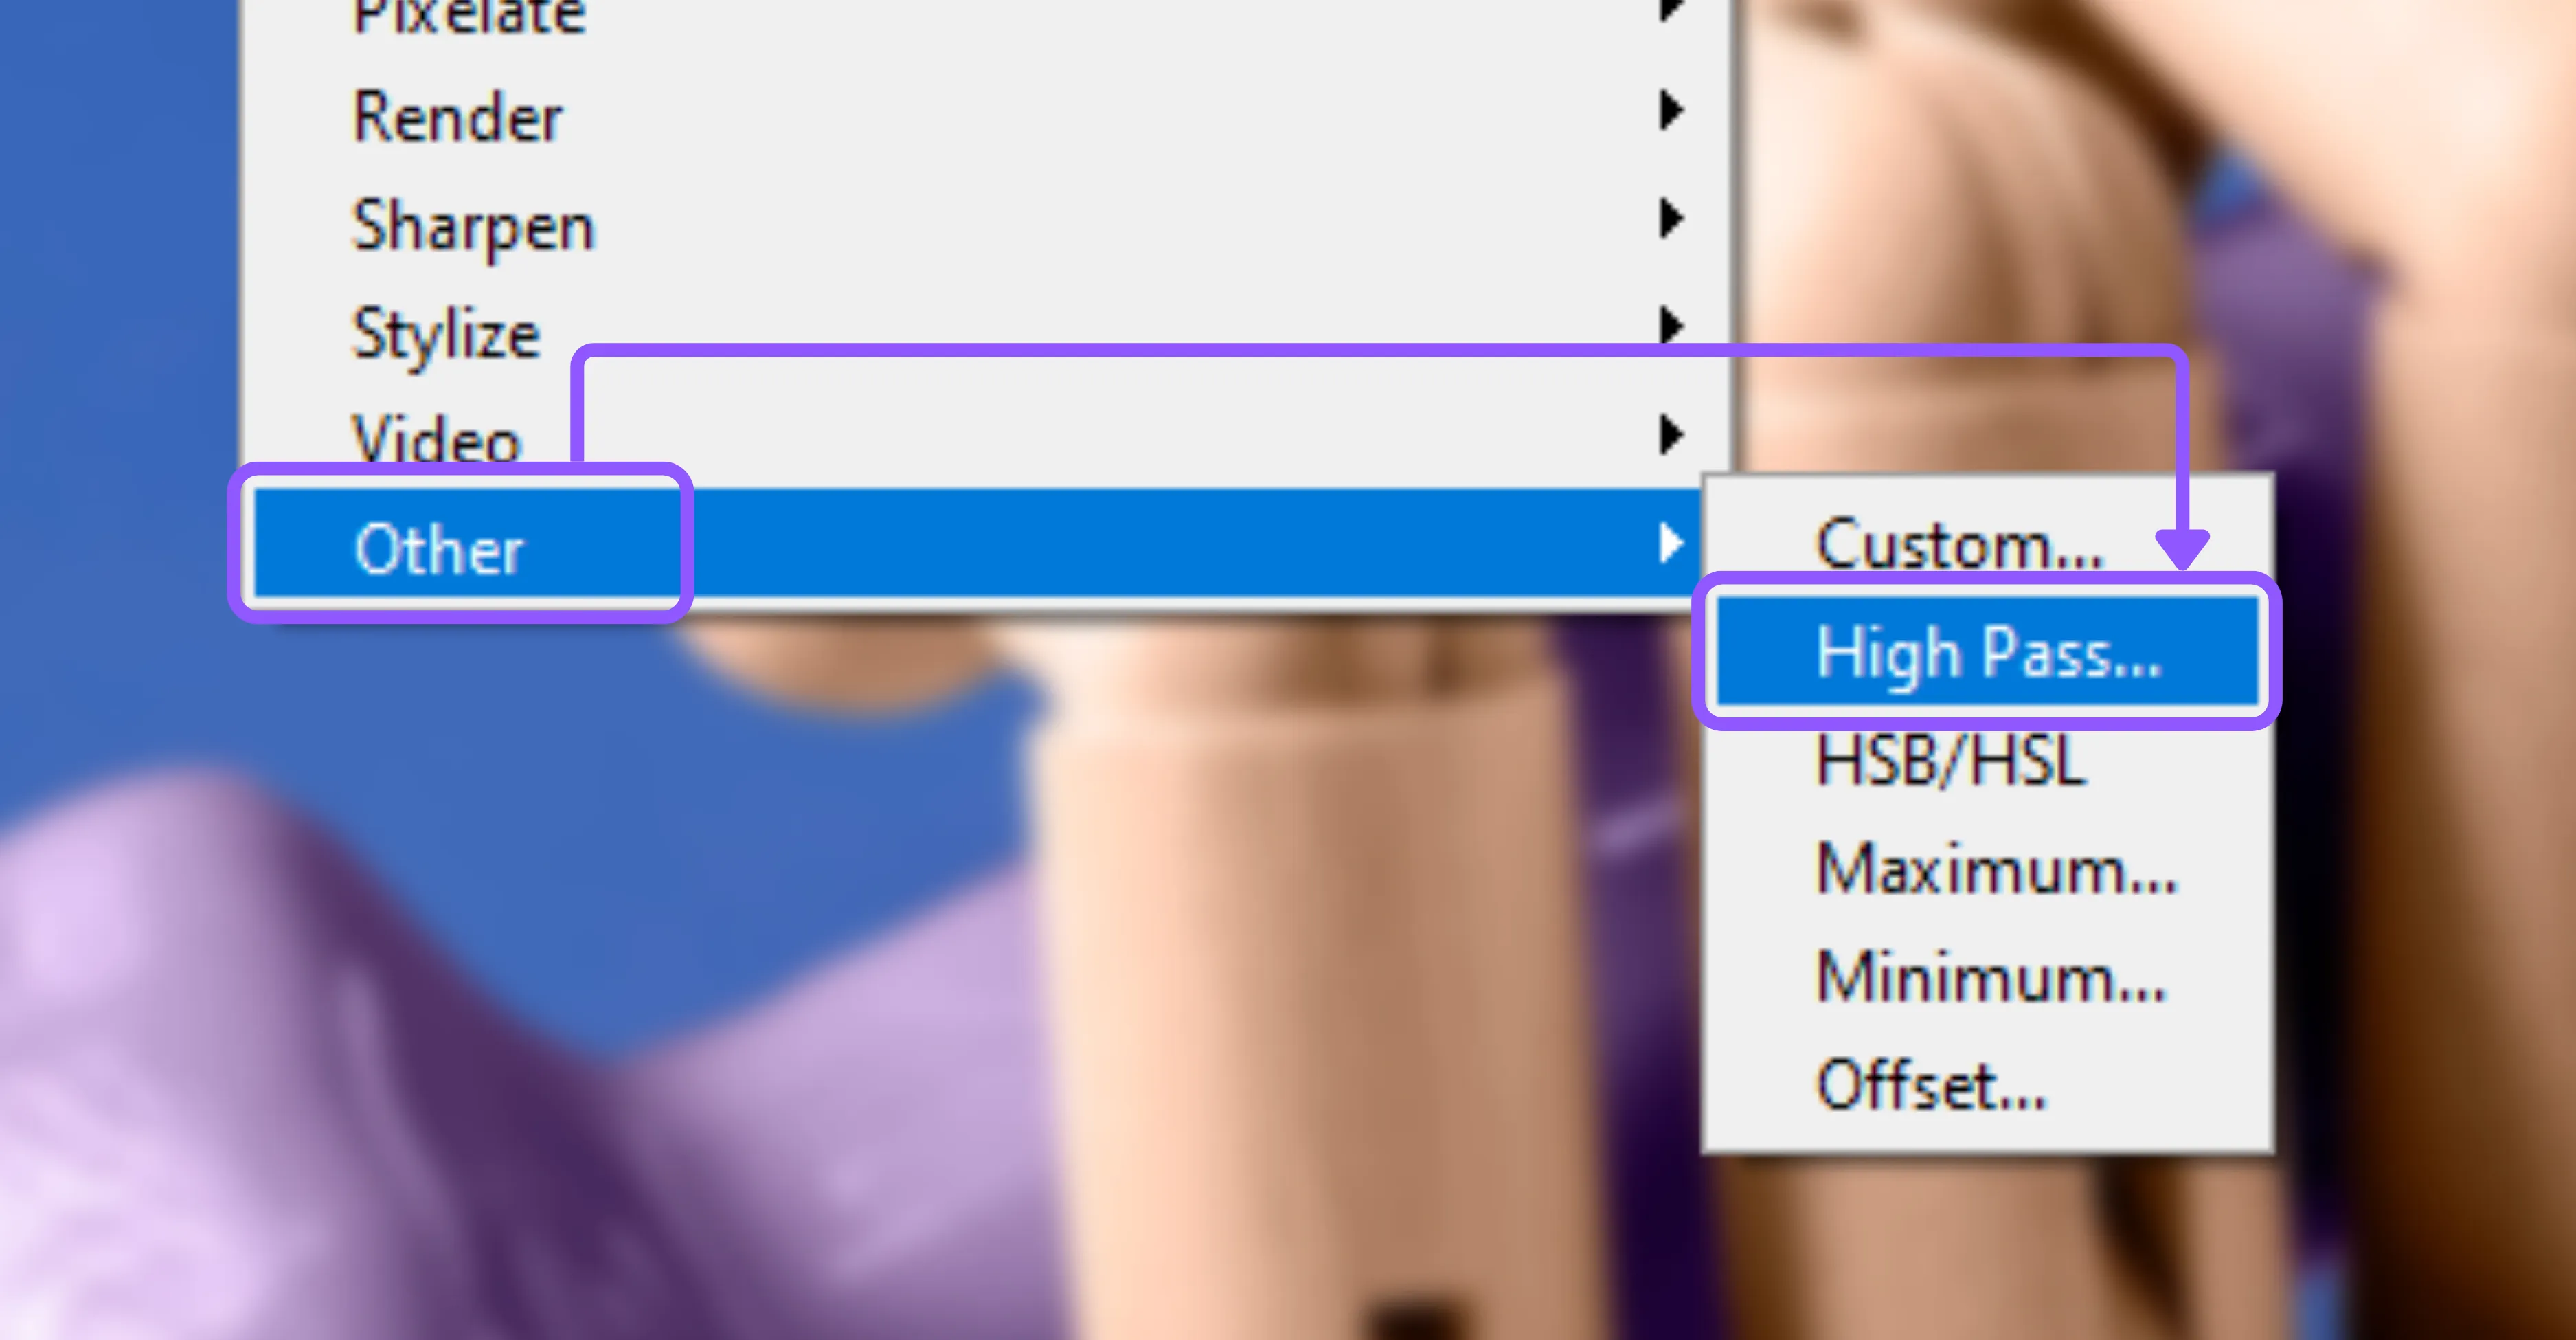
Step 3: A gray preview will appear—set the Radius between 1 and 3 pixels for a light sharpening effect.
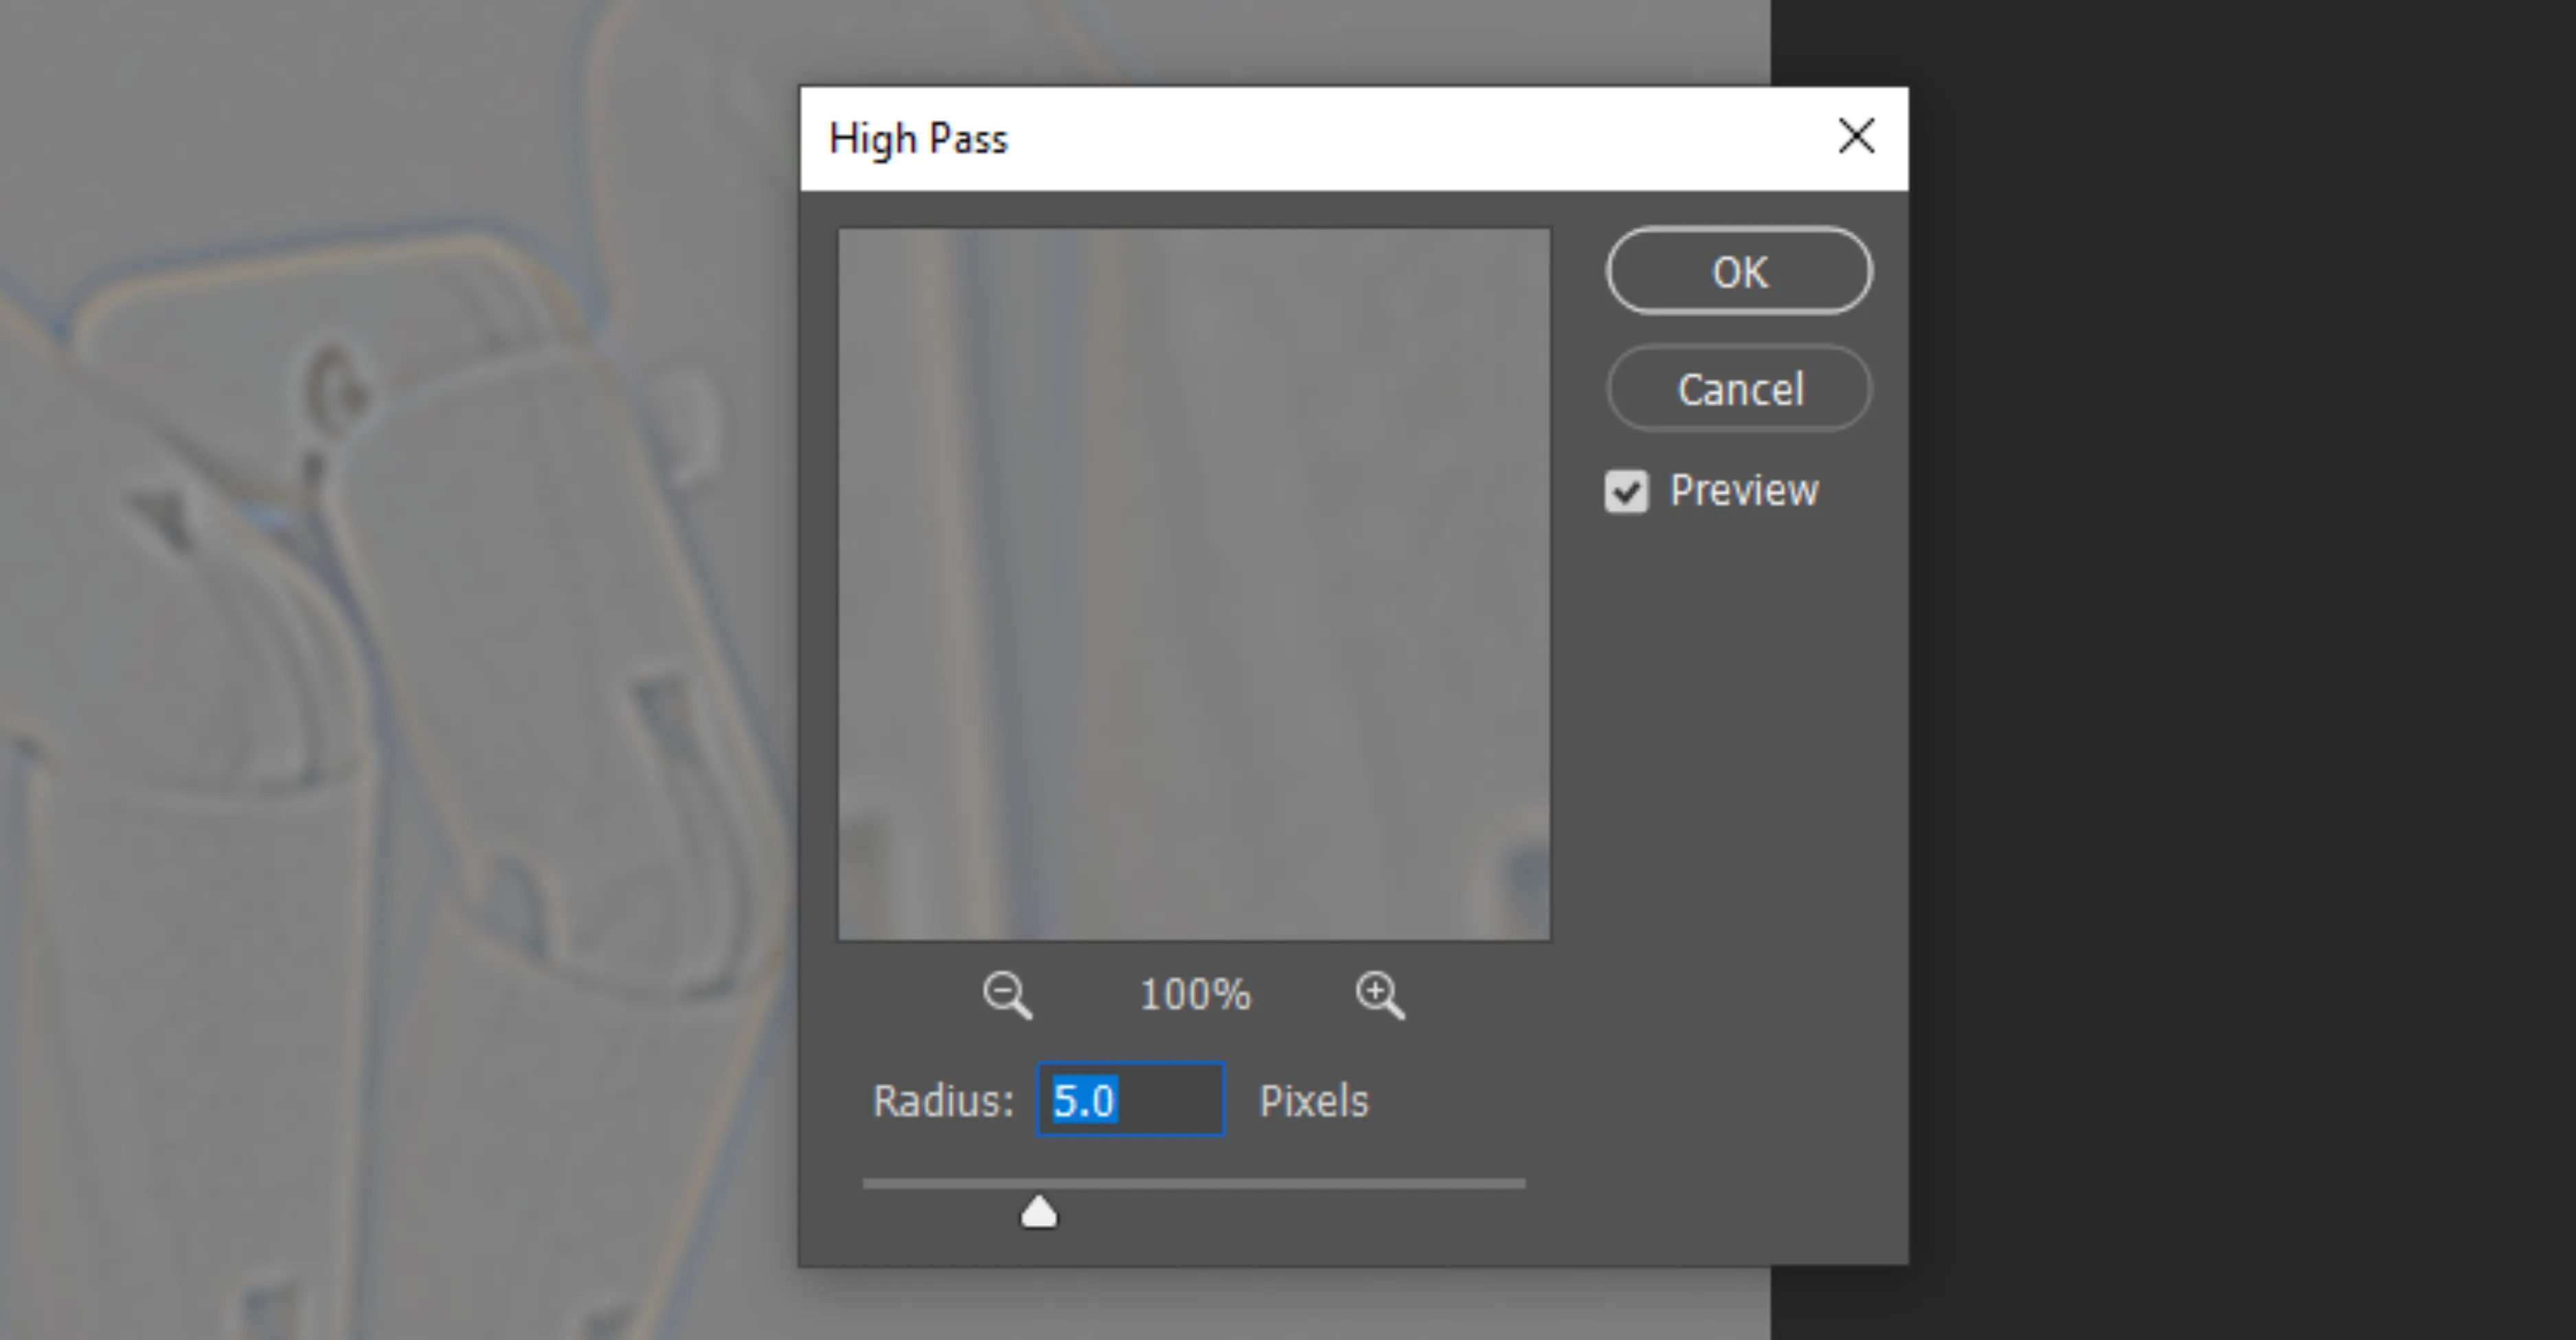
Step 4: Click OK, then go to the Layers panel and change the blending mode of this layer to Overlay (or Soft Light for a gentler effect).
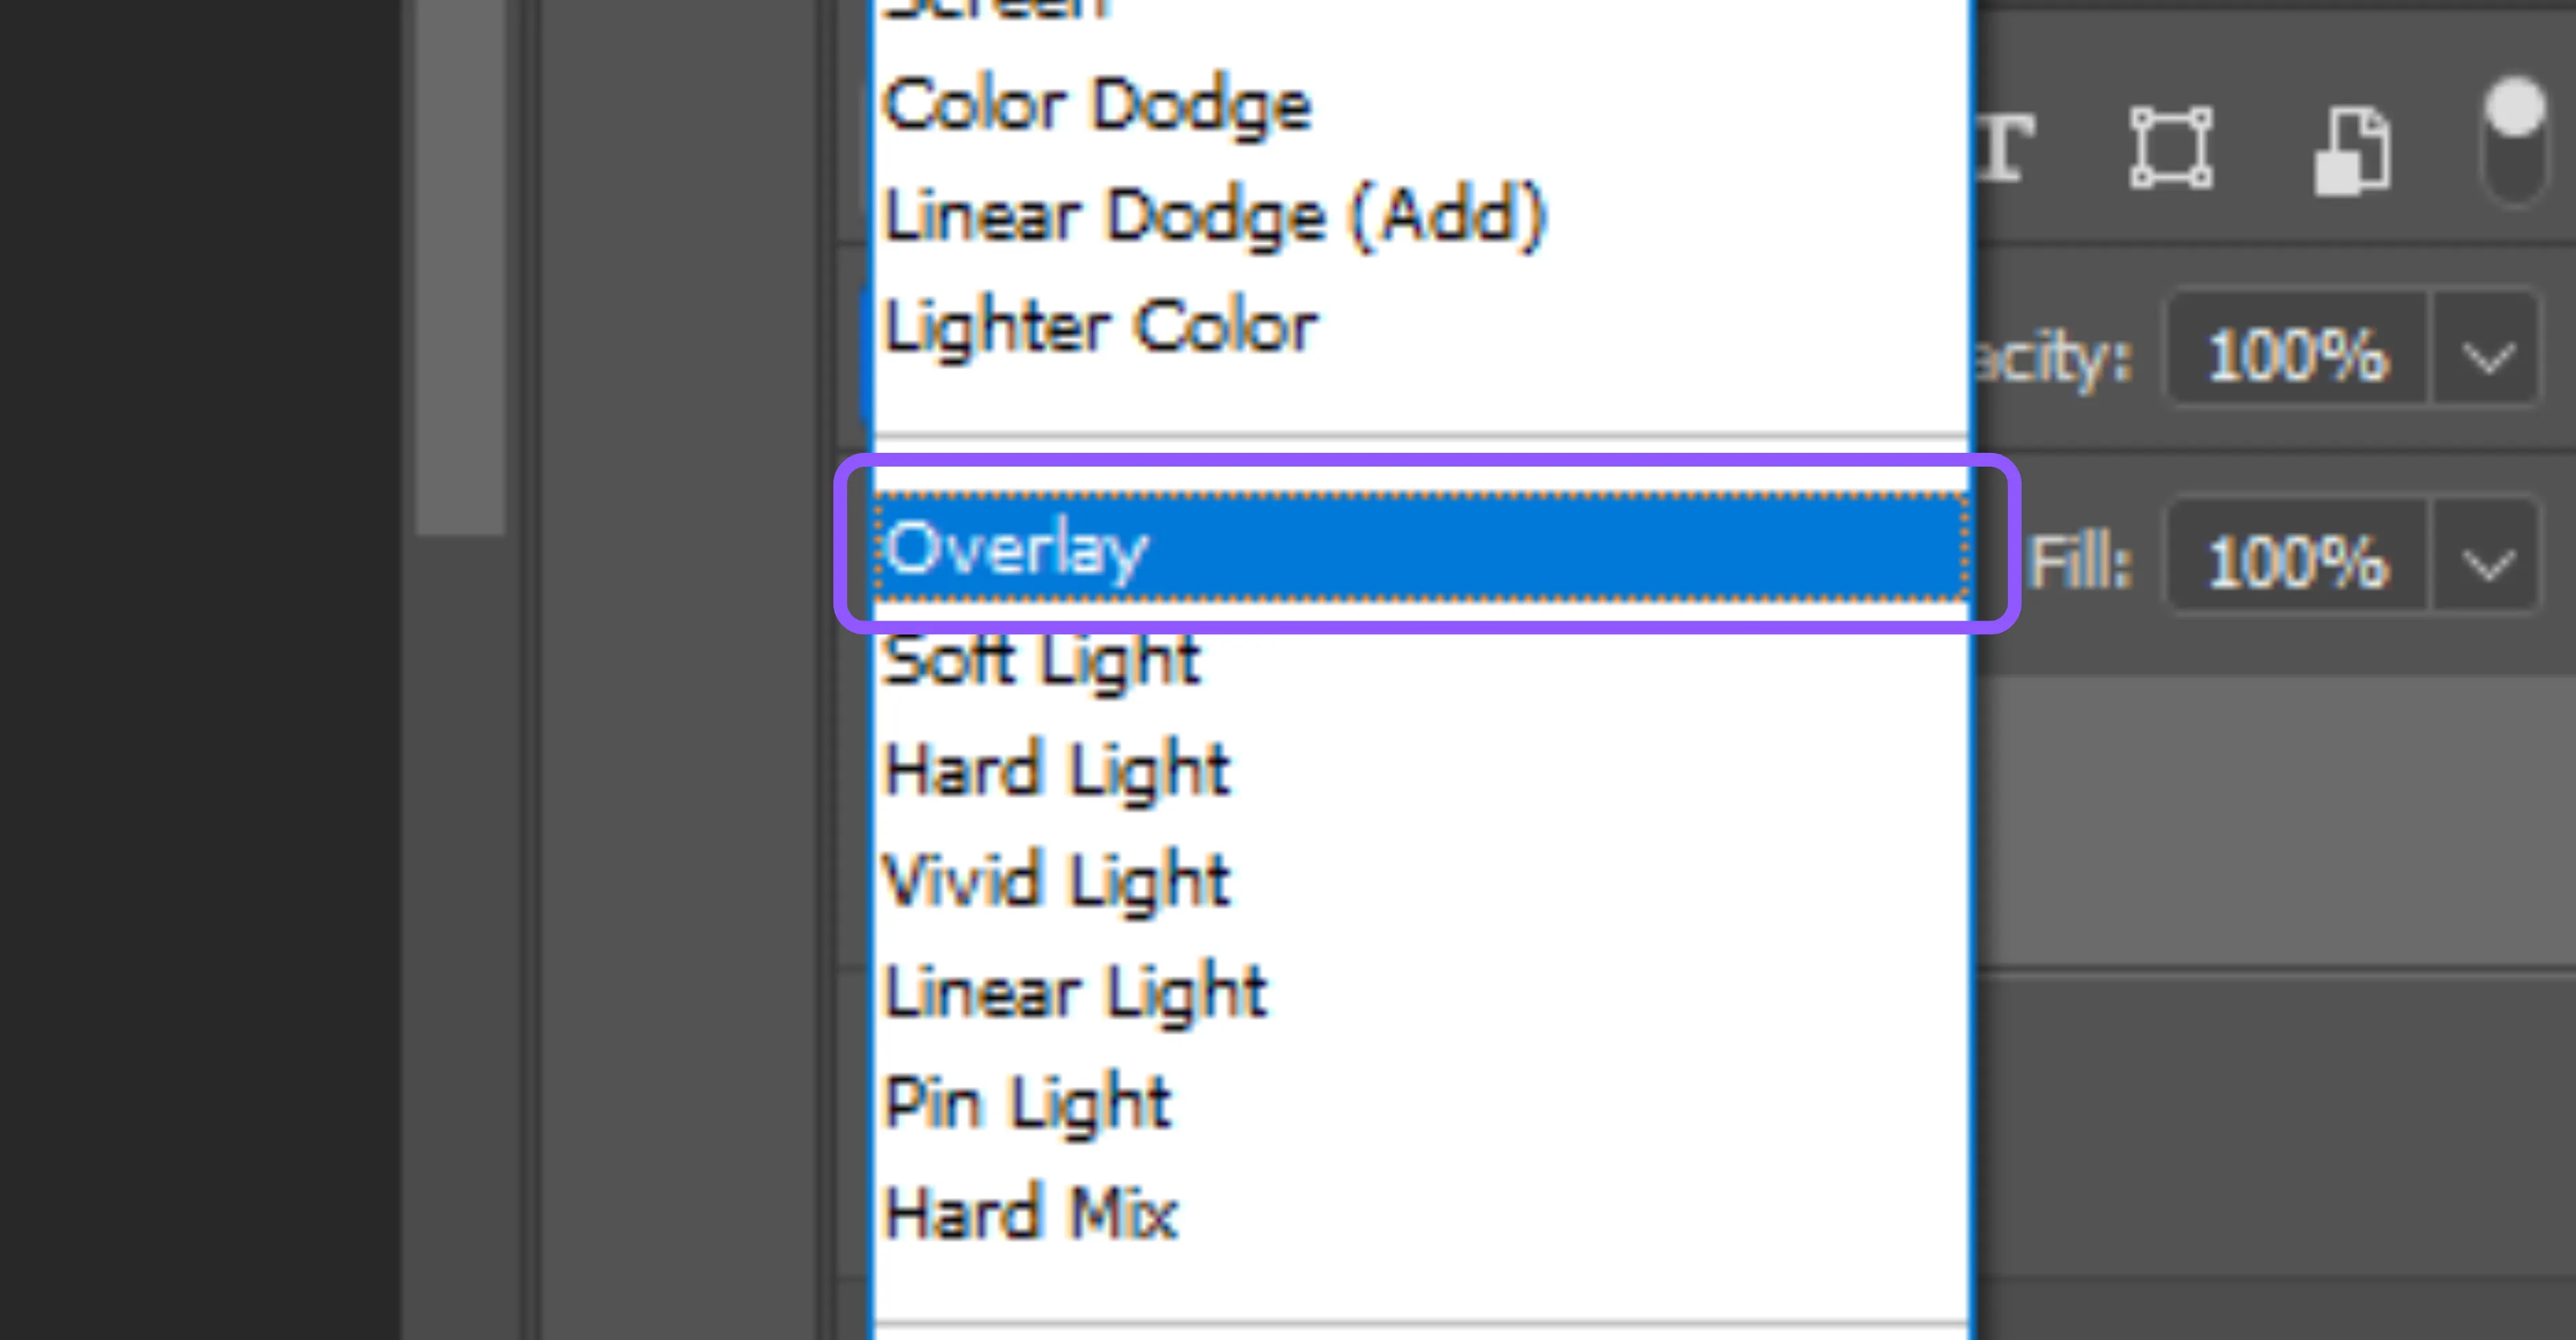
Step 5: If it’s too strong, lower the opacity of the layer until it looks natural.
NOTE - This method is best for fine details, like sharpening eyes in portraits or text on images.
Additional tips for better results
Sharpening tools in Photoshop can do a lot to fix blurry images, but they work best when used carefully. A photo may look grainy or unnatural if edited heavily.
So, it's important to follow a few basic best practices when editing to ensure that your edits remain adaptable and simple to modify in the future. In this section, I will share a few practical tips that will help you get clean, professional-looking results.
- Avoid sharpening too much: Although it may be tempting to raise the sharpening sliders too much, doing so may result in noise (grainy dots) or edge halos. Always zoom in to 100% and stop when the image appears natural but clear.
- Work in layers: Create a duplicate layer of the image (or use Smart Objects) before sharpening. This helps modify or eliminate the effect at any time without having to start over, and your original photo remains unaltered.
- Try resizing or cropping: Sometimes, instead of forcing too much sharpening, simply reducing the image size can make it appear clearer. Cropping out very blurry areas also improves the overall look.
- Use noise reduction filters: If the image appears grainy after sharpening, adjust it by selecting Filter > Noise > Reduce Noise. This will keep the details visible while smoothing out the rough spots.
Keep these useful tips in mind while editing images in Photoshop to get sharper photos without making them look fake or over-edited.
Top 10 AI tools to unblur images
1. Pixelbin.io
Create, edit, and optimize visuals with just a few clicks. The tool automatically sharpens edges, reduces noise, and brings out finer details lost in blur. It has an intuitive interface that makes it beginner-friendly while still giving professional-quality results.
You can edit multiple image formats on this platform. It is a cloud-based solution; a user doesn't need to install heavy software, making it a good choice for quick and hassle-free image unblurring.
Steps to unblur images using Pixelbin
Step 1: Visit the Pixelbin website and sign up for a free account.
Step 2: Go to the Apps tab and click on Unblur images.
Step 3: Upload the image you want to unblur.
Step 4: After uploading the image, you will receive a deblurred image that you can download.
2. YouCam Enhance
A mobile-based application designed to fix blurry and low-quality photos. It is powered by AI and loved by smartphone users who want to enhance their selfies or casual photos. It sharpens details, adjusts lighting, and enhances colors to deliver natural-looking pictures.
Upscale your image without compromising the quality of the pictures, making them suitable for printing or sharing online. This application integrates with social media, which allows users to directly share their enhanced images with a single click.
Steps to unblur the image using YouCam Enhance
Step 1: Visit the Youcam and sign up. Then, click on products> photo enhancer.
Step 2: Upload the image you want to unblur.
Step 3: After uploading the image, you will get a clear one in one click.
3. Topaz Photo AI
Topaz Photo AI is a professional-grade image enhancement software widely used by photographers and editors. It automatically applies the best corrections after using machine learning to identify low resolution, noise, and blur. It is known for its precision in sharpening, making blurry edges look crisp without adding unnatural artifacts.
It includes denoising and upscaling features, offering all-around photo improvements. It saves time by supporting batch processing and high-resolution editing across multiple photos.
Steps to unblur images using Topaz Photo AI
Step 1: Visit the Topaz and sign up. Click on New webapps > unblur.
Step 2: Upload the image you want to deblur and get the result in one click.
4. VanceAI Image Enhancer
It offers both a web-based tool (no installation needed) and a desktop app with multiple AI modes for blur removal and photo upscaling. For web-based, you simply have to go to Image Sharpening and upload the image you want to enhance.
It supports batch processing to fix many photos at once. Great for both casual and professional use. Below are the given steps needed for the desktop version of VanceAI image enhancer.
For Desktop App -
Step 1: Visit the VanceAI and download the VanceAI PC.
Step 2: Once the download completes, launch the installer.
Step 3: Choose the option given on the screen. To deblur the image, choose - sharpen.
Step 4: Choose the image you want to deblur.
Step 5: After choosing the file, you will get the enhanced picture.
5. Remini
A mobile-first app (iOS & Android) known for restoring old and blurry portraits. AI enhances facial details and increases resolution. Perfect for reviving family photos or selfies. The tool can transform low-quality, pixelated images into sharp, high-definition versions.
It supports video enhancement that can be used to unblur a moving image. The app is basically made for daily use; even non-professionals who want fast results can use it. Its ability to revive old photos and bring out hidden details has made it a favorite among users.
Steps to unblur the image using Remini
Step 1: Visit the Remini and click on Enhance > Unblur & Sharpen.
Step 2: Click on enhance on Remini web and upload a photo.
Step 3: Choose a file that you want to deblur.
Step 4: You will get a before-and-after of the uploaded image. Download it.
6. Artguru AI Unblur
A free online tool that requires no signup. Quickly sharpens faces, old images, and low-quality photos. Very easy to use with instant results. Artguru is more than just unblurring; it also provides creative editing options like background changes and AI-generated art.
It has a simple interface that makes it accessible to beginners, while still offering powerful results that rival professional editing tools. Artguru allows for enhancing and personalizing images by combining unblurring with artistic enhancements.
Steps to unblur the image using Artguru
Step 1: Visit the Artguru.
Step 2: Click on the photo enhancer and upload the image.
Step 3: After uploading the image, you will get an enhanced version of your uploaded image.
7. Fotor
Fotor AI Unblur is a dedicated feature within the Fotor editing platform that helps users restore clarity to blurry images. It uses artificial intelligence to identify and sharpen blurred areas while retaining natural textures. The tool is adaptable for a variety of use cases and performs well in product, landscape, and portrait photography.
It consists of a comprehensive set of editing tools, such as color correction, unblurring, retouching, and filters. Since it’s available both online and as an app, Fotor AI Unblur provides flexibility for quick edits anytime, anywhere.
Steps to unblur images using Fotor AI unblur
Step 1: Visit the Fotor and sign up.
Step 2: Click on online photo editor > unblur image.
Step 3: Click on unblur image now > upload image.
Step 4: After uploading the image, you will get an enhanced version of your photo.
8. Picsart
It is an all-in-one photo editing app that helps preserve details lost due to motion blur or poor-quality clicks. It is used for both creative and casual editing because it offers filters, overlays, and advanced retouching options along with unblurring.
The reason behind its popularity is that it supports social media integrations, which allows users to share their images instantly. One notable feature of Picsart is its community-driven platform, which allows users to experiment with and imitate different editing styles.
Steps to unblur images using Picsart
Step 1: Visit the Picsart and sign up.
Step 2: Browse the file and upload it.
Step 3: It will process the image and produce an enhanced version.
9. PicWish
Free online service (also has a desktop app) with AI modes for faces, text, and general photos. Offers watermark-free downloads and batch processing. Great for bulk edits. Images appear sharper and more polished due to the AI engine's automatic enhancement of sharpness and removal of unwanted fuzziness.
PicWish is especially helpful for casual users who want to edit their daily photos and for e-commerce sellers who require clear product images. Overall, it provides a fast, easy, and reliable way to sharpen blurry photos.
Steps to unblur images using PicWish
Step 1: Visit the PicWish and sign up.
Step 2: Click on tools > enhance photo.
Step 3: Now upload the image and get the enhanced image.
10. Neural Love Image Sharpener
It is a cutting-edge AI-powered tool that accurately restores clarity to blurry images. It uses deep learning to analyze image patterns and reconstruct lost details, making photos appear sharper and more defined. It is popular for its ability to manage complex blurs, including motion blur and low-resolution issues, while preserving a realistic appearance.
This platform provides features for style transfer, upscaling, and AI art creation. It is a full suite of AI-based creative tools, not just a sharpener. Its online accessibility ensures anyone can use it without technical skills.
Steps to unblur images using Neural Love
Step 1: Visit the Neural Love and sign up.
Step 2: On the left-hand side, click on Tool > ImageSharpening.
Step 3: Upload the image you want to unblur and get the result instantly.
Conclusion
Fixing blurry images is no longer a struggle - whether you’re using Photoshop tools like Shake Reduction, Smart Sharpen, and High Pass filters or relying on modern AI-powered apps. Photoshop gives you control and precision, while AI tools offer speed and simplicity for beginners and non-designers.
Selecting the appropriate approach for your needs is crucial. AI tools such as Pixelbin.io, YouCam Enhance, Remini, or Fotor are great for one-click fixes. Photoshop or Topaz Photo AI are still the best options for editing at a professional level.
In the end, no tool can fully restore every blurry image, but with the correct methods and AI assistance, you can preserve priceless moments, bring out details, and produce clear, polished photos.
FAQs
Not always. Photoshop can reduce blur and make a photo look much clearer, but if the image is extremely out of focus or too shaky, it may not return to perfect quality. The goal is improvement, not perfection.
Blurriness usually comes from camera shake, subject motion, low resolution, or focusing errors. Poor lighting and slow shutter speeds also add to the problem.
The most effective tools are Shake Reduction, Smart Sharpen, and the High Pass Filter method. Each tool works differently; the right one depends on the type of blur you have.
No. For motion blur brought on by camera shake, it is most effective. High Pass or Smart Sharpen might produce better results if the blur is caused by focus or lens issues.
Yes, always. Non-destructive editing is ensured by duplicating the layer or turning it into a Smart Object, allowing you to go back if something doesn't look right.
No. There are many AI-powered tools like Pixelbin, YouCam Enhance, Remini, and VanceAI that make the process automatic. They’re great alternatives if Photoshop feels too complex.