

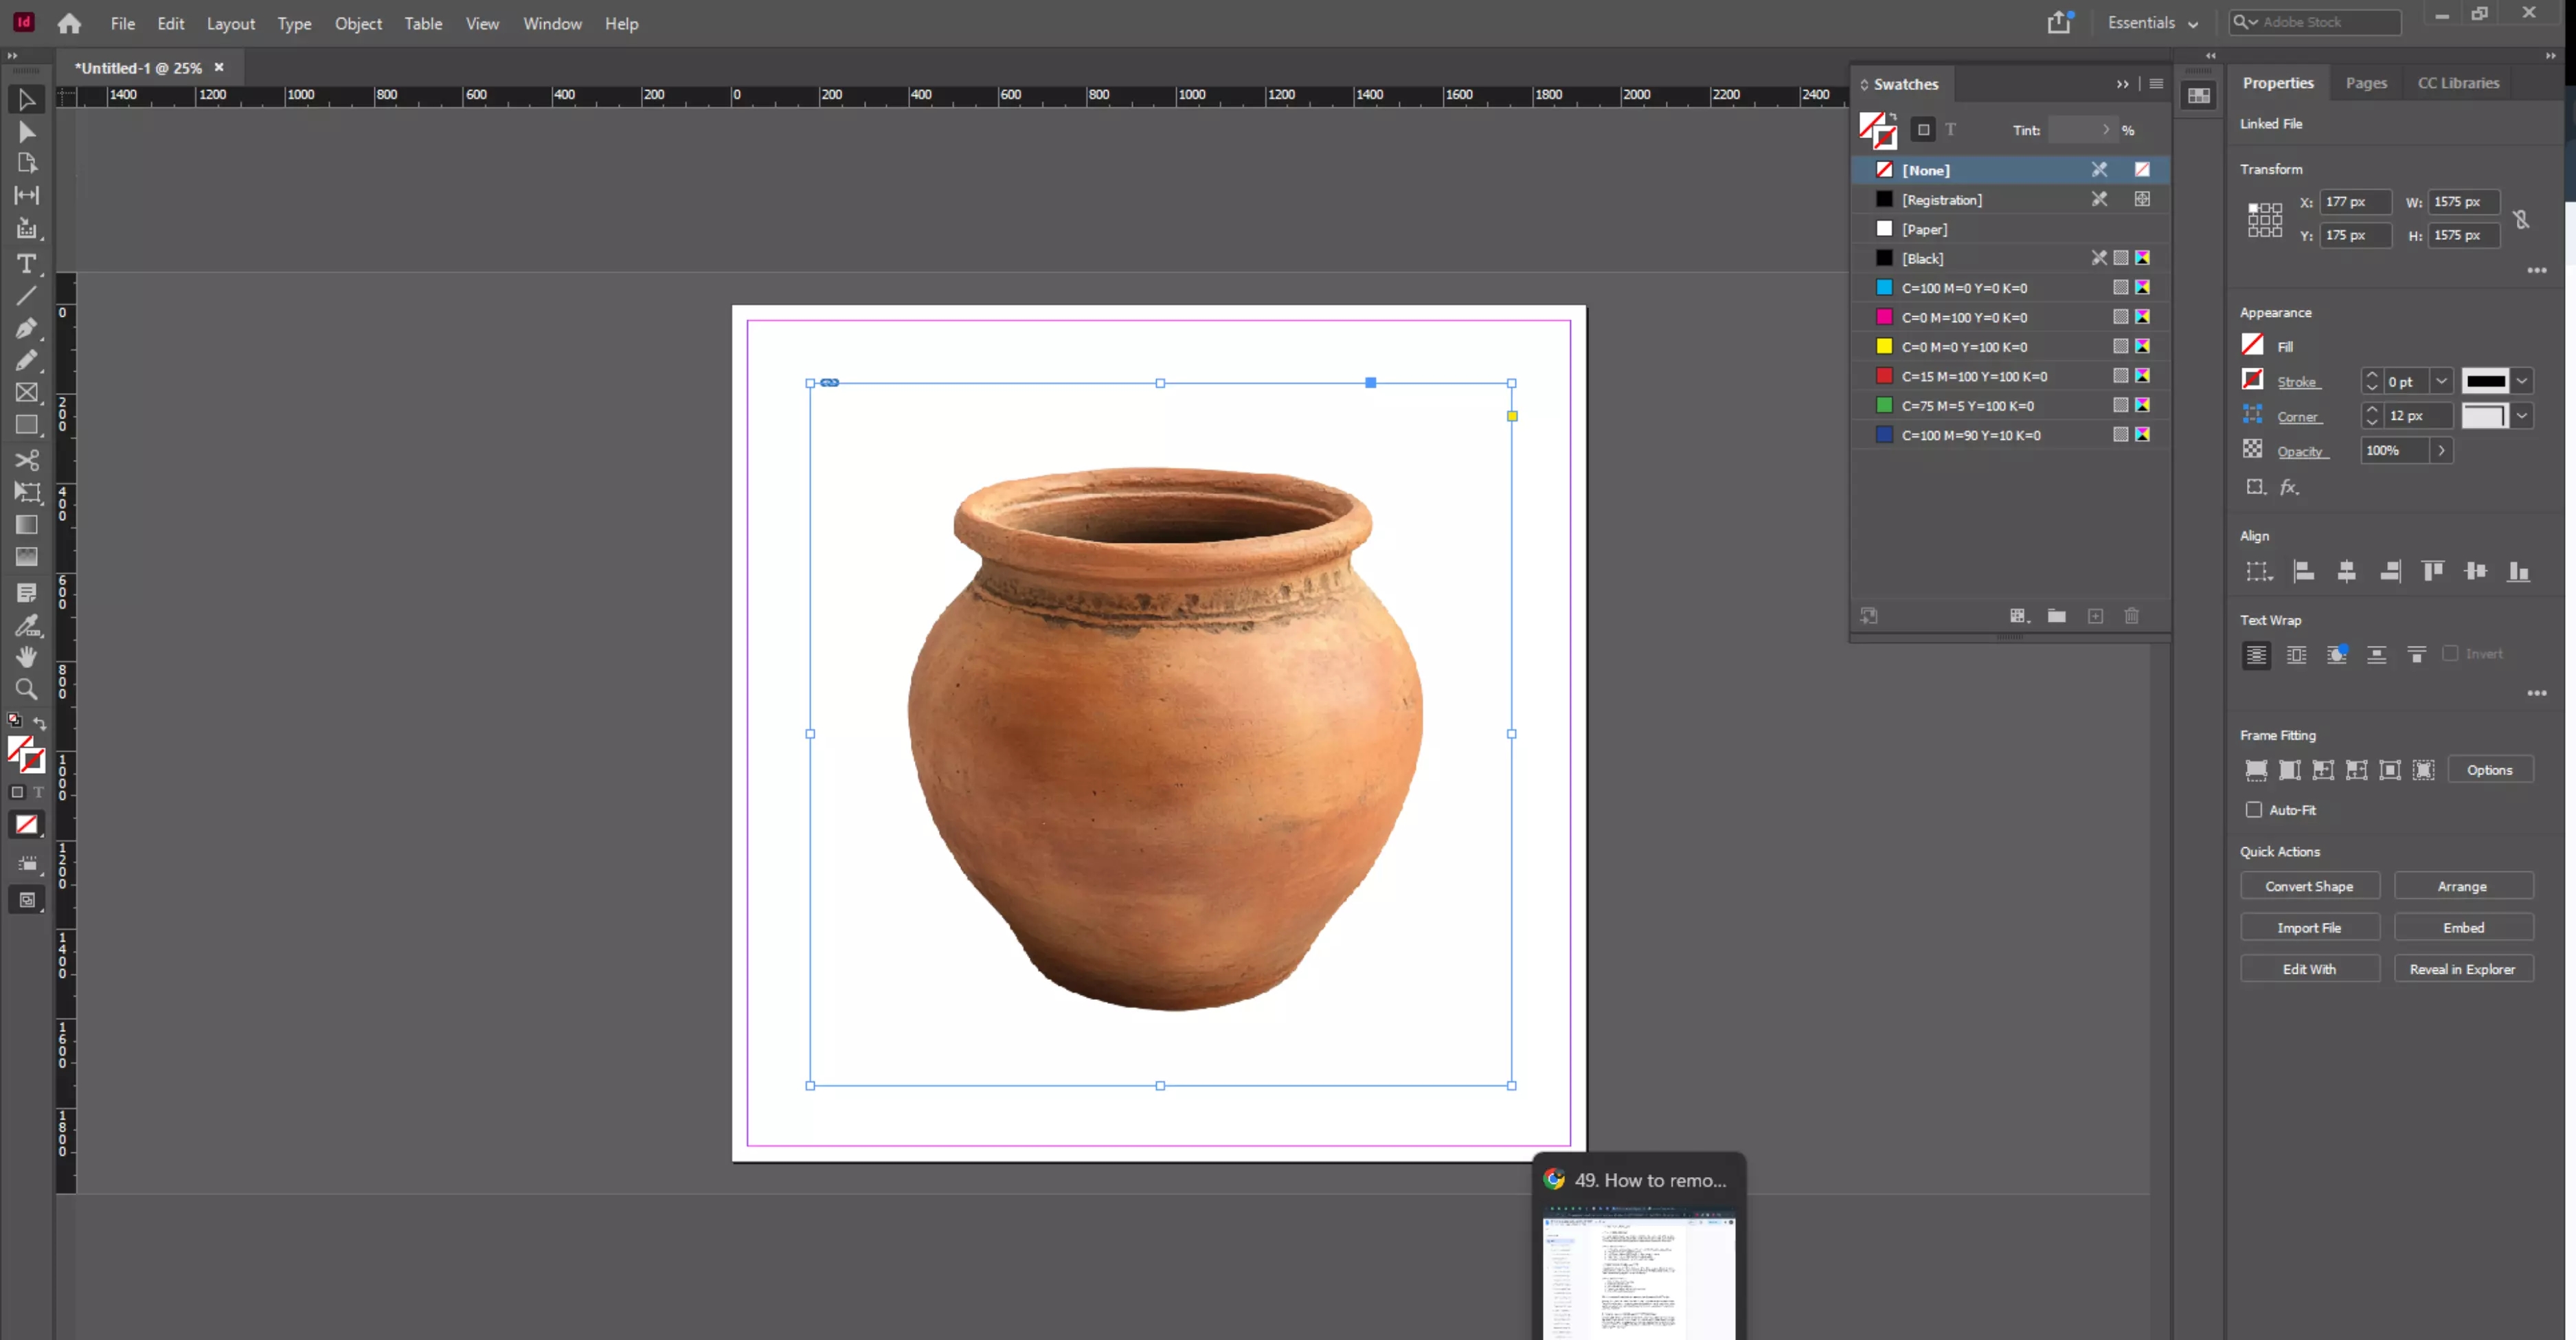
Placing images into Adobe InDesign for removing background often brings a small but frustrating problem: a background removal that you don’t want to be in your picture. Maybe it’s a white box behind a logo or a solid color behind a product photo. Either way, it stands out and disrupts the flow of your design.
The truth is, InDesign isn’t built for background editing. It’s a layout tool, not a background remover like Photoshop. That means you won’t find an eraser or cut-out tool inside the program.
What you do have, though, are a handful of features—Clipping Paths, Alpha Channels, Transparency controls, and Object settings—that can address simple background issues.
For straightforward graphics, these tools are usually enough. But if you’re working with detailed photos or anything that needs precise cutouts, it’s smarter to clean up the image in Photoshop or Illustrator first, then bring it into InDesign for the final layout.
How to remove background in InDesign 2026
The newest version of InDesign still doesn’t offer a built-in eraser, but it gives you a few dependable ways to manage backgrounds. These tools are not flashy, but they work well if your files are prepared correctly. Below are the three approaches most designers rely on.
1. Use Clipping Path
Clipping Paths are a quick way to cut an object away from its background. They’re best for simple images like logos or icons where the image has clean, sharp edges.
If you try this on a complex photo, the result will often look rough or incomplete.
How to use the method?
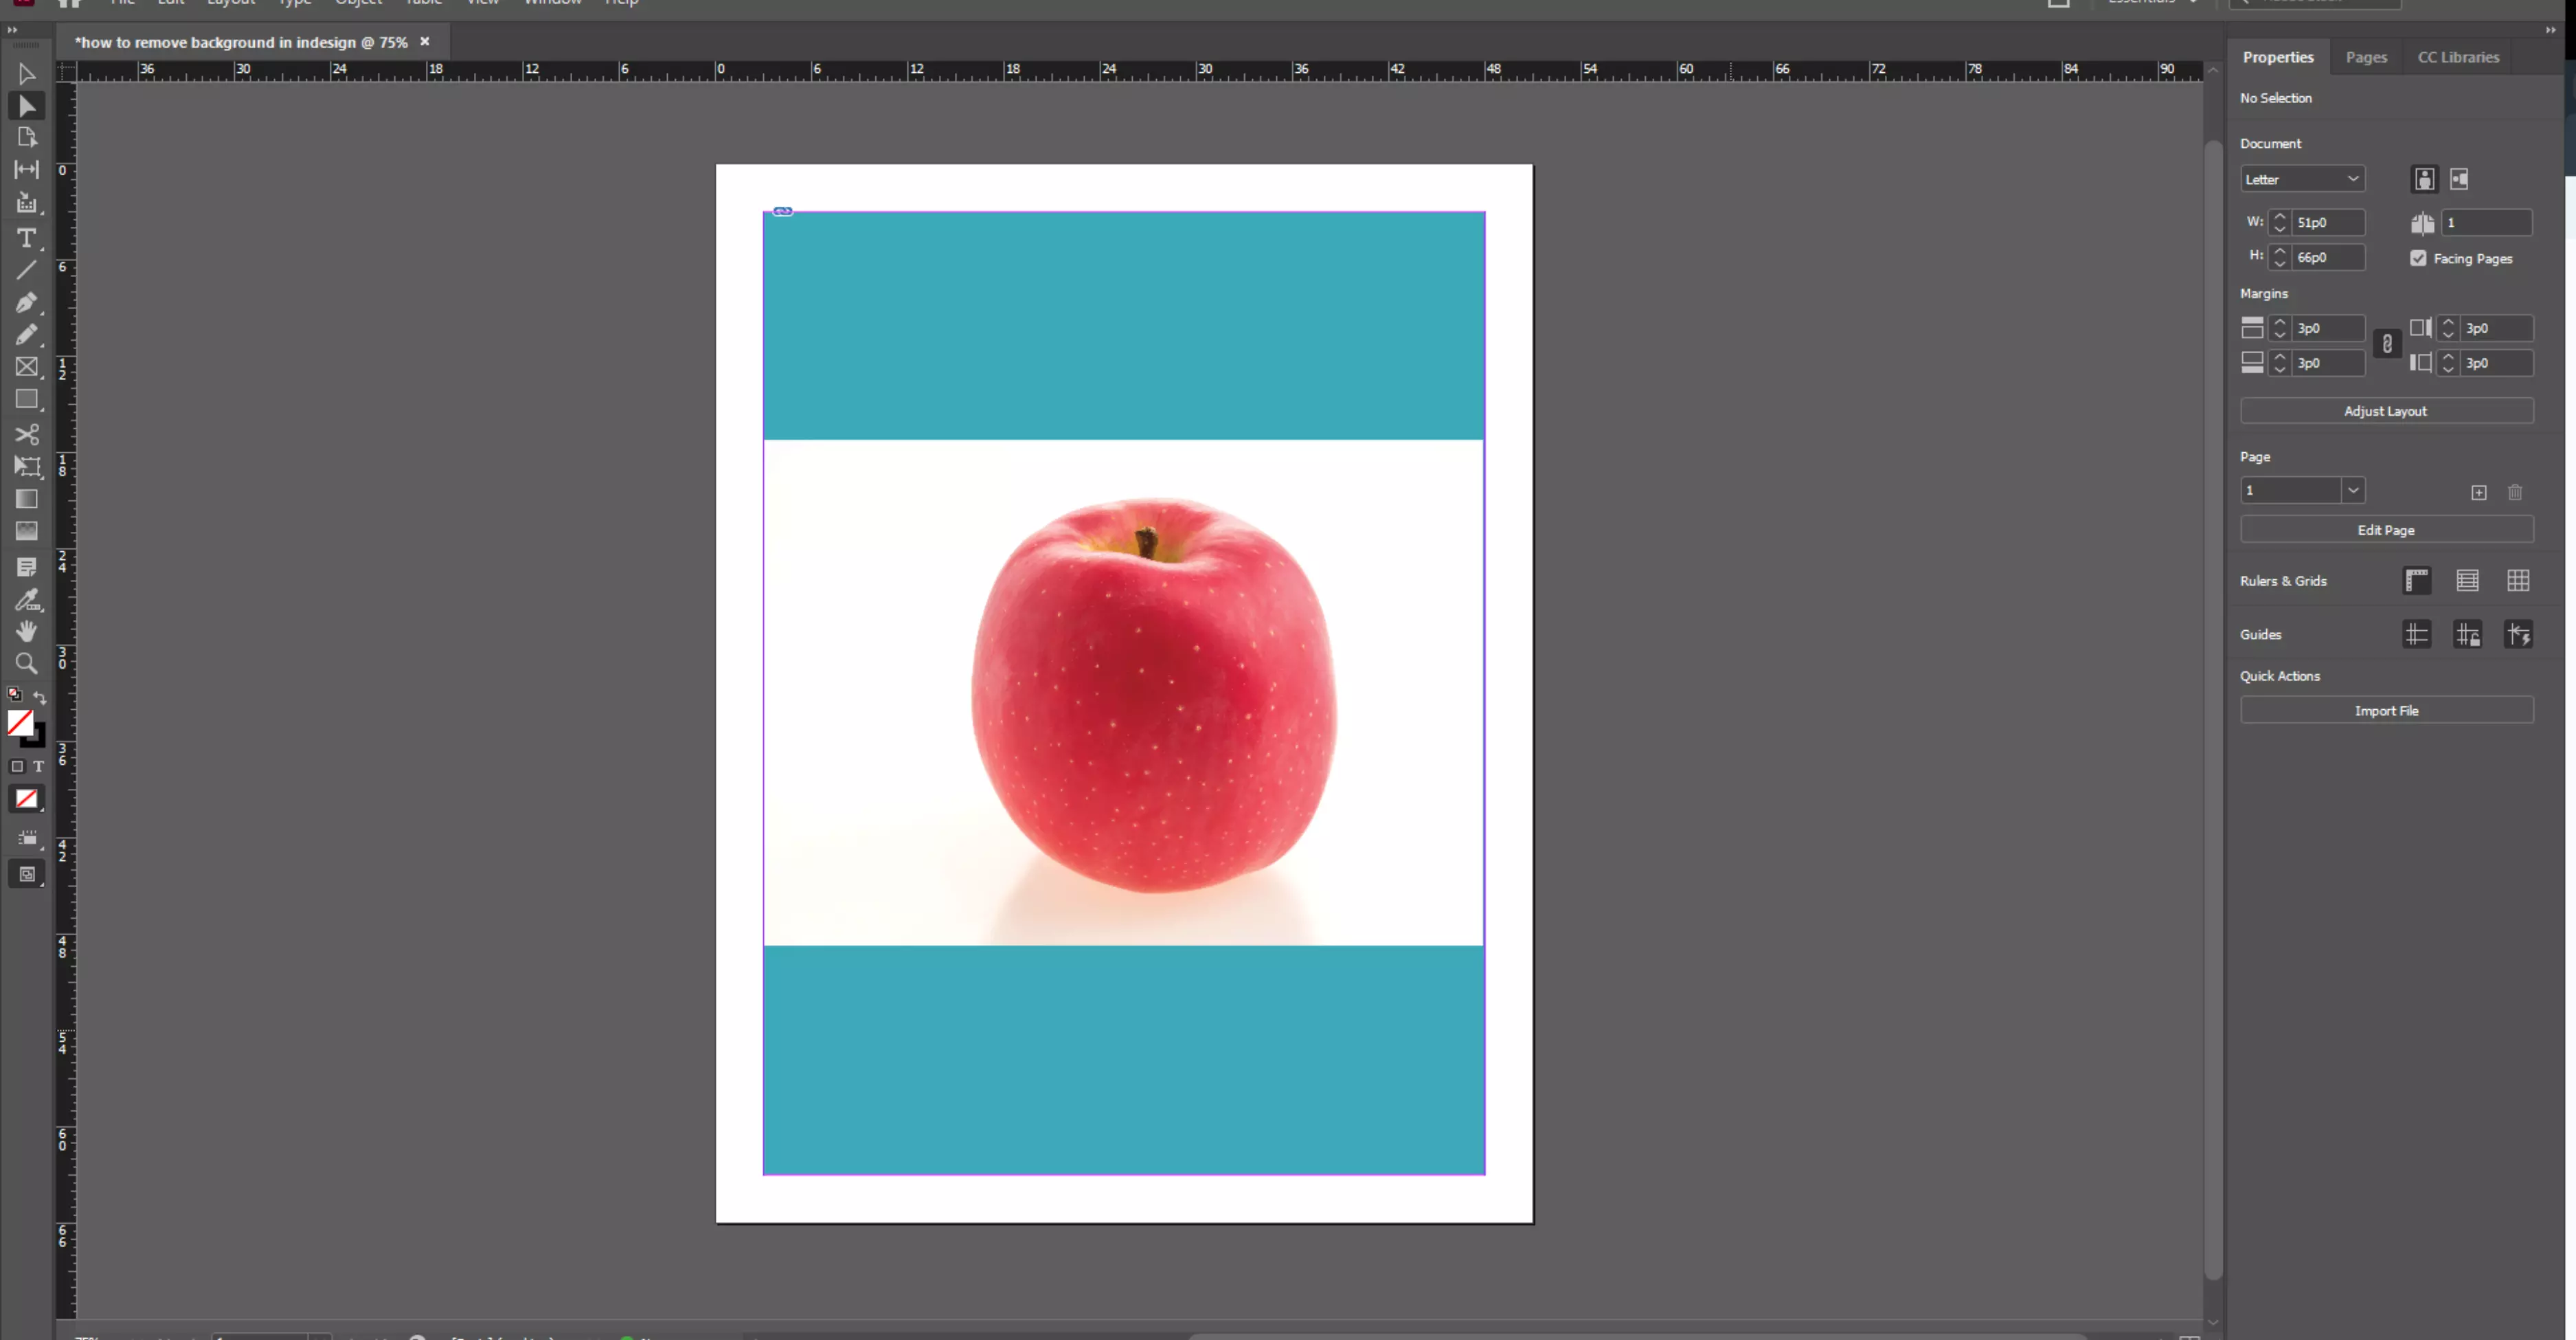
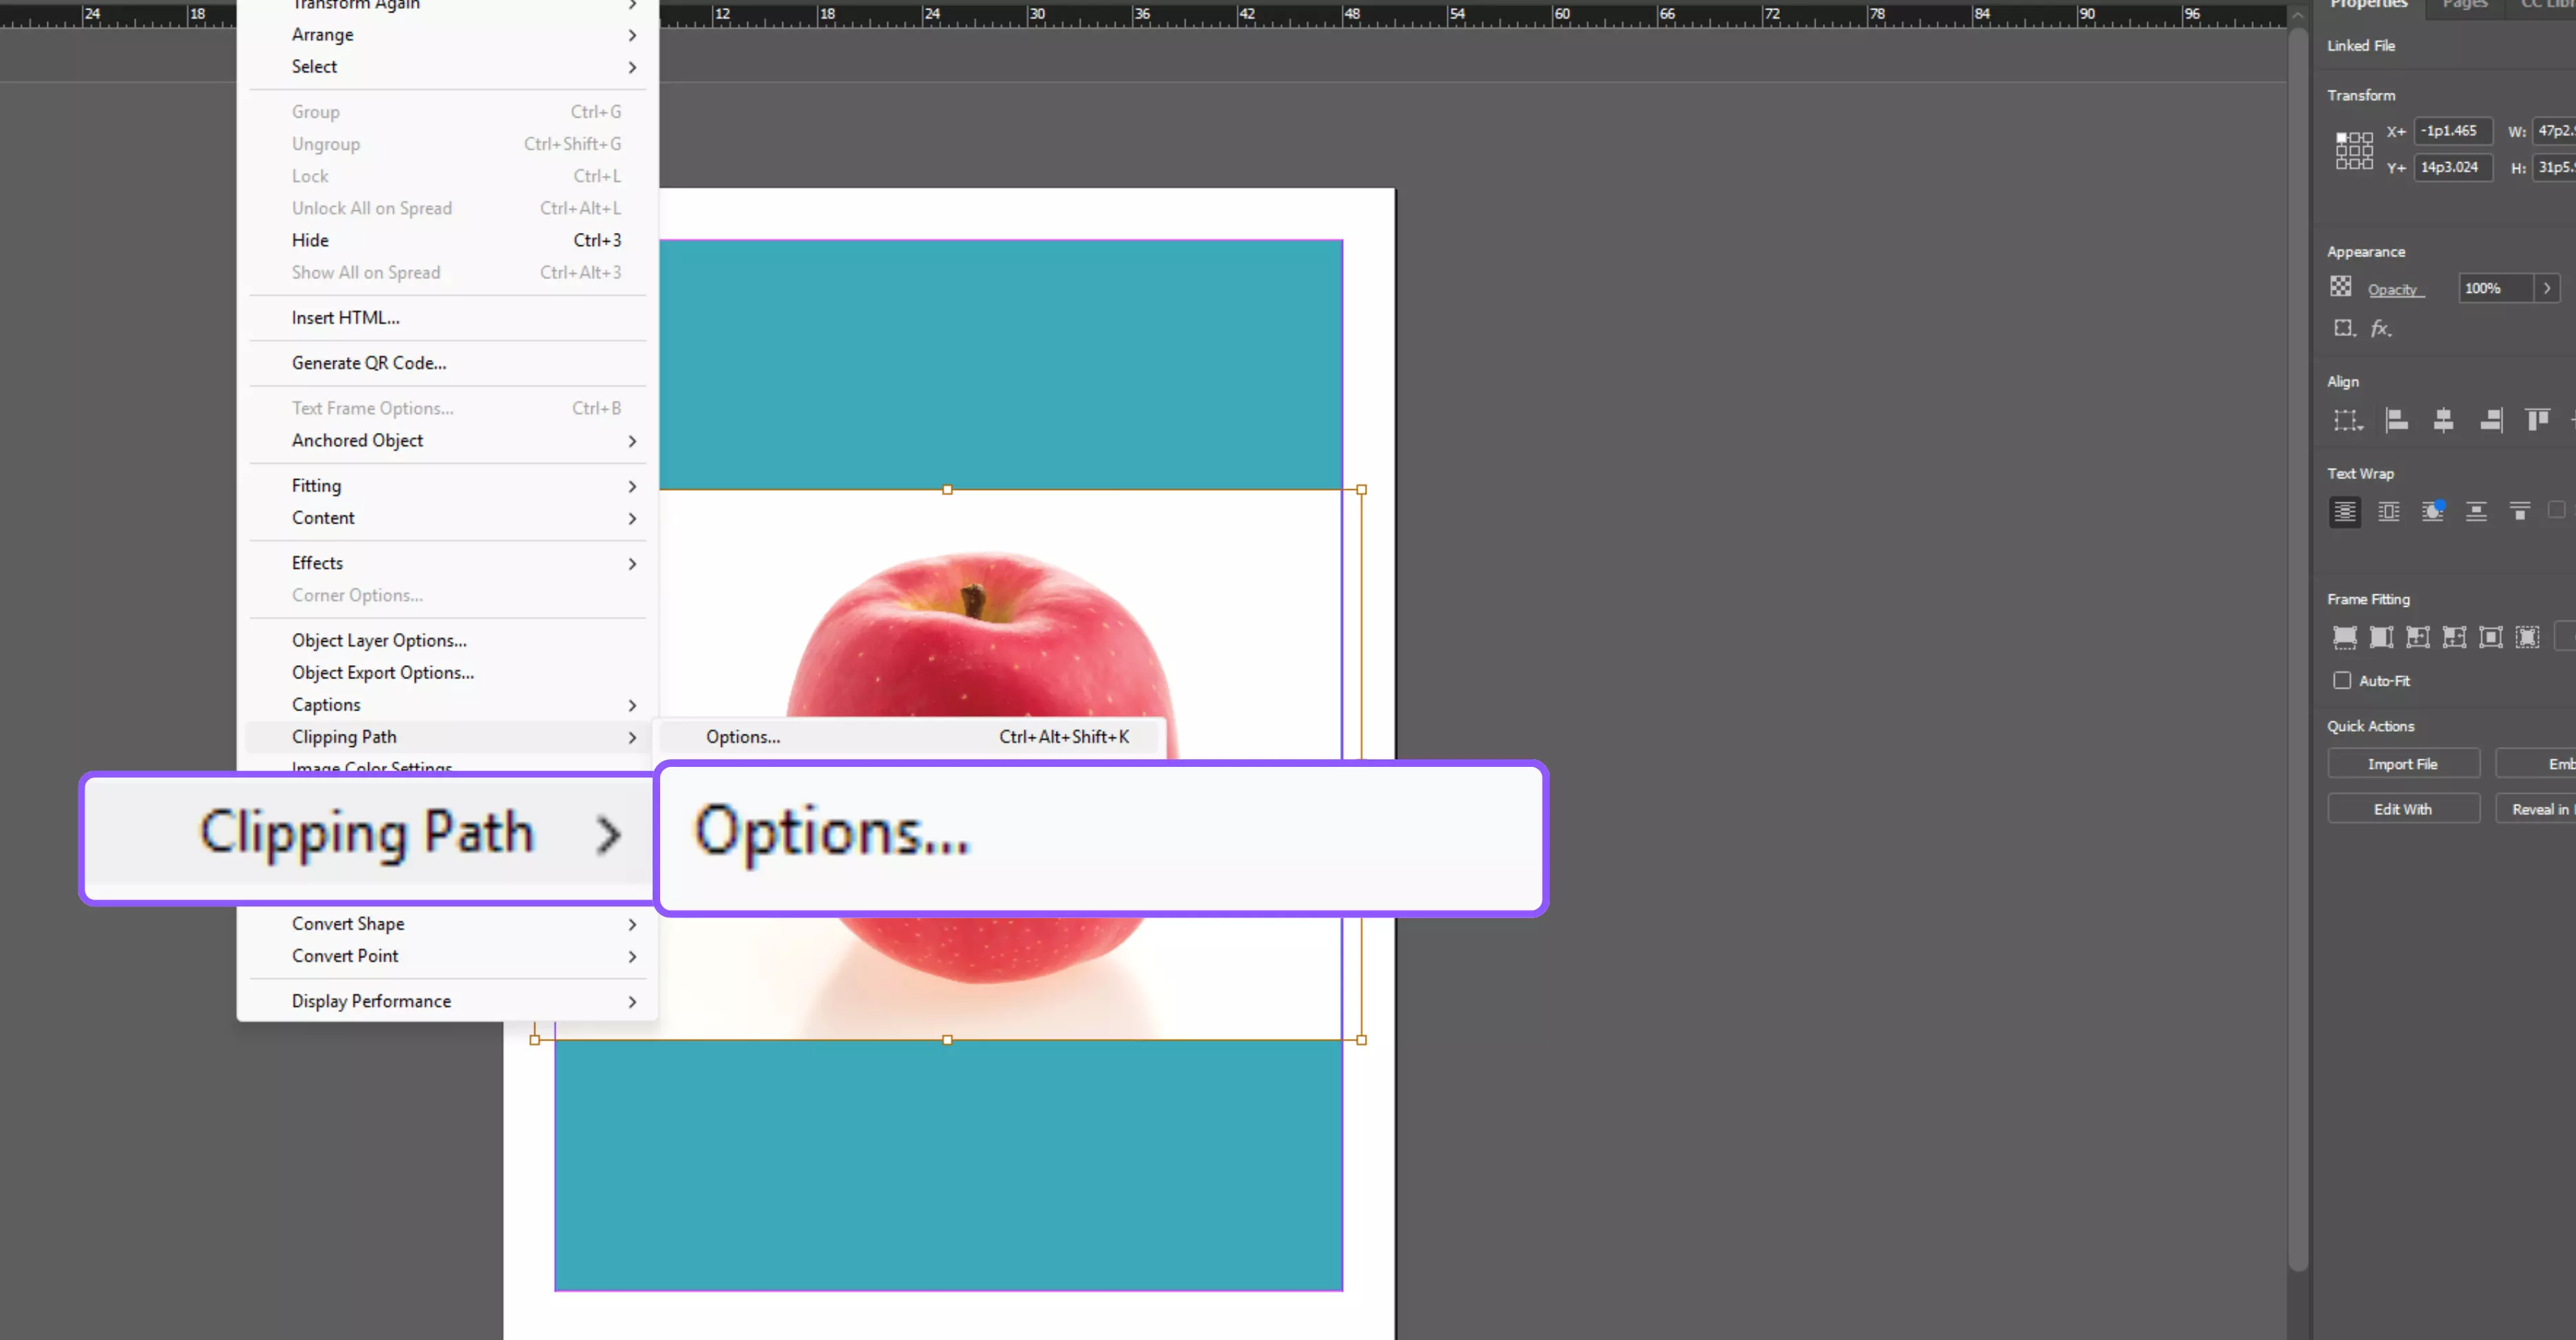
Step 1: Select the placed image in your layout.
Step 2: Open the menu: Object → Clipping Path → Options.
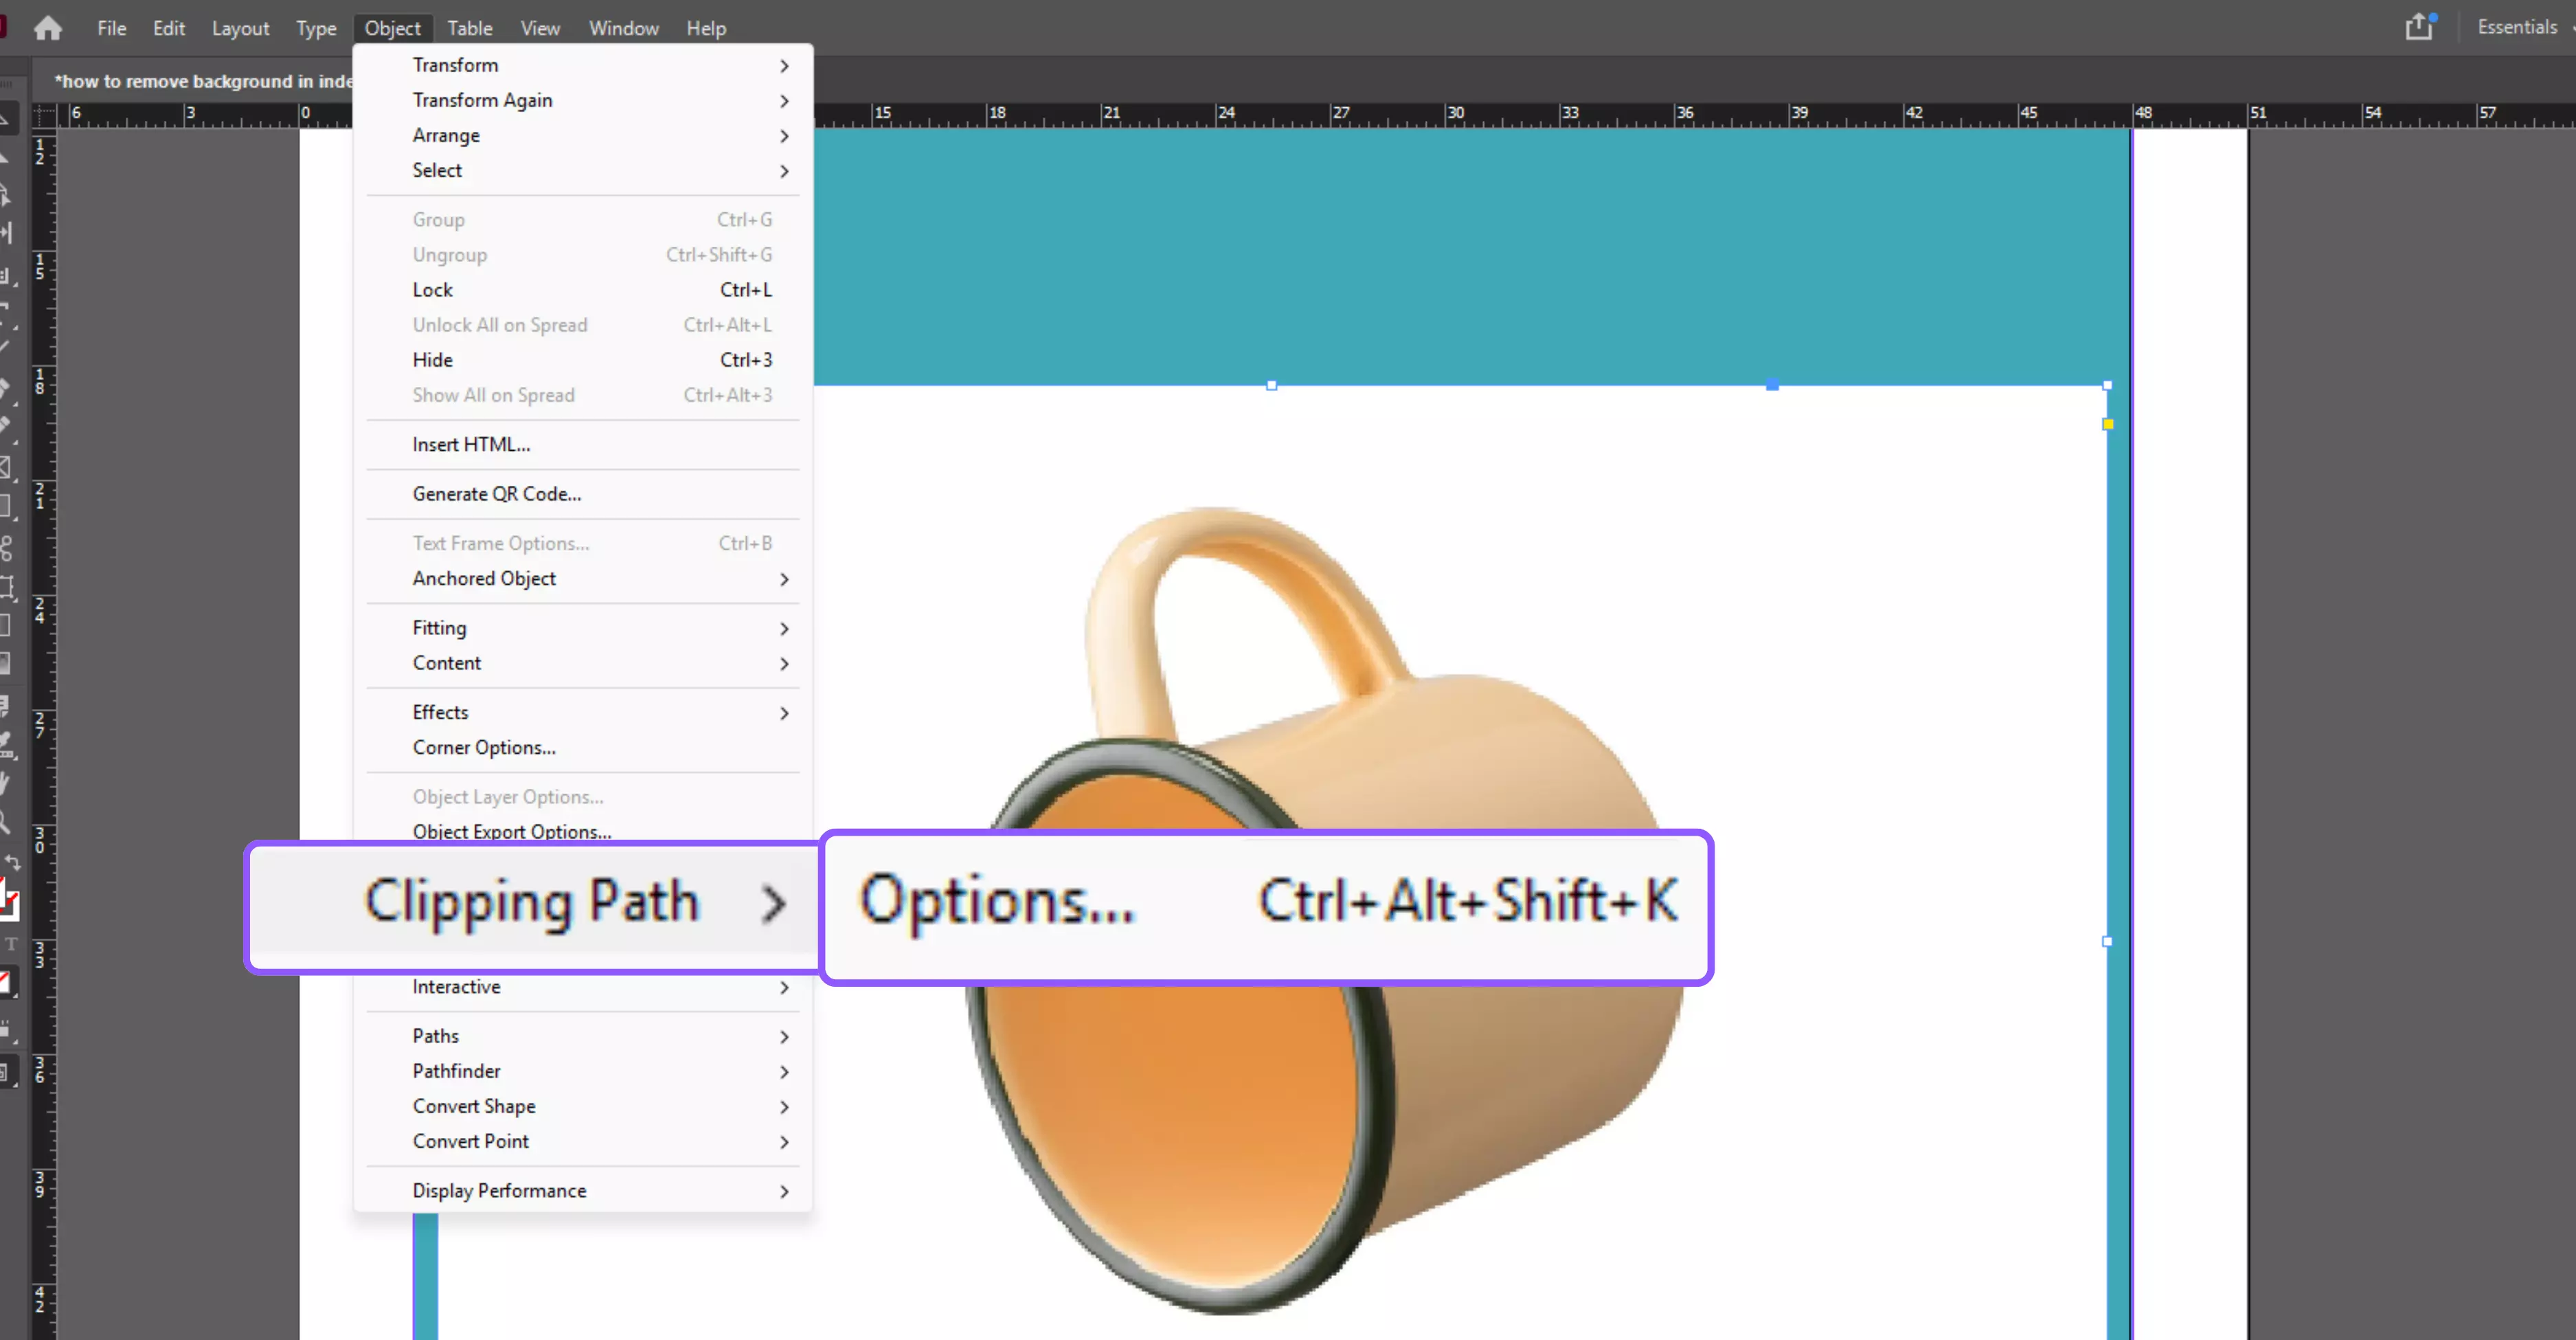
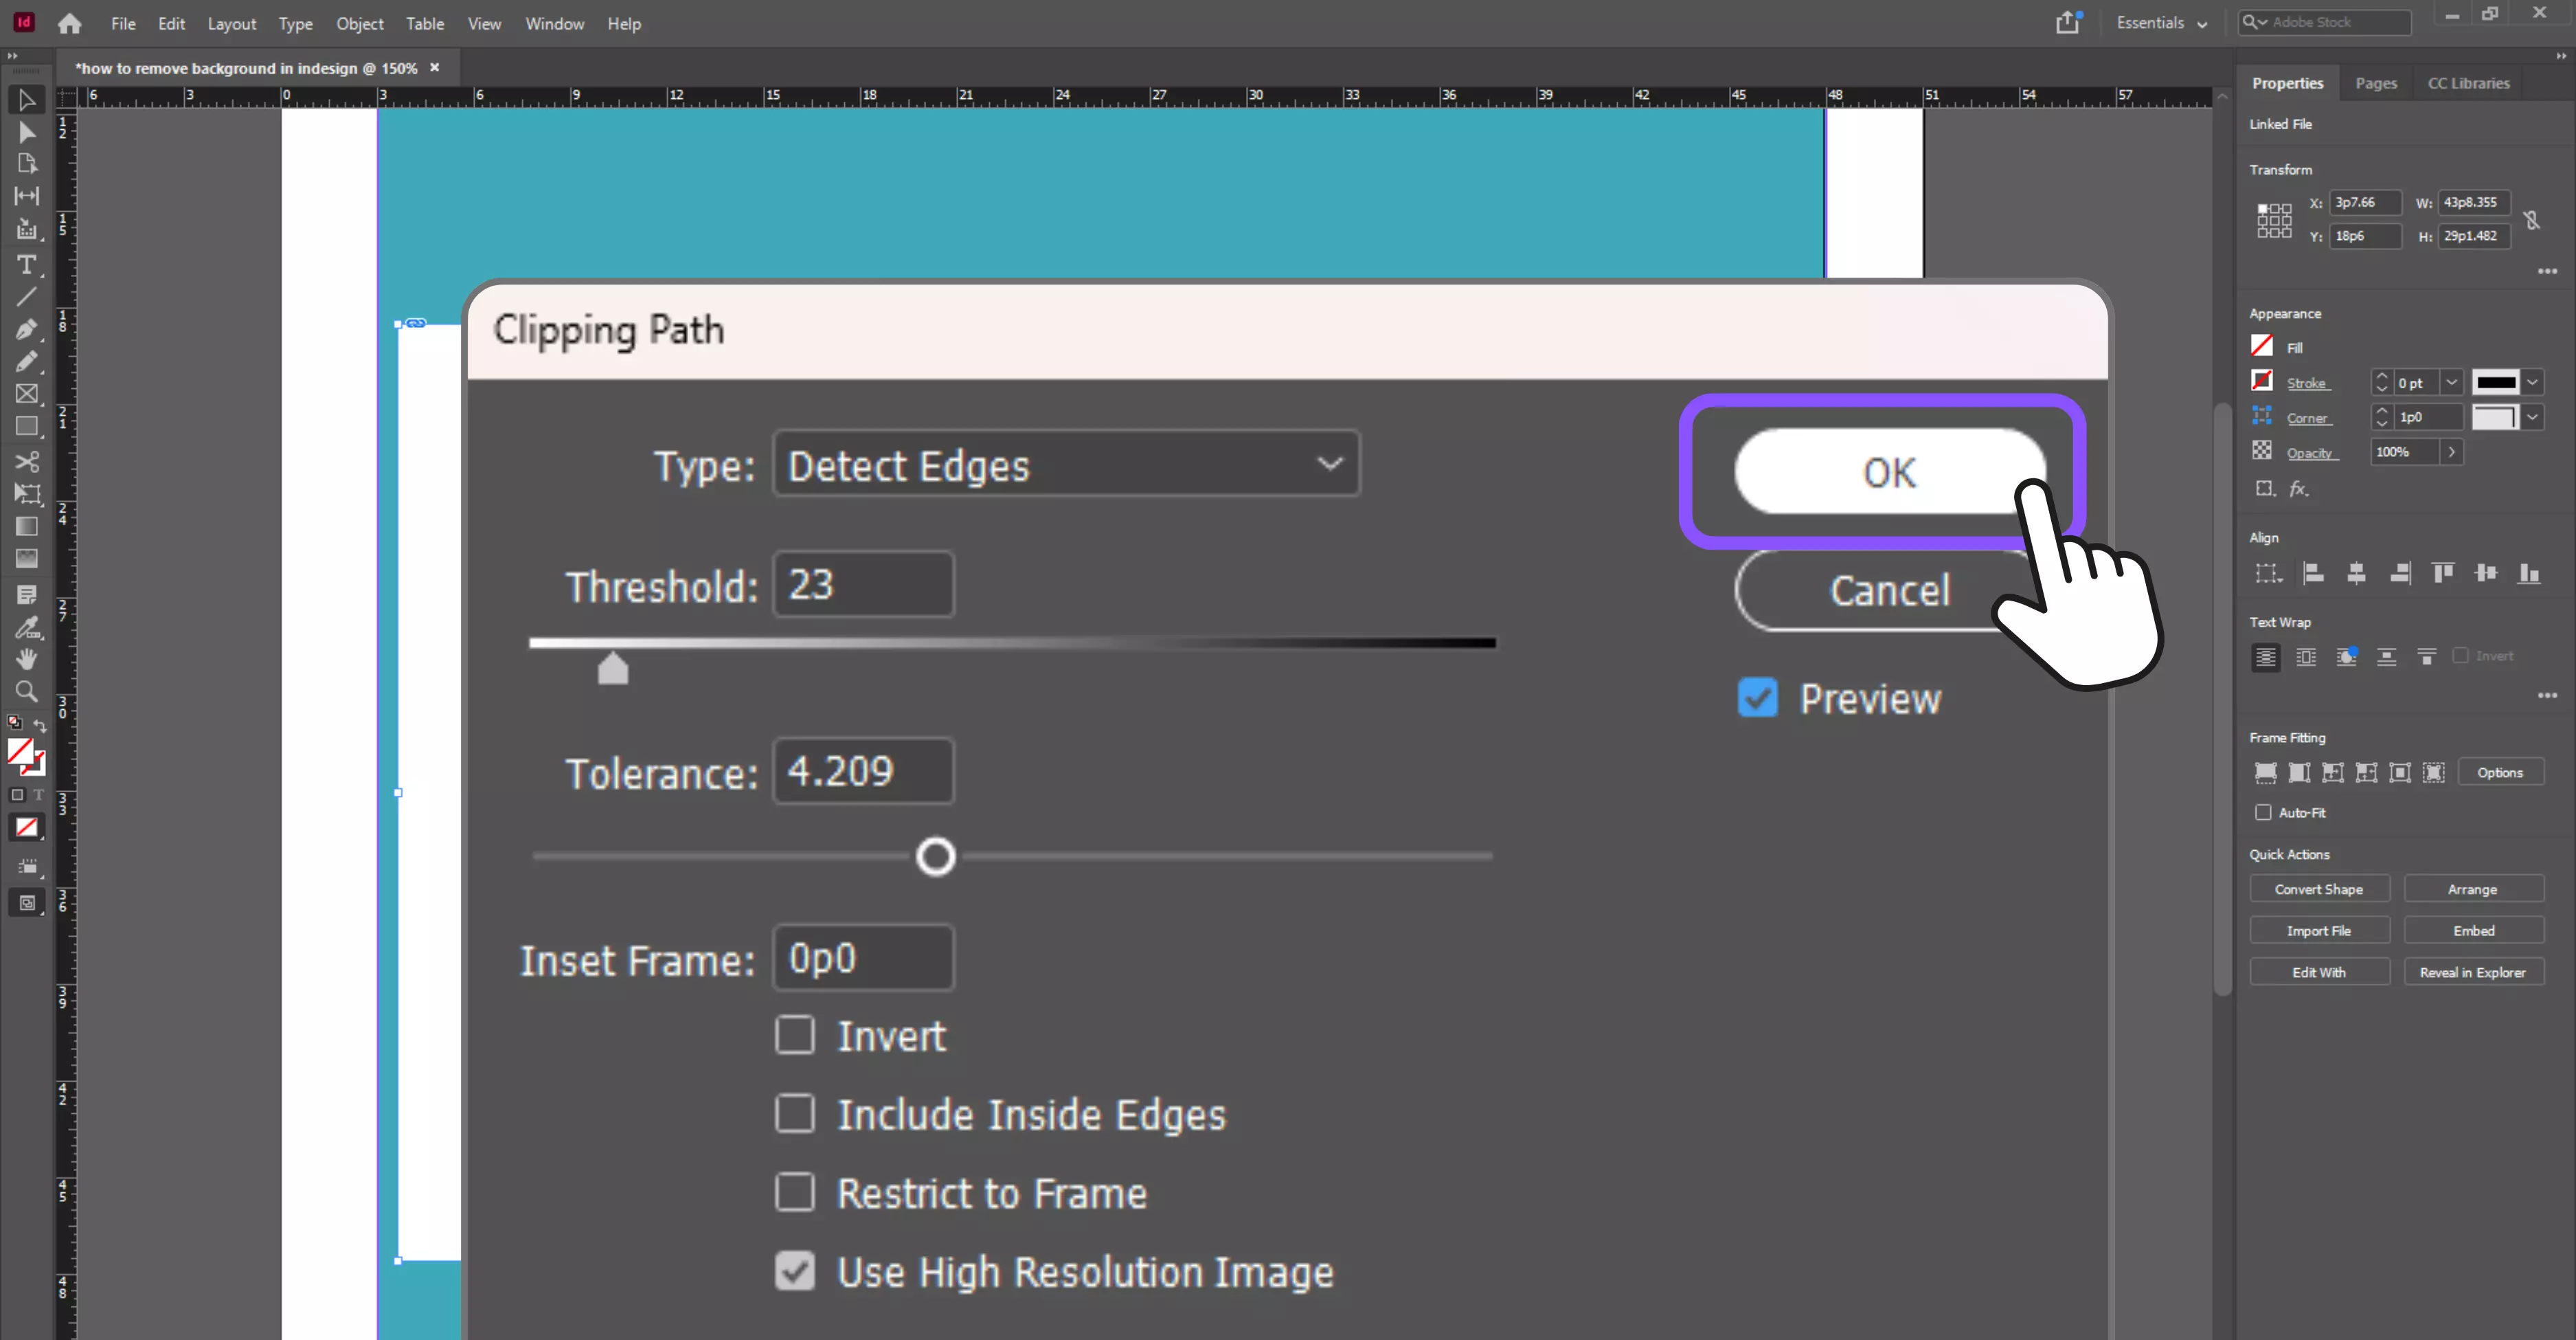
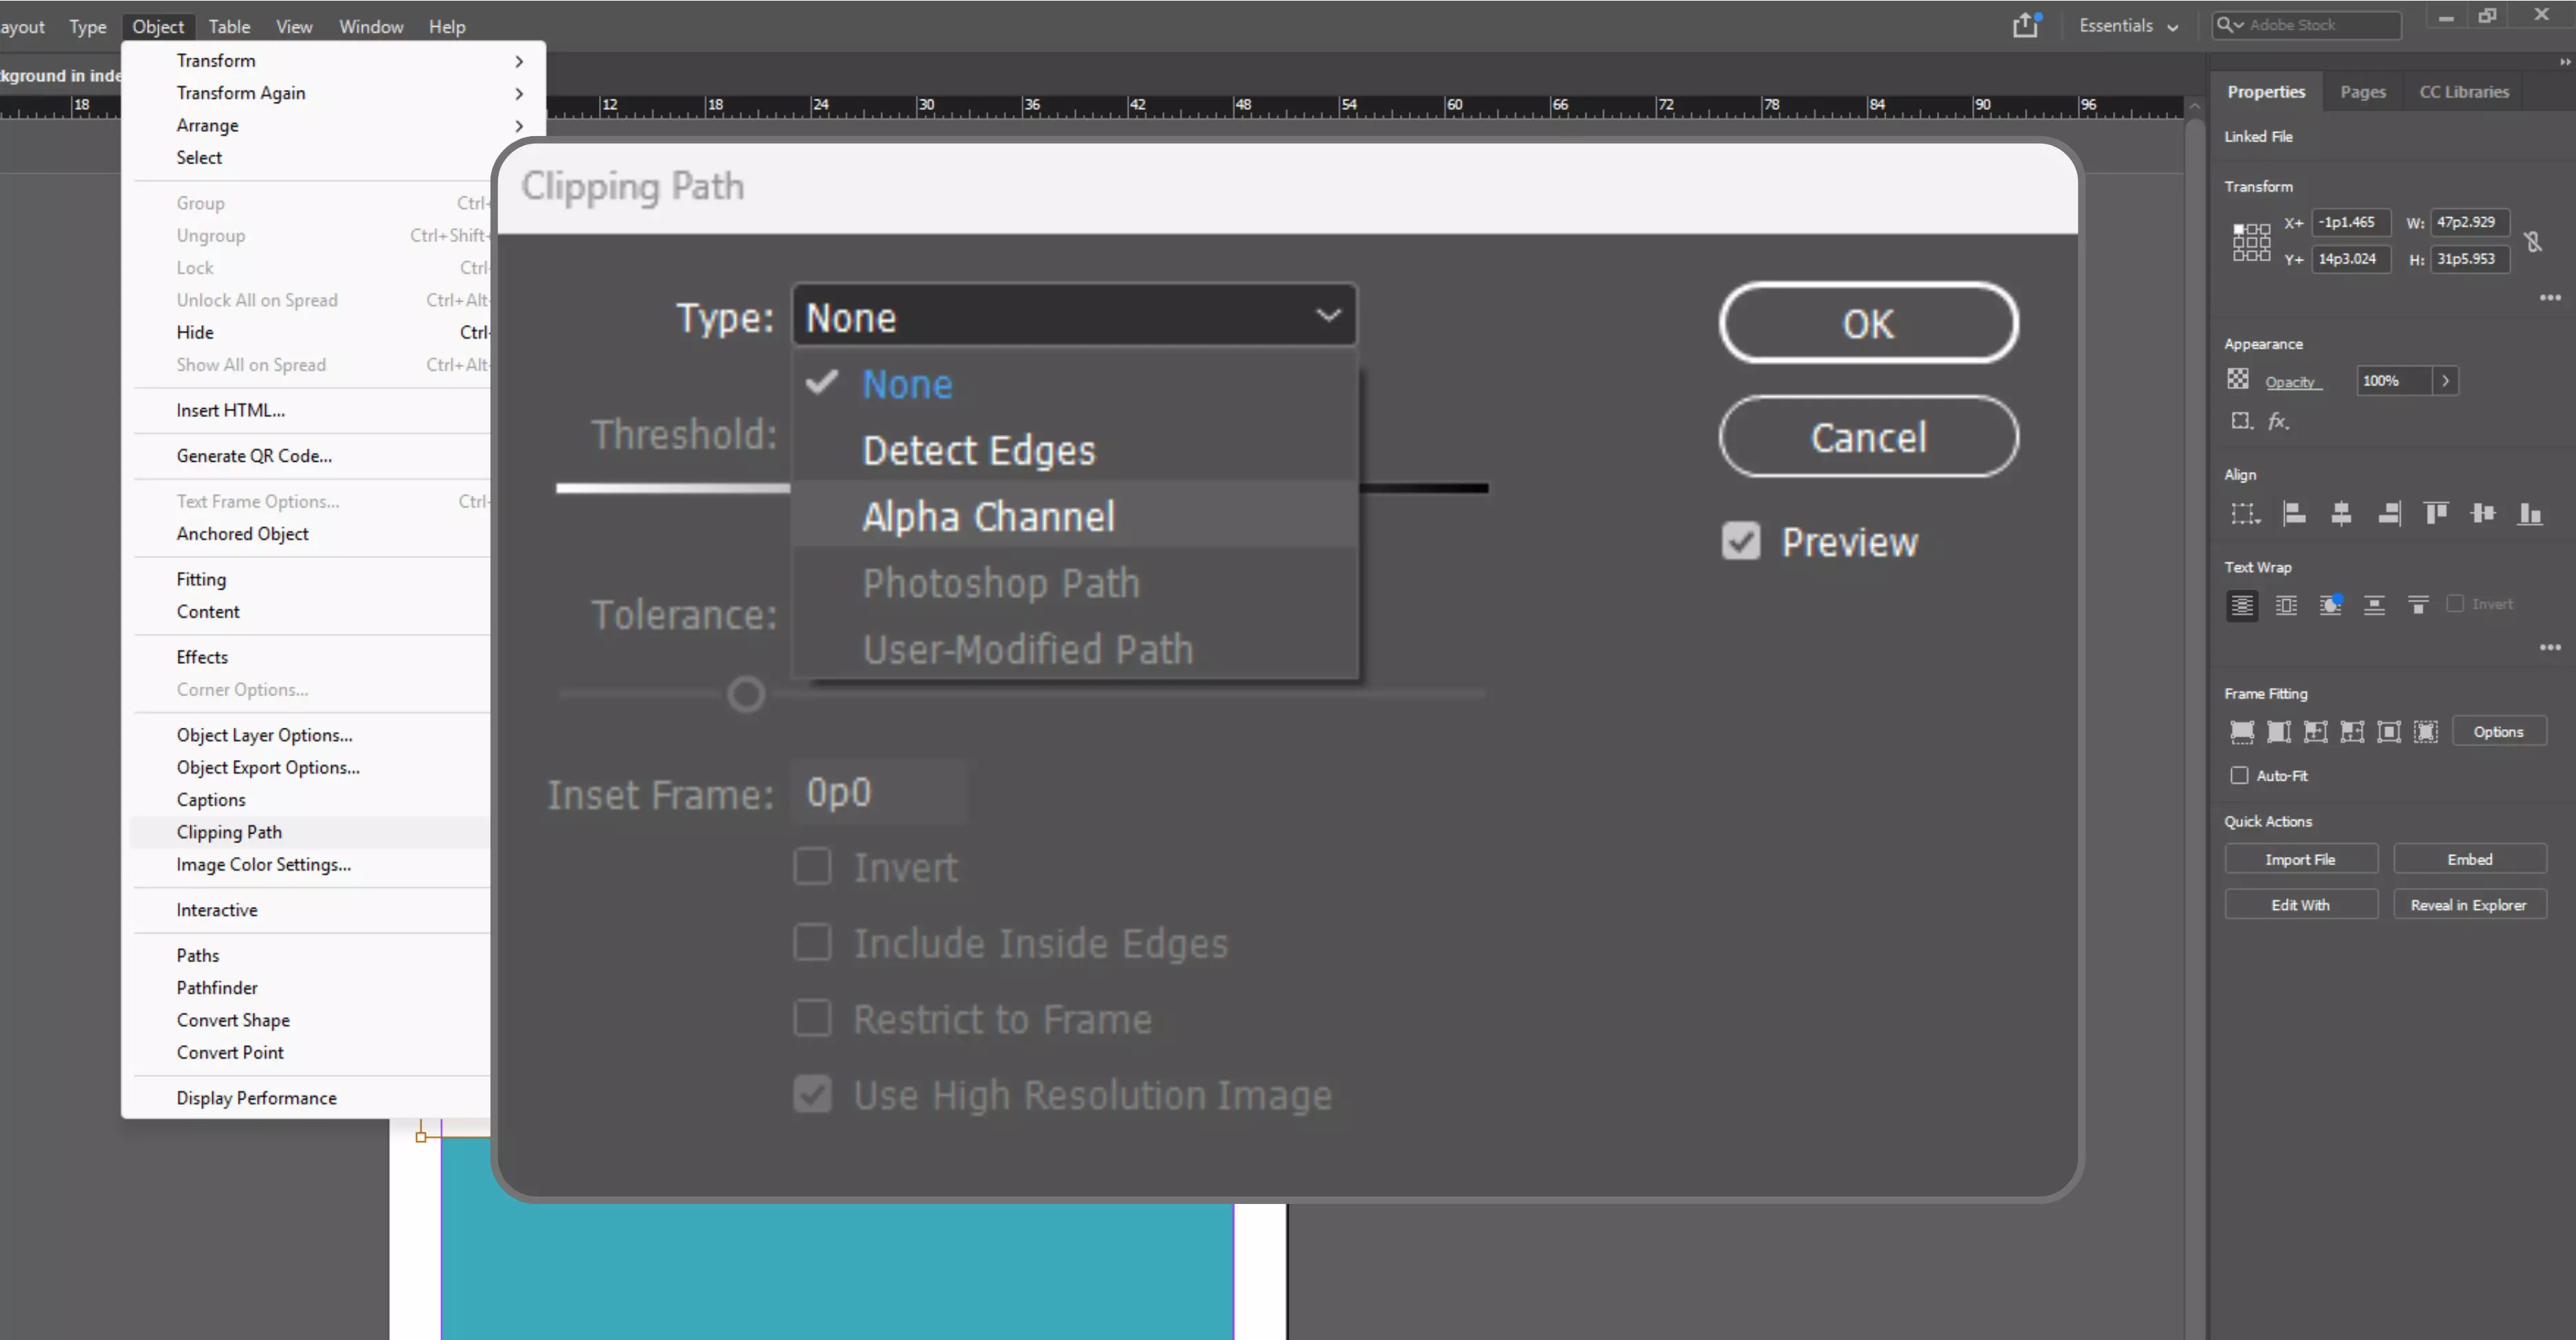
Step 3: In the “Type” dropdown, pick Detect Edges.
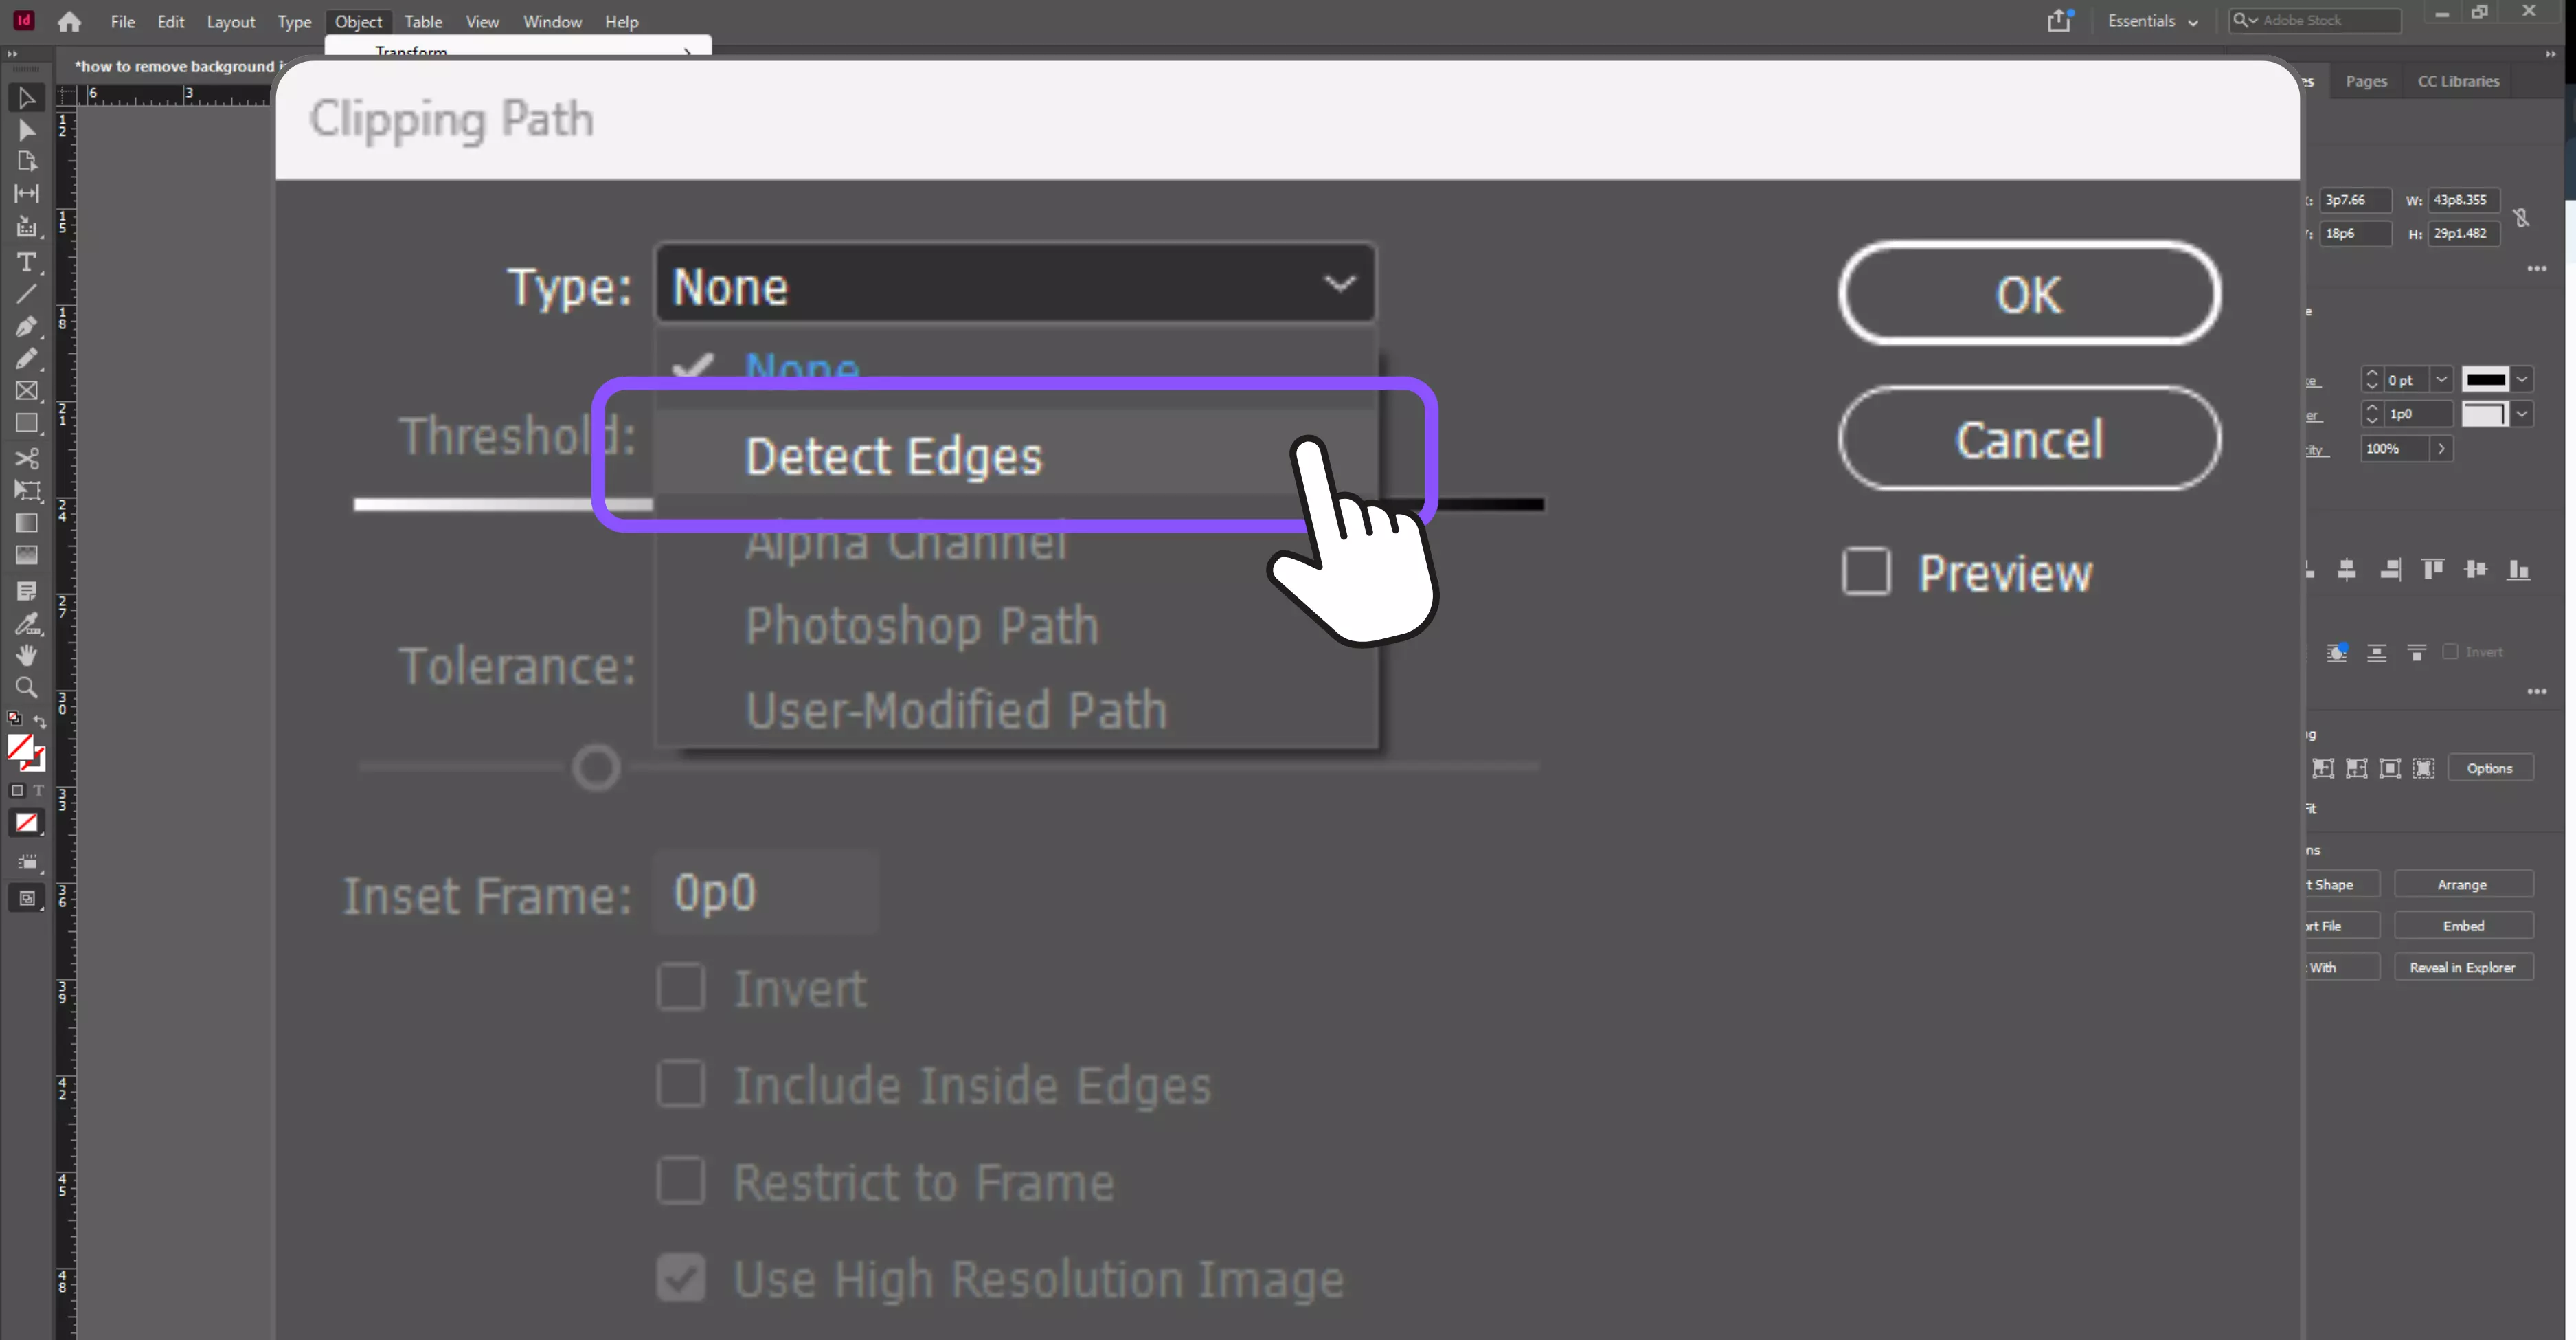
Step 4: Move the Threshold and Tolerance sliders until the background drops out.
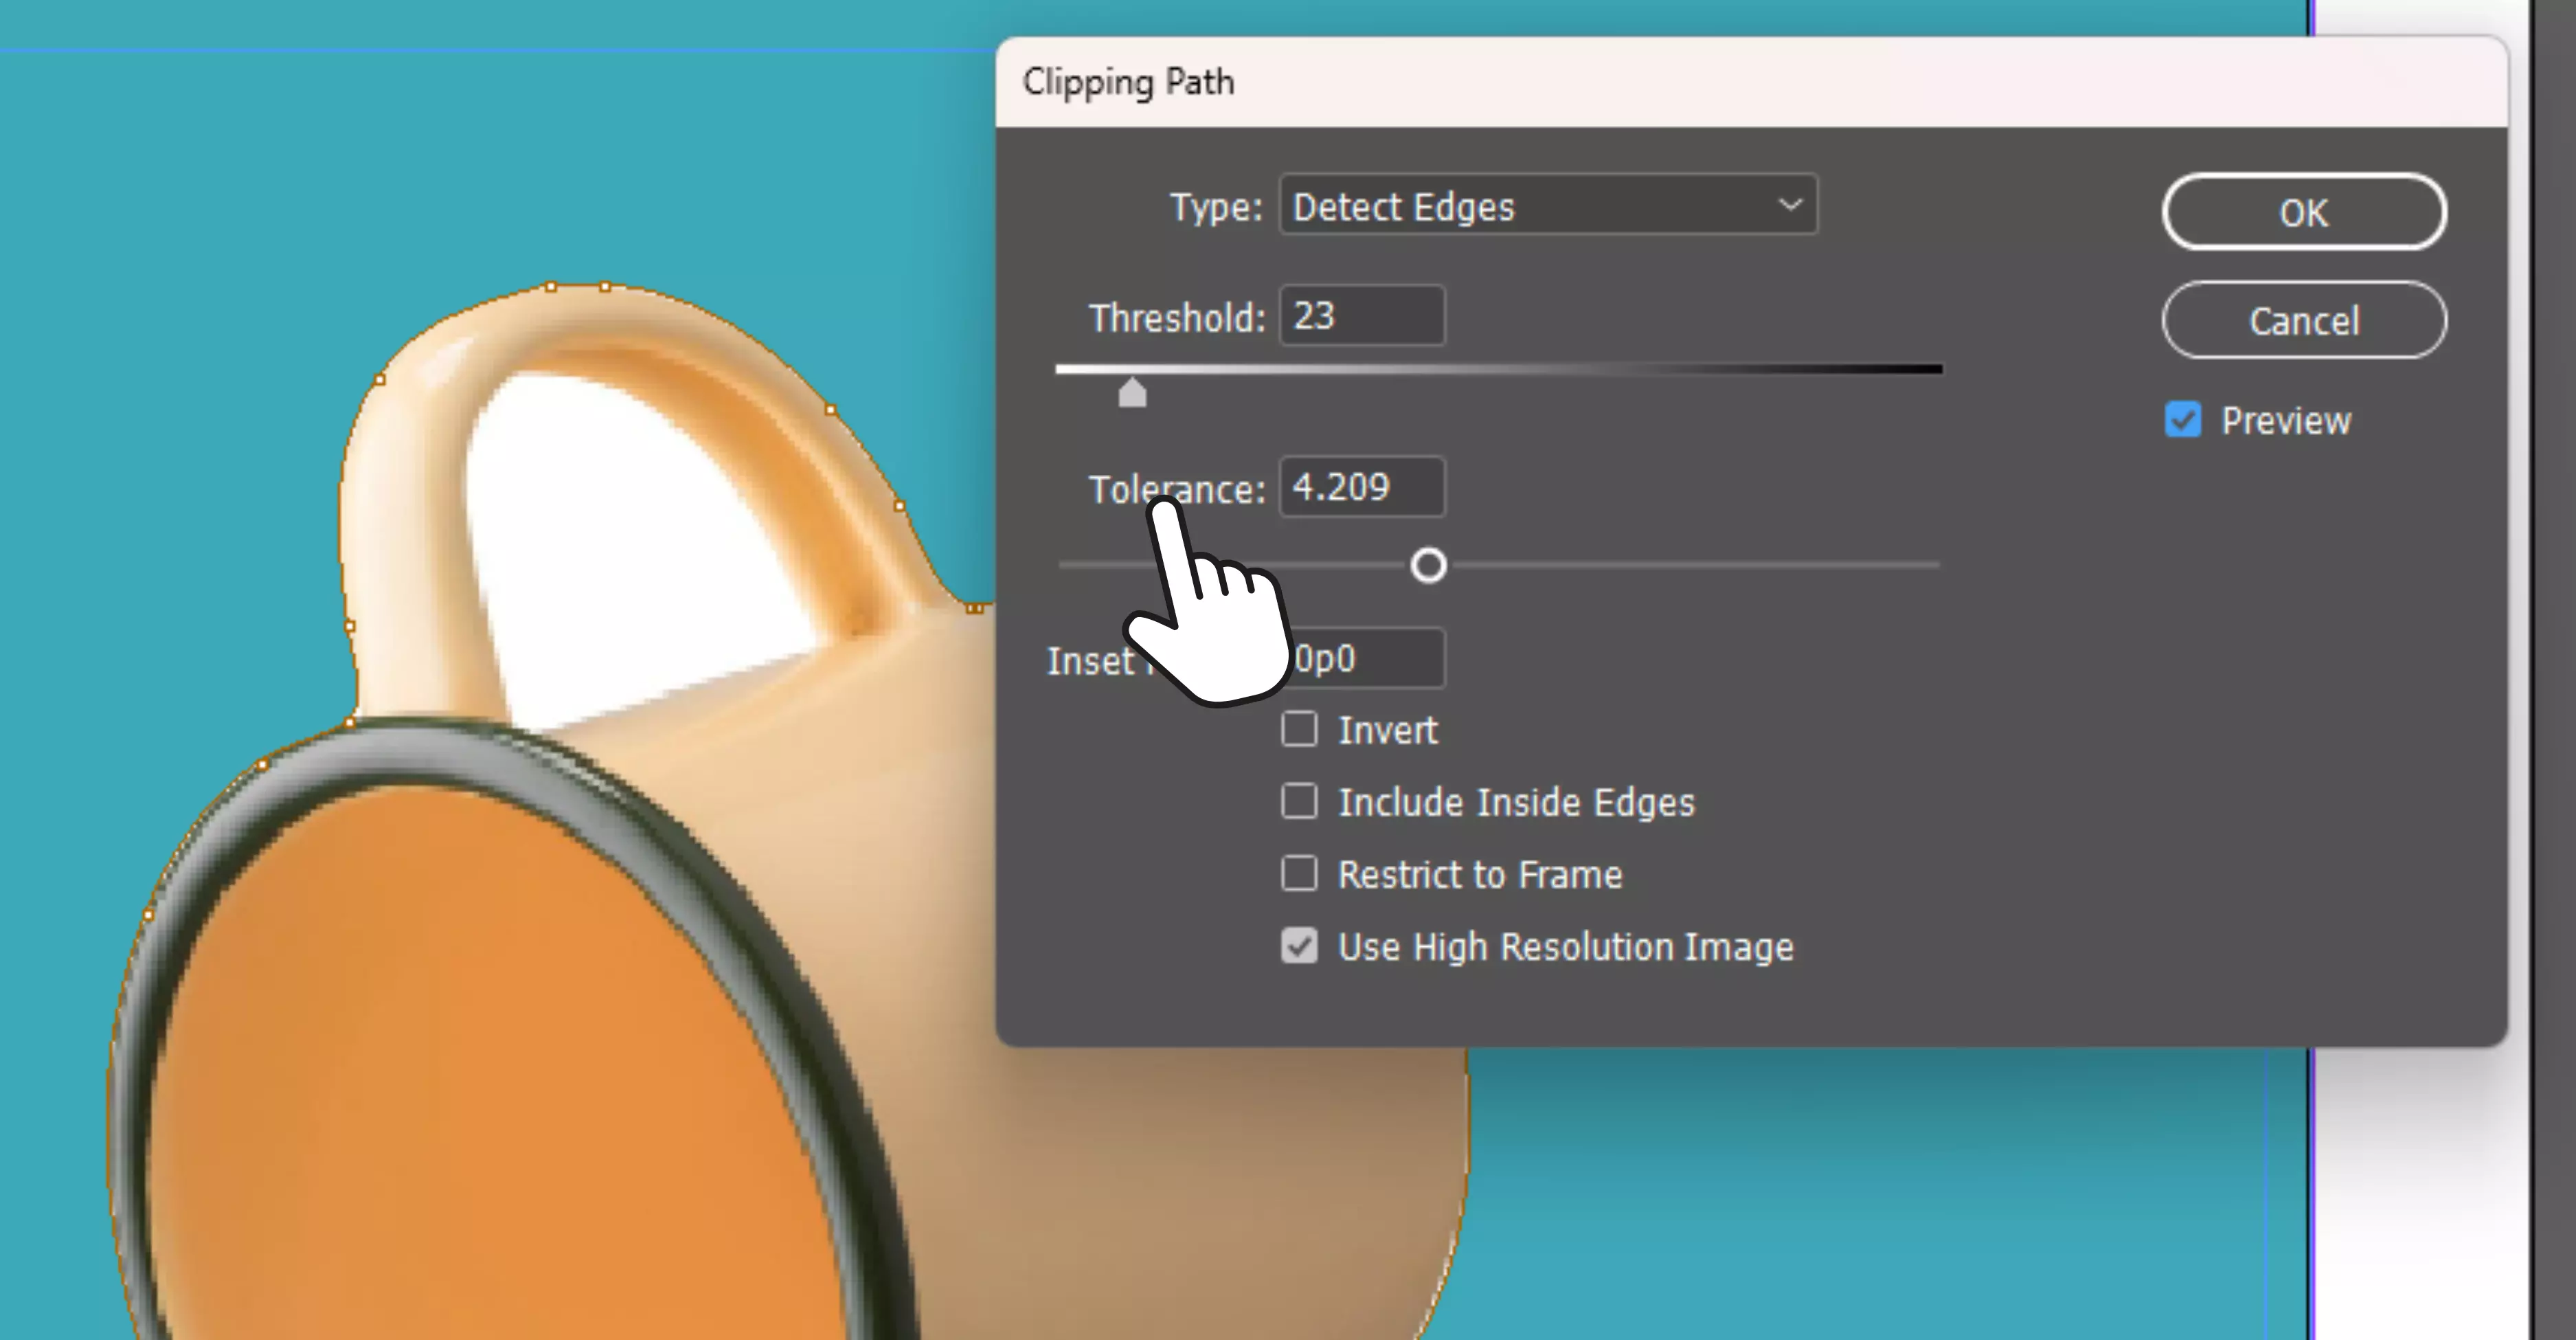
Step 5: Click OK to apply the cutout.
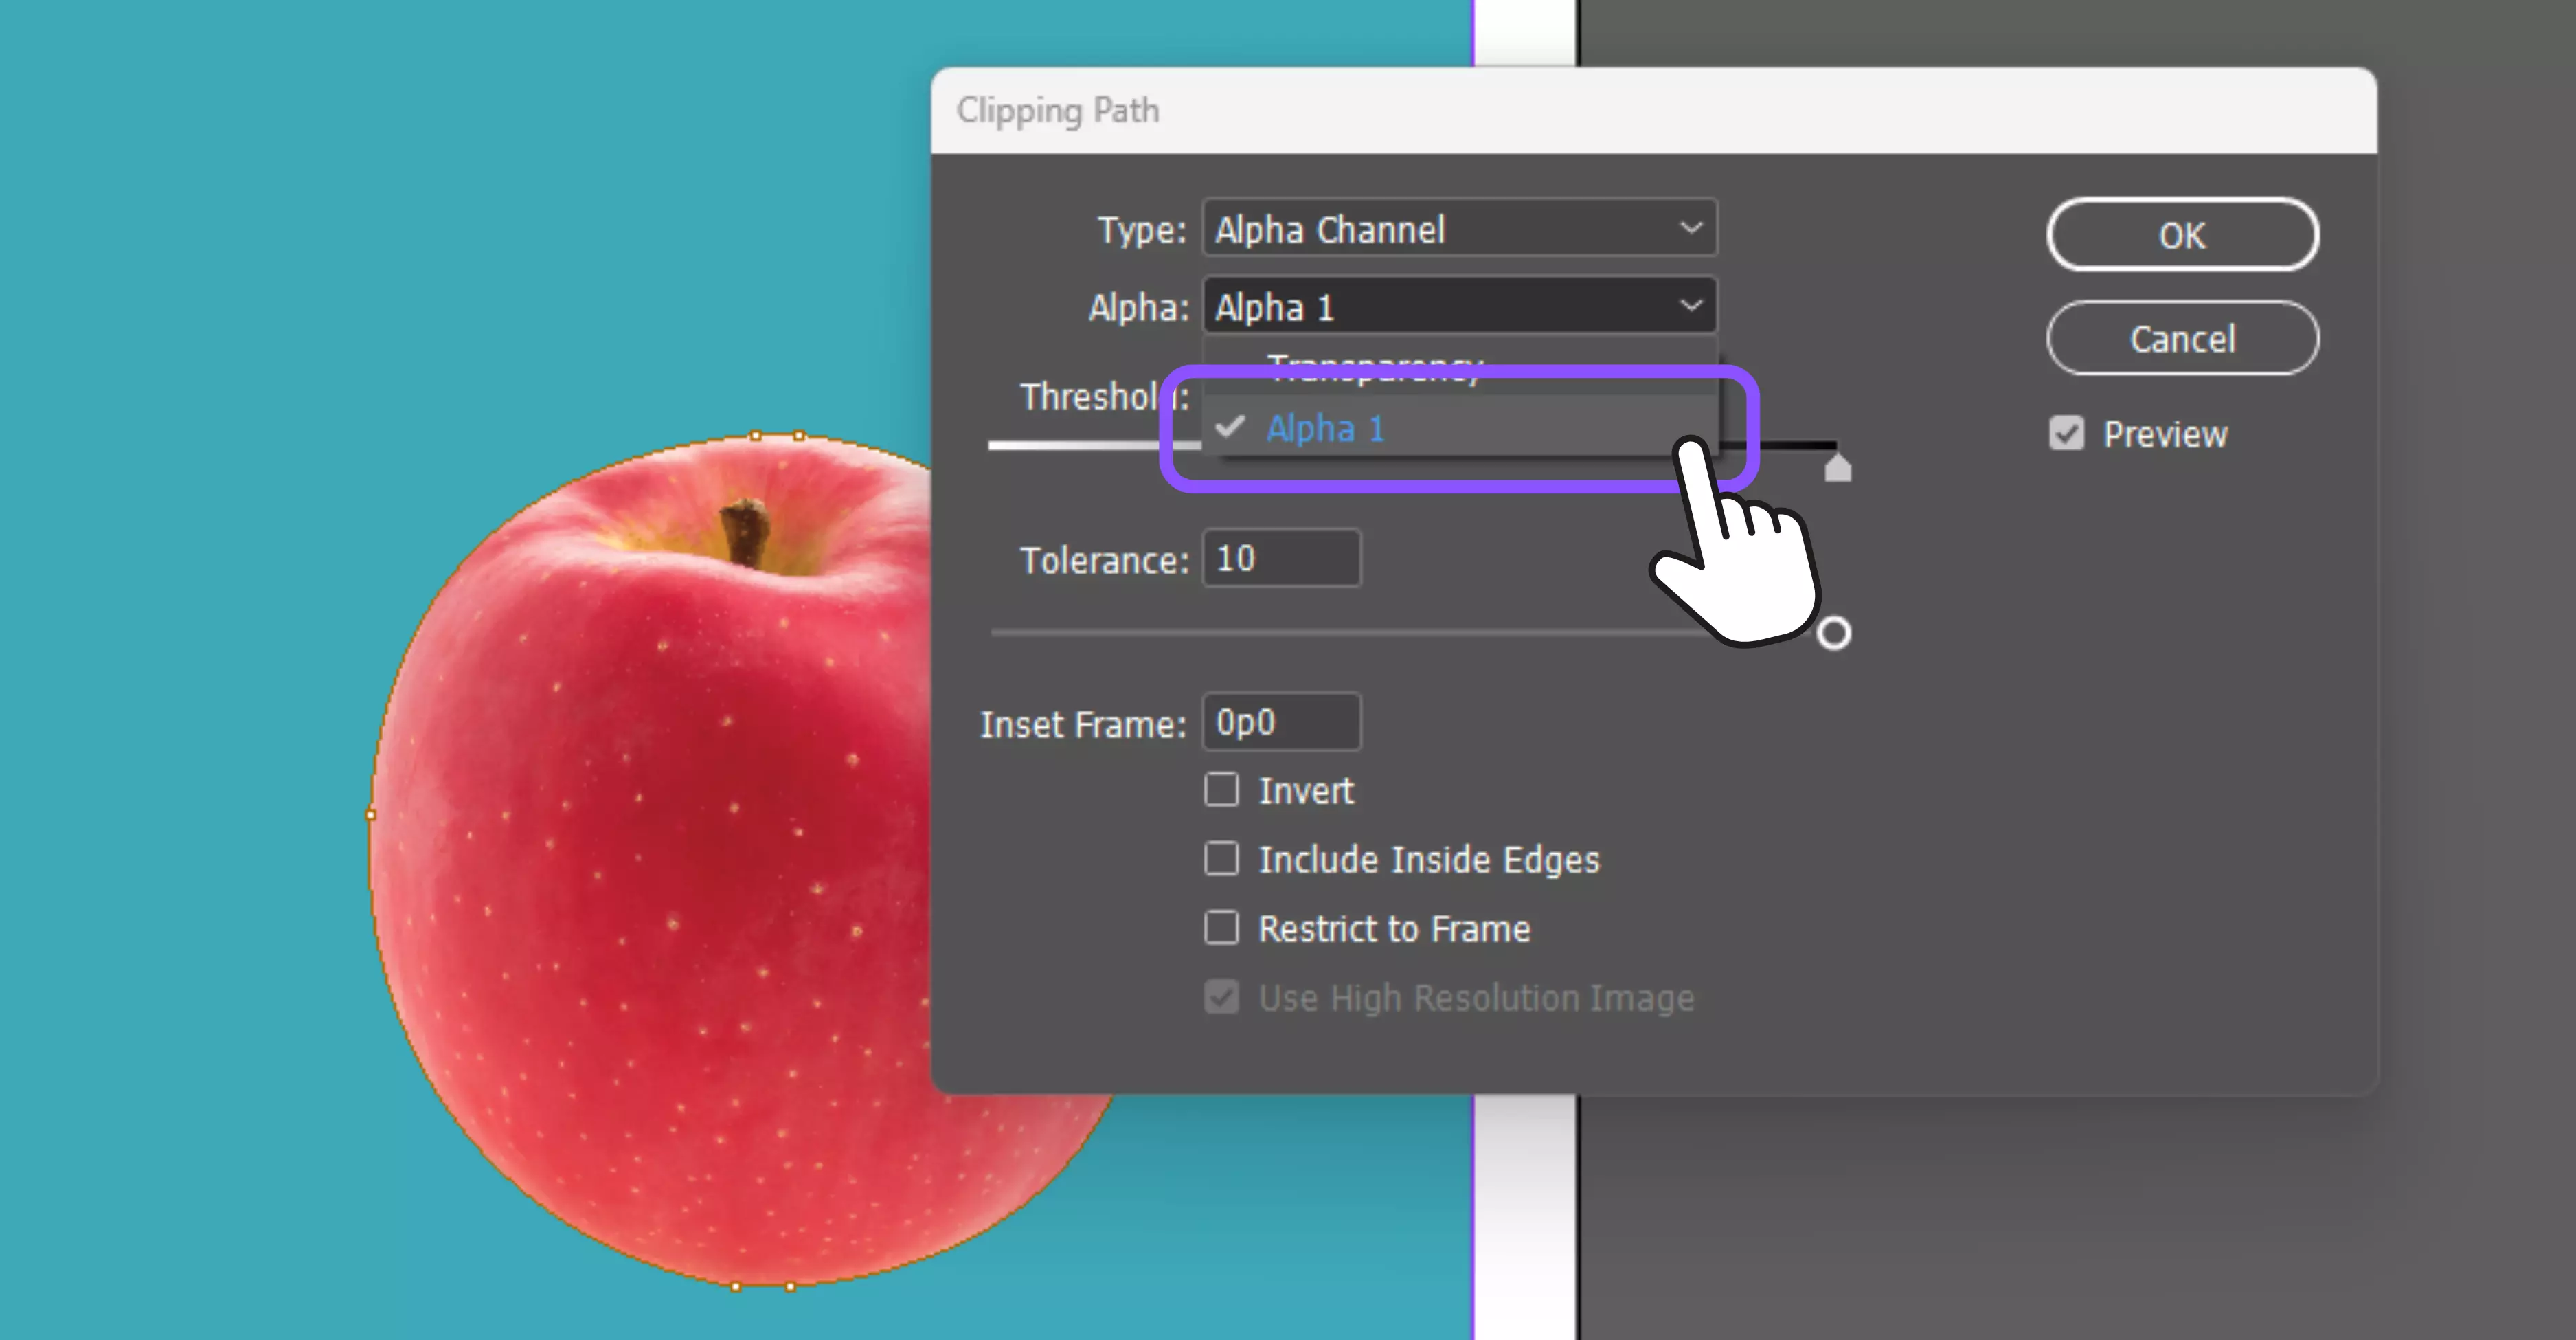
2. Use Alpha Channel
For cleaner results, prepare your image in Photoshop first. Save it with either an Alpha Channel or a path around the subject.
When you bring this file into InDesign, you can use the saved selection to remove the background automatically without having to redo the work.
How to use the method?
Step 1: In Photoshop, save the image as PSD, TIFF, or EPS with a path or Alpha Channel.
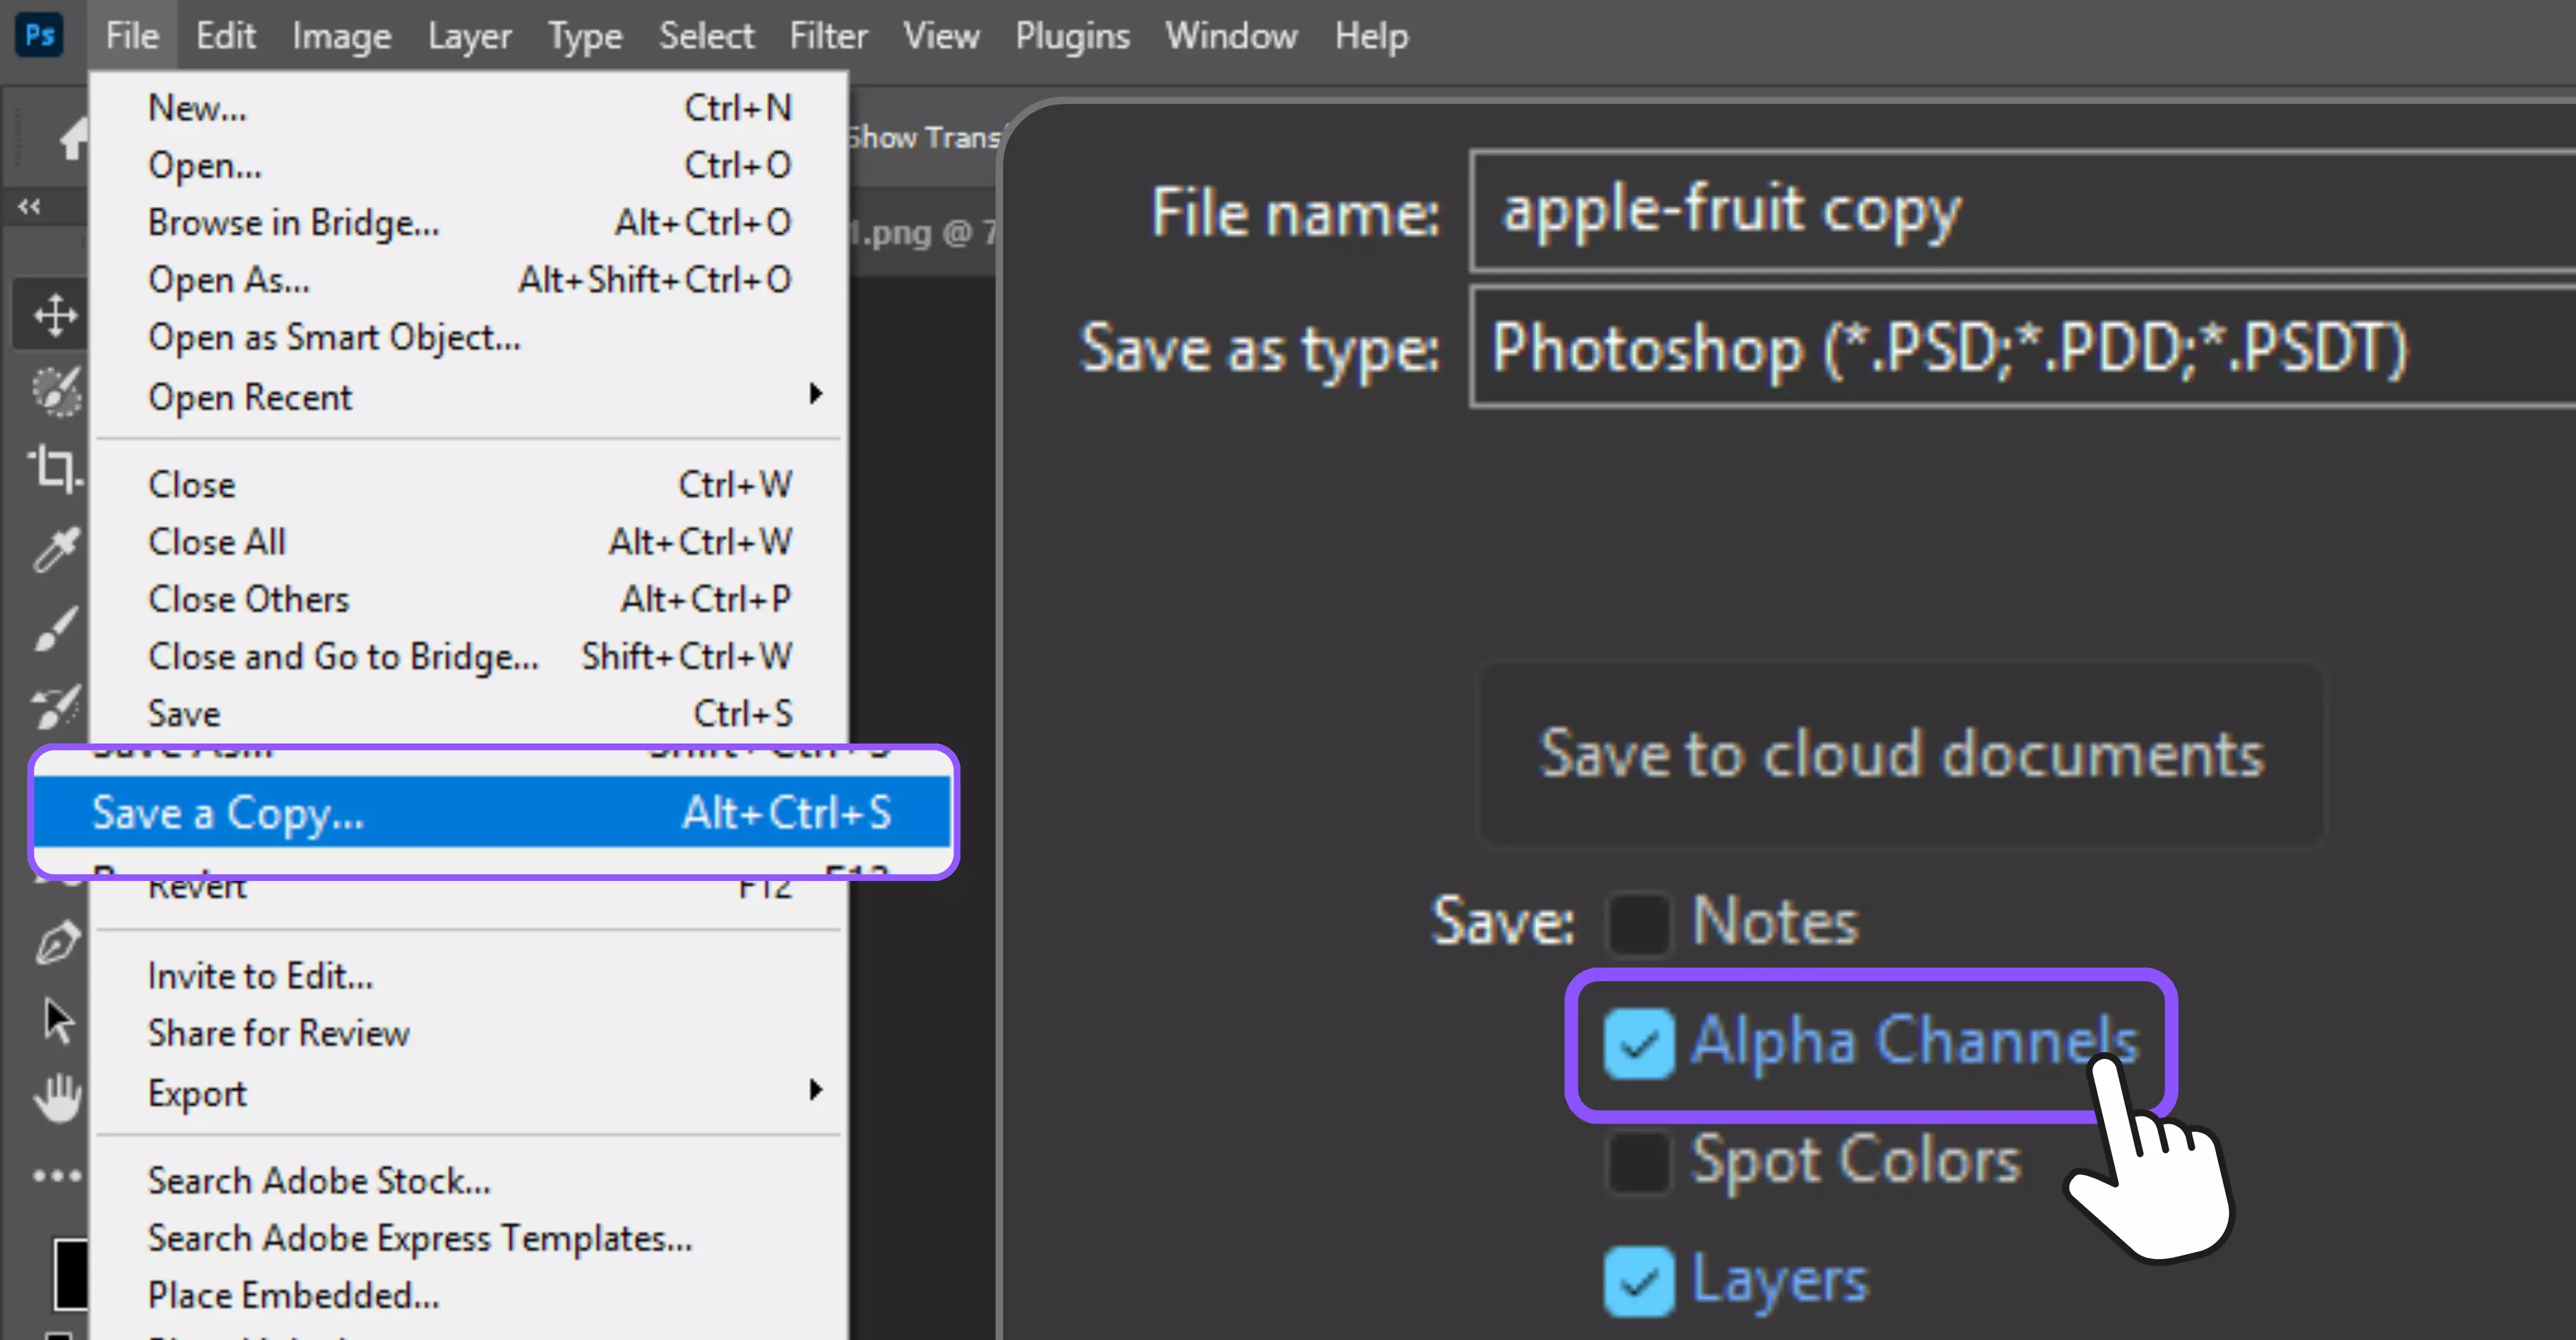
Step 2: Place the file into your InDesign document.
Step 3: With the image selected, go to Object → Clipping Path → Options.
Step 4: Under “Type,” choose Alpha Channel or Photoshop Path.
Step 5: The background disappears, leaving only the cutout subject.
3. Clear Frame Background Fill
Sometimes the problem isn’t in the image—it’s in the frame. InDesign frames can carry a background fill or stroke that looks like an unwanted box.
Removing this fill is often all you need to make the image appear clean against the page.
How to use the method?
Step 1: Click the frame around the image.
Step 2: Open the Swatches panel.
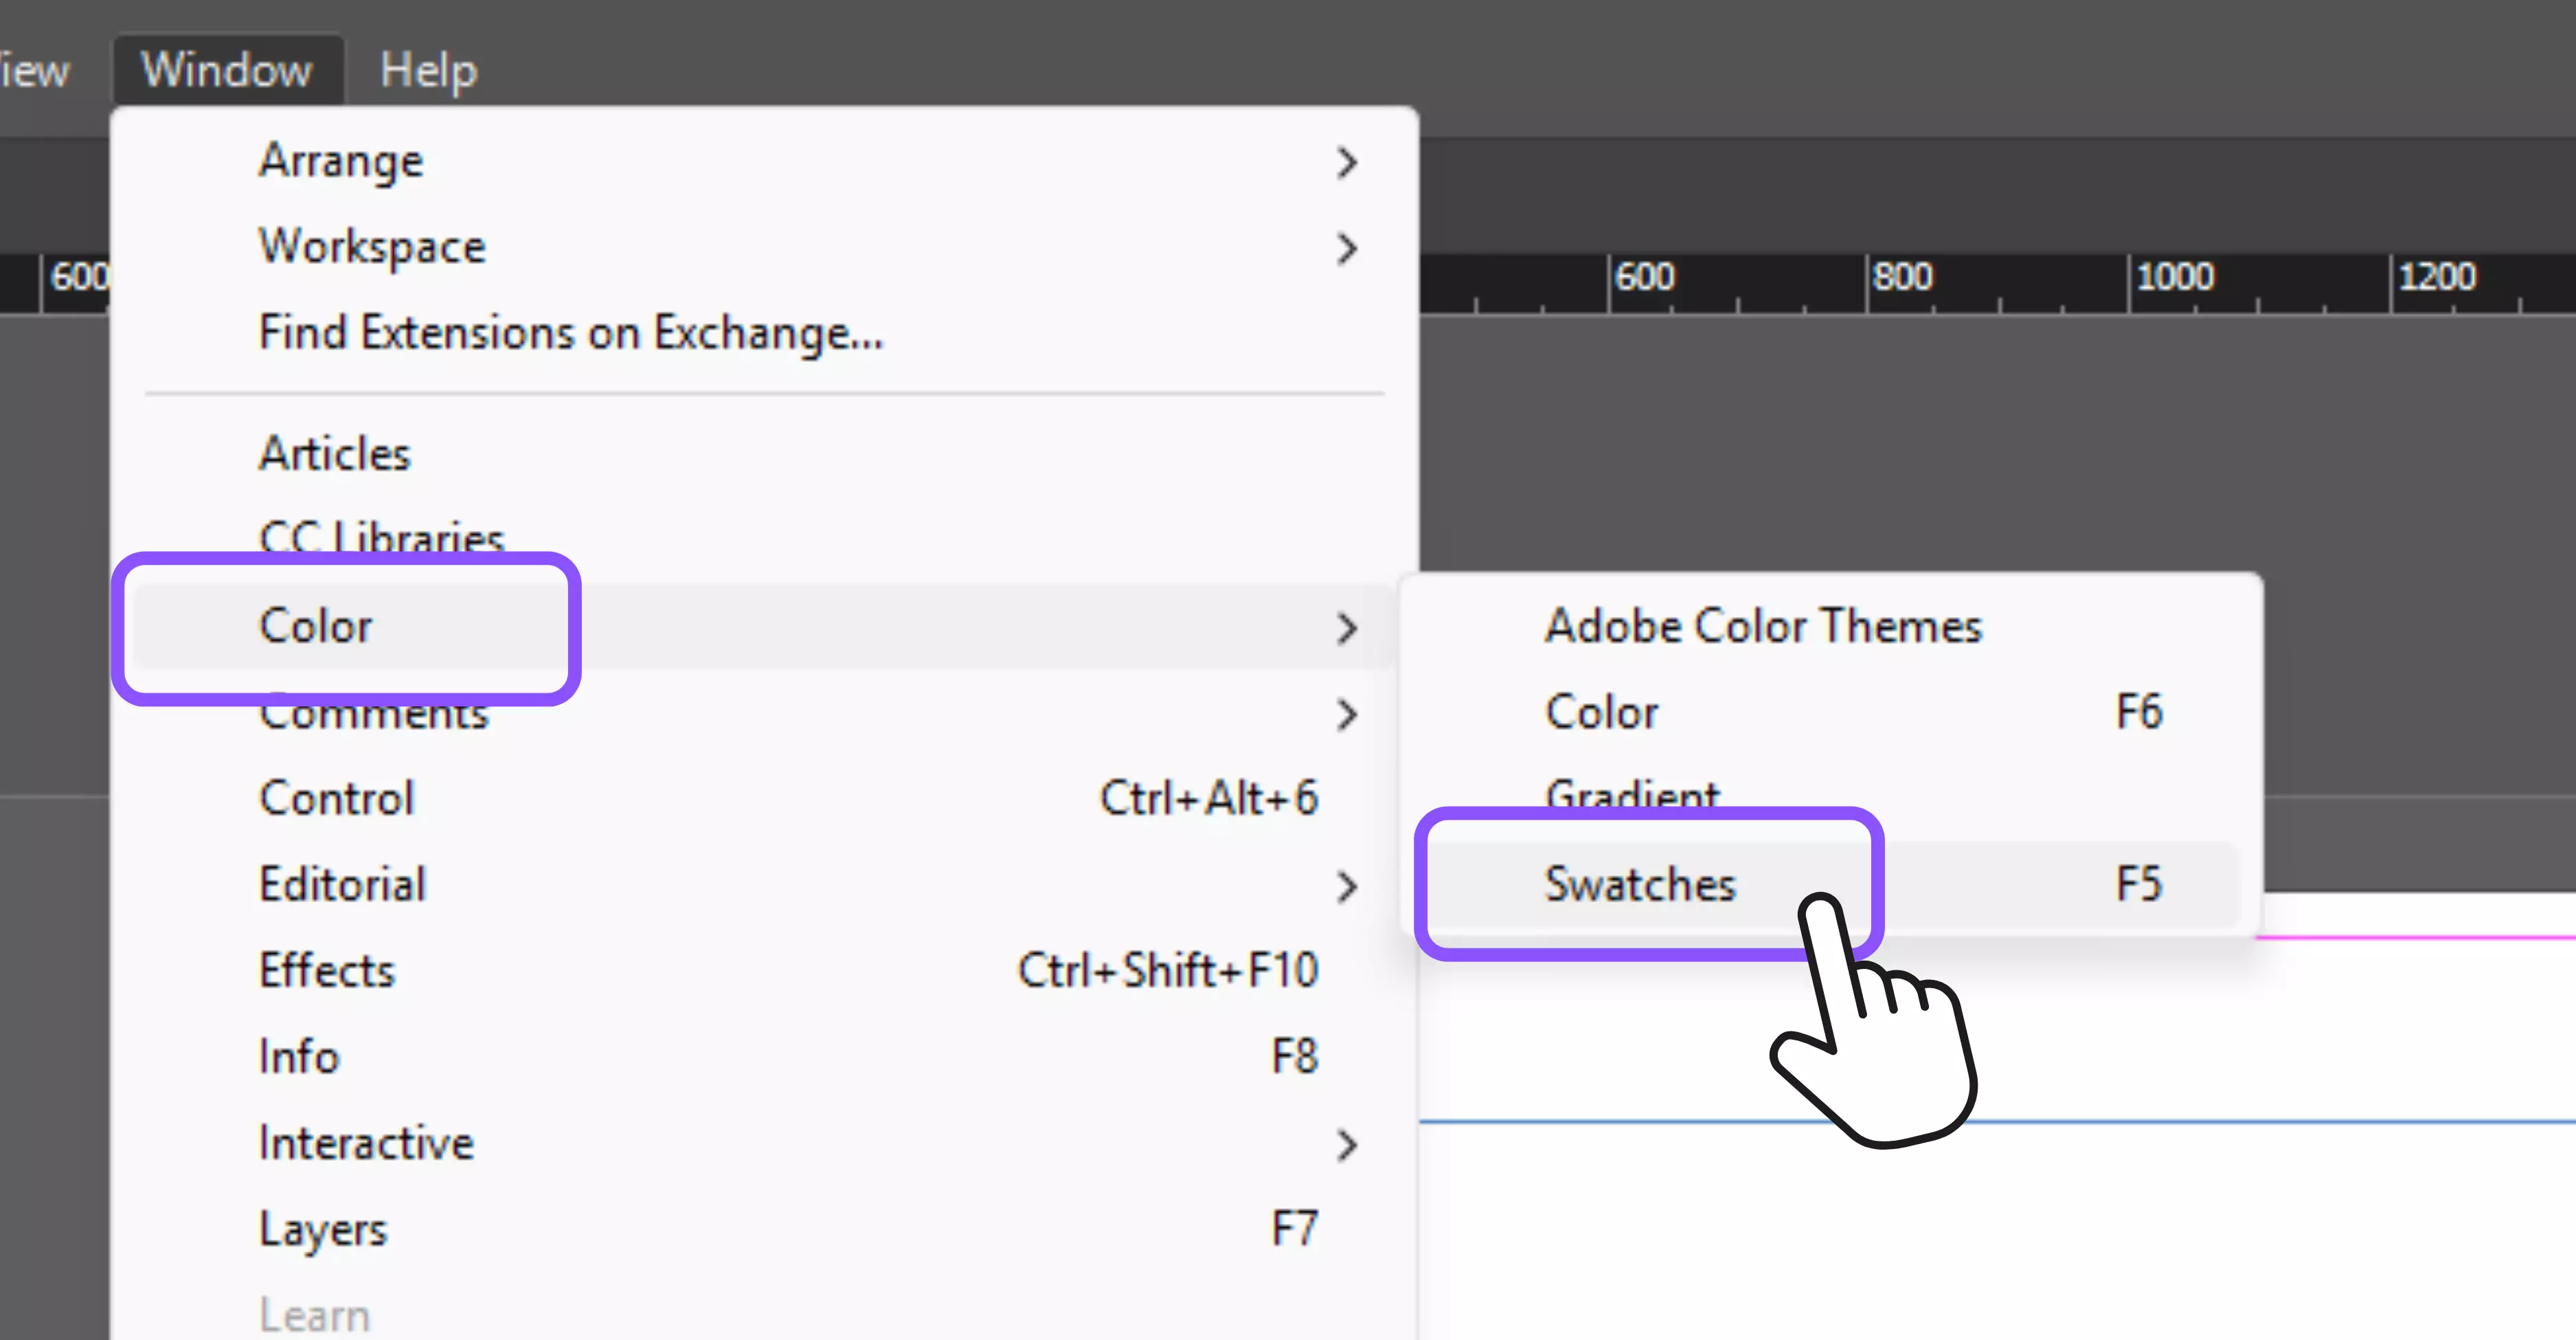
Step 3: Set Fill to None (red slash icon).
Step 4: Remove any stroke by setting it to None as well.
Step 5: Check that only the image remains.
Most searched methods to remove background in InDesign
InDesign isn’t meant for background removal, but it provides several dependable tools. These let you hide, clear, or replace backgrounds depending on the file type and the design needs. Here are the most practical techniques that designers use every day to keep layouts clean and professional.
4. How to remove background in InDesign 2024
InDesign 2024 doesn’t come with a background eraser like Photoshop, but it handles transparency better than the older versions. The update makes it easier to bring in images with transparent areas, so designers don’t waste time cleaning them up again inside the layout.
The focus is on smoother performance, not new tools. You will get a clear idea after going through the steps below.
Place a transparent PNG or PSD
Open your image in Photoshop, remove the background, and save it with transparency as a PNG or PSD. Then, in InDesign, go to File → Place and insert it. The background will already be gone, leaving only the subject. This is the fastest and cleanest method.
Apply a Clipping Path
Select your placed image, then go to Object → Clipping Path → Options. From the “Type” dropdown, choose Detect Edges. Adjust the sliders until the background gets removed. This works best when the subject has strong edges against the background.
Use an Alpha Channel
If you save the image from Photoshop with an Alpha Channel, InDesign can recognize it. Place the file, open the Clipping Path Options, and set the “Type” to Alpha Channel. This uses the transparency already built into the image for an accurate cutout.
Clear Frame Fill or Stroke
Sometimes, the problem isn’t the image at all—it’s the frame. Select the frame around your picture, open the Swatches panel, and set both Fill and Stroke to None. This removes any unwanted grey or colored box that looks like a background.
5. How to remove background in InDesign 2020
InDesign 2020 didn’t add anything new for background removal, but it remained dependable with the tools it had. If you were working with this version, the key was always preparing your images properly before bringing them into the layout. Transparent PNGs, PSDs, and clipping Paths were the main methods.
While later versions improved stability, the 2020 release could still handle transparency well if the files were set up correctly. If you have to work with the InDesign 2020 version, then go through the following steps.
Use Transparent PNG or PSD Files
Edit your image in Photoshop, delete the background, and save it as a PNG or layered PSD. Then, in InDesign, go to File → Place and insert the file. The transparent areas will carry over automatically, so there’s no extra setup required.
Apply a Clipping Path
Select the placed image, then go to Object → Clipping Path → Options. From the “Type” menu, choose Detect Edges. Move the Threshold and Tolerance sliders until the unwanted areas disappear. This works best on images with strong contrast between the subject and background.
Use Alpha Channels
If the file has an Alpha Channel saved in Photoshop, InDesign 2020 can use it directly. Place the PSD or TIFF into your layout, open Clipping Path Options, and choose Alpha Channel. This applies the transparency exactly as it was created in Photoshop.
Check the Frame for Fills or Strokes
Sometimes the problem isn’t in the image but the frame around it. Select the frame, open the Swatches panel, and set both Fill and Stroke to None. This clears any solid box or outline that might look like a background.
6. How to hide the background in InDesign
There are times when you don’t actually want to delete a background—you just need to hide it temporarily. The good thing about hiding instead of removing is that it’s reversible.
You can quickly switch views, turn off a layer, or lower the opacity and bring the background back later. This makes it useful for experimenting with layouts. For a better idea, go through the steps below.
Switch to preview mode
Press W on your keyboard to toggle between Normal View and Preview Mode. His hides, guides, and frame edges so you see a cleaner print preview. Press W again to return to Normal View when you’re ready to edit.
Lower the opacity
Click on the image and head over to the Effects panel. If you drag the opacity slider down, the whole picture fades—including the subject and the background. It won’t delete anything, but it makes the background less distracting. Think of it like turning it into a faint watermark.
Hide a background layer
Pop open the Layers panel and look for the layer with your background image. There’s a little eye icon next to it—click that, and the background disappears. Nothing’s gone for good, though. You can bring it back anytime just by clicking the eye again.
Cover it with a shape
Another simple trick: draw a rectangle over the background, fill it with white (or whatever color your page needs), and send it in front of the image. It’s not fancy, but it hides the background fast. I use this a lot when I just need something quick.
7. How to remove the grey background in InDesign
Sometimes when you place an image in InDesign, a grey background shows up behind it. It looks like something’s broken, but usually it’s just a setting inside the program. Fixing it doesn’t take long—you only need to check a few options to clear it out. Know the steps below;
Check display performance
Sometimes the grey background is only visible in InDesign, not in the actual file. Right-click the image, go to Display Performance, and switch to High Quality Display. This refreshes the preview and often clears the unwanted grey instantly.
Check the blend space
Sometimes that weird grey comes from a mismatch in settings. Go to Edit → Transparency Blend Space. Switch it to either Document RGB or Document CMYK—whichever fits your project. That small change usually clears the shading.
Look at your export options
If the grey only shows after you make a PDF, the export preset is likely the culprit. Choose File → Export, pick Adobe PDF (Print), and select PDF/X-4. That preset keeps transparency intact and stops those flat grey boxes from appearing.
Check frame fill and stroke
Sometimes it’s not a transparency issue at all—the frame itself may have a fill. Select the image frame, open the Swatches panel, and set both Fill and Stroke to None. This ensures no extra color or shading is behind the image.
How to remove background in InDesign (bonus tip)
Getting clean results in InDesign isn’t just about the tools—it’s also about how you prepare and manage your files. A few simple habits can save you from common problems like grey boxes, missing transparency, or heavy files. Know the steps below;
- Link images instead of embedding: Place your images as links, not embedded files. Linked files keep the document smaller and let you update the image in Photoshop without redoing the layout.
- Edit backgrounds before placing: Edit the background in Photoshop first, then save as PNG or PSD. Place that file in InDesign, and the background will already be gone.
- Use non-destructive methods: Don’t flatten or permanently erase parts of your image. Rely on transparency, Clipping Paths, or masks so you can make changes later if needed.
- Check export settings: When exporting to PDF, choose a preset like PDF/X-4. This setting keeps transparency intact and prevents grey or white boxes from appearing behind your images.
Tips to remove background in InDesign
InDesign isn’t a photo editor, so the secret is to prepare your files properly before you drop them in. If you handle the images the right way, you’ll avoid the common issue—grey boxes, white outlines, or exaggerated files—that many beginners run into.
Here are a few practices that make the process smoother:
1. Keep images linked
Don’t embed your pictures. Place them as links instead. Linked files keep your document light and easy to update. If you tweak the original in Photoshop, just refresh the link in InDesign and the layout updates on its own.
2. Fix the background first
Do the cut-out work in Photoshop, not InDesign. Save the file as a PNG for simple transparency or as a PSD if you want to keep layers intact. This way, the image is already clean when you place it.
3. Avoid destructive edits
Try not to flatten or permanently erase parts of an image. Use masks, Clipping Paths, or transparency instead. Keeping an untouched original means you can always go back and adjust things later.
4. Check exports
If your transparent image suddenly shows a blocky background in the PDF, it’s usually the export preset. Choose PDF/X-4, which supports transparency. For web use, stick with PNG instead of JPEG, since JPEG can’t handle transparency.
Best online tools to remove background from an image
If you feel that InDesign is too complex and pricy, here is a solution: AI tools can remove backgrounds in seconds. I tested three ranking tools with three sample images: a product, a portrait, and a complex object.
1. Pixelbin background remover

Pixelbin is all about speed. You don’t have to learn anything new—just upload your picture and let the tool handle the background. Within seconds, it spits out a transparent PNG that you can place right into InDesign.
It’s not trying to compete with Photoshop’s level of detail, but for simple objects or portraits, it gets the job done quickly.
Why do I like the tool?
- Quick background removal at a single click.
- Handles fine details like hair and edges neatly.
- Let's you save images with transparent backgrounds.
- Option to remove backgrounds in bulk.
- Works directly online, no extra software needed.
2. Erase.bg
Erase.bg is designed for people who want instant results without extra steps. You drop in your photo, and a few moments later, the background is gone.
It’s great for profile photos, e-commerce images, or any job where speed matters more than manual precision. It may not handle fine details like hair perfectly, but for straightforward backgrounds, it’s reliable and quick.
Why do I like the tool?
- Removes backgrounds instantly with AI in one click.
- Supports HD to 4K image quality without losing sharpness.
- Works online—no software or sign-up needed.
- Allows you to replace backgrounds with solid colors or themes.
- Offers bulk removal and API support for businesses and developers.
3. Photoshop
If I need a super-clean cutout, I still open Photoshop first. It takes more time, but you can really zero in on details—hair strands, soft fabric edges, all the fussy bits. I’ll usually start with Select Subject for a quick pick, then clean it up in Quick Mask.
For tough spots, the Pen tool and layer masks give me all the control I need. When I’m done, I save it as a PSD or PNG with transparency and drop it into InDesign.
Why do I like the tool?
- Select Subject and Quick Mask for automatic selection.
- Pen tool and layer masks for precise control.
- Edge refinement for soft or complex details.
- Saves PSD/PNG with transparency for InDesign.
4. illustrator
Logos and vector art are a different game. illustrator works with paths instead of pixels, so you can redraw or tweak shapes until the background disappears.
The best part: no matter how big or small you scale it in InDesign, it stays razor-sharp. That’s why I use it whenever I’m prepping branding graphics or anything that shouldn’t have a white box around it.
Why do I like the tool?
- Image Trace to convert raster art into vectors.
- Pen tool to manually remove unwanted shapes.
- Clean, scalable graphics without pixel edges.
- Saves as AI or EPS with transparent background.
Final thoughts
InDesign is a layout tool at heart. It was never meant to replace Photoshop or Illustrator, and that’s important to remember when you’re trying to deal with image backgrounds.
You can hide, clip, or adjust how images sit on the page, but the heavy lifting should be done elsewhere. The most reliable workflows usually start outside InDesign. Clean your image in Photoshop or another editor, then bring it in as a PNG or PSD with transparency.
Inside InDesign, you can fine-tune with Clipping Paths, Knockout Group, or simple frame adjustments, but you’re not actually erasing pixels. For complex removals—hair, fabrics, glass—dedicated software is the way to go.
InDesign works best once the image is already prepared. Think of it this way: prep outside, polish inside. That habit saves time, keeps your files lighter, and guarantees better results every single time.
FAQs
You can’t really erase a background inside InDesign. What you can do is hide it. The usual way is to place a PNG or PSD that already has transparency. Another option is Clipping Paths. Think of InDesign as arranging what’s already prepared, not editing the picture itself.
This happens a lot. Usually, the file wasn’t saved properly in Photoshop—maybe it was flattened or saved as a JPEG by mistake. Another thing to check is the frame in InDesign. If it has a fill color, the “transparent” background will look solid. Set the fill to “None” and it should work.
If you just want it gone from view, select the frame and remove both fill and stroke. That’s the quick fix. You’re not deleting anything—just hiding it on the page. Handy if you want to test how something looks without that block in the way.
That white box isn’t really in your file—it’s from the export settings. If you save to a JPEG, transparency turns white, always. Use a format that supports transparency like PDF/X-4 or keep the file as a PNG when possible. Changing that setting usually clears up the issue.
Open the Background Tasks panel (Window → Utilities → Background Tasks). You’ll see whatever’s running there. If something’s stuck—like a PDF taking forever—you can cancel it from that panel. It doesn’t delete your work, it just stops that one process.
Not really. InDesign can only use a path if it already exists in the image file, usually made in Photoshop. If you place a plain JPEG with no path, there’s nothing for InDesign to grab. In that case, edit the image first, then place it again.