
This happened to me too many times now that I had found a perfect image for my blog or presentation, but a watermark was over or across it. And this is too frustrating. These watermarks are digital stamps used to protect content from being copied or reused without permission.
In this post, I’m going to walk you through eight different ways you can remove a watermark from a photo. I’ve tested every method myself on my PC, using Photoshop, Snapseed, and several free AI tools that serve as watermark removers.
Whether you're trying to clean up a vacation pic, edit product shots, or touch up a meme, there’s a method here that’ll work for you. Let’s delve into the blog to know more about the tools and tricks.
How to remove a watermark from a photo using Photoshop

Photoshop is my go-to when I want total control over an image. It’s a powerful editor that lets you erase watermarks with high manual control.
Method 1
Step 1: Open an image containing a watermark in Photoshop to remove the watermark. Look at the image below. We are going to remove the before-and-after marks and the watermark as well.

Step 2: To remove the before-and-after marks, at your first attempt, take a selection tool. Here, we are taking the Rectangular marquee tool to make a selection of the ‘before’ marks.

Step 3: Press the right button on the selection and click on the Fill option. You can go to Edit from the top bar and click on the Fill option from the dropdown menu.

Step 4: Once you click on the Fill option, you will get another dialogue box. Select the Content Aware Fill and click on OK. Content-Aware Fill is sampling the same color from around and filling the area. Now let’s remove the watermark by applying the same process of Content-aware. Zoom the image until it gets distorted.

Step 5: Take the Lasso tool here in lieu of the Rectangular marquee tool since the edges of the watermarks are not straight as it was in the case of the before-and-after marks that we removed earlier. Do the work patiently and spend time to gain the best result.

What I found after testing Photoshop: Photoshop yields the cleanest results, especially in challenging areas such as faces, hair, and scenic backgrounds.
But it does take time and patience, and includes having editing skills. It’s perfect if you’re doing this professionally, or else you can perform this within a few seconds with online tools.
Method 2
- Open Image & Select Watermark Area: Launch Photoshop, load your image, and use the Rectangular Marquee Tool to isolate the watermark region.

- Access Color Range Tool: Go to Select > Color Range. Use the eyedropper to click on the watermark. Adjust Fuzziness until the watermark appears clearly in white in the preview.

- Confirm & Create Selection: Hit OK — Photoshop now selects all pixels matching the watermark's color tone.

- Use Remove Tool: Choose the Remove Tool (from the Spot Healing Tool group), then brush over the selected watermark area to intelligently erase it.

- Deselect & Final Touch-Up: Press Ctrl + D (or Cmd + D) to deselect. If needed, lightly clean with the Healing Brush for a flawless finish. Done!

What I found after testing Photoshop: Photoshop yields the cleanest results, especially in challenging areas such as faces, hair, and scenic backgrounds.
But it does take time and patience, and includes having editing skills. It’s perfect if you’re doing this professionally, or else you can perform this within a few seconds with online tools.
How to remove a watermark from a photo using online tools for free (6 tools tested)
There are tons of online tools that promise watermark removal. Some use manual selection, others use AI. I tested six of the best, and here's what I found.
1. AI Watermark Remover by Pixelbin
After testing a bunch of AI tools for watermark removal, I have to say—Pixelbin’s Studio Editor surprised me. It’s more than just another online watermark remover.
Once I logged into their studio console, I realized it’s an AI-powered tool built for bulk image editing, optimization, and delivery. Pixelbin’s watermark remover is easy and beginner-friendly.
What I loved about the tool?
- No complex brushwork, simply upload the image, click, and done.
- If you’re managing 100+ product photos, this is a game-changer as it includes batch processing.
- You can see changes as you apply them without refreshing or re-uploading.
- No forced watermark on exported files.
How to remove a watermark using Pixelbin?
Step 1: Head over to Pixelbin Studio Editor.

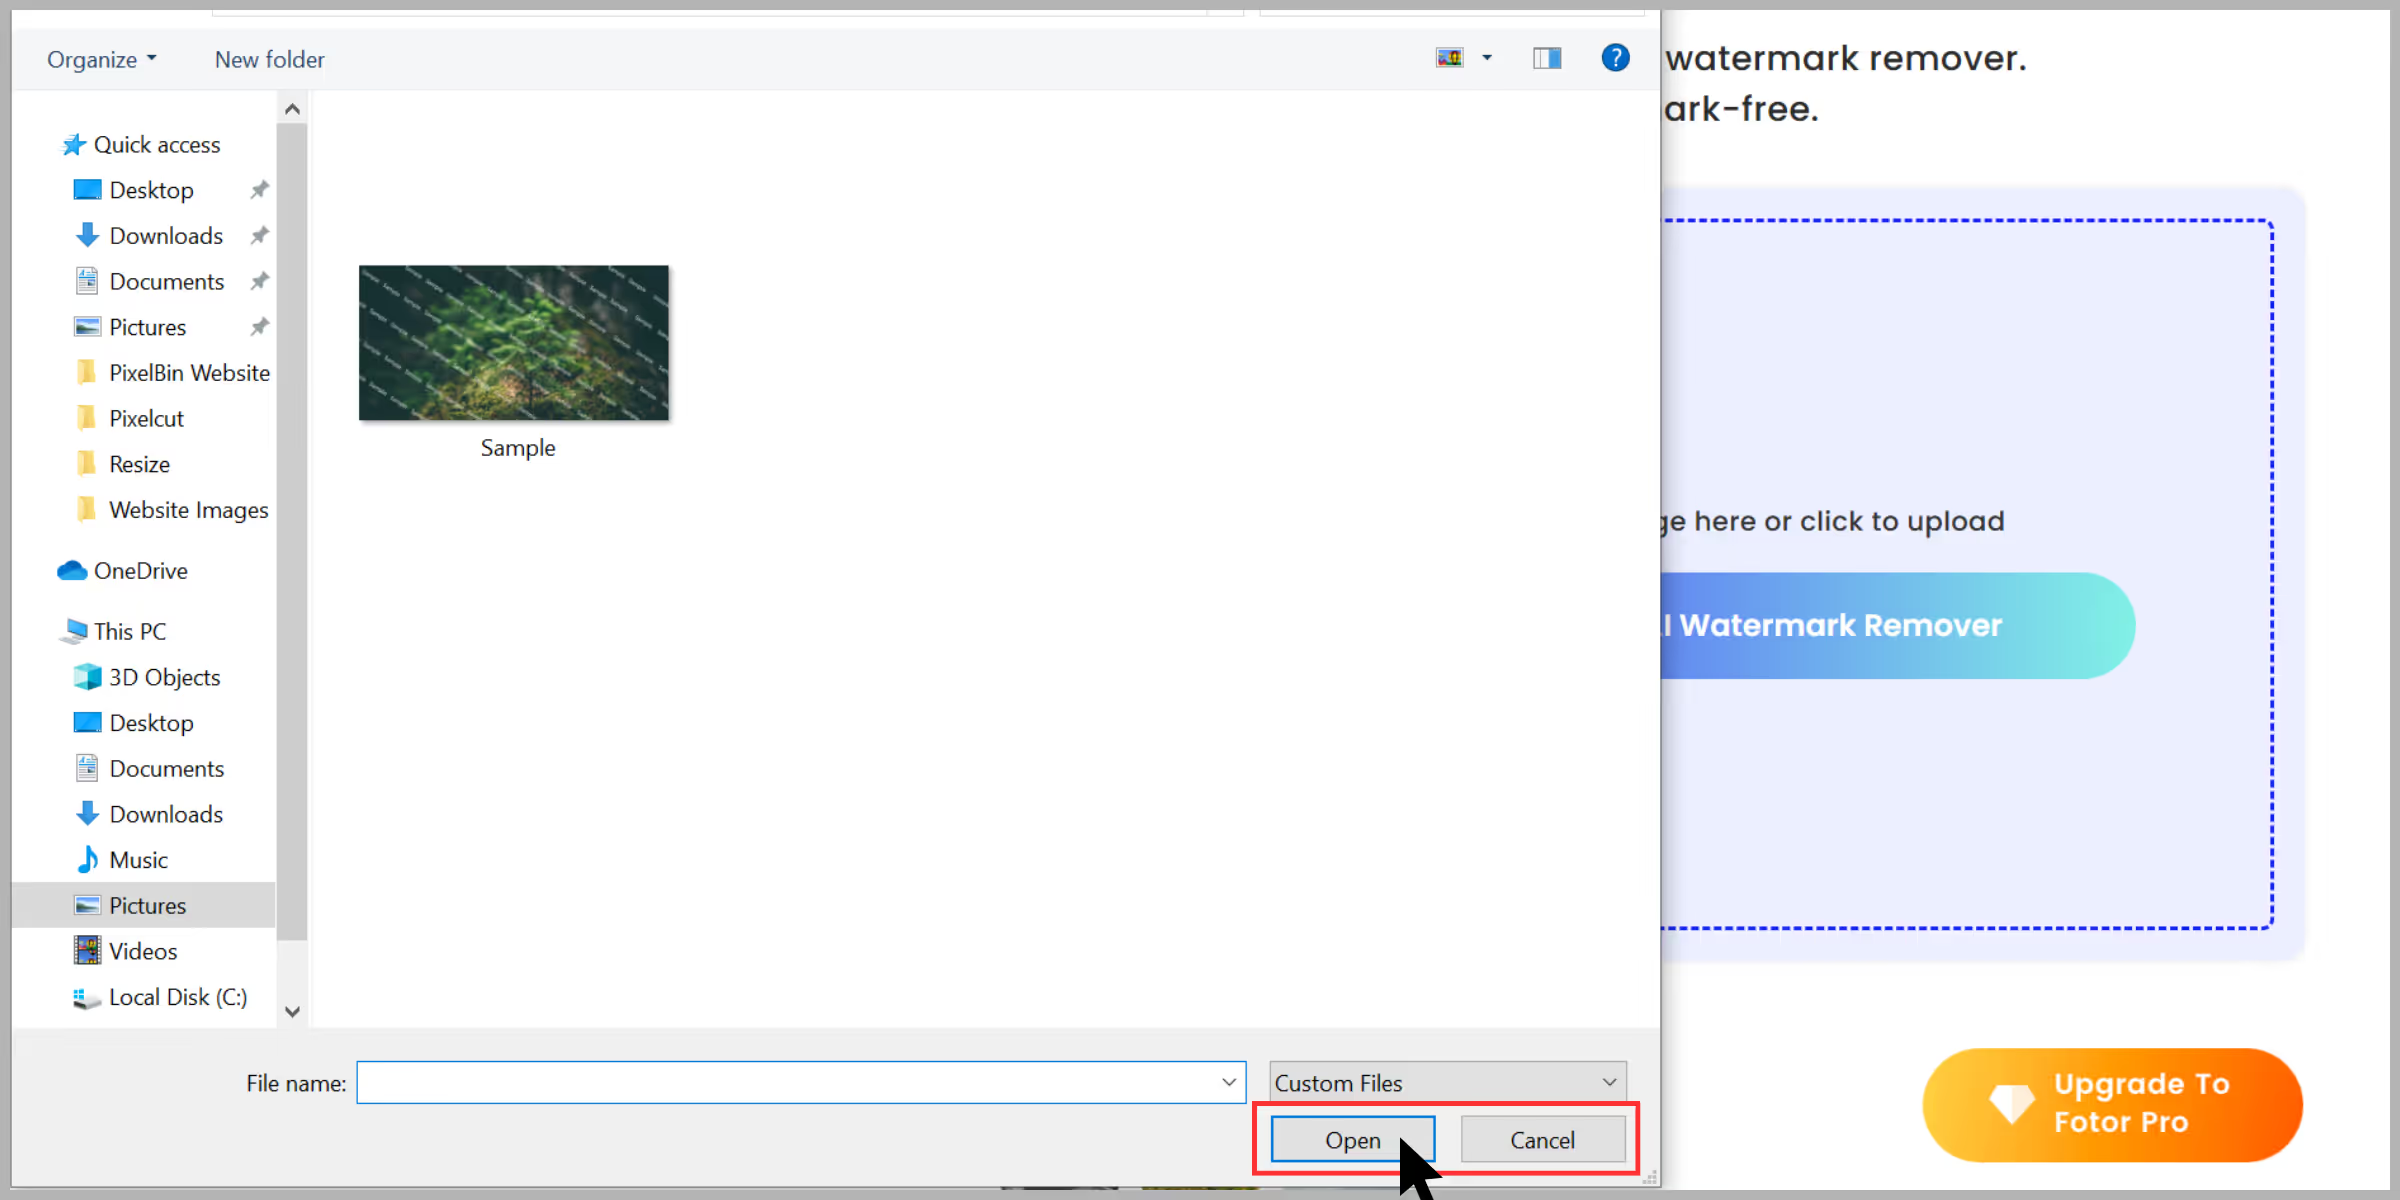
Step 2: From the dashboard, click on “Upload Image” and select the test image.
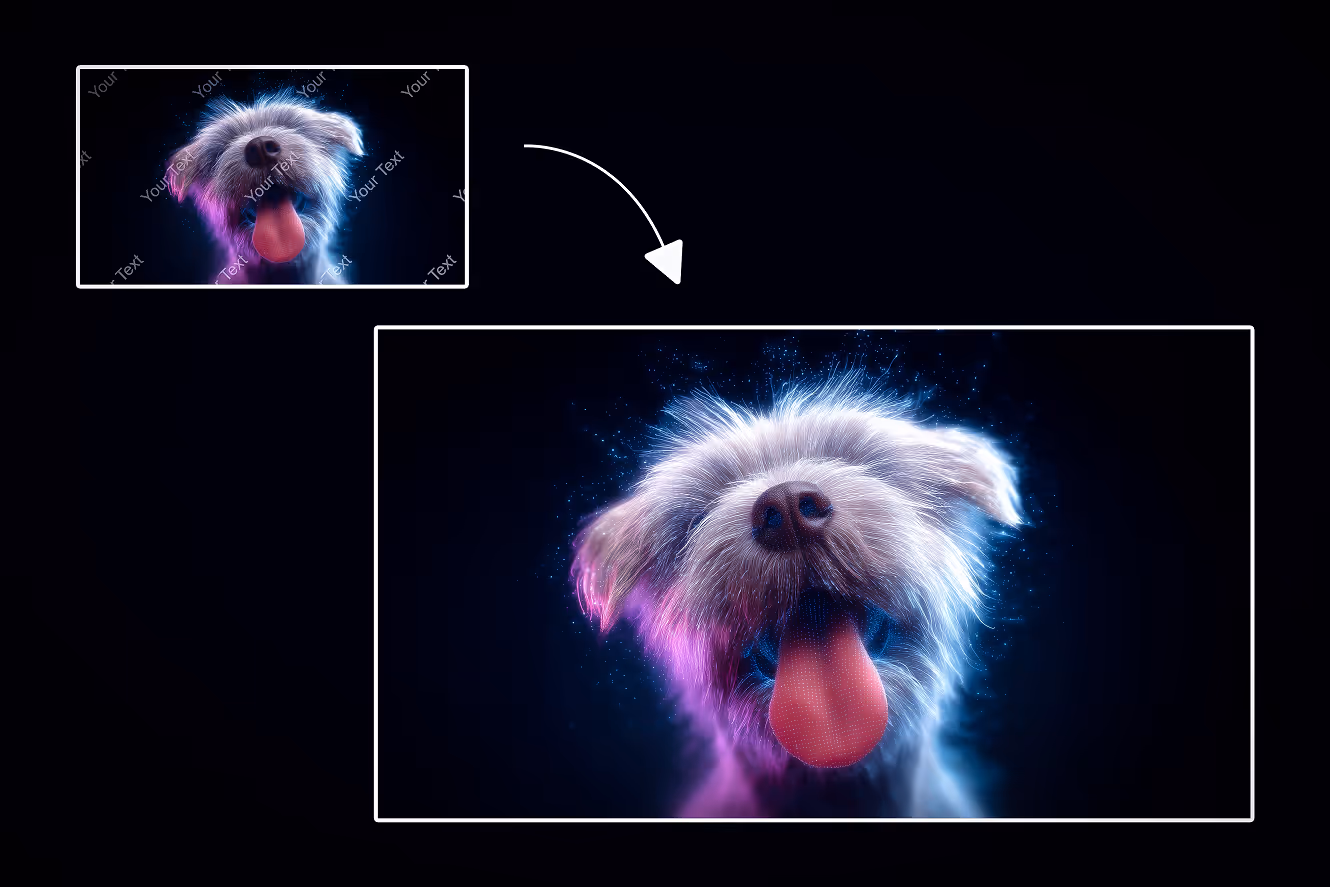
Step 3: Once the image is ready, select the “Watermark” option from the left panel and click on Auto. The AI will process within 5–7 seconds.
Step 4: It showed a before/after preview for your easy understanding.
Step 5: Once you are done, click on “Download” and select the image’s file format, and download the watermark-free version.
2. WatermarkRemover.io

If you’re looking for an easy and simple tool to remove a watermark from a photo without any editing skills, then this tool is one of the best. I tested it out on a few different images, and here’s everything I found.
What I loved about the tool?
- Just upload, and the tool does the rest.
- No signup or login required, the basic features are free to use.
- Clean and easy-to-understand user interface.
- The AI algorithm works accurately for images with complex backgrounds.
- No added watermark on output image.
How to remove a watermark using WatermarkRemover.io?
Step 1: Go to WatermarkRemover.io.

Step 2: Click the “Upload Image” button (they accept JPG, PNG, WEBP, HEIC, and JPEG).
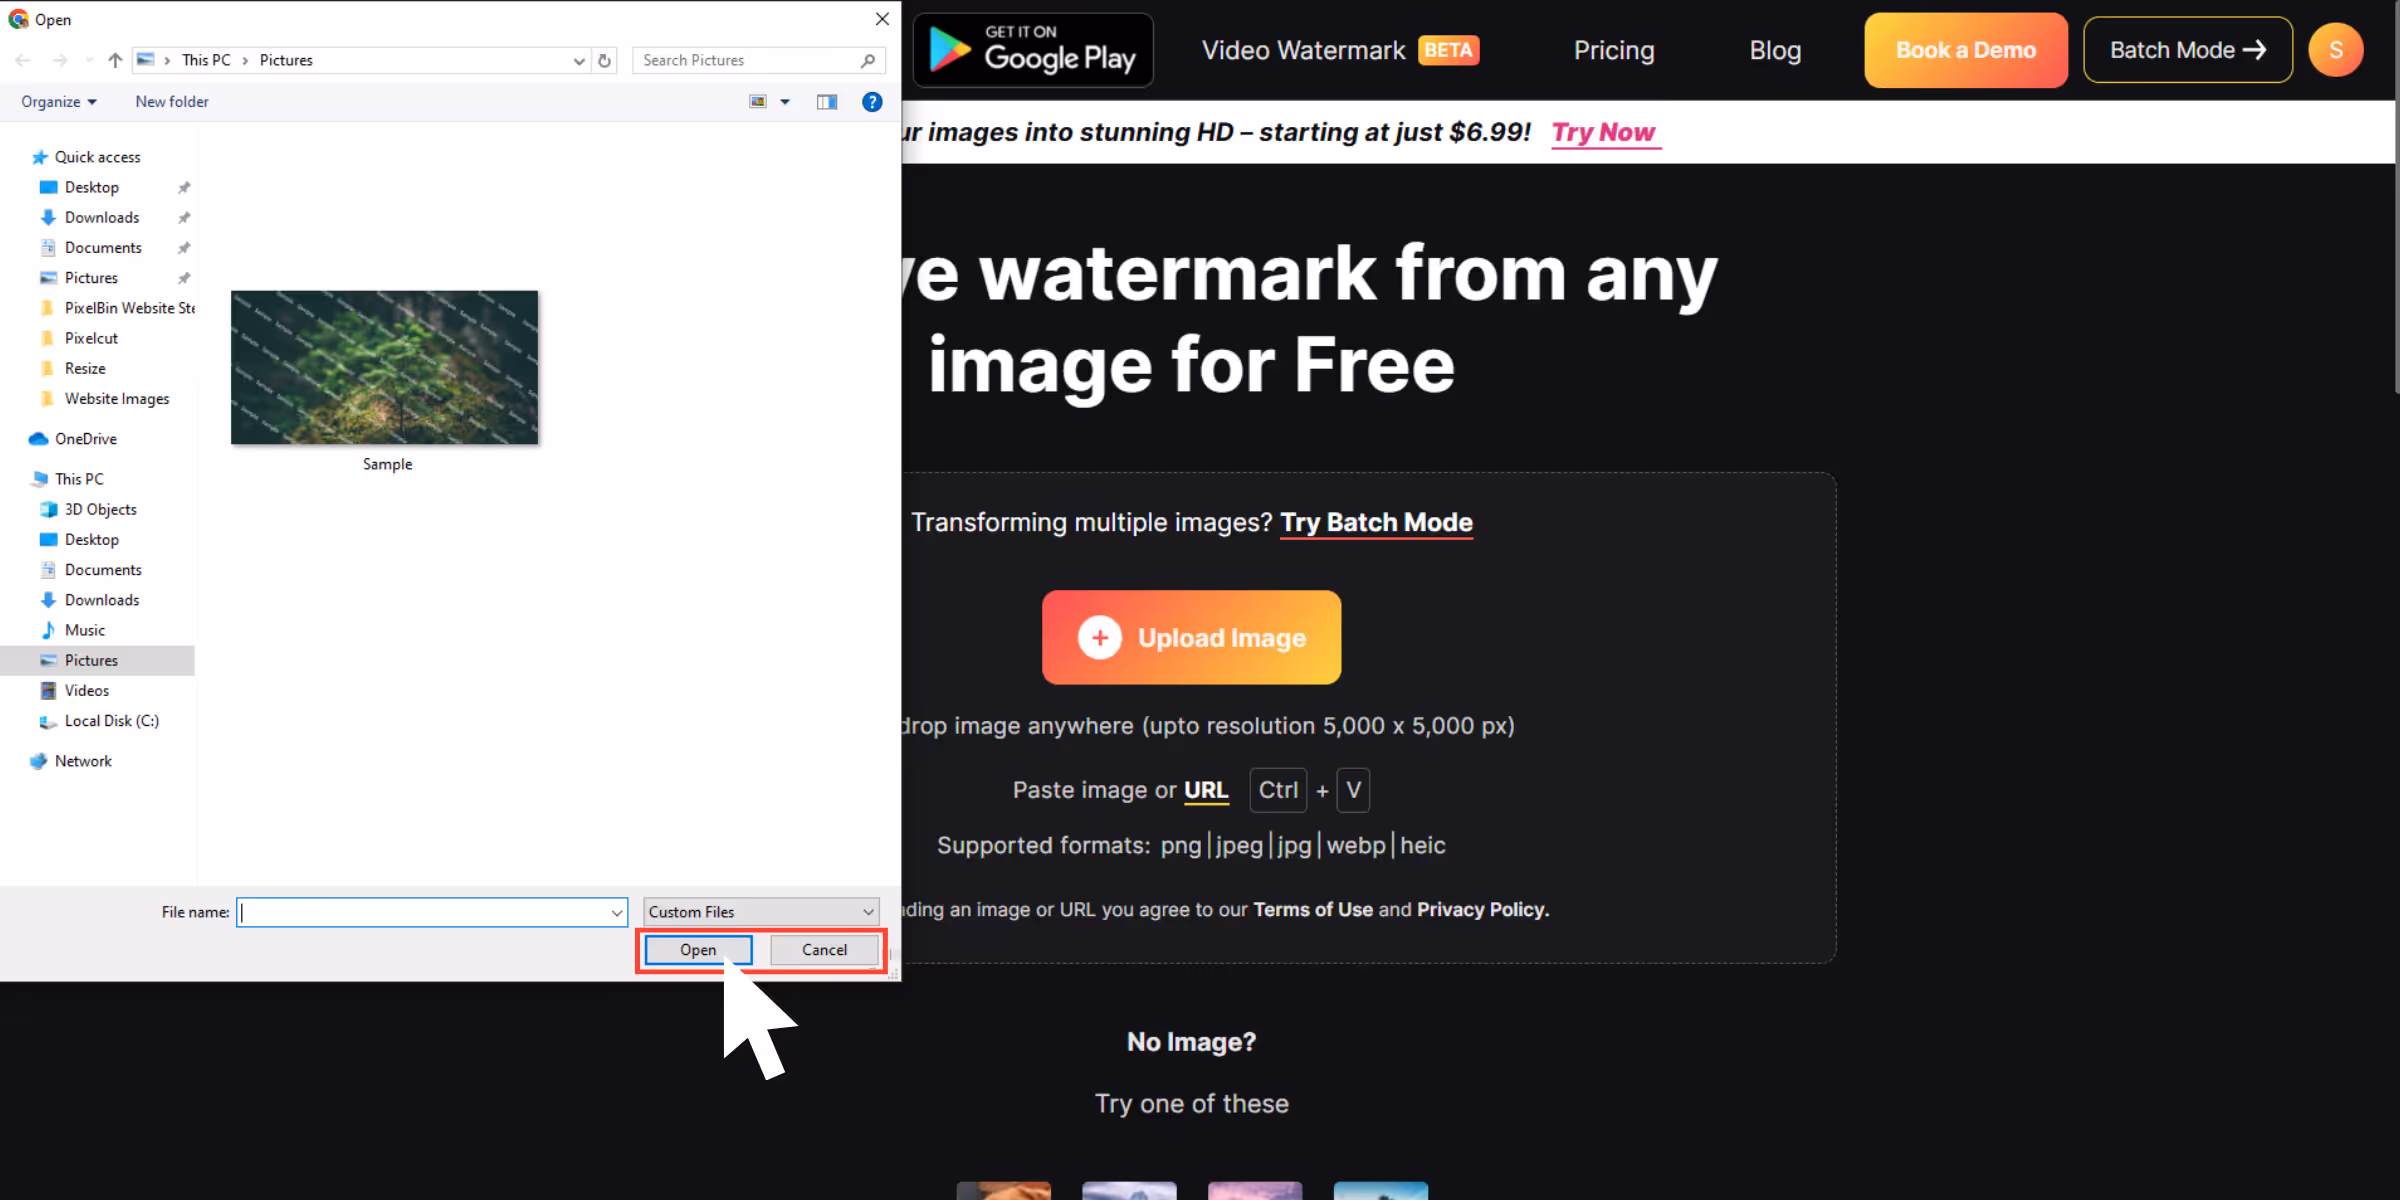
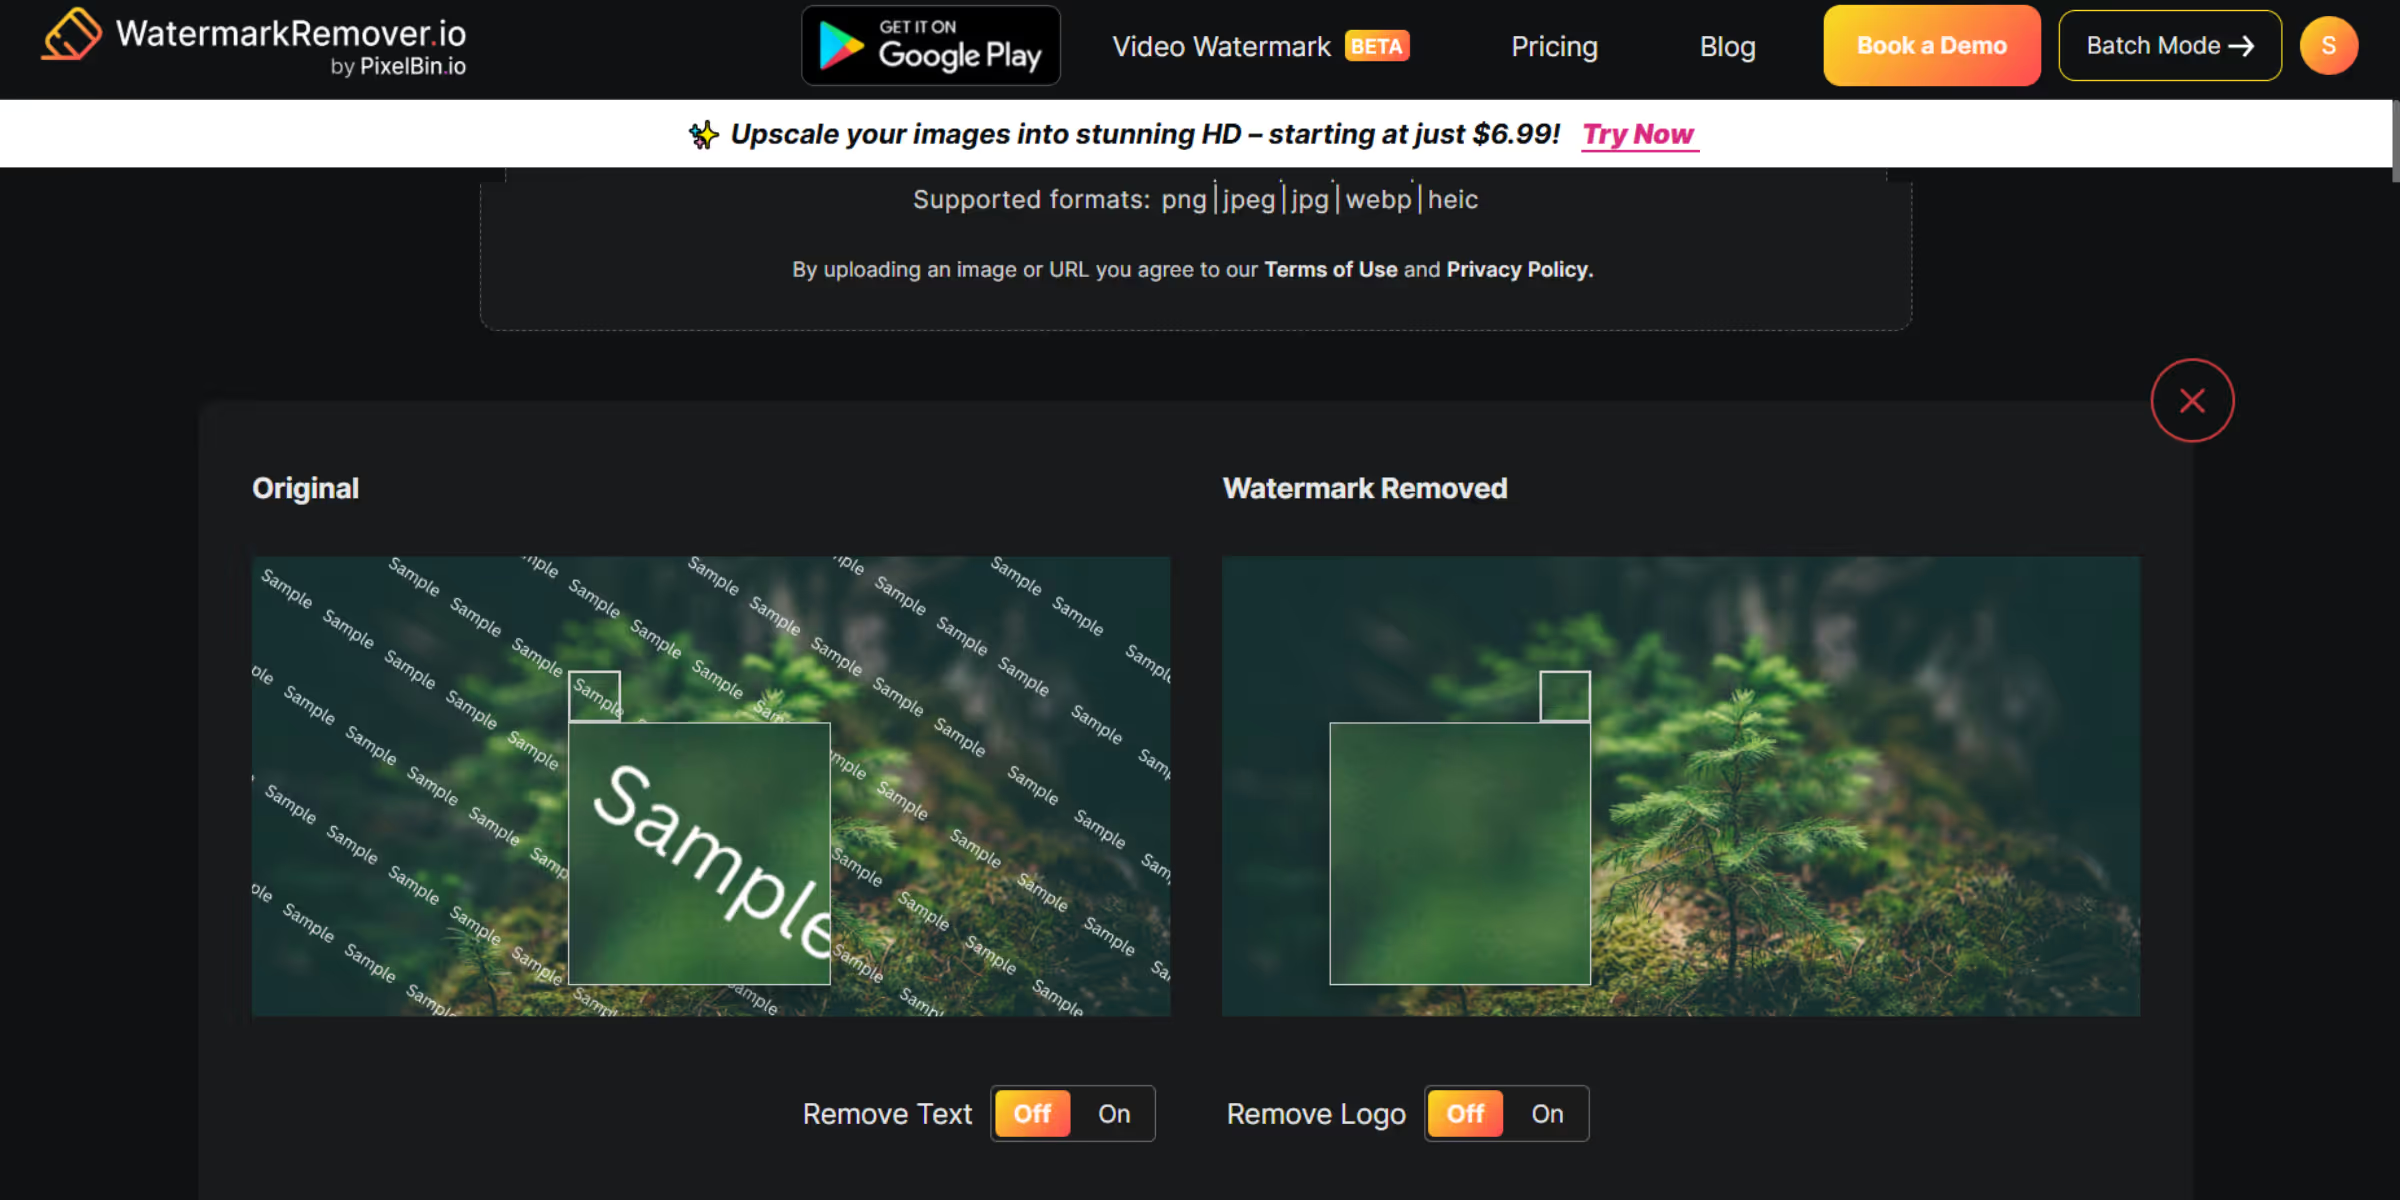
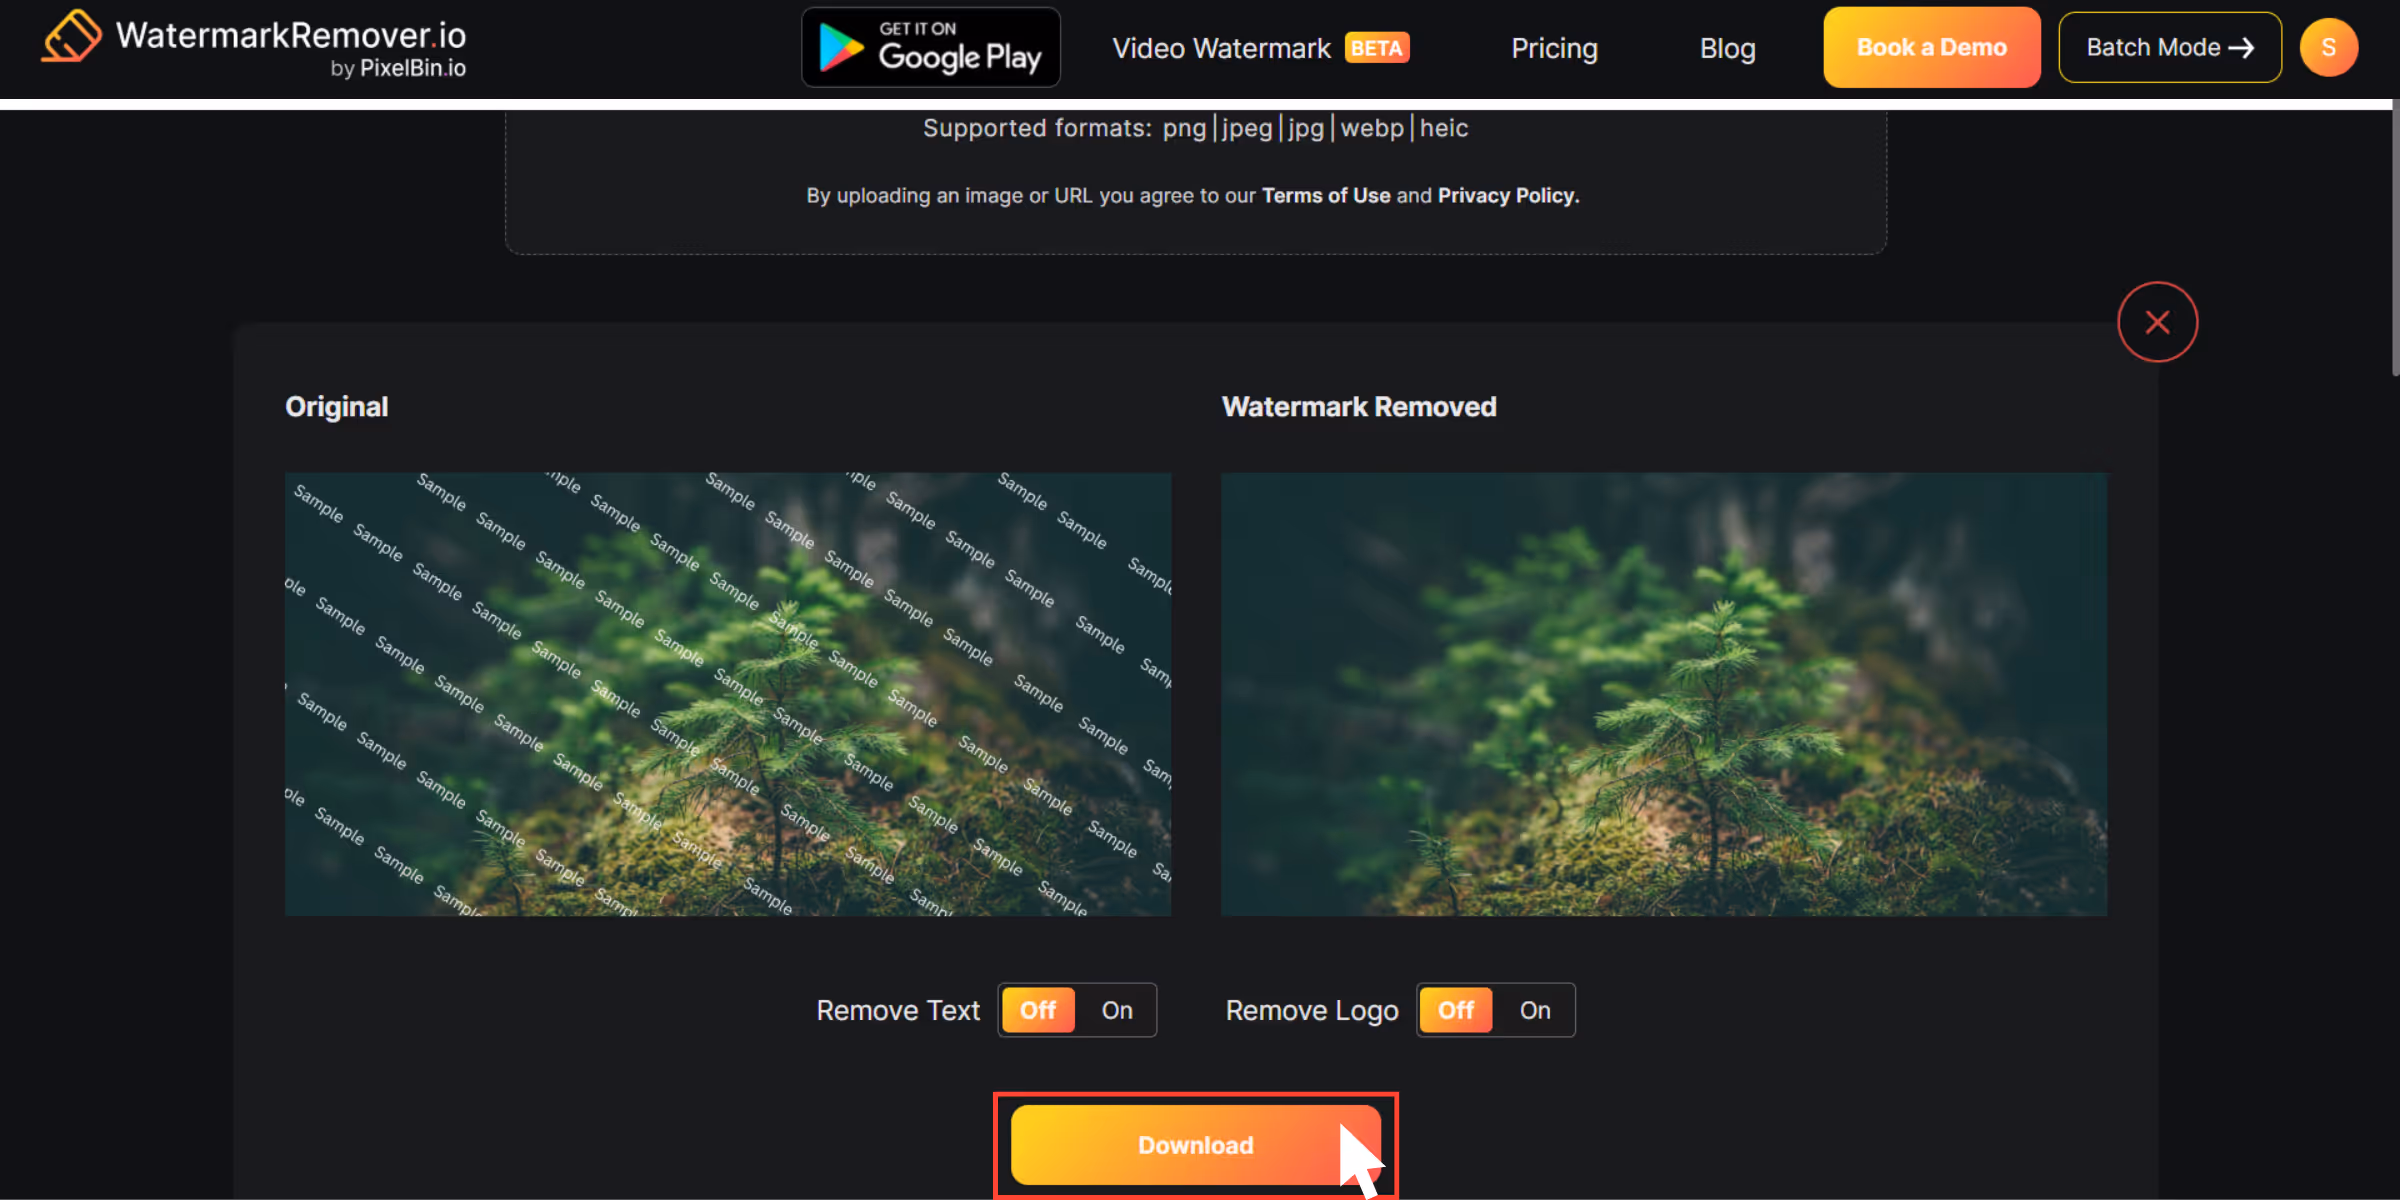
Step 3: After uploading the image, click on remove text or click on remove logo according to your need.
.avif)
Step 4: After using the features. The tool will automatically show a before-and-after slider, so I can compare.
Step 5: Hit Download and save the cleaned-up image to your desktop.
3. Watermark Remover by Fotor

When I first opened Fotor’s watermark remover, I didn't expect too much; it looked more like a graphic design app than a photo editor. The feature that caught my eye was that Fotor gives you manual control with brush and lasso tools, which means you can target specific watermark areas without any hassle.
What I loved about the tool?
- The zoom-in feature is available and adjusts the brush size for precision.
- The before/after slider made it easy to compare results.
- It includes batch processing, and you can add 50 images at once.
- If you want to edit the image, some extra tools like crop, adjust, and text are available.
- Remove watermarks pretty fast, even from HD images, without deteriorating the quality.
How to remove a watermark using Watermark Remover.io?
Step 1: Go to Fotor’s watermark remover.

Step 2: Upload the image by selecting “upload image.”
Step 3: On the left panel, click “AI Tools” and then choose “Watermark Remover.”

Step 4: Highlight the watermark using the “brush” tool (you can adjust the brush size to fit closely around the watermark). Or else you can use the “advanced” feature for free with credits, and the AI will remove the watermark automatically.
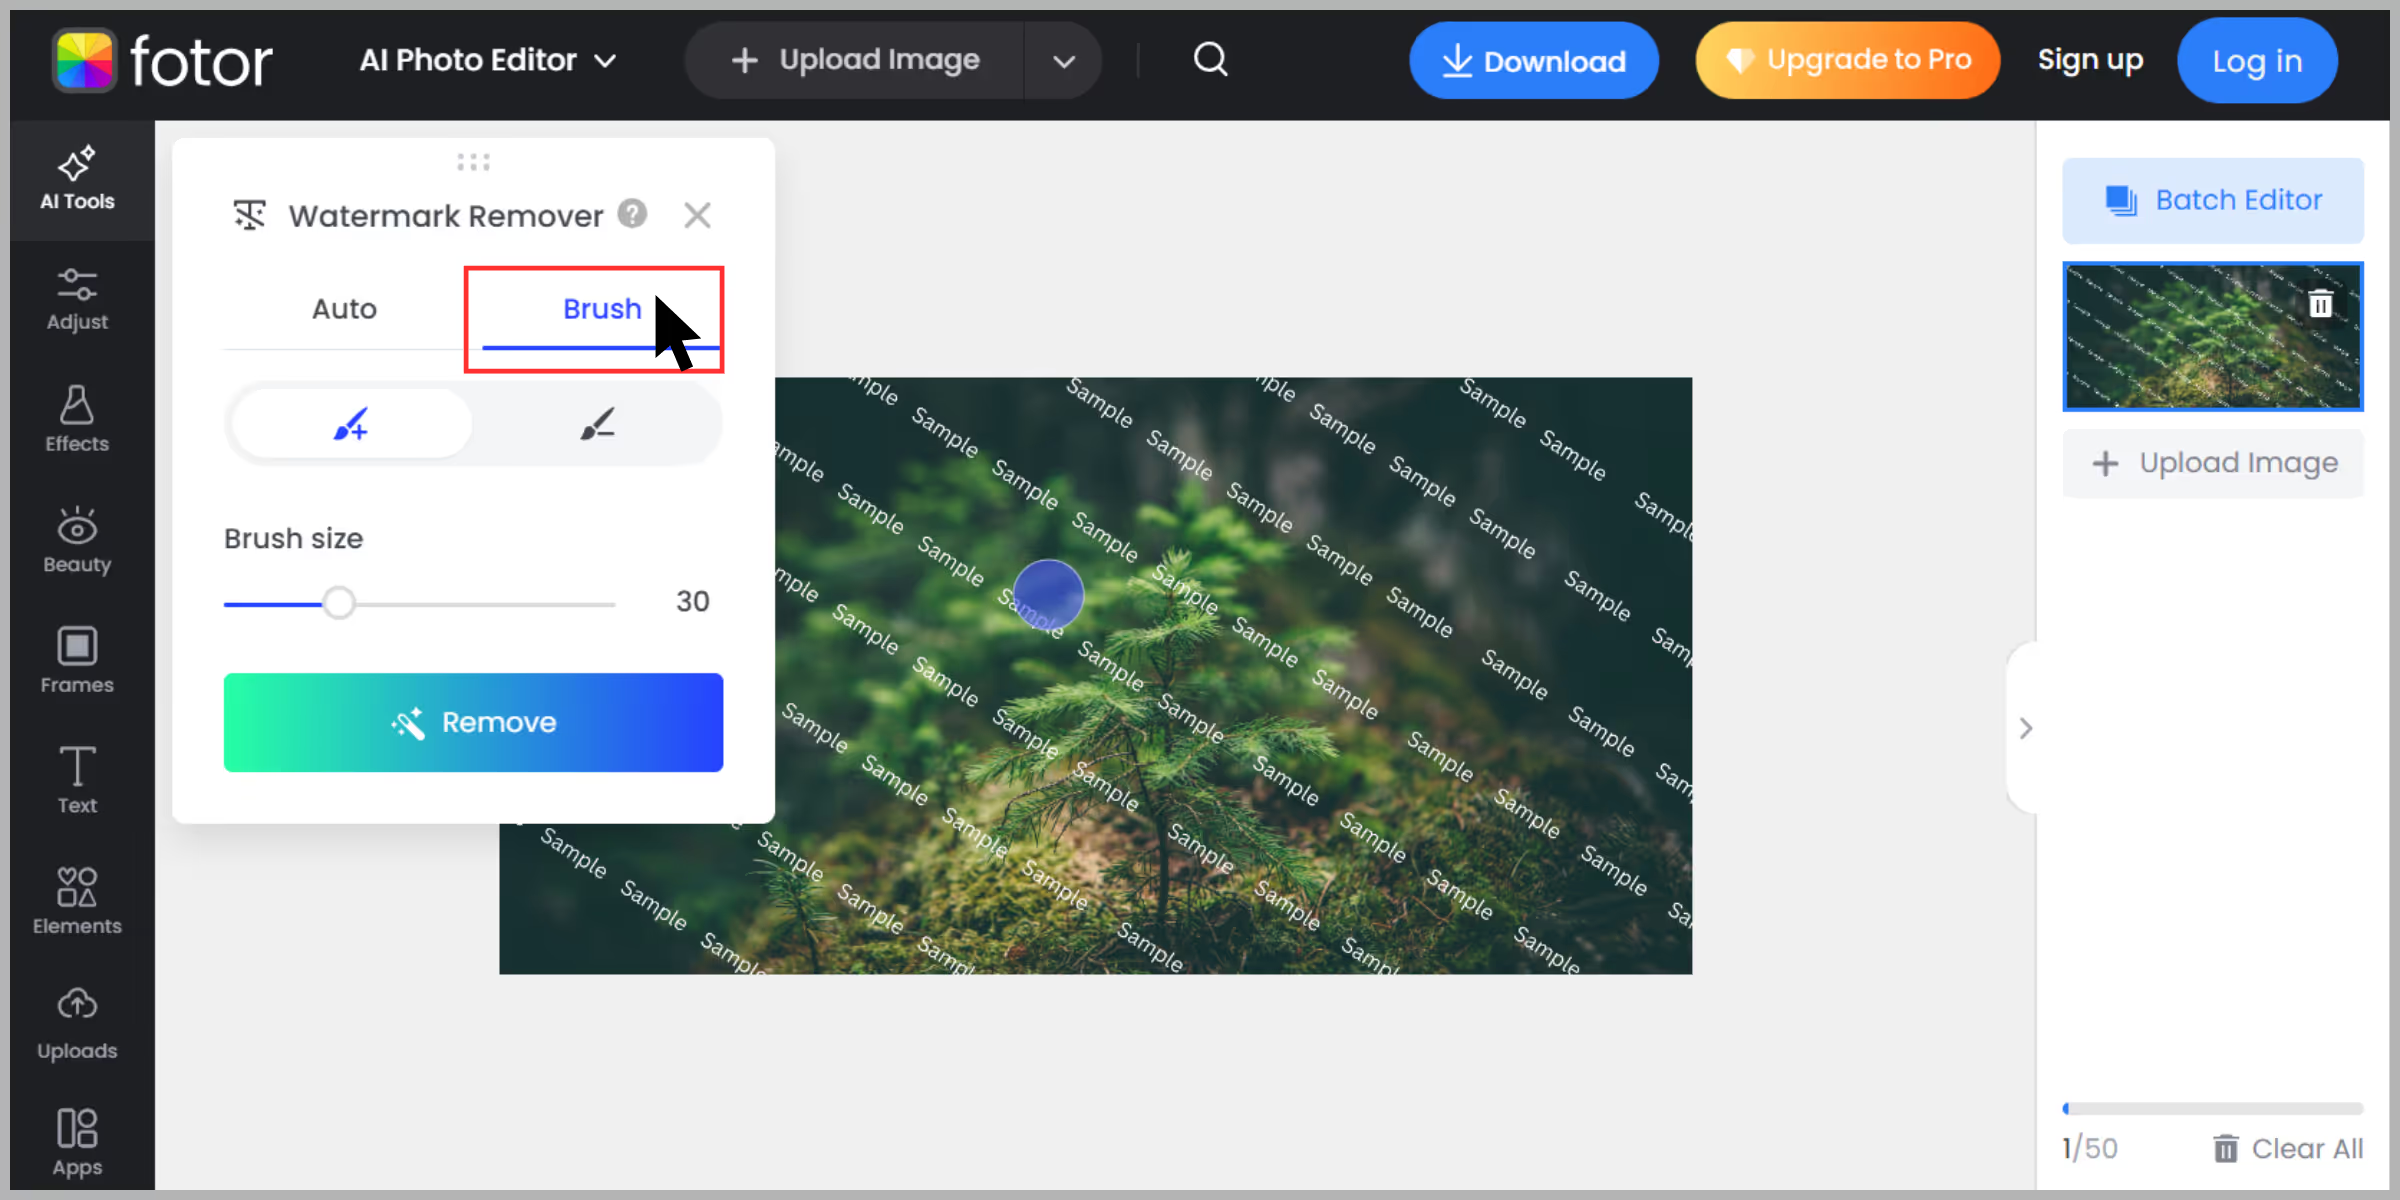
Step 5: Click on “Remove”

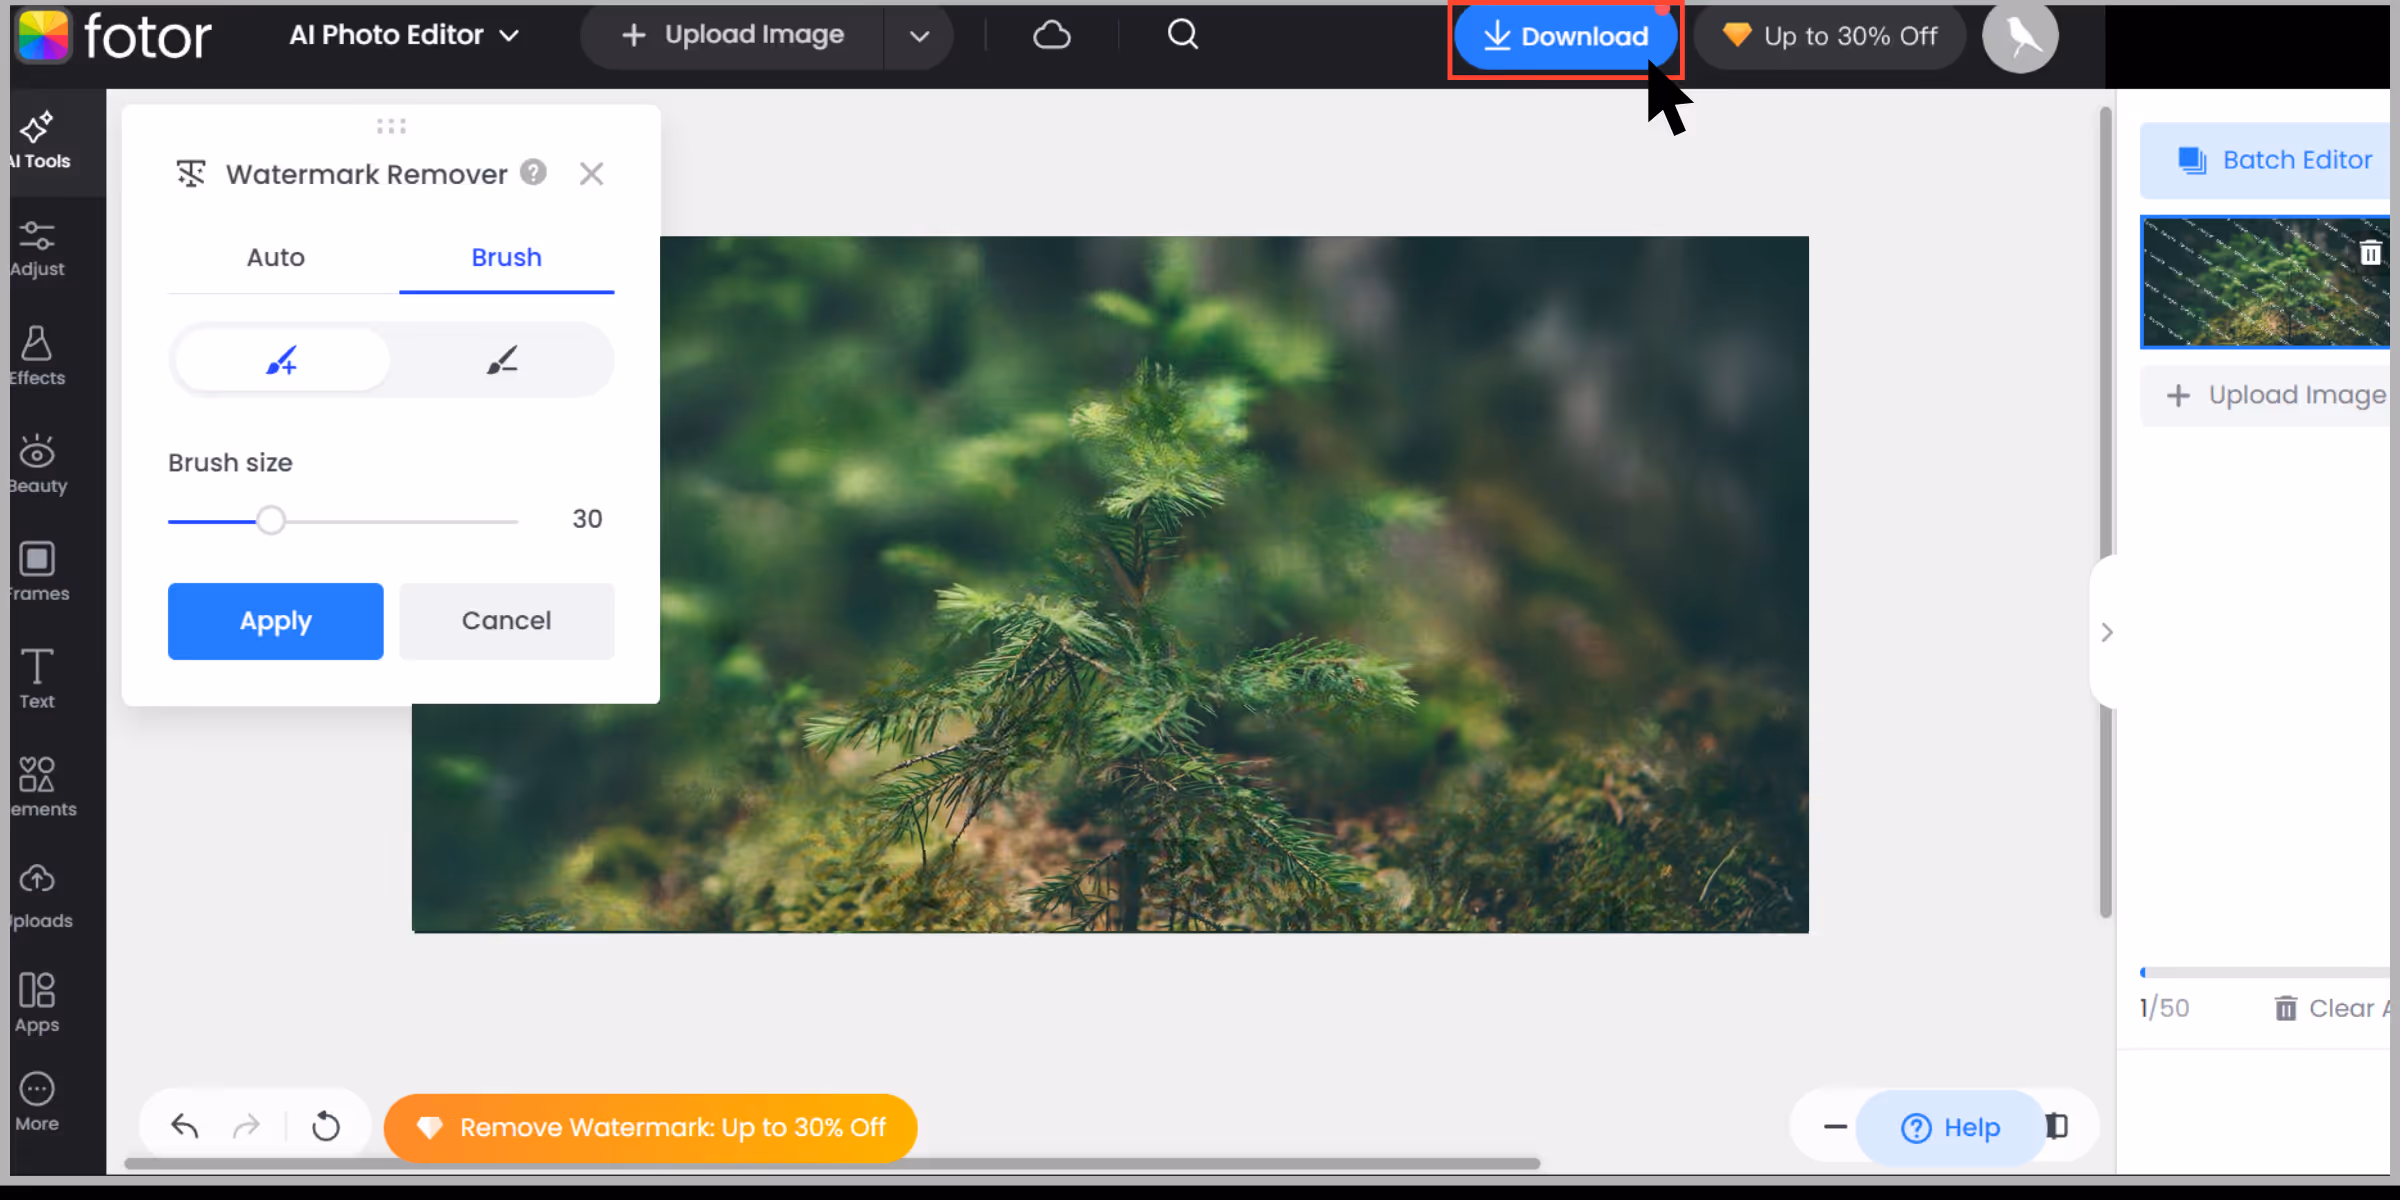
Step 6: Click “Download” and you’re done– but you have to sign up or upgrade to Fotor Pro for high-resolution export.
4. AIEase Watermark Remover

When I first stumbled upon AIEase, I was drawn in by its tagline: “one-click watermark removal.” I decided to test it with an image having logo and signature watermarks mixed over different backgrounds, and here is what I actually found out after using the tool.
What I loved about the tool?
- Lightning-fast AI watermark cleanup.
- Batch watermark removal can process up to 10 images at once.
- It offers dual modes: auto for speed, and Manual for precision editing.
- It works on smartphones via a browser.
- Supports image formats like JPG, JPEG, WEBP, PNG, and BMP.
How to remove a watermark using AIEase?
Step 1: Visit the AIEase Image Watermark Remover page.

Step 2: Upload images that you want to test.

Step 3: Click on “Auto mode”—the AI detected and removed the watermark instantly.

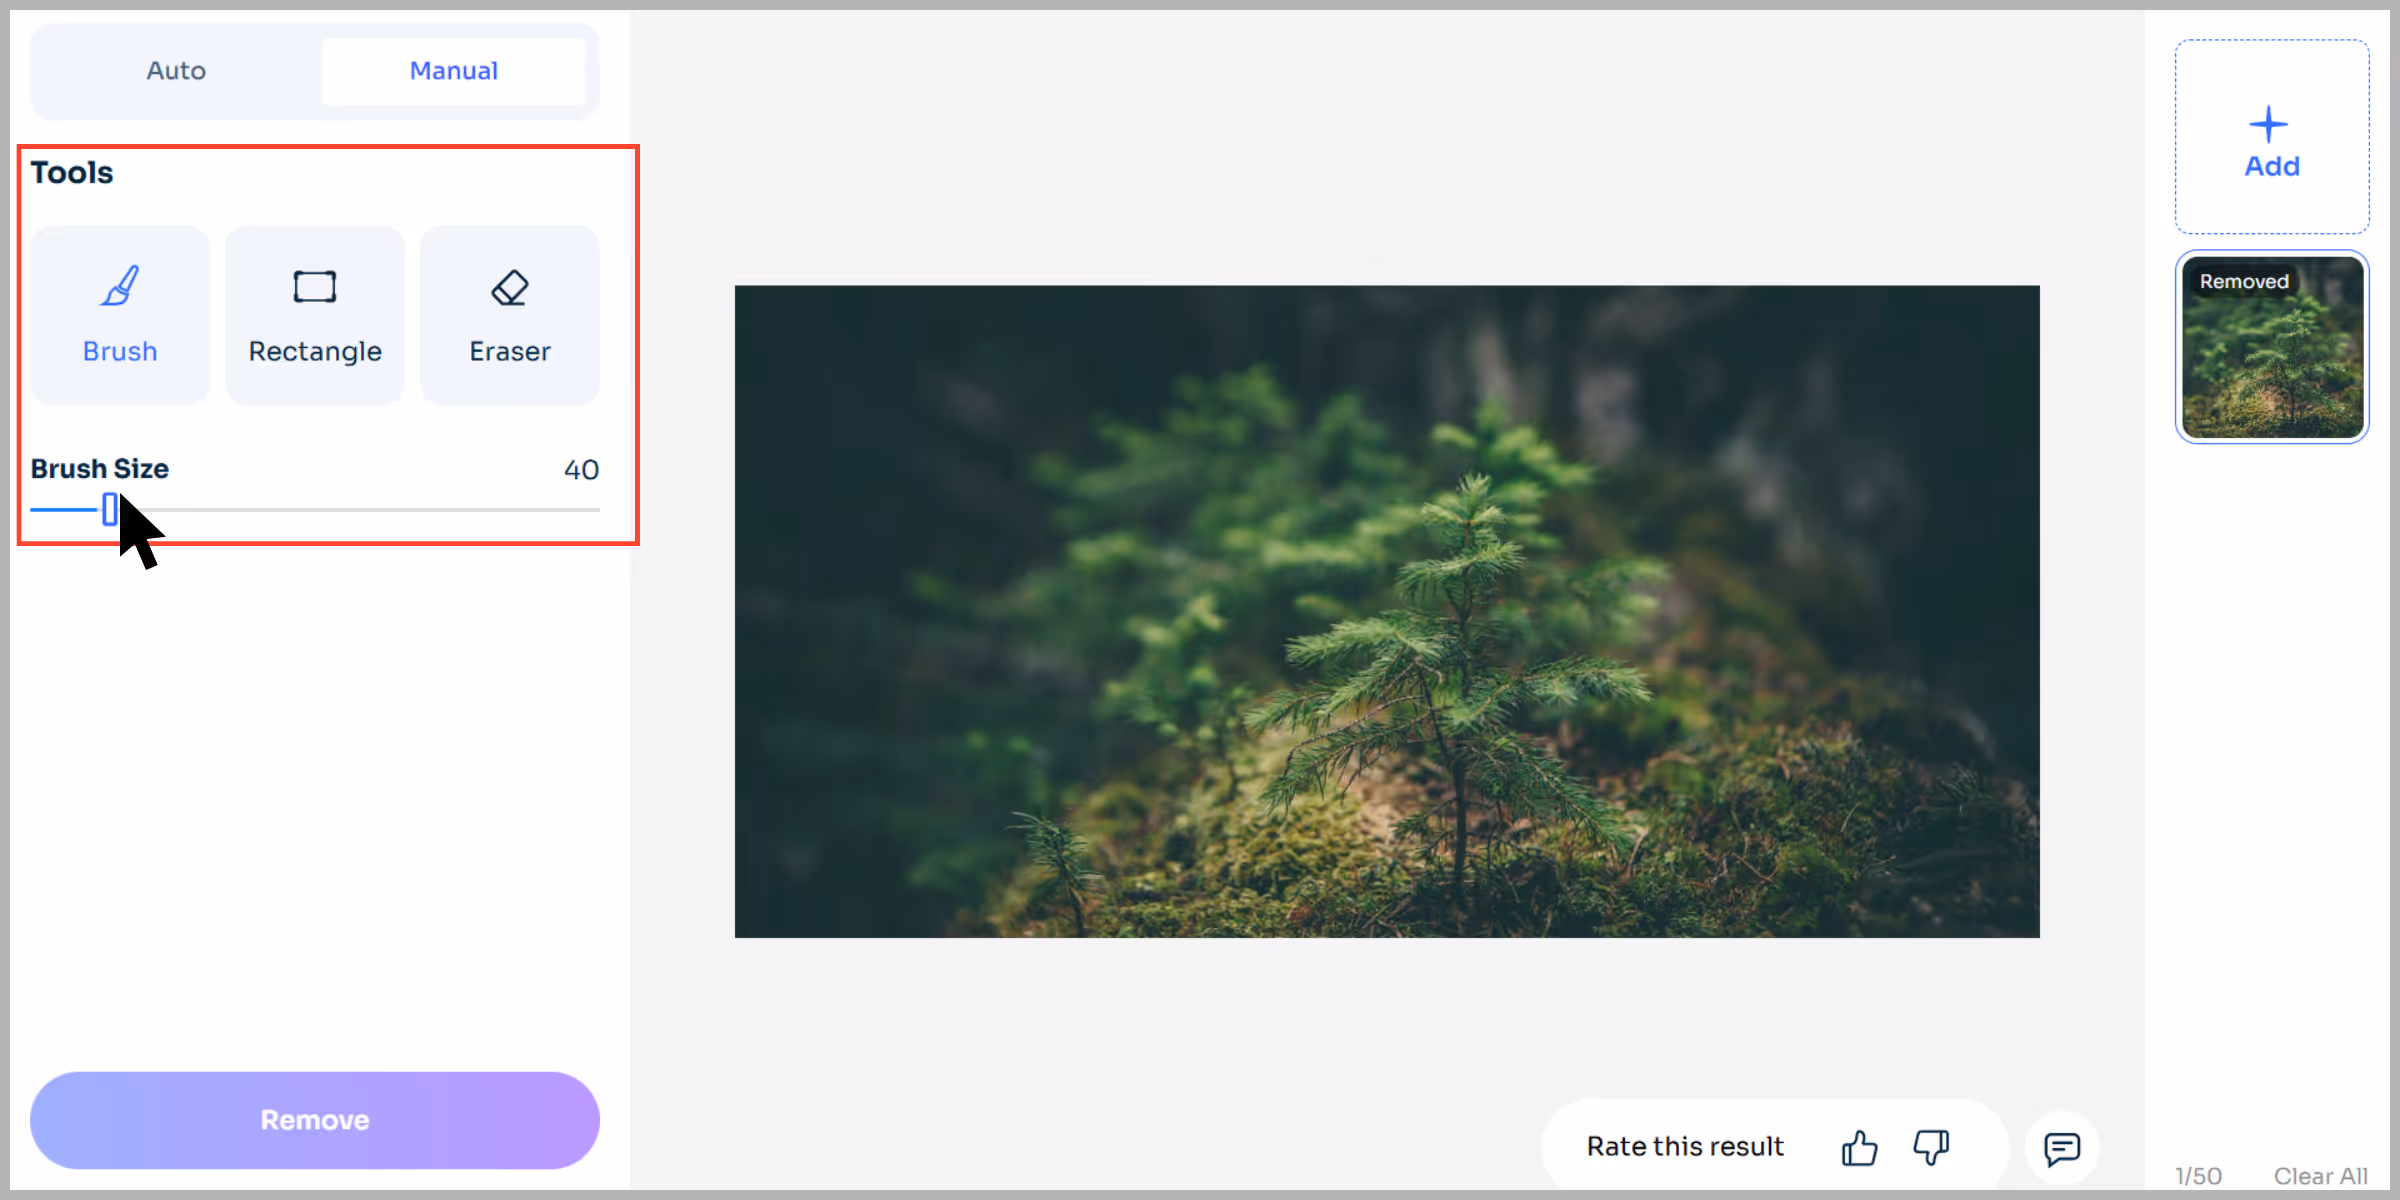
Step 4: Toggle to “Manual” to clean small remnants using the brush, rectangle, and eraser tools.
Step 5: Hit “Remove”, preview the result with the “eyes” icon.
.avif)
Step 6: Download the final image—no sign-up, no watermarks.
.avif)
5. PicWish

PicWish is a free, AI-powered watermark removal tool that you can access on your pc as well as your mobile. When I first tried PicWish’s watermark remover, it felt like a no-brainer—just upload and click. But once I tested the image, I discovered it’s deeper than just that. This tool blends speed, precision, and batch processing in a way that makes cleanup genuinely painless.
What I loved about the tool?
- Super fast auto removal of watermarks generally vanishes in under 5 seconds.
- Batch processing is available, so you can upload multiple product shots at once.
- Clean interface with minimal distractions, no ads, no pop-ups.
- High-quality output with background preserved, no blur or artifacts.
- Free to use and no login required, no forced resolution limits for watermark removal.
How to remove a watermark using PicWish?
Step 1: Visit the PicWish watermark remover page and click “Upload Image”.

Step 2: Drop in a photo with a semi-transparent text watermark.

Step 3: Default to Auto mode, and click Remove.

Step 4: In about 3 seconds, the tool flashed the result, and it looked surprisingly clean.

Step 5: Optionally switch to Manual mode: Select the brush tool, resize it, and brush areas needing touch-up.

Step 6: Toggle the Compare button to check before vs after.

Step 7: Hit Download—high quality, no added watermark.

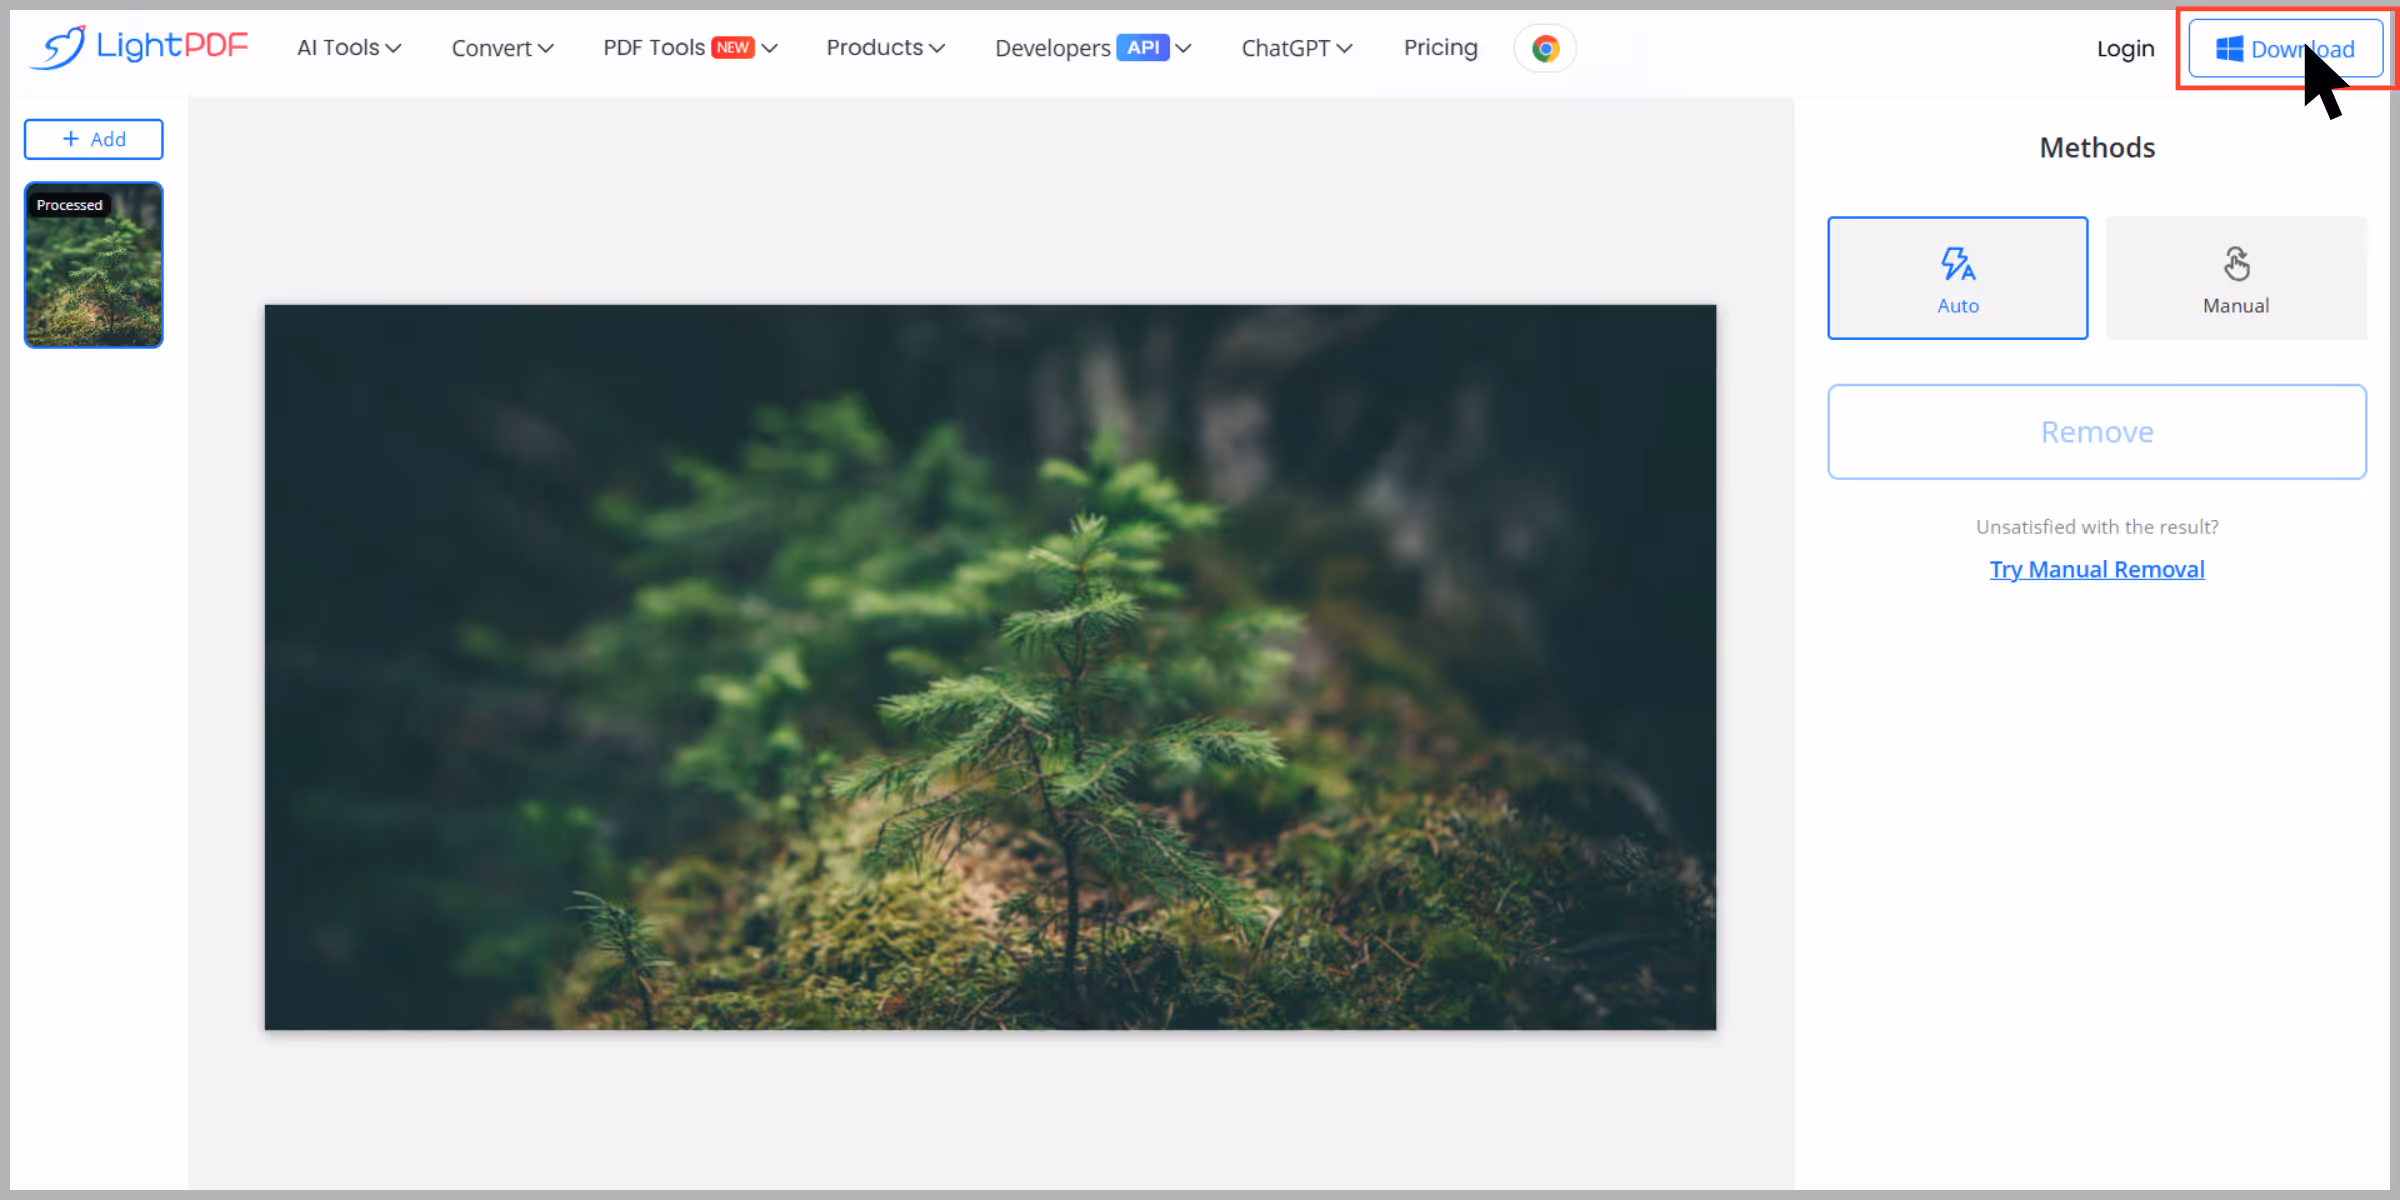
6. AI Image Watermark Remover by LightPDF

When I first landed on LightPDF’s Image Watermark Remover page, I was curious about how a tool known for PDFs really handles image watermarks? After testing it with an image I found it to be surprisingly smart and fast and for your ease I have listed what I actually found out after using the tool.
What I loved about the tool?
- AI algorithm handles most cases smoothly, but if the AI misses a spot, Manual mode (with brush/lasso/rectangle tools) gives me fine precision.
- I uploaded 10 product shots and processed them all at once—time savings for the win.
- After removing the watermark, I tapped “Photo Enhancer” to sharpen and restore color—no extra tools needed.
- No pop-ups, no forced sign-up before trying—it’s straightforward to use.
How to remove a watermark using LightPDF?
Step 1: Open LightPDF’s AI Image Watermark Remover.

Step 2: Click on Upload Image and select an image with a watermark.
Step 3: Choose Auto Remove AI processed it in ~6 seconds.

Step 4: Notice a tiny blur on a textured area, then switch to Manual Mode: Use the Brush tool to retouch the edge.

Step 5: Hit Download to get a high-resolution PNG with no new watermark and preserved quality.
How to remove a watermark from photos using Snapseed on your phone?

When you need to edit something on my phone, Snapseed is my go-to option. It’s a free app from Google and works great for quick edits and watermark removal. Have a look at the quick steps to remove the watermark easily:
Step 1: Install Snapseed and launch the app from the Google Play Store or App Store.
Step 2: Tap the + icon to load the photo.
Step 3: Then, head to Tools and click on “Healing.”
Step 4: Zoom into the watermark using two fingers and gently brush over it. If the first try doesn’t look right, tap Undo and try again with smaller strokes.
Step 5: Finally, export the photo using Export and then click on Save.
What I found after testing Snapseed: Snapseed works best on simple watermarks against plain backgrounds. It doesn’t always handle complex logos perfectly, but it also handles quick edits.
Final thoughts
And that’s a wrap, so if you want to remove watermarks from your photos with full control, Photoshop is great (though it takes practice). For quick edits on your phone, Snapseed is super handy.
And if you just want fast, clean results with no effort, WatermarkRemover.io and Pixelbin are my personal favorites because they remove the watermark without leaving any artifacts. Give the aforementioned tools a shot!
FAQs
Generally, it’s only legal if you own the image or have permission from the creator. Using copyrighted images without approval can get you into legal trouble.
I’d recommend WatermarkRemover.io or Cleanup. pictures. Both are beginner-friendly and deliver solid results without much effort.
Absolutely. Snapseed is a great free app that can handle basic watermark removal using its Healing tool.
Sometimes, yes. AI tools usually keep things clean, but poor-quality removers or over-editing can create blurs or artifacts. Always preview before saving.
Yes. Tools like PicWish support batch watermark removal and are great if you’re editing multiple images.
You can! But you’ll need video-specific software like HitPaw Video Watermark Remover or Adobe Premiere Pro to do it properly.