

Ever tried editing a product photo or graphic, only to struggle with a background that distracts the focus of the audience? Background removal is one of the most important skills in image editing. Whether you’re preparing product shots, creating digital art, or crafting social media content, a clean background can significantly enhance your images.
While tools like Photoshop are widely used to remove backgrounds, the paid version offers only a limited number of methods. Luckily, GIMP (GNU Image Manipulation Program) is a free alternative. With the right techniques, you can achieve background removal without spending any money.
In this guide, I will show you six tested methods for removing backgrounds in GIMP as well as teach you how to make backgrounds transparent, introduce four AI tools for automatic background removal, and help you avoid common mistakes.
Understanding background removal in GIMP
Before diving into the methods, it’s crucial to understand how GIMP handles background removal. Knowing this will enable you to work more efficiently and accurately.
Know the Supported Versions (GIMP 2.10 & 3.0)
GIMP’s background removal features are available in both GIMP 2.10 and GIMP 3.0:
- GIMP 2.10: The most widely used stable version with all the necessary background removal tools.
- GIMP 3.0: Introduces a refreshed interface and performance improvements. All background removal techniques discussed here are compatible with 3.0, although tool icons and menus may exhibit slight changes.
Everything you should know about GIMP background removal
Before you start removing backgrounds in GIMP, familiarize yourself with these essential concepts:
- Selections: These are temporary outlines that define which parts of your image you want to edit. All background removal tools rely on creating accurate selections.
- Layer Masks: A non-destructive editing method that hides parts of a layer instead of permanently deleting pixels. This allows you to refine or undo changes later.
- Alpha Channel: This channel adds transparency to your image. Without it, deleting a background will result in a solid color (usually white or black) instead of transparency.
How to remove background in GIMP (6 tested methods)
Removing backgrounds in GIMP can be done in multiple ways, depending on the image type. Clean product shots, complex hair, or solid backgrounds all require different approaches. Here are six tested methods that work on GIMP 2.10 and 3.0, complete with use cases, step-by-step instructions, and pro tips.
1. Using the Paths tool
If you’re editing product shots, logos, or illustrations, the Paths Tool is perfect for creating razor-sharp edges. It provides full manual control and delivers professional results when accuracy is crucial.
Steps to know
Step 1: Open your image in GIMP. Go to File → Open and pick the file you want to edit.
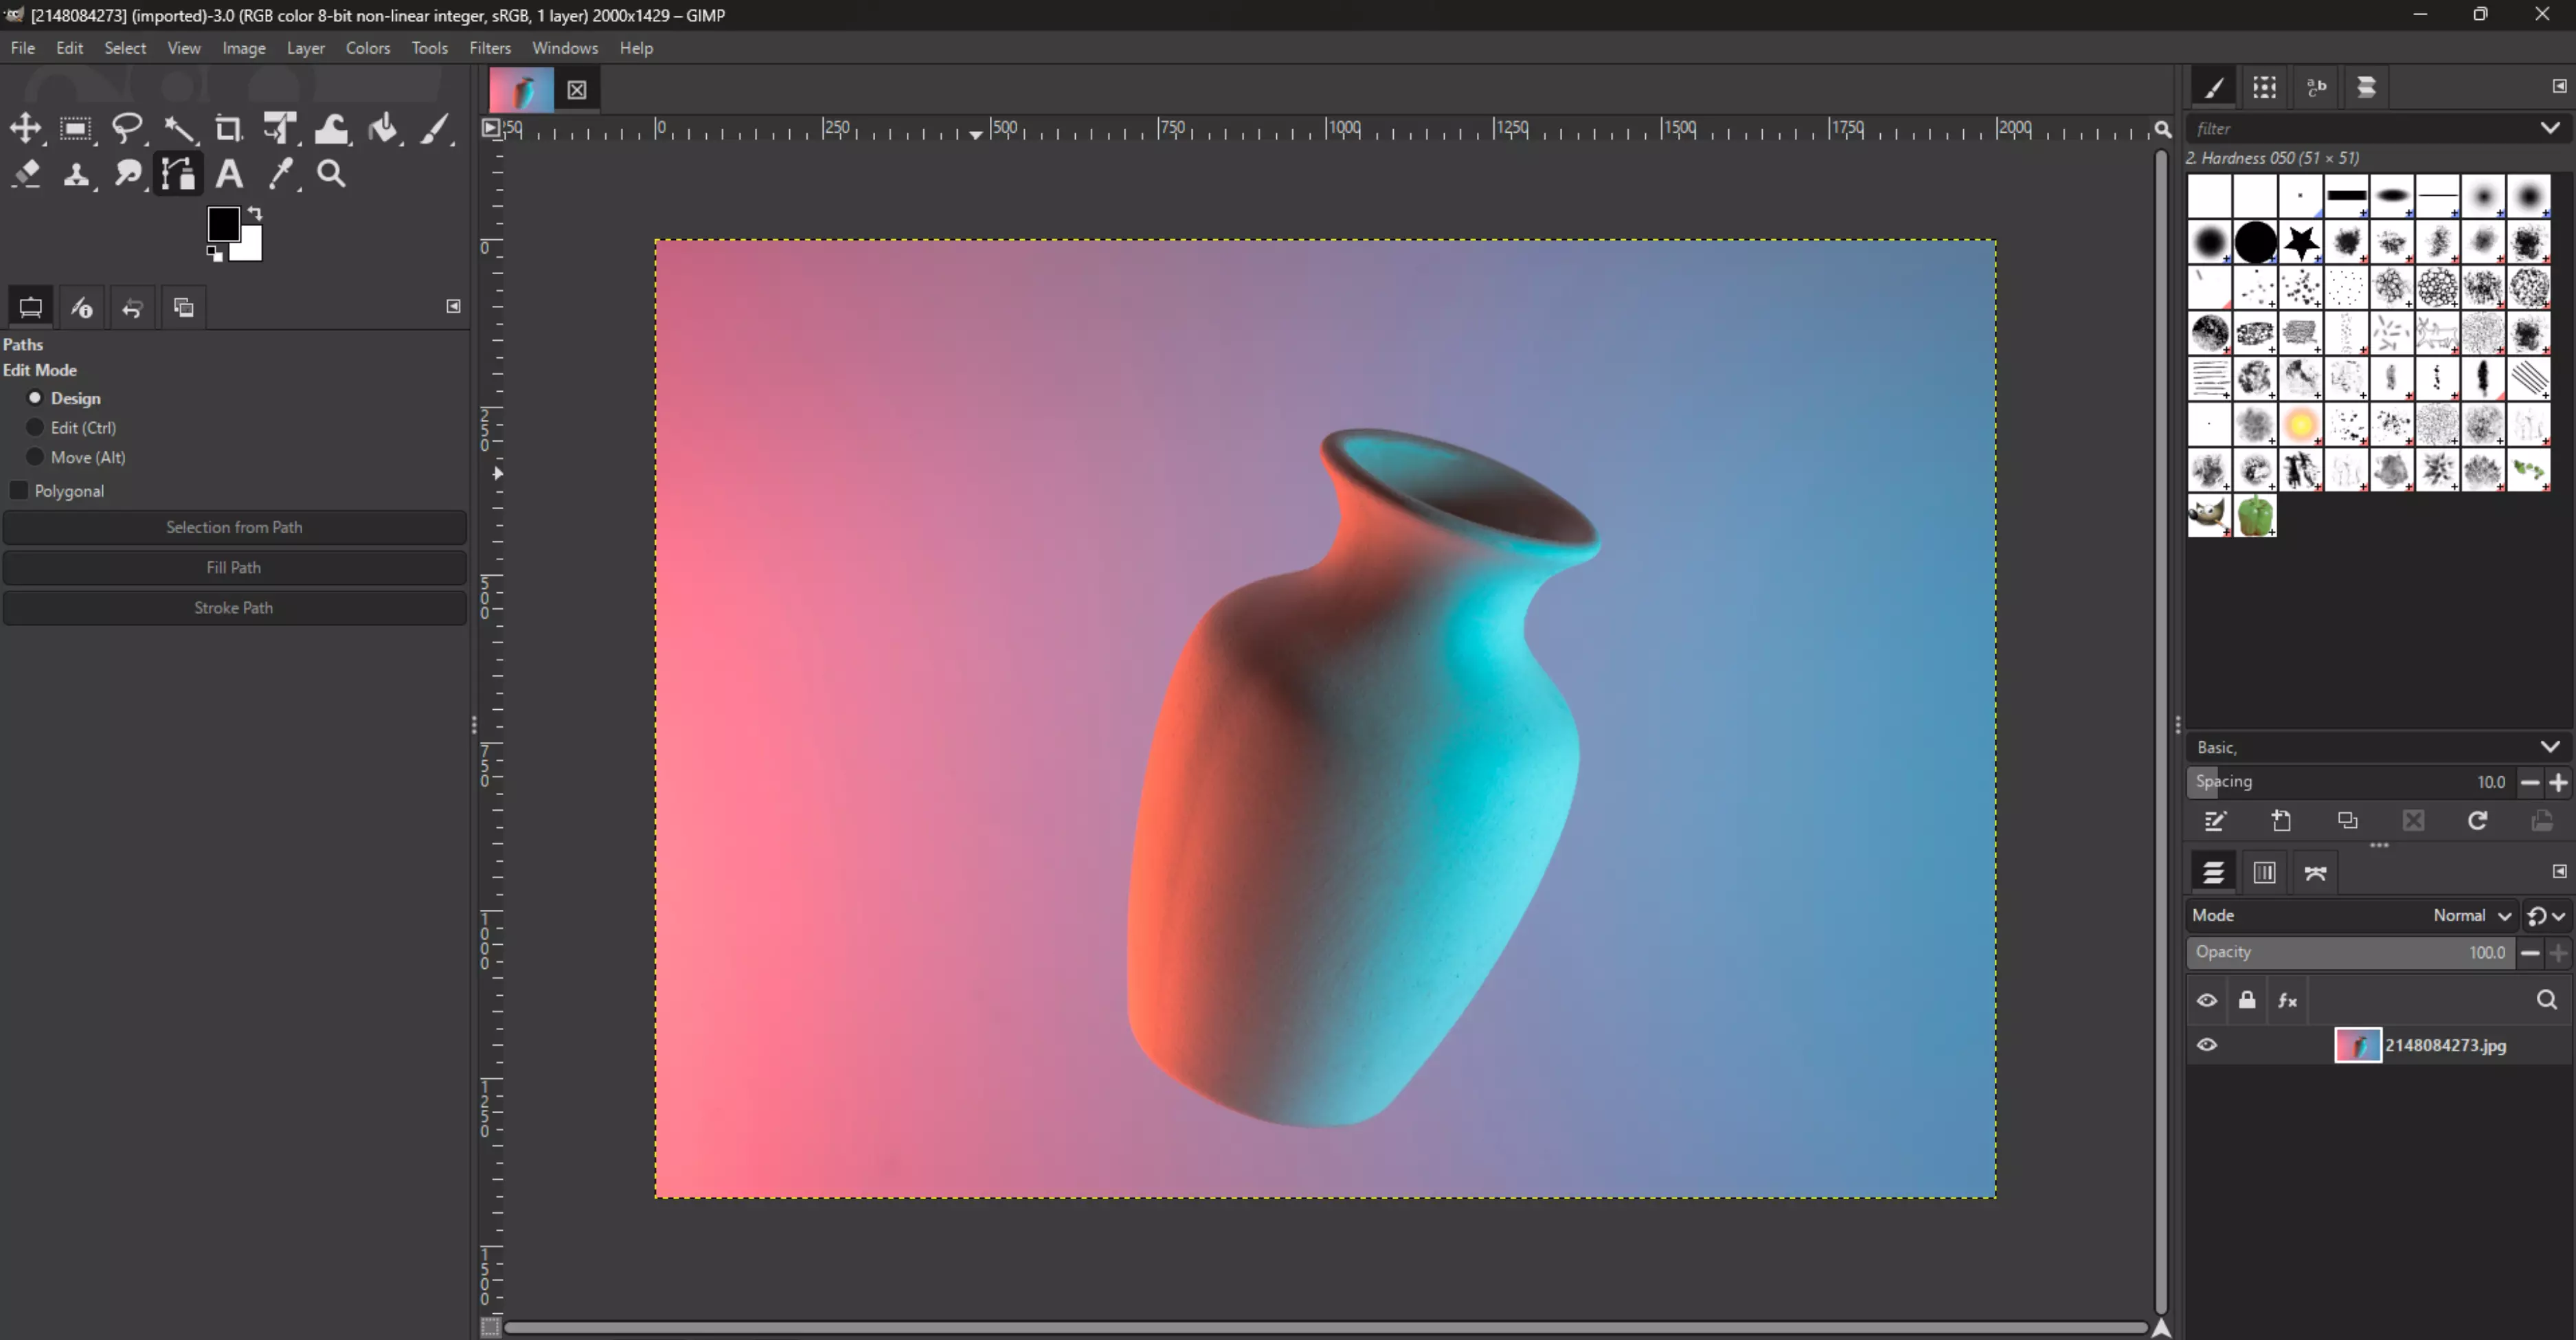
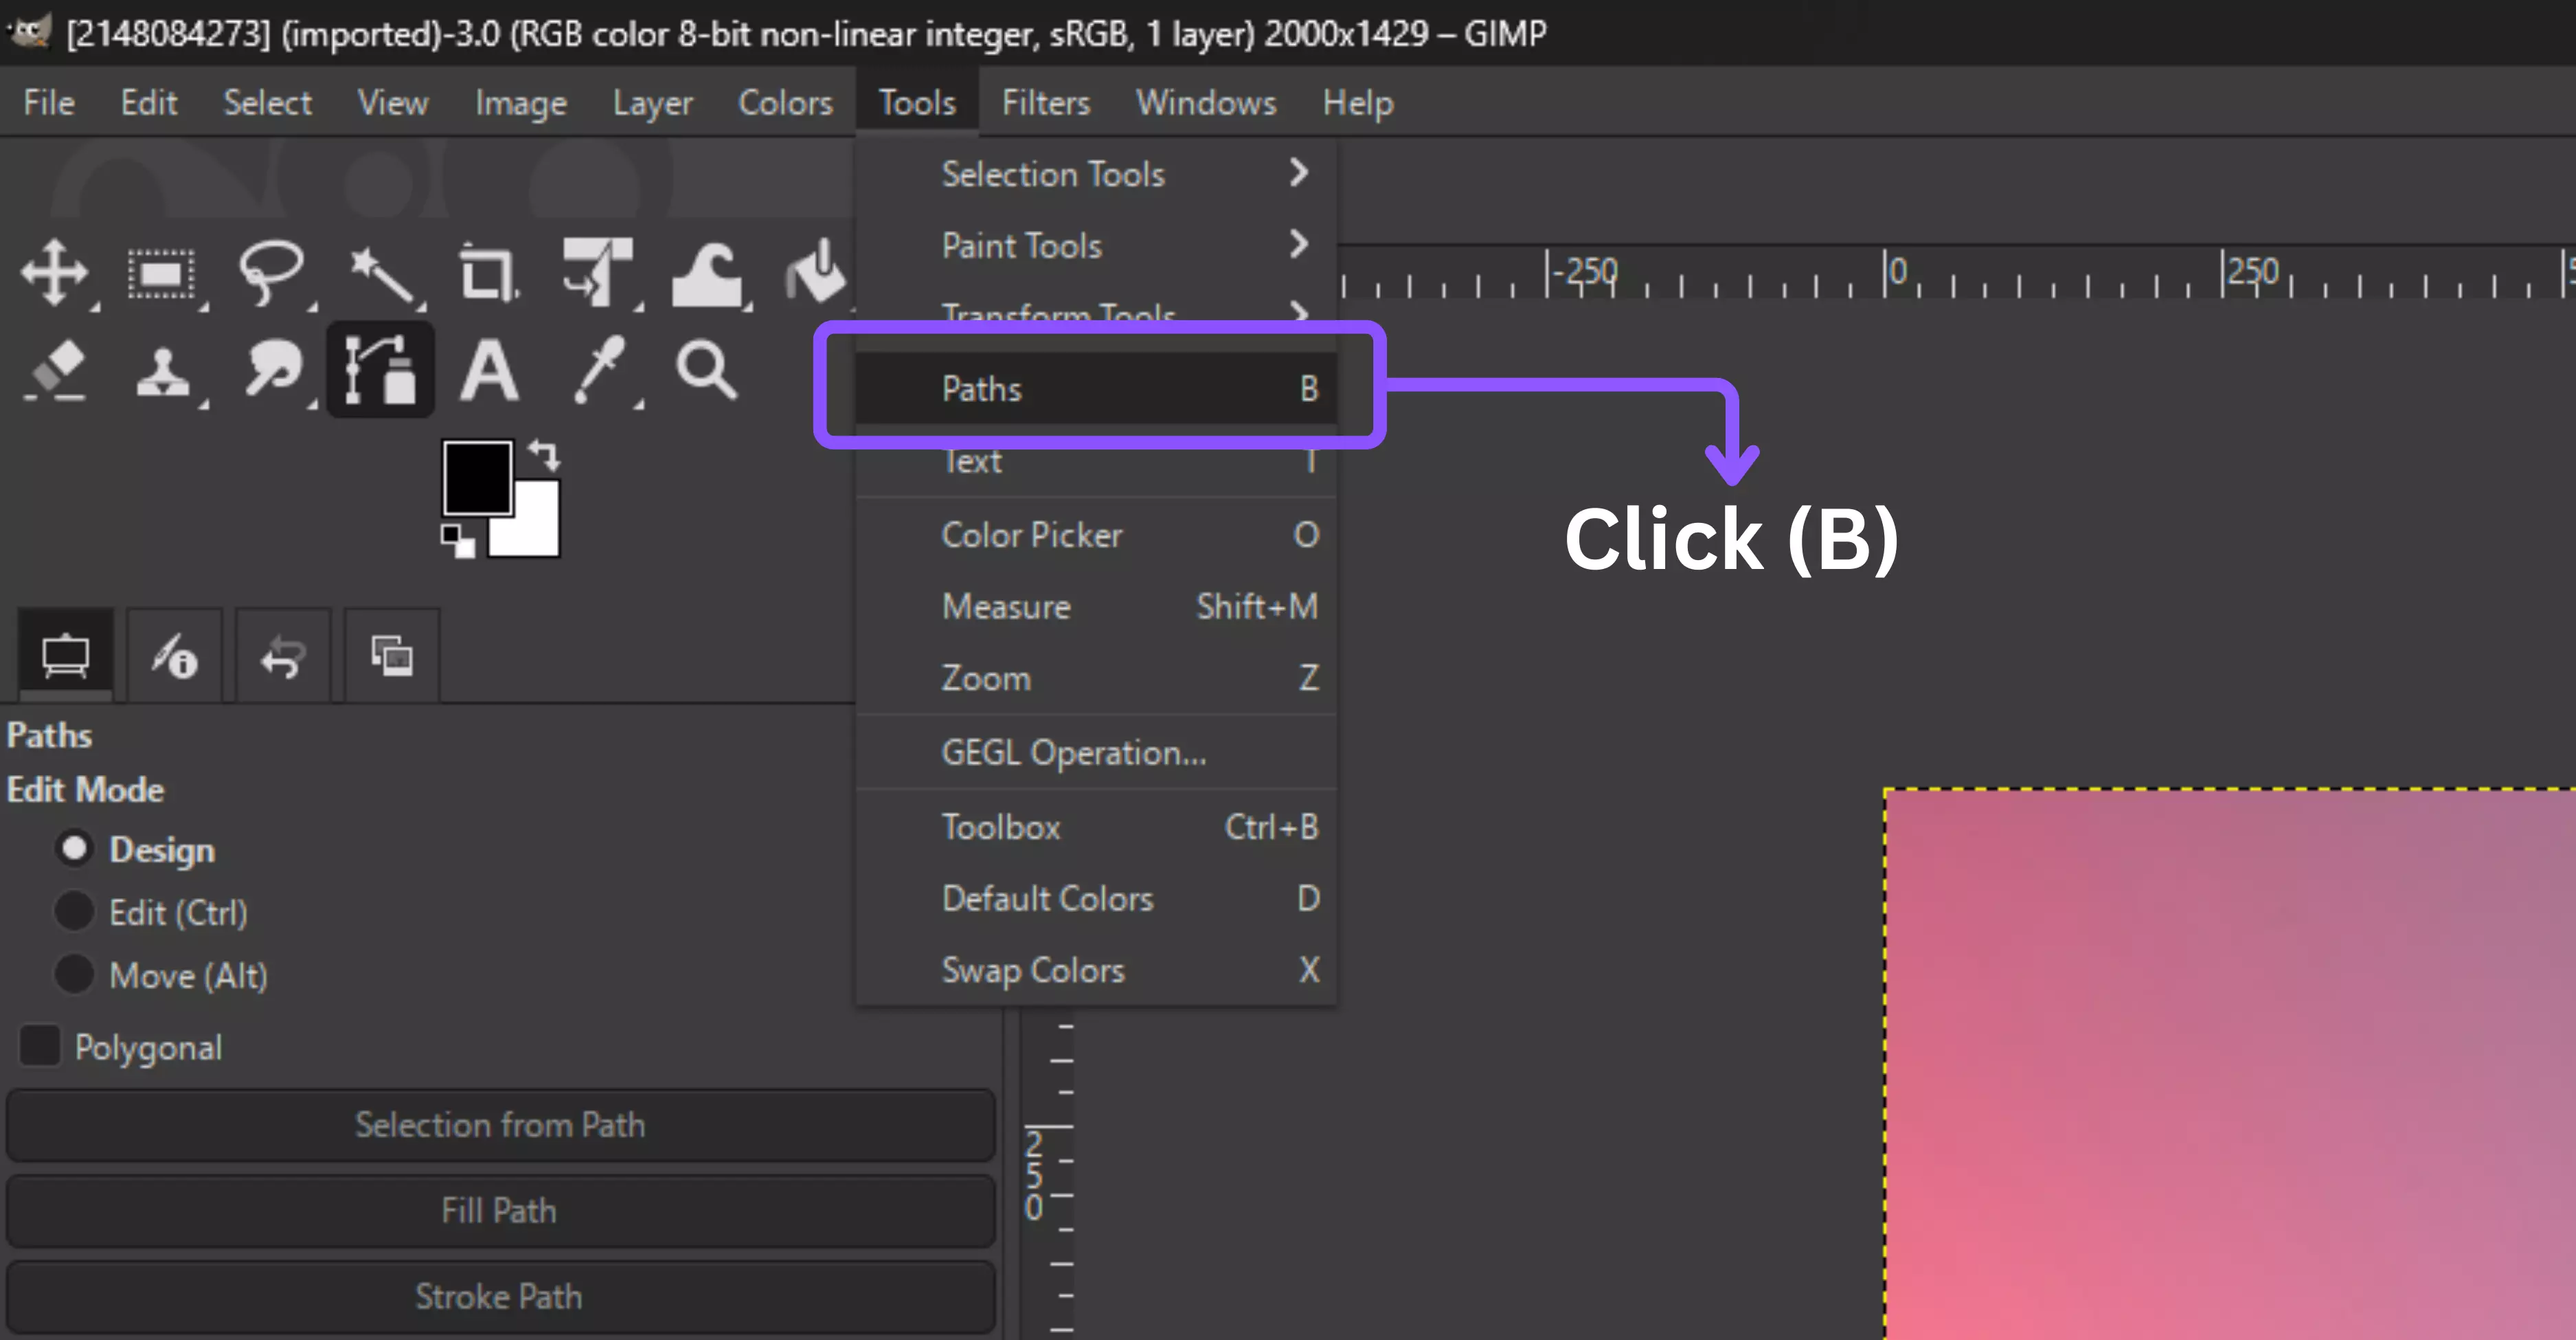
Step 2: Select the Paths Tool (B) from the toolbox—it’s like a digital pen for tracing your subject.
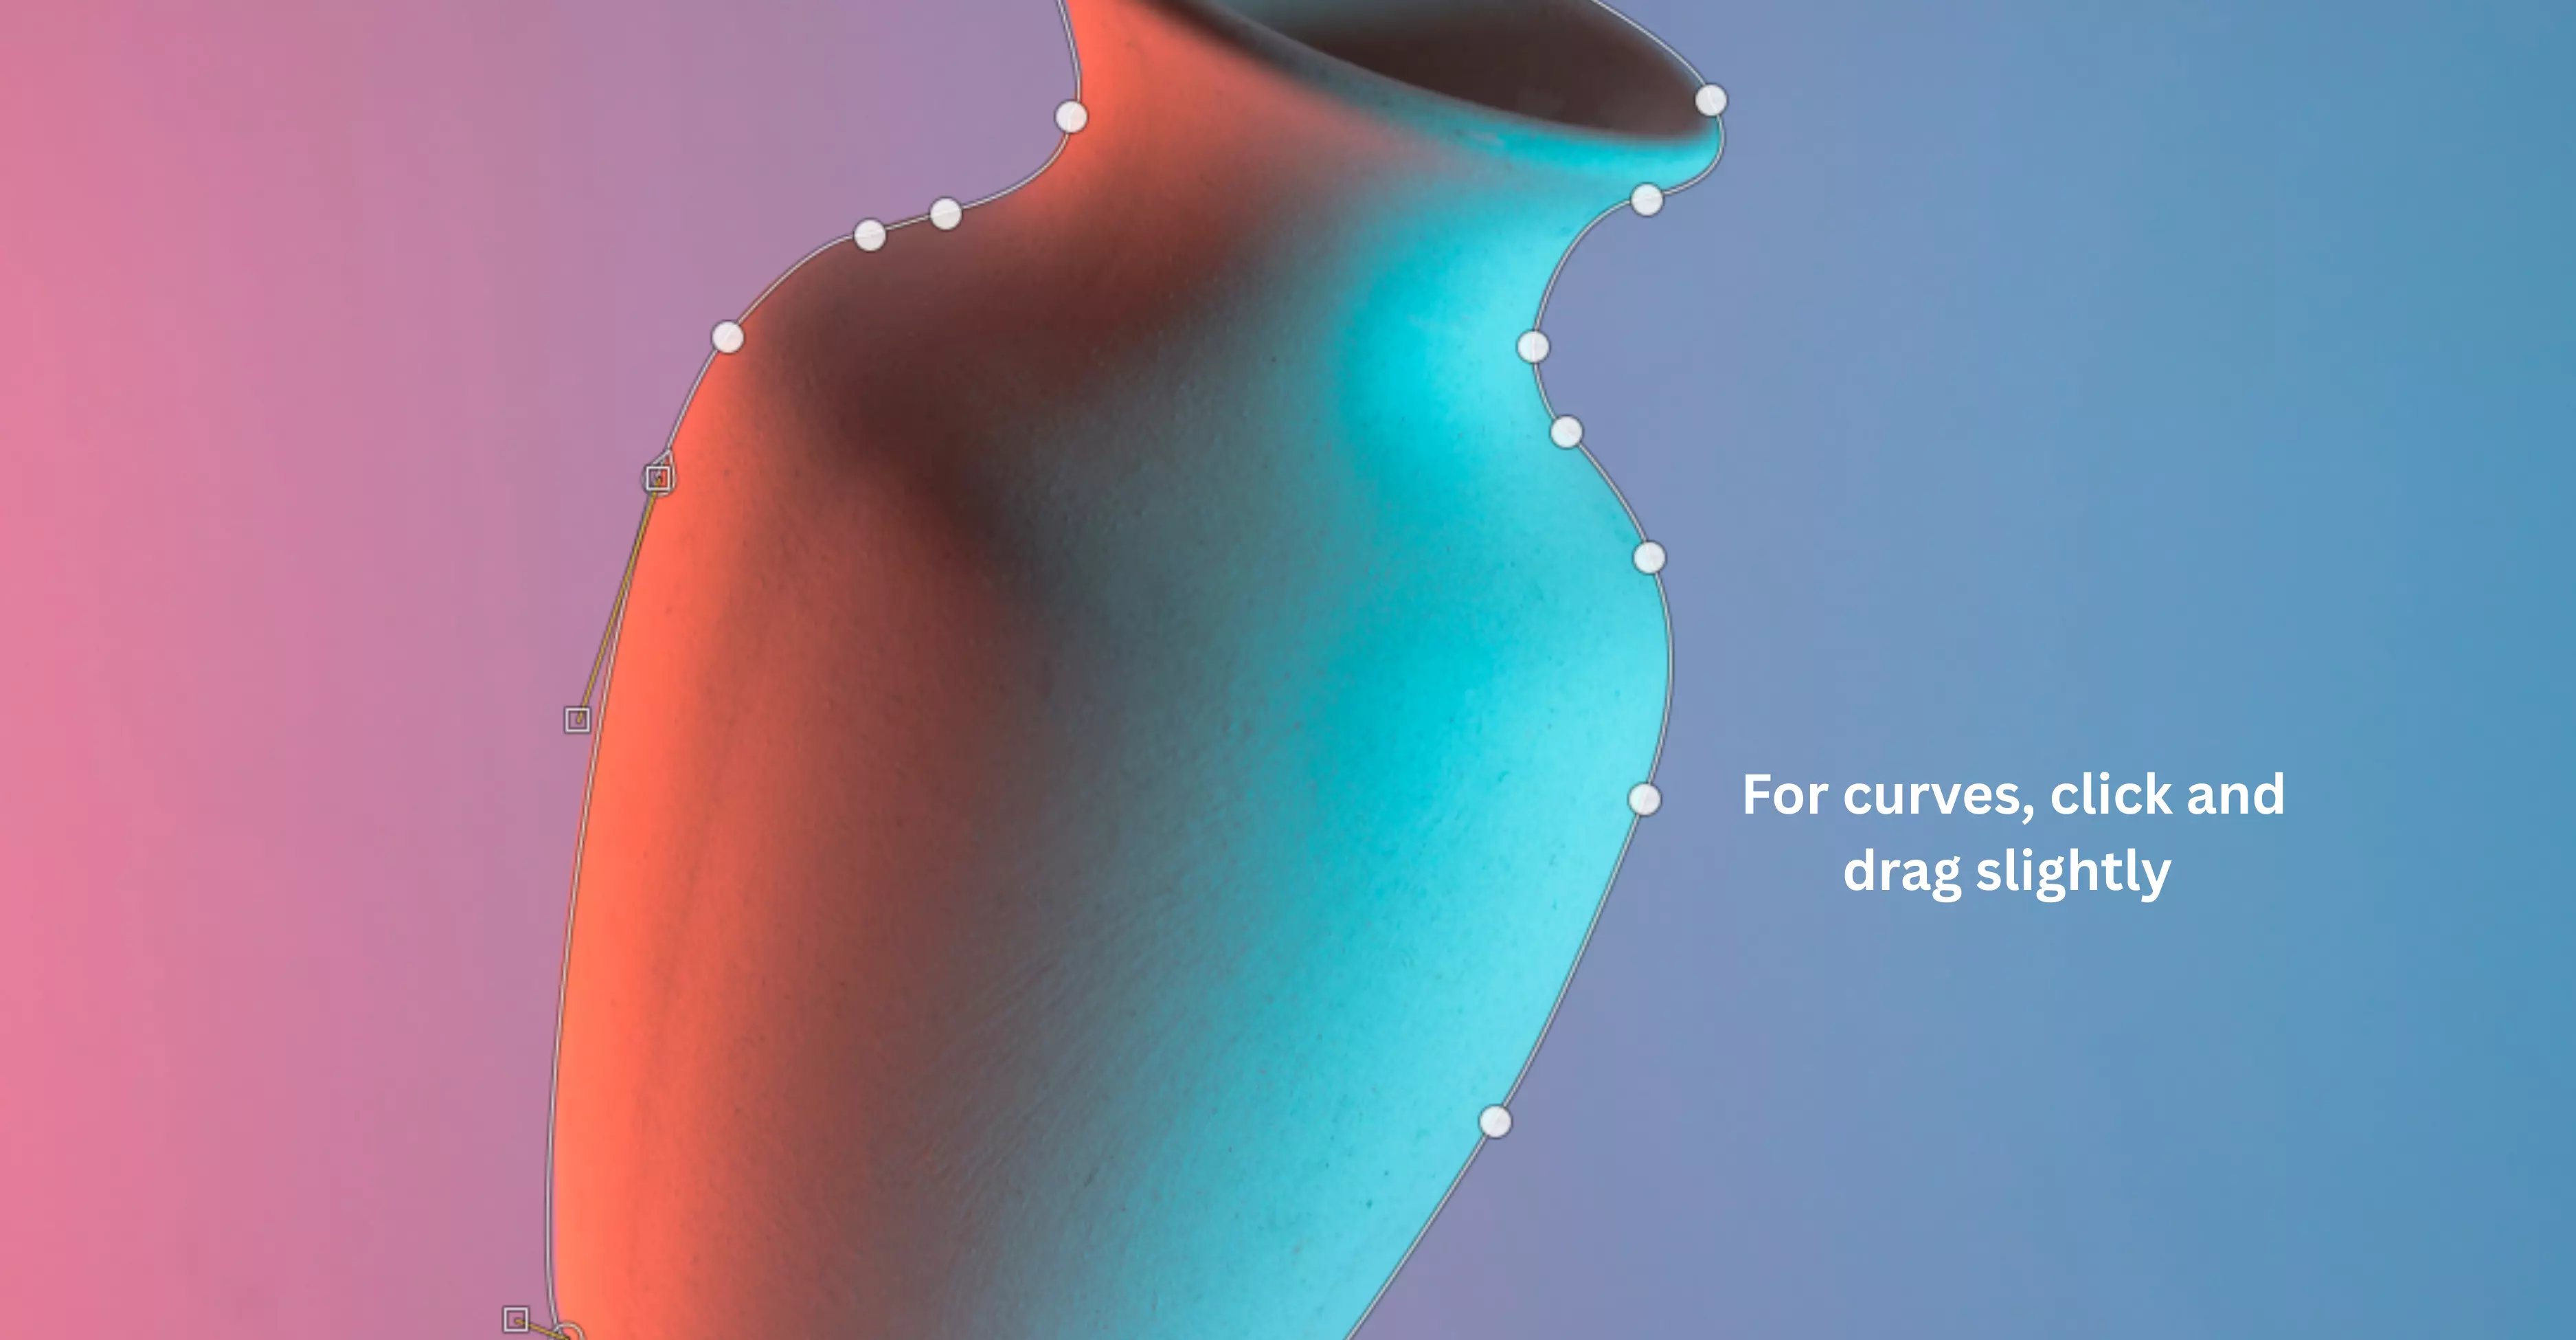
Step 3: Click along the edge of your subject to drop points. For curves, click and drag slightly to shape smooth lines.
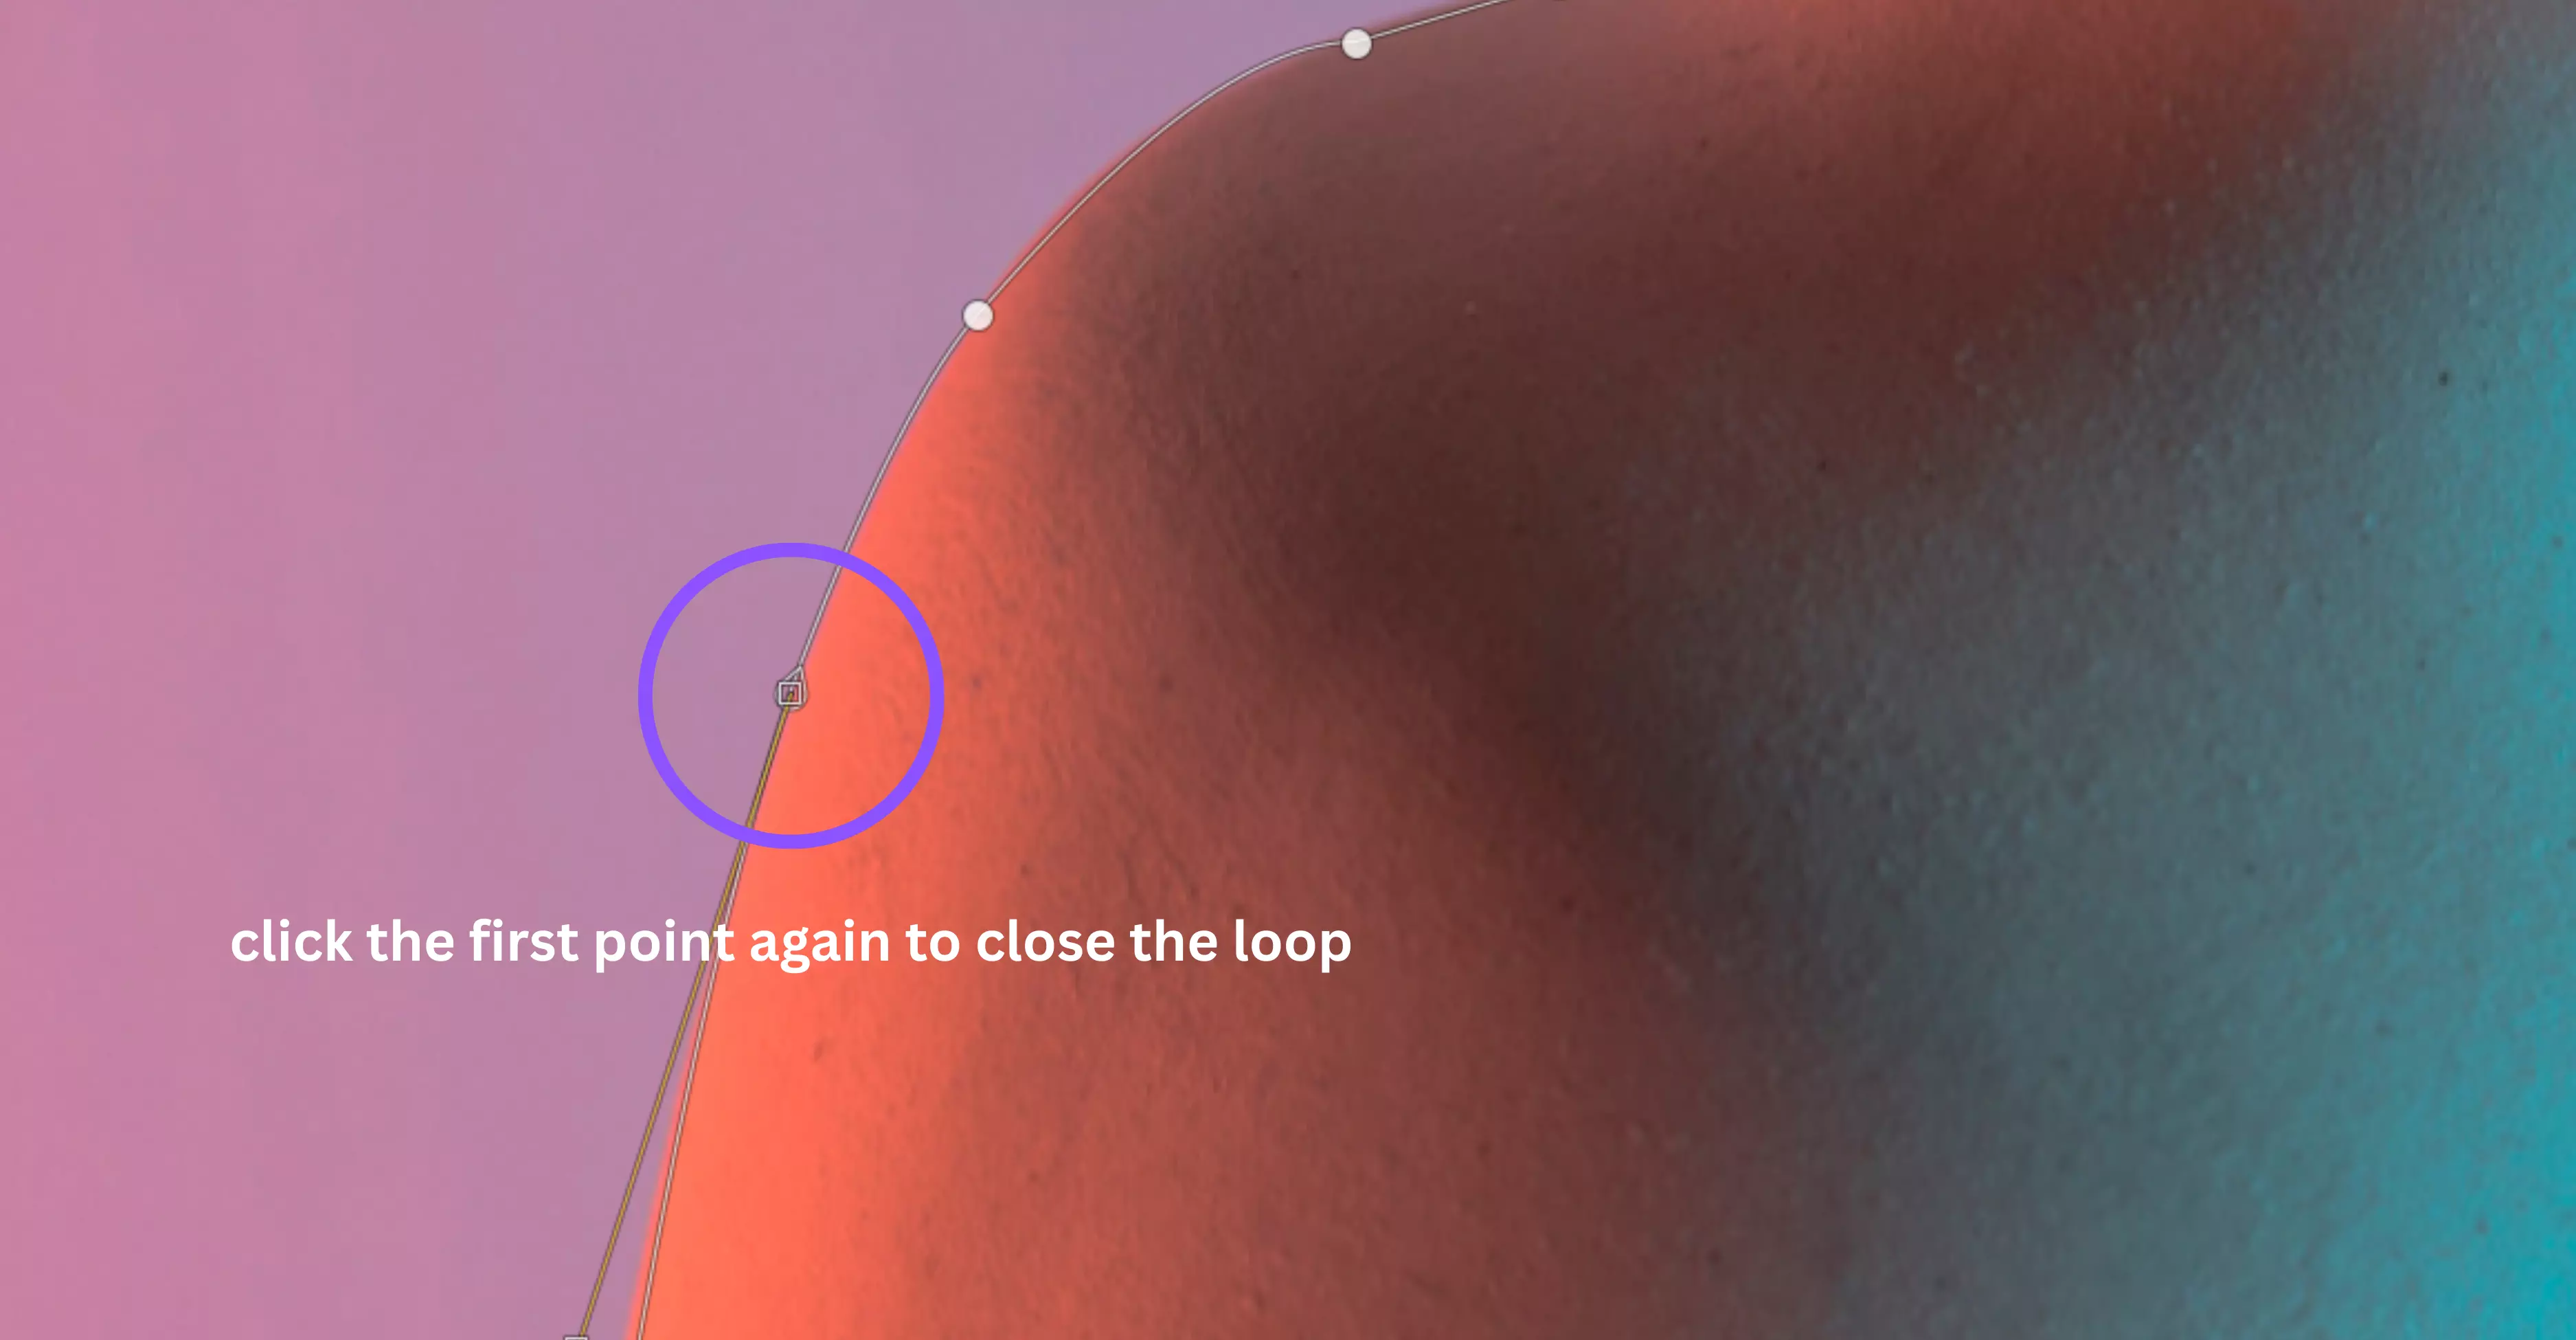
Step 4: Work your way around the subject, then click the first point again to close the loop.
Step 5: Convert the path into a selection by choosing Select → From Path.
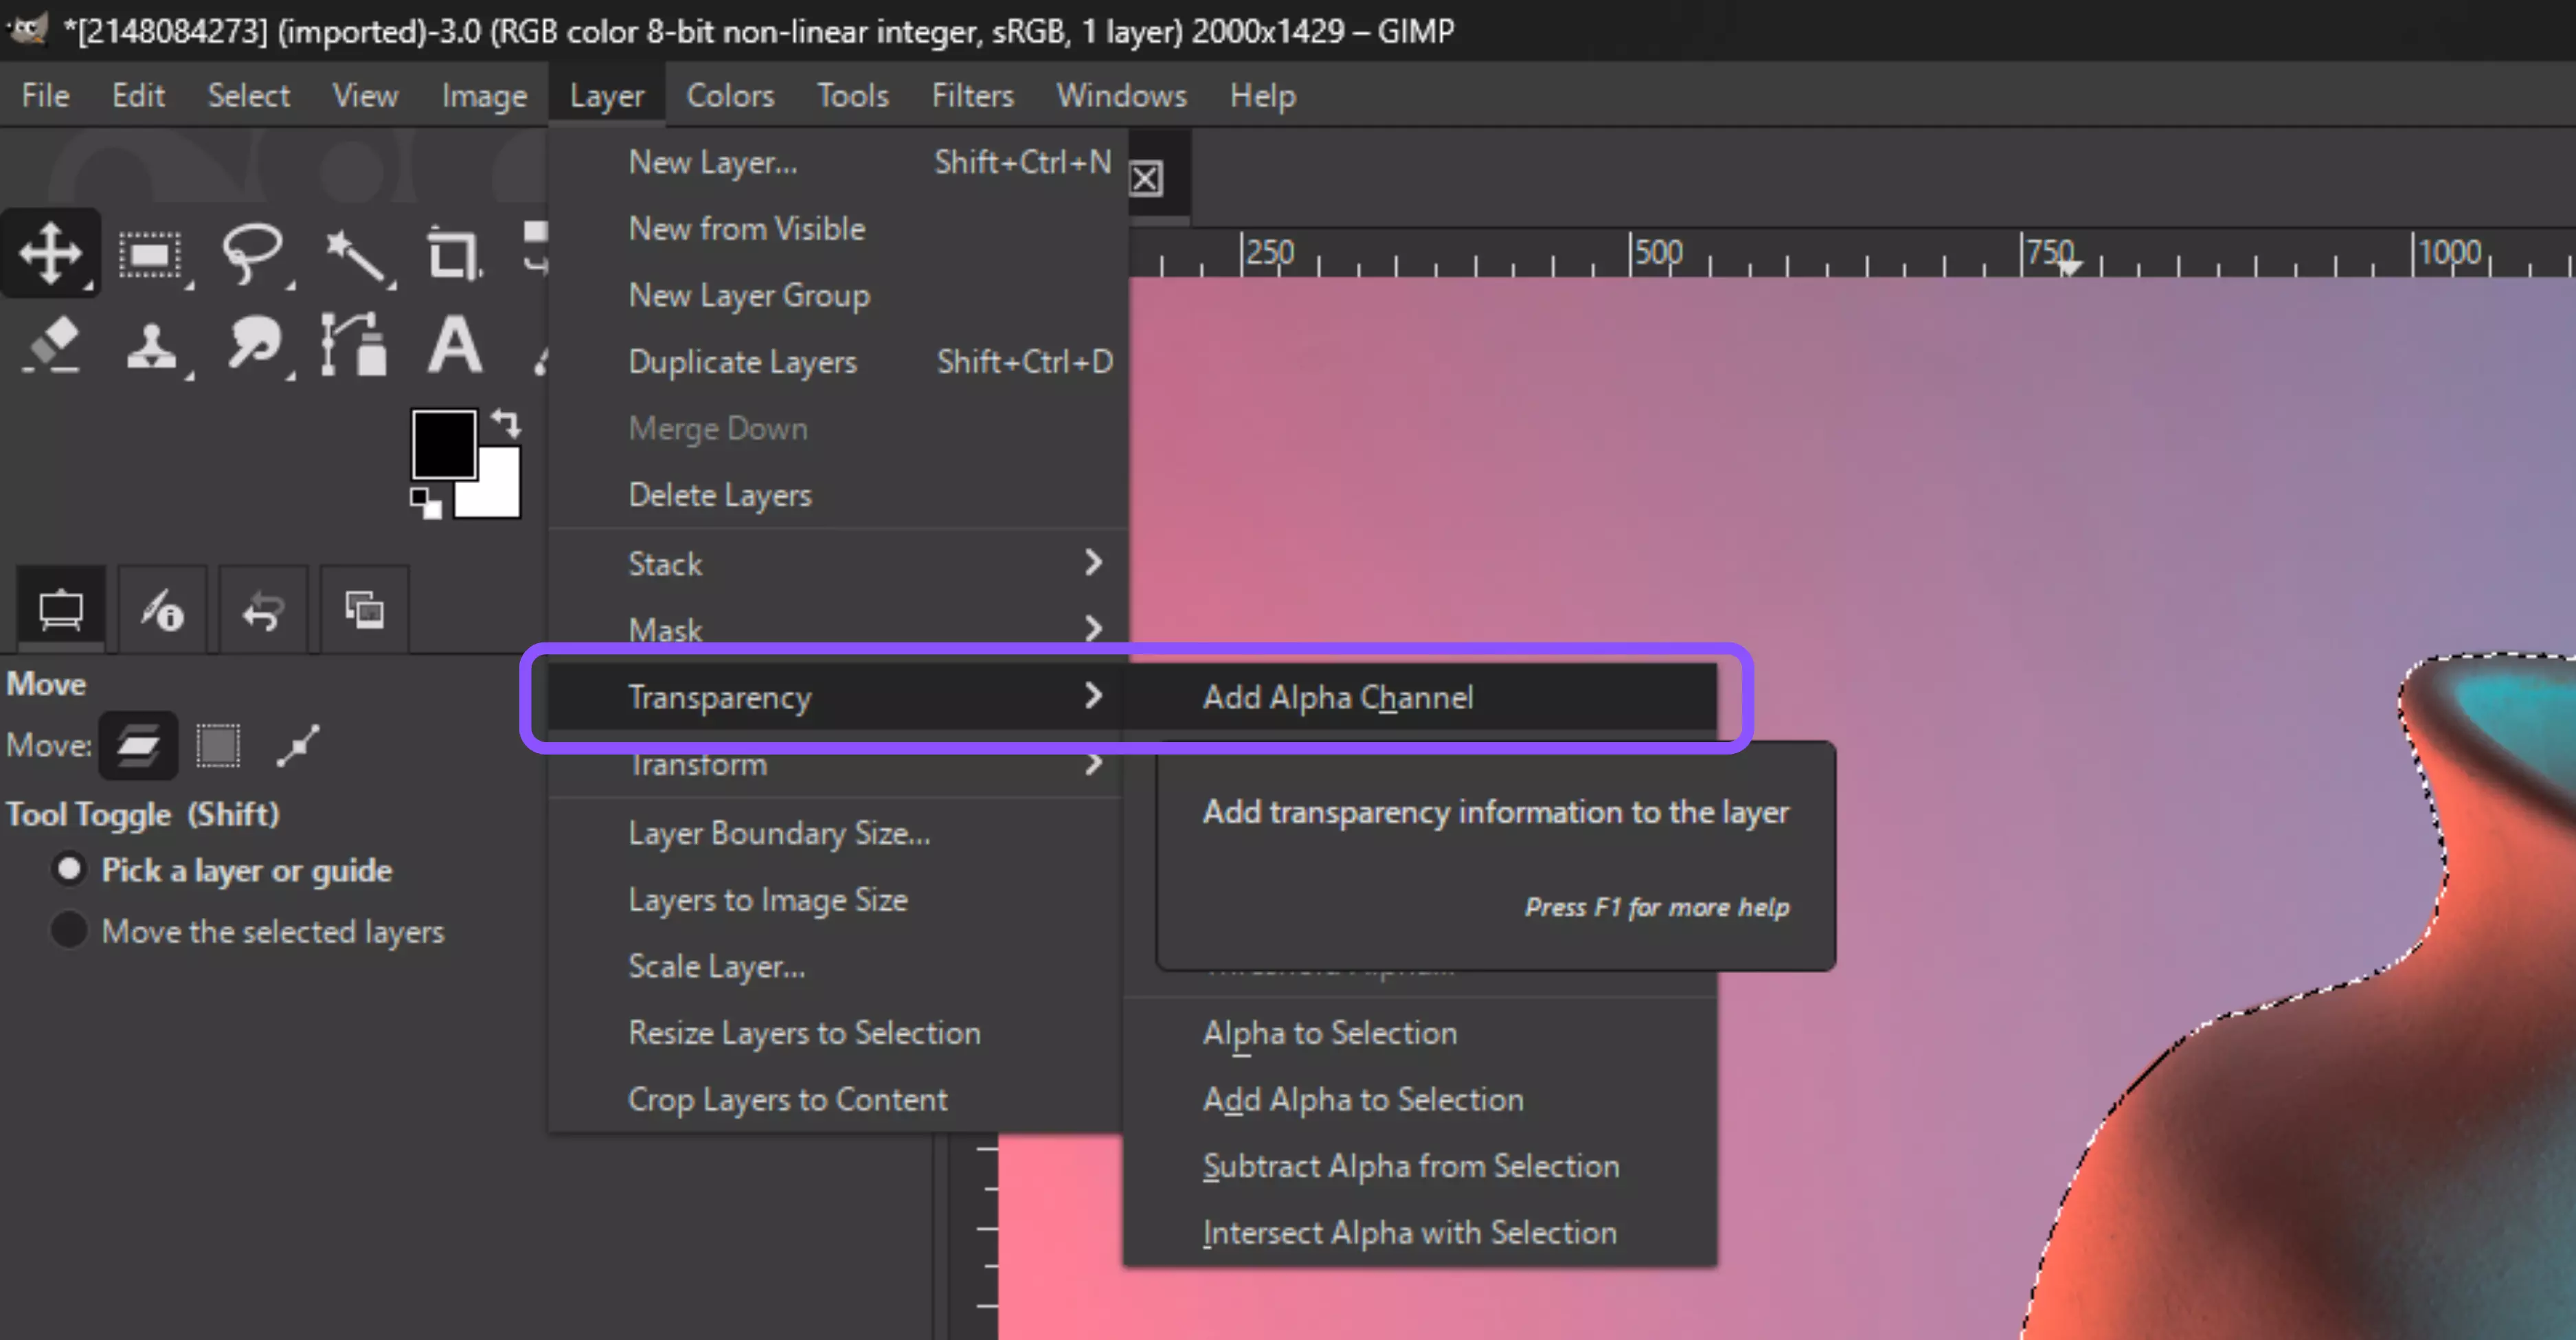
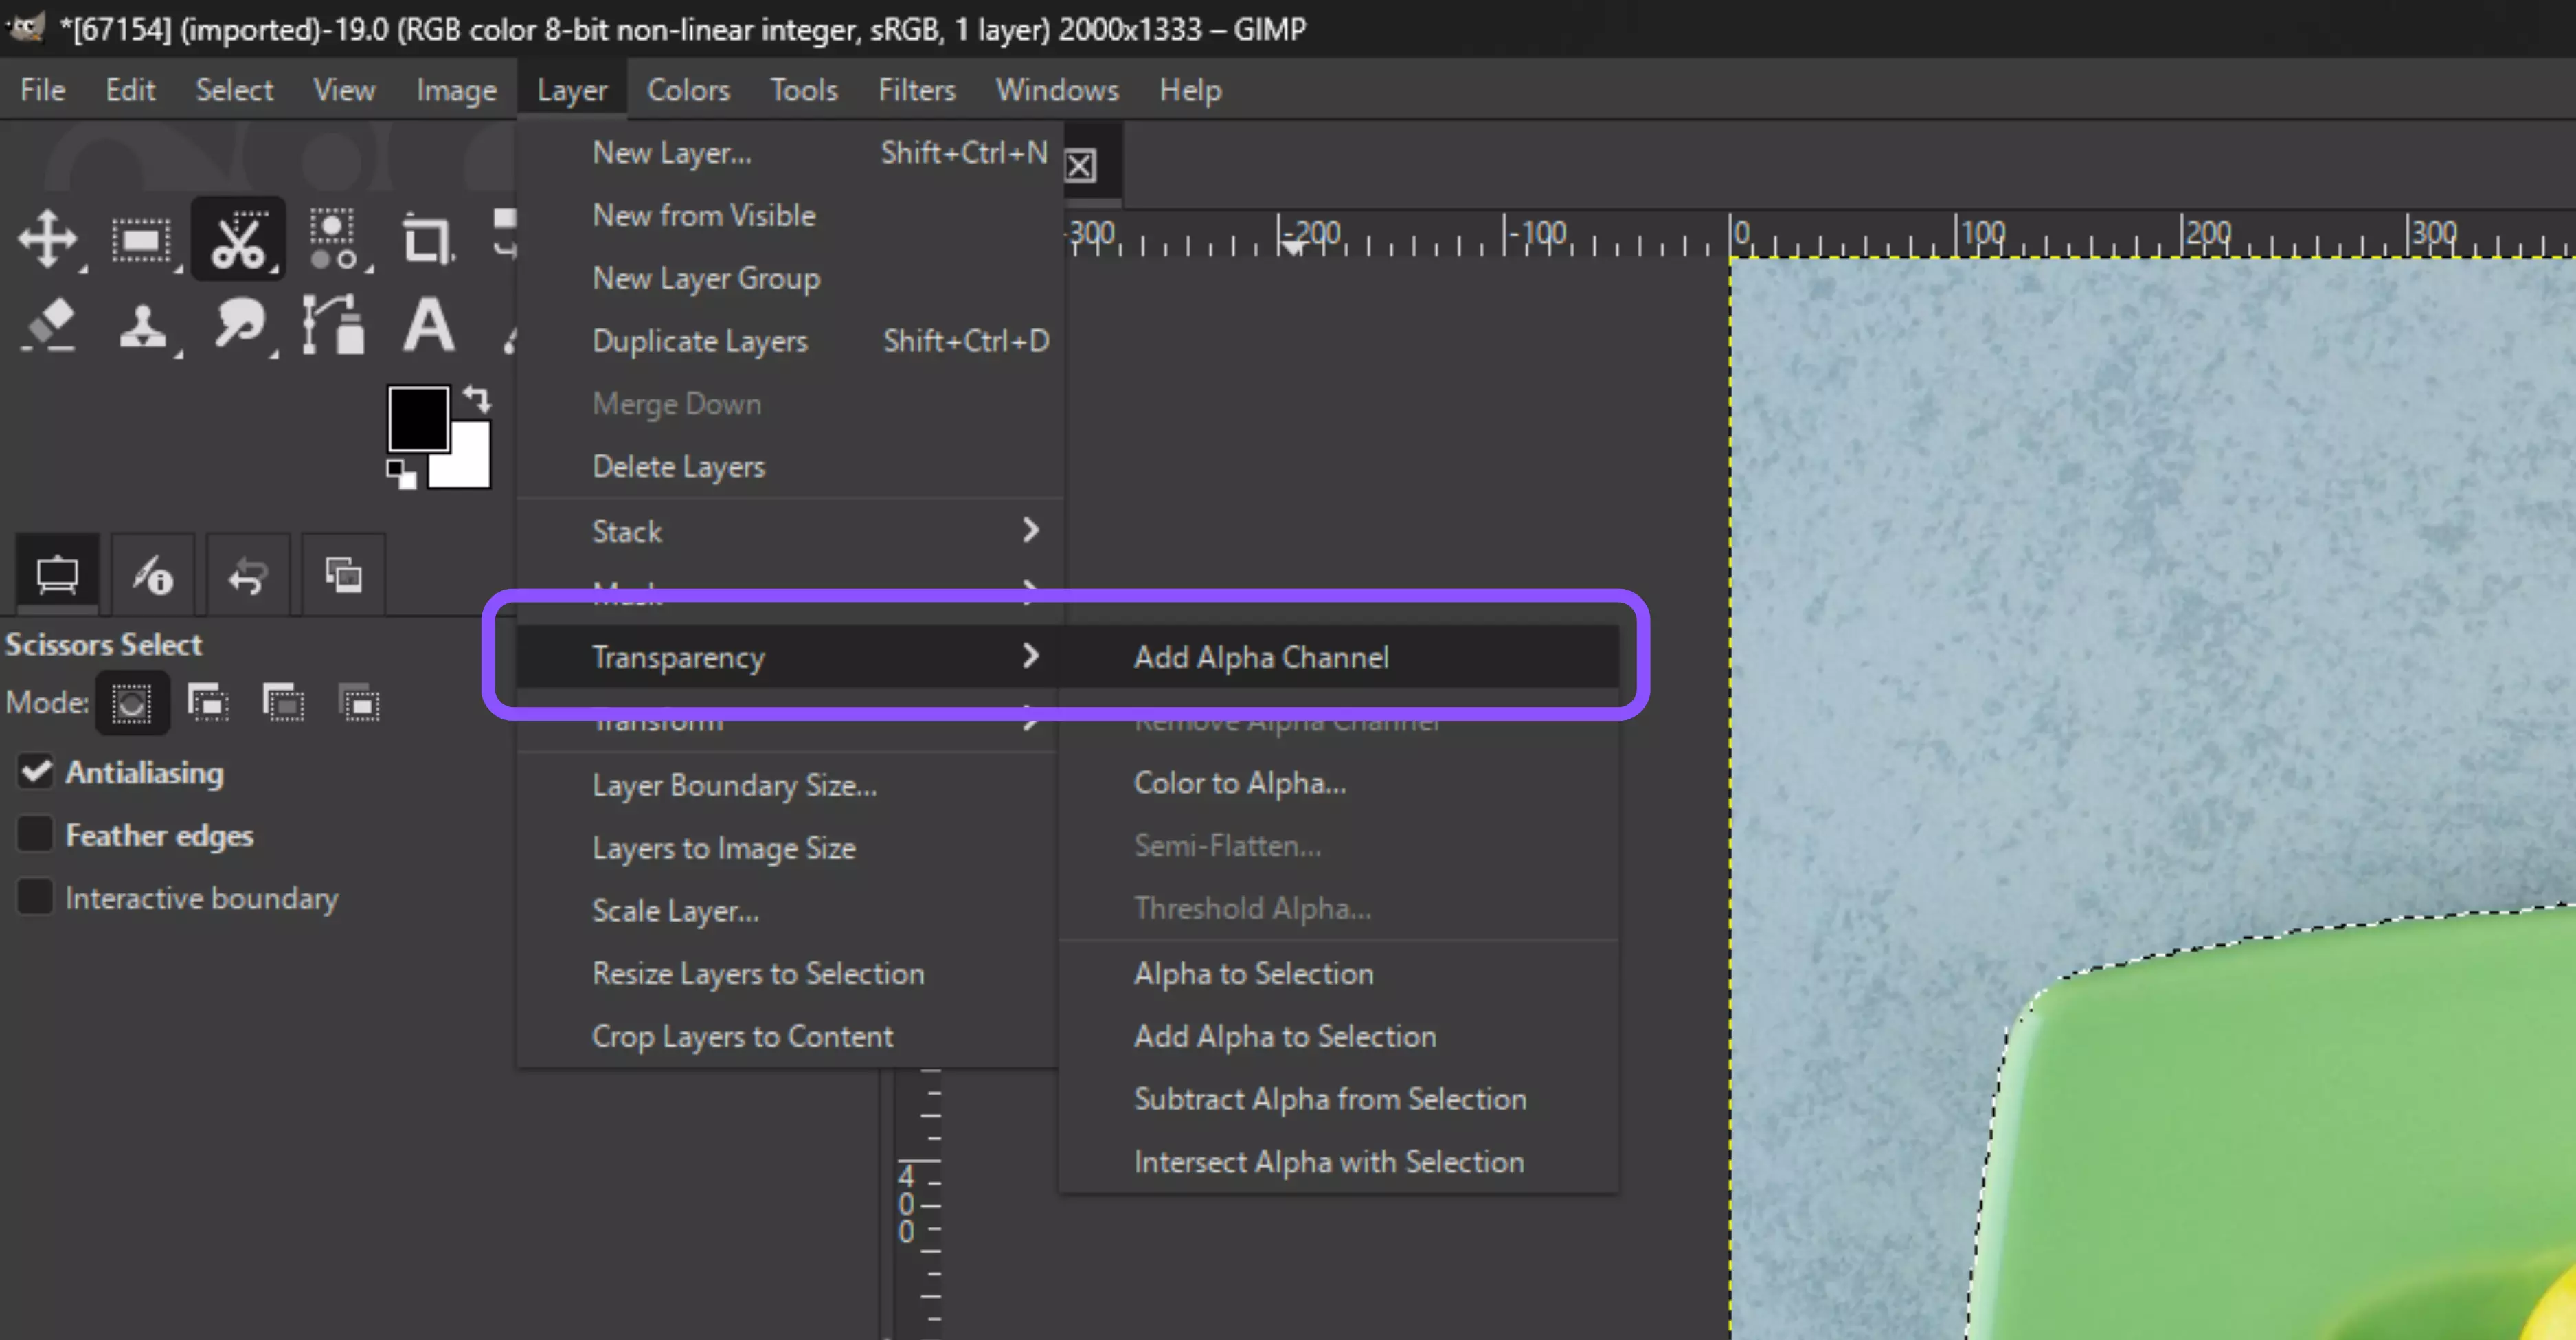
Step 6: Ensure transparency is enabled on your layer: Layer → Transparency → Add Alpha Channel.
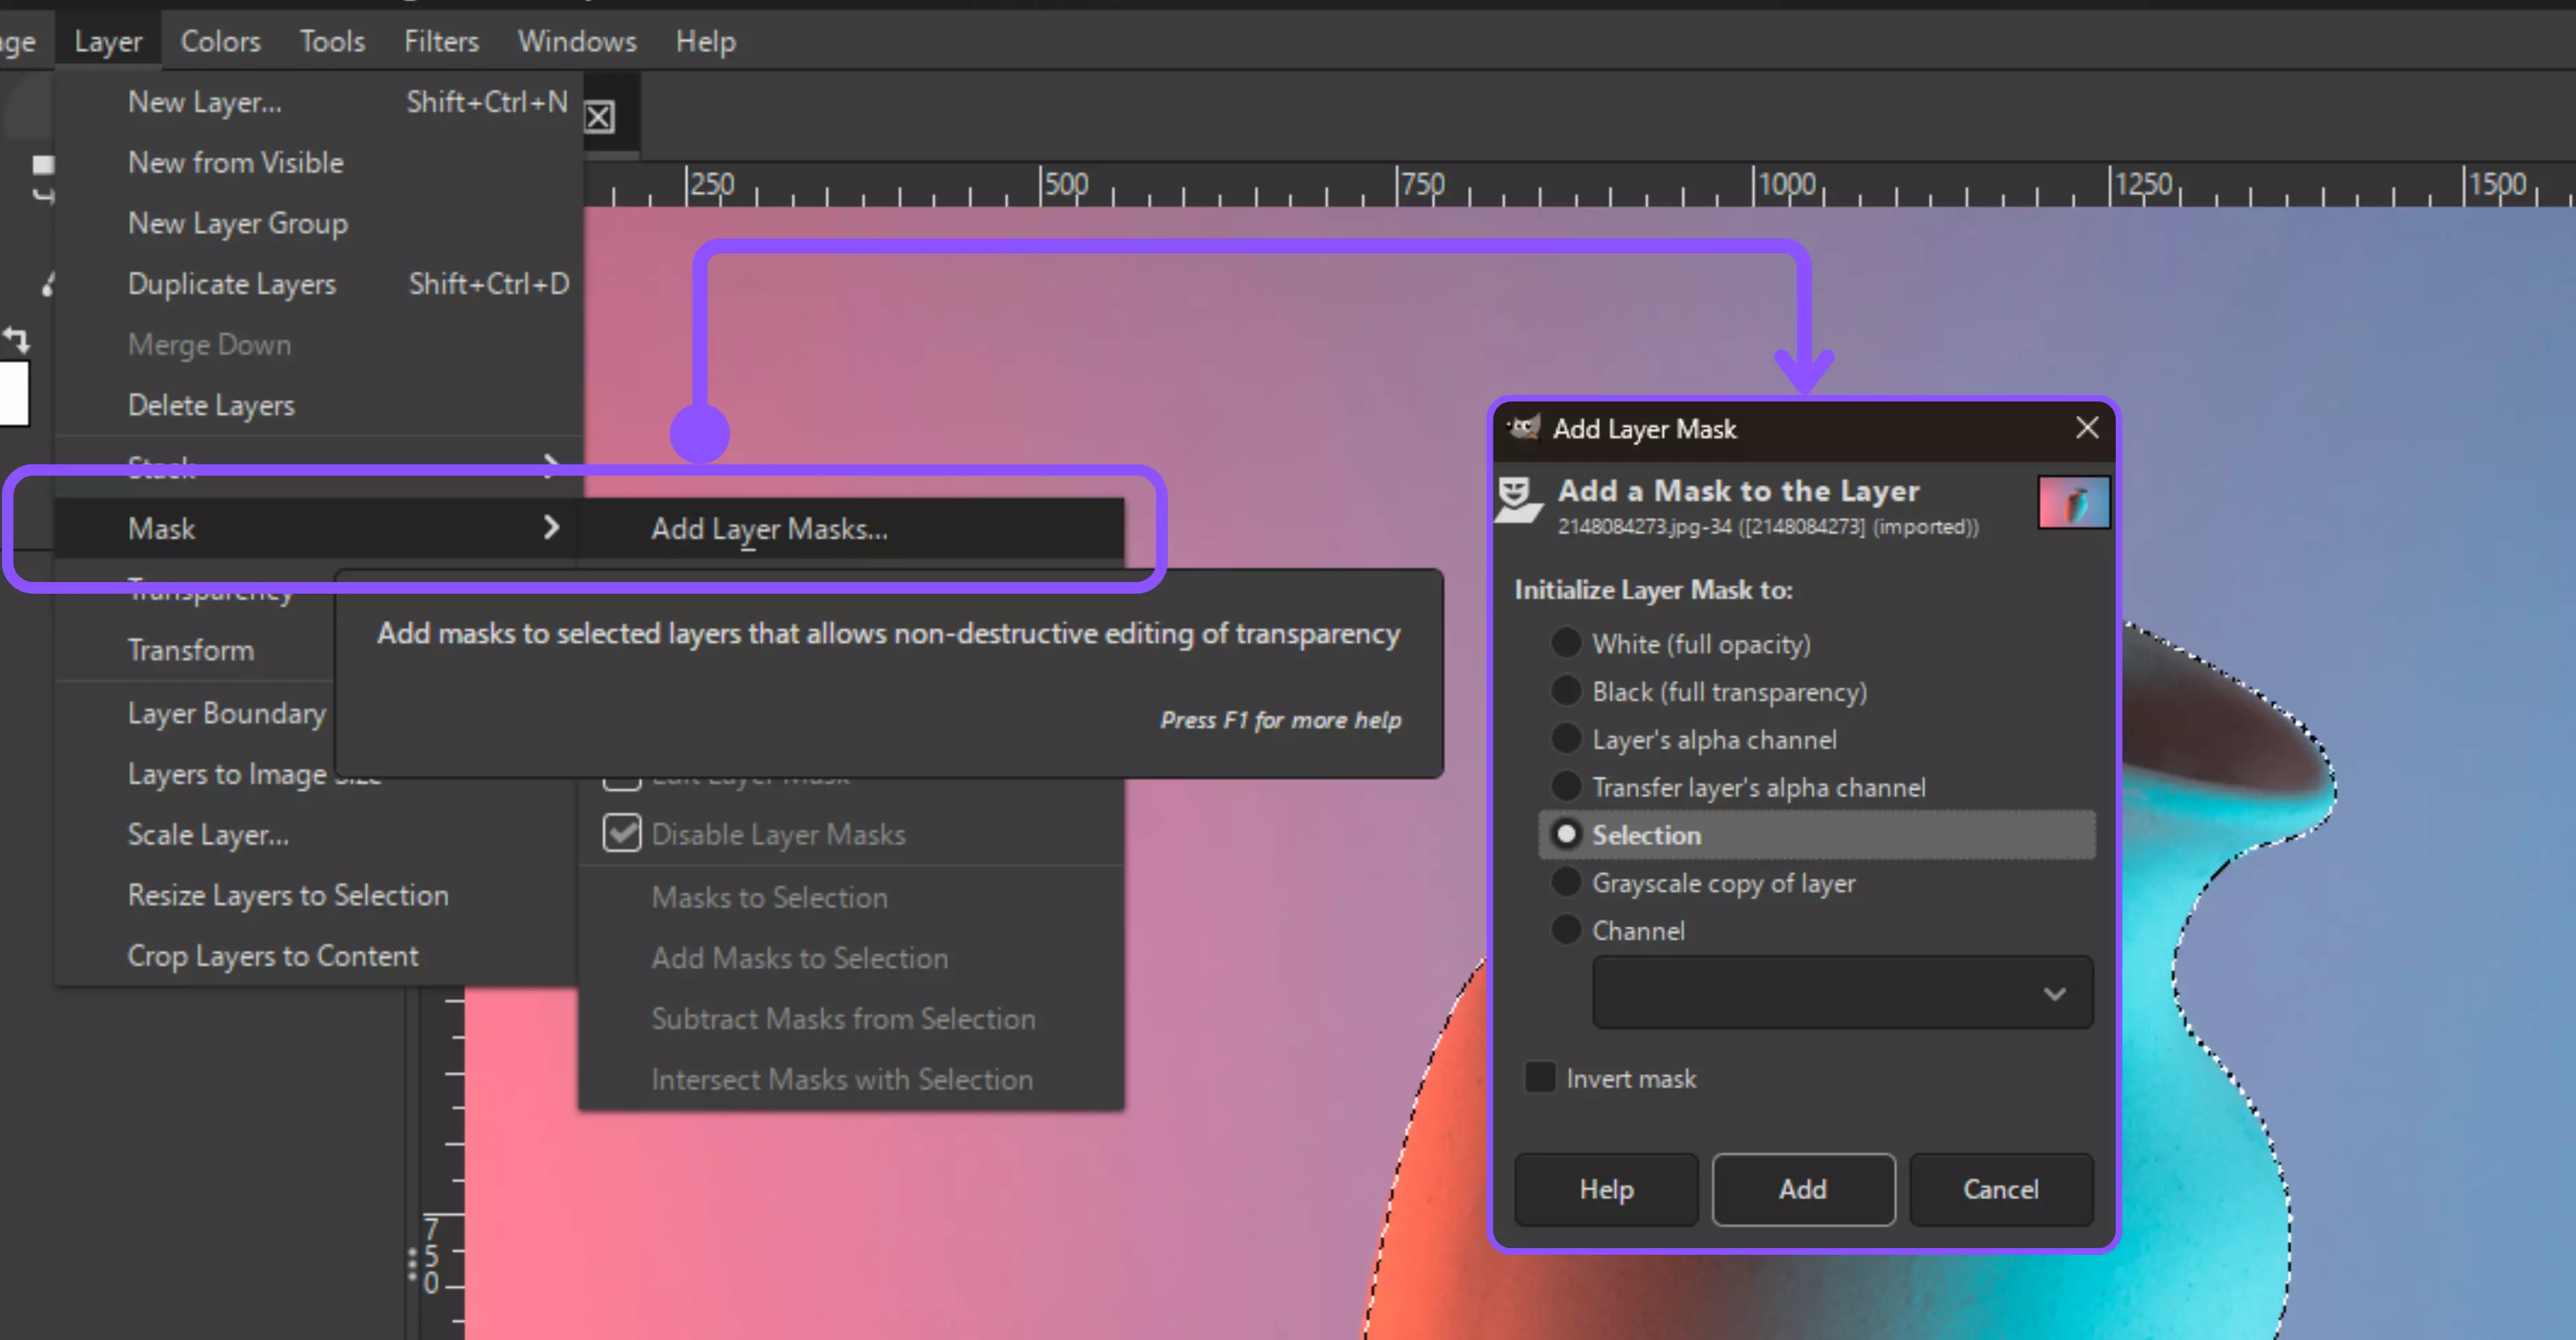
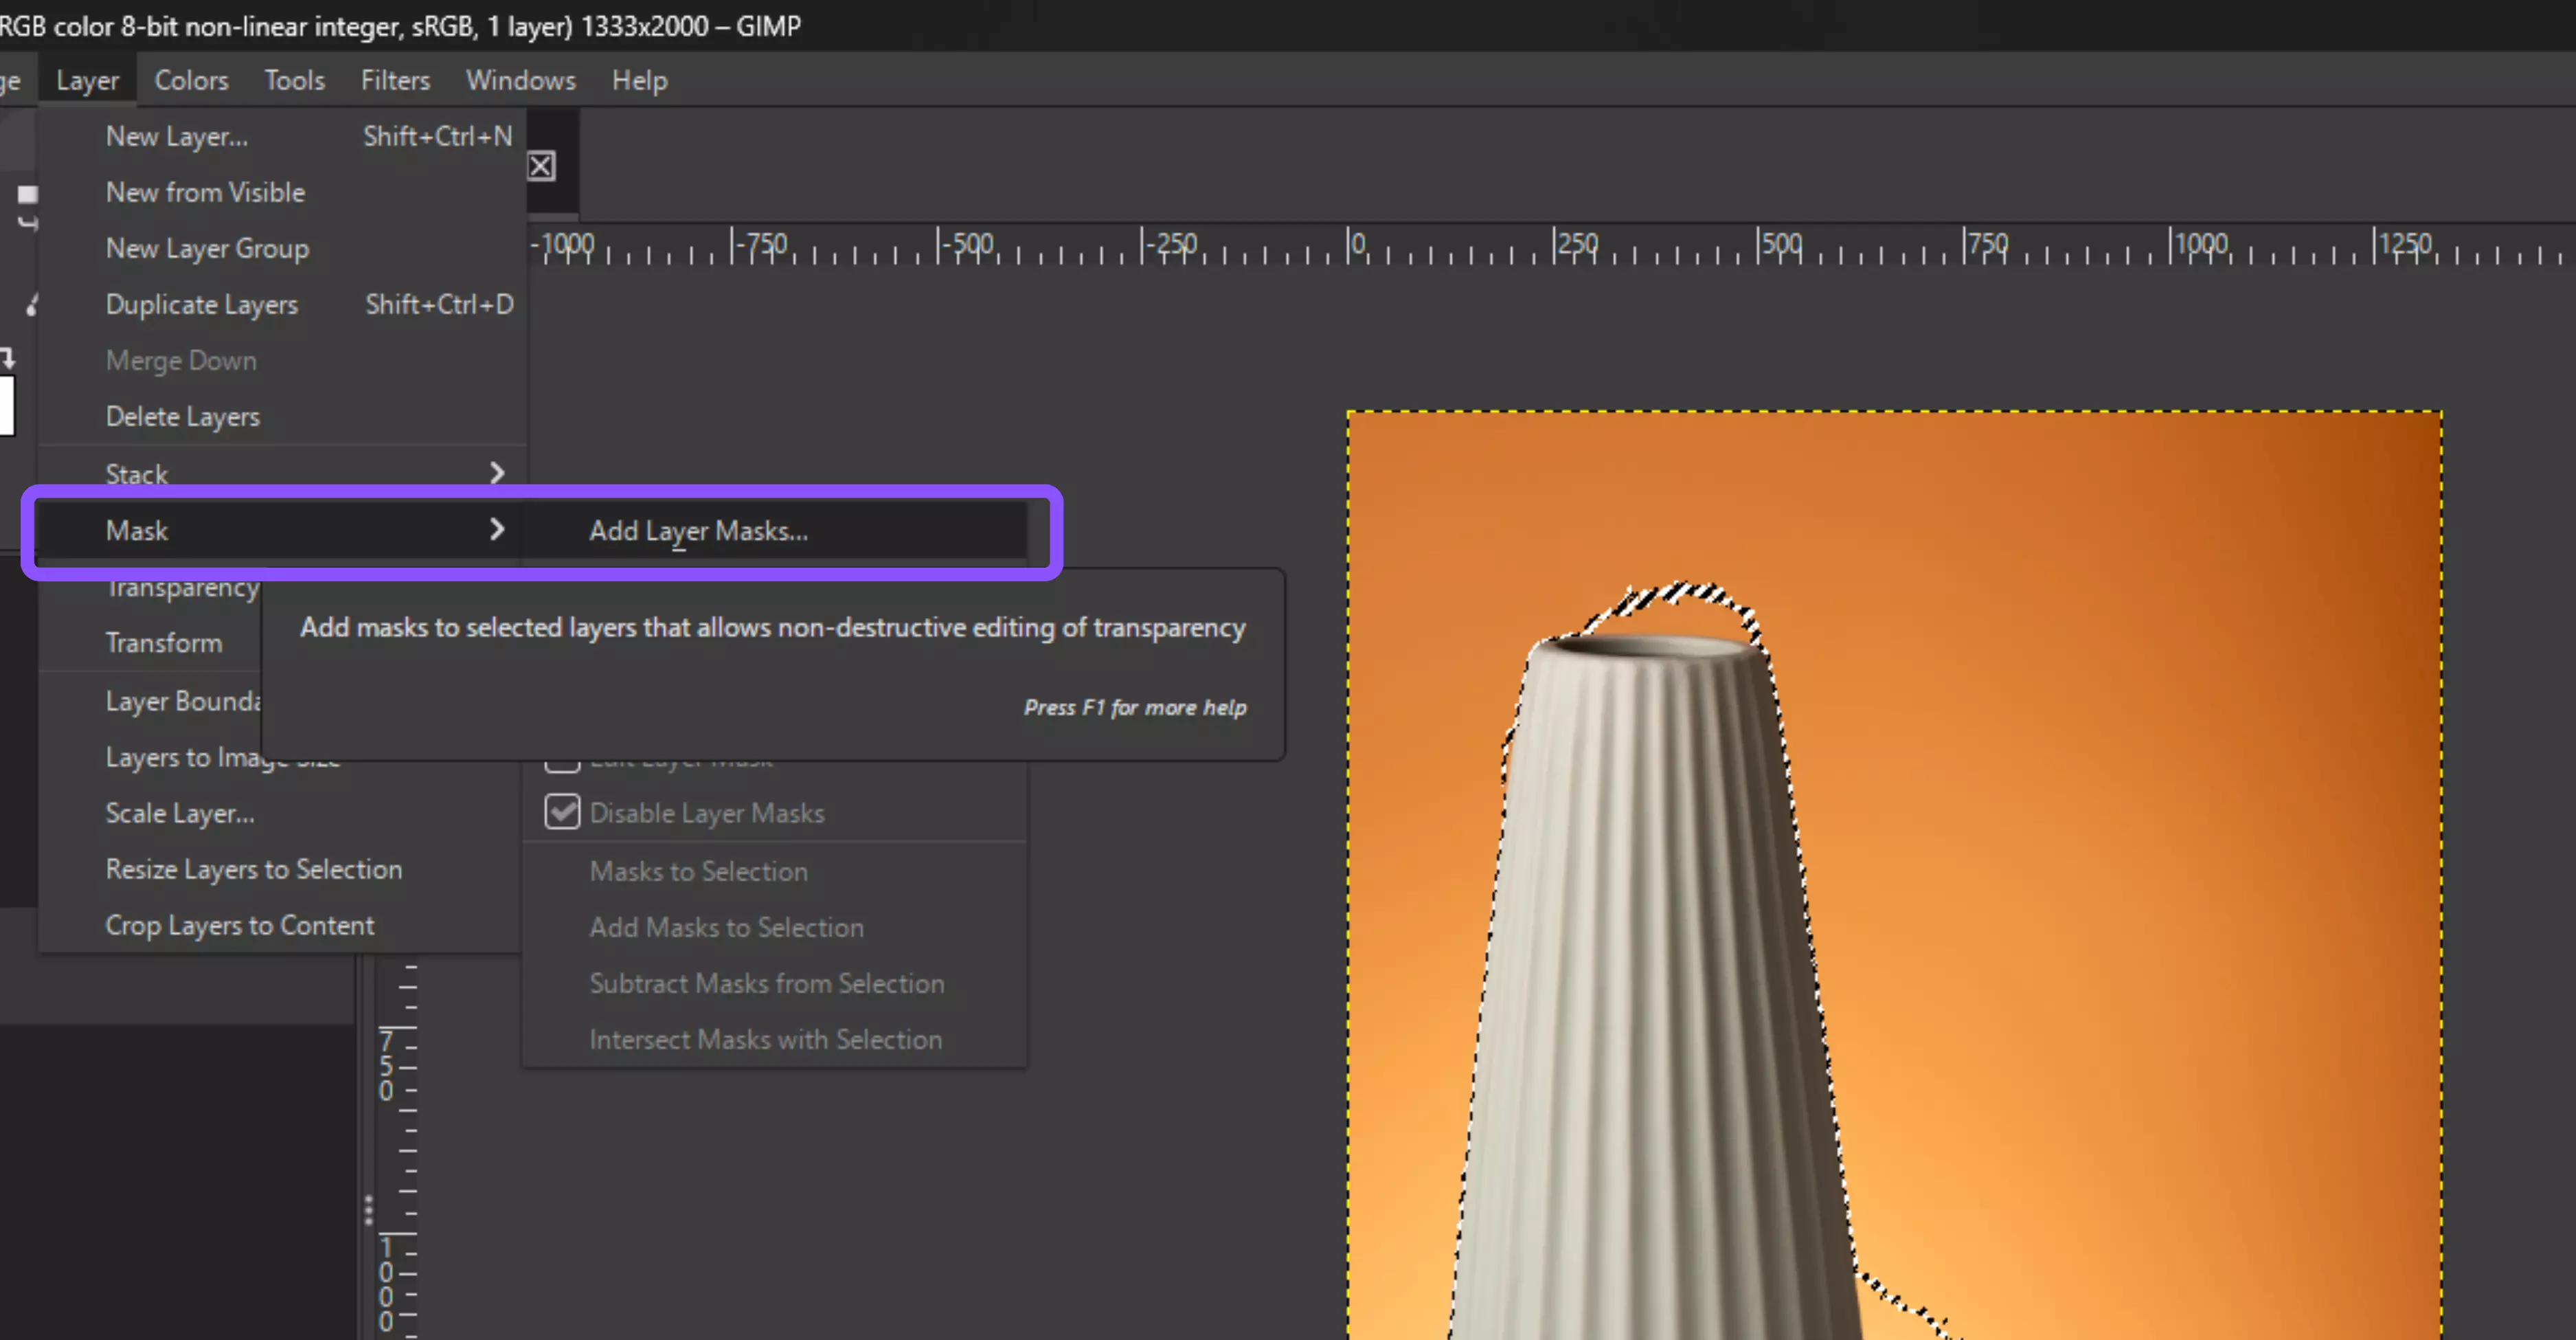
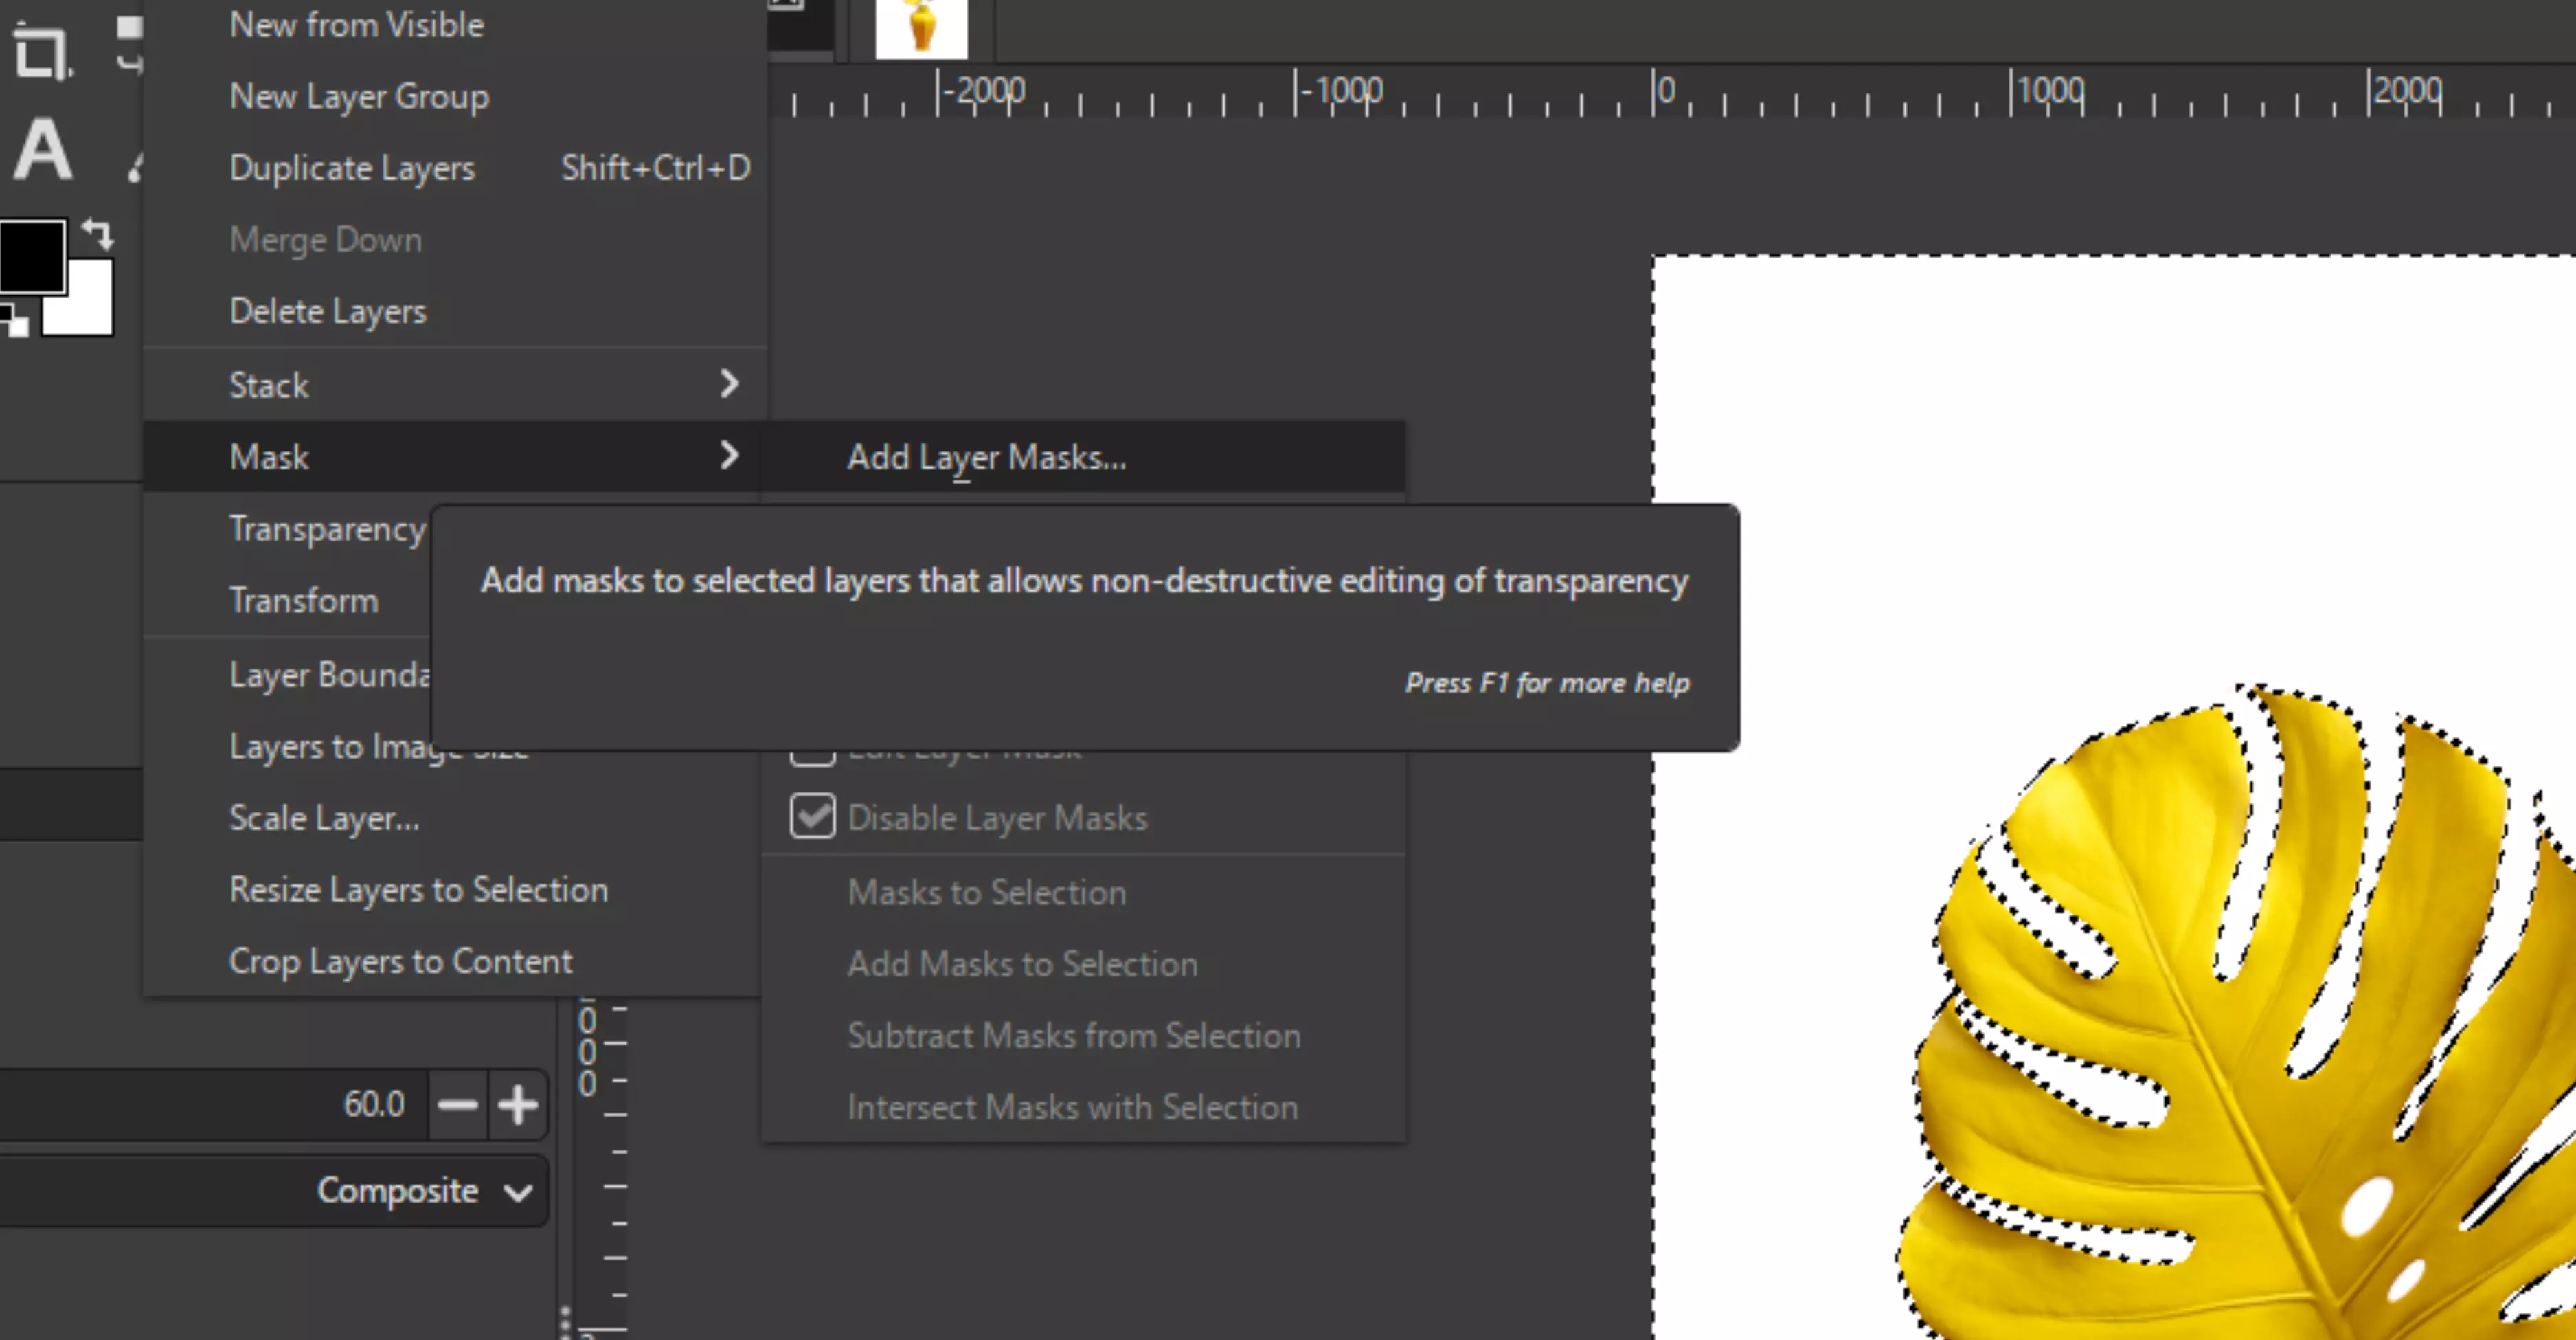
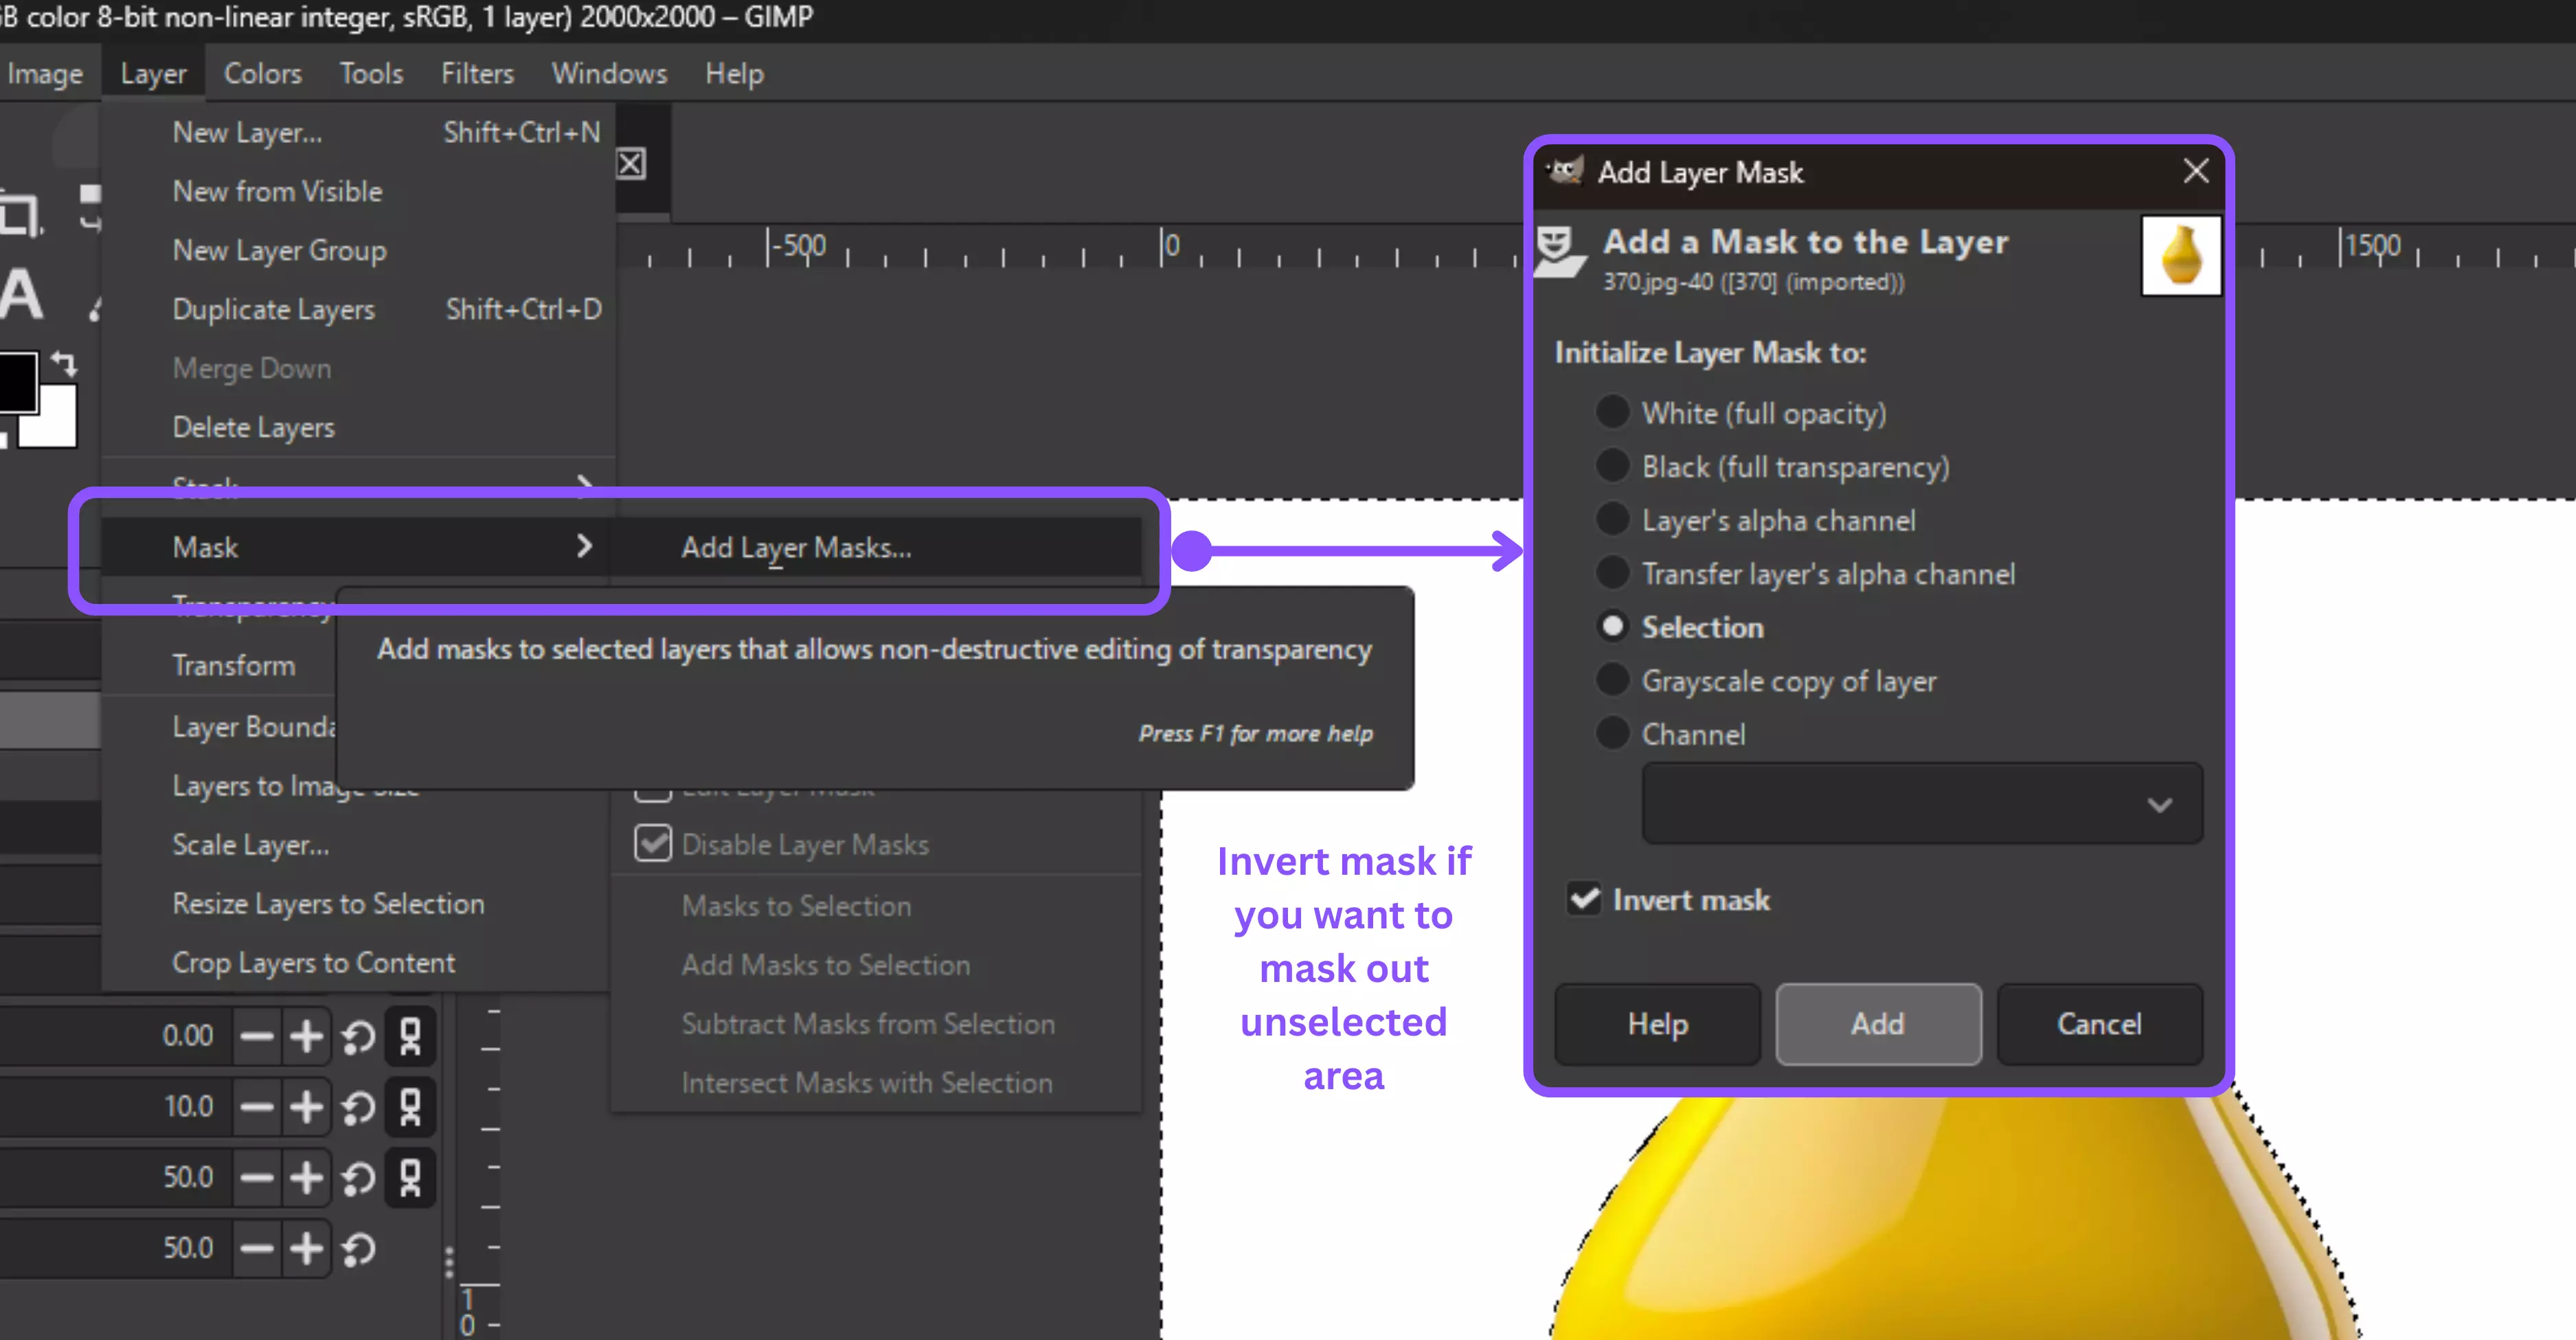
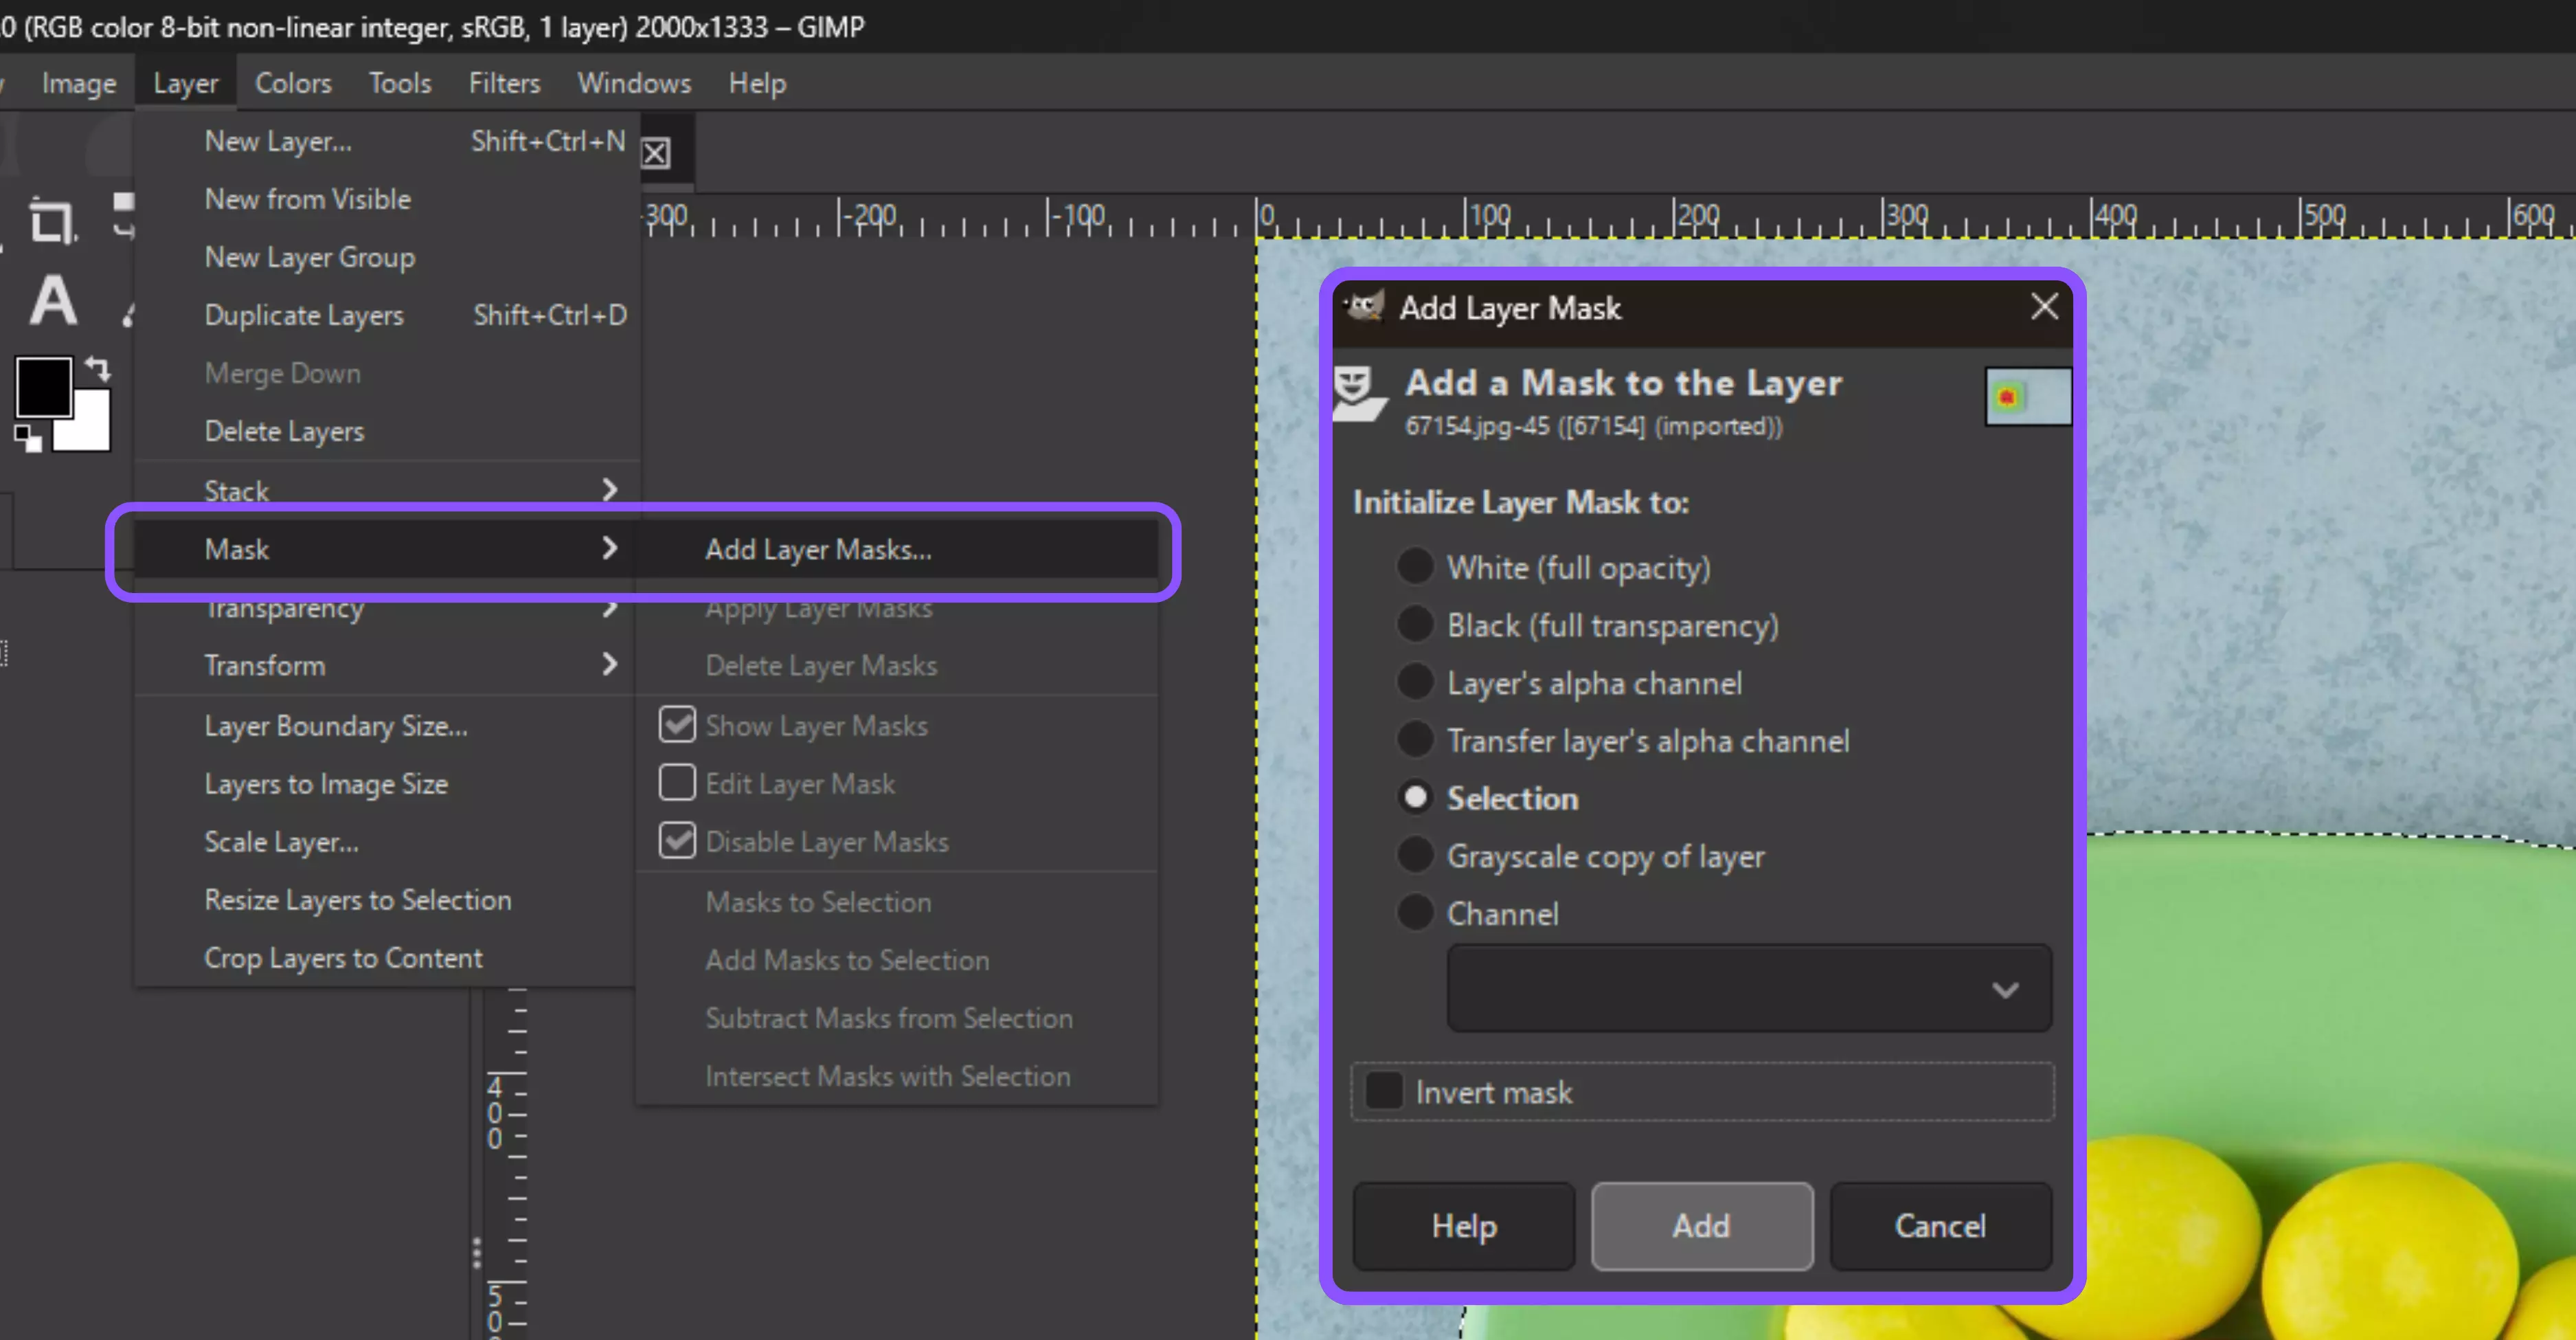
Step 7: Add a non-destructive mask: Layer → Mask → Add Layer Mask → Selection.
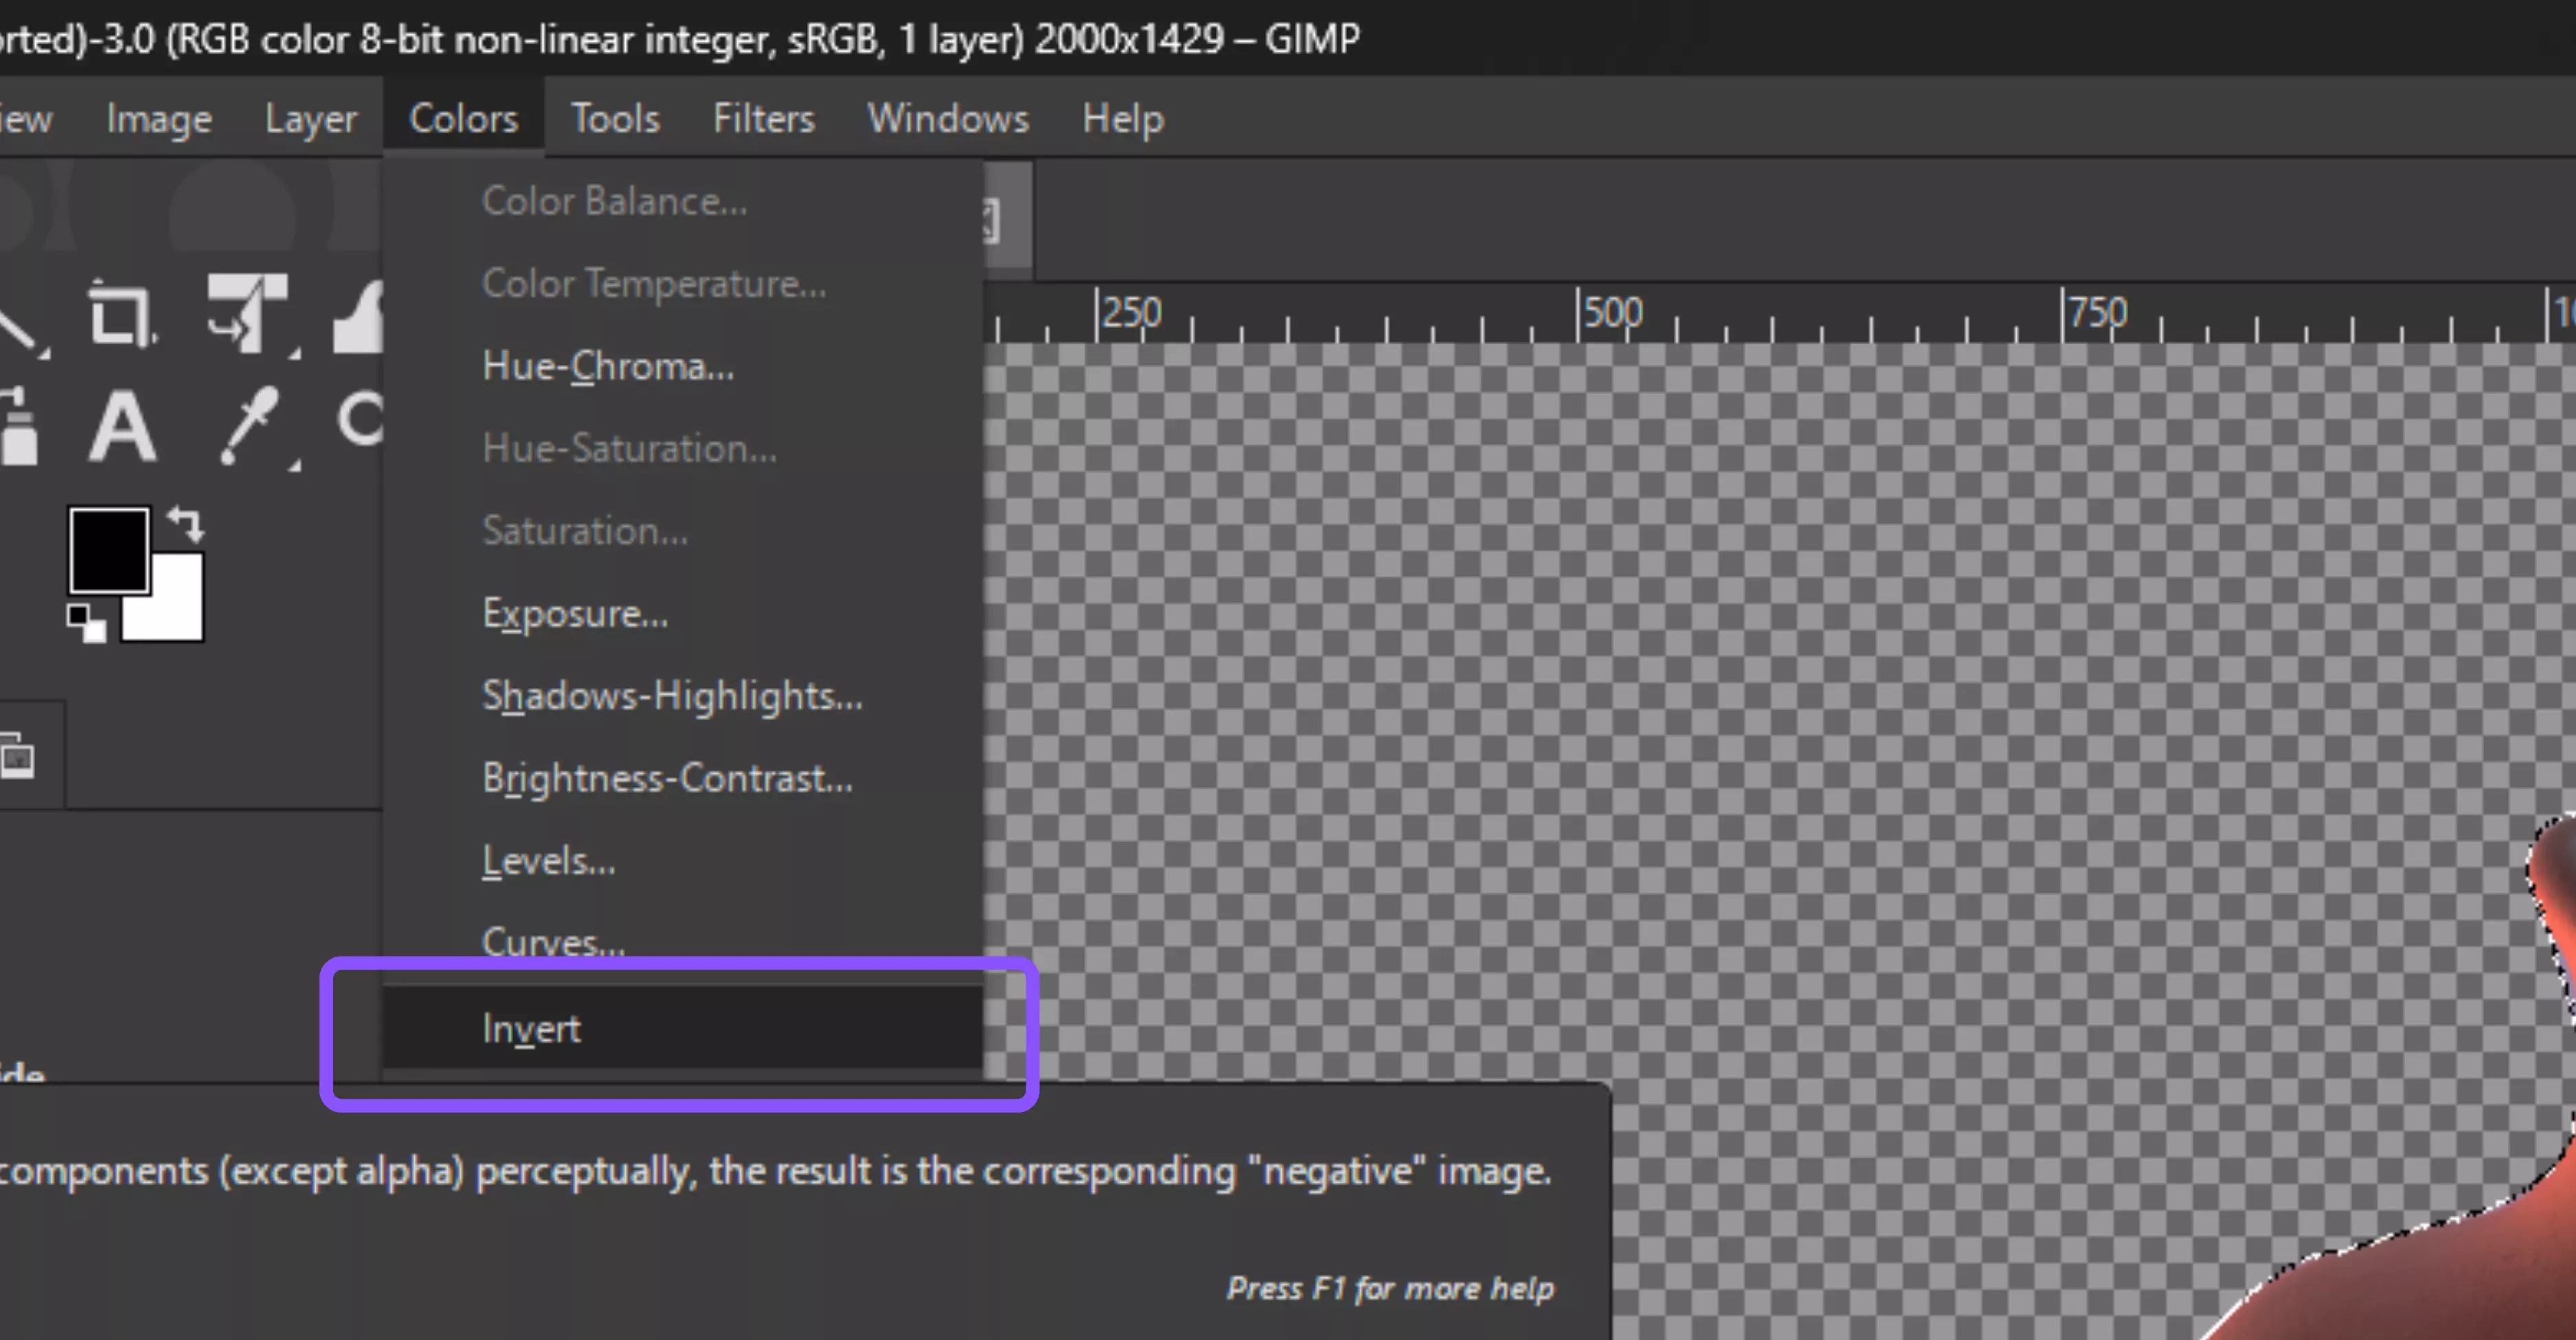
Step 8: Click the layer mask thumbnail in the Layers panel, then go to Colors → Invert to flip the mask.
Why use it?
The Paths Tool gives you unmatched accuracy for sharp-edged subjects. It’s time-consuming initially, but it produces professional, clean results, especially for products, geometric shapes, and logos.
2. Using the Foreground Select tool
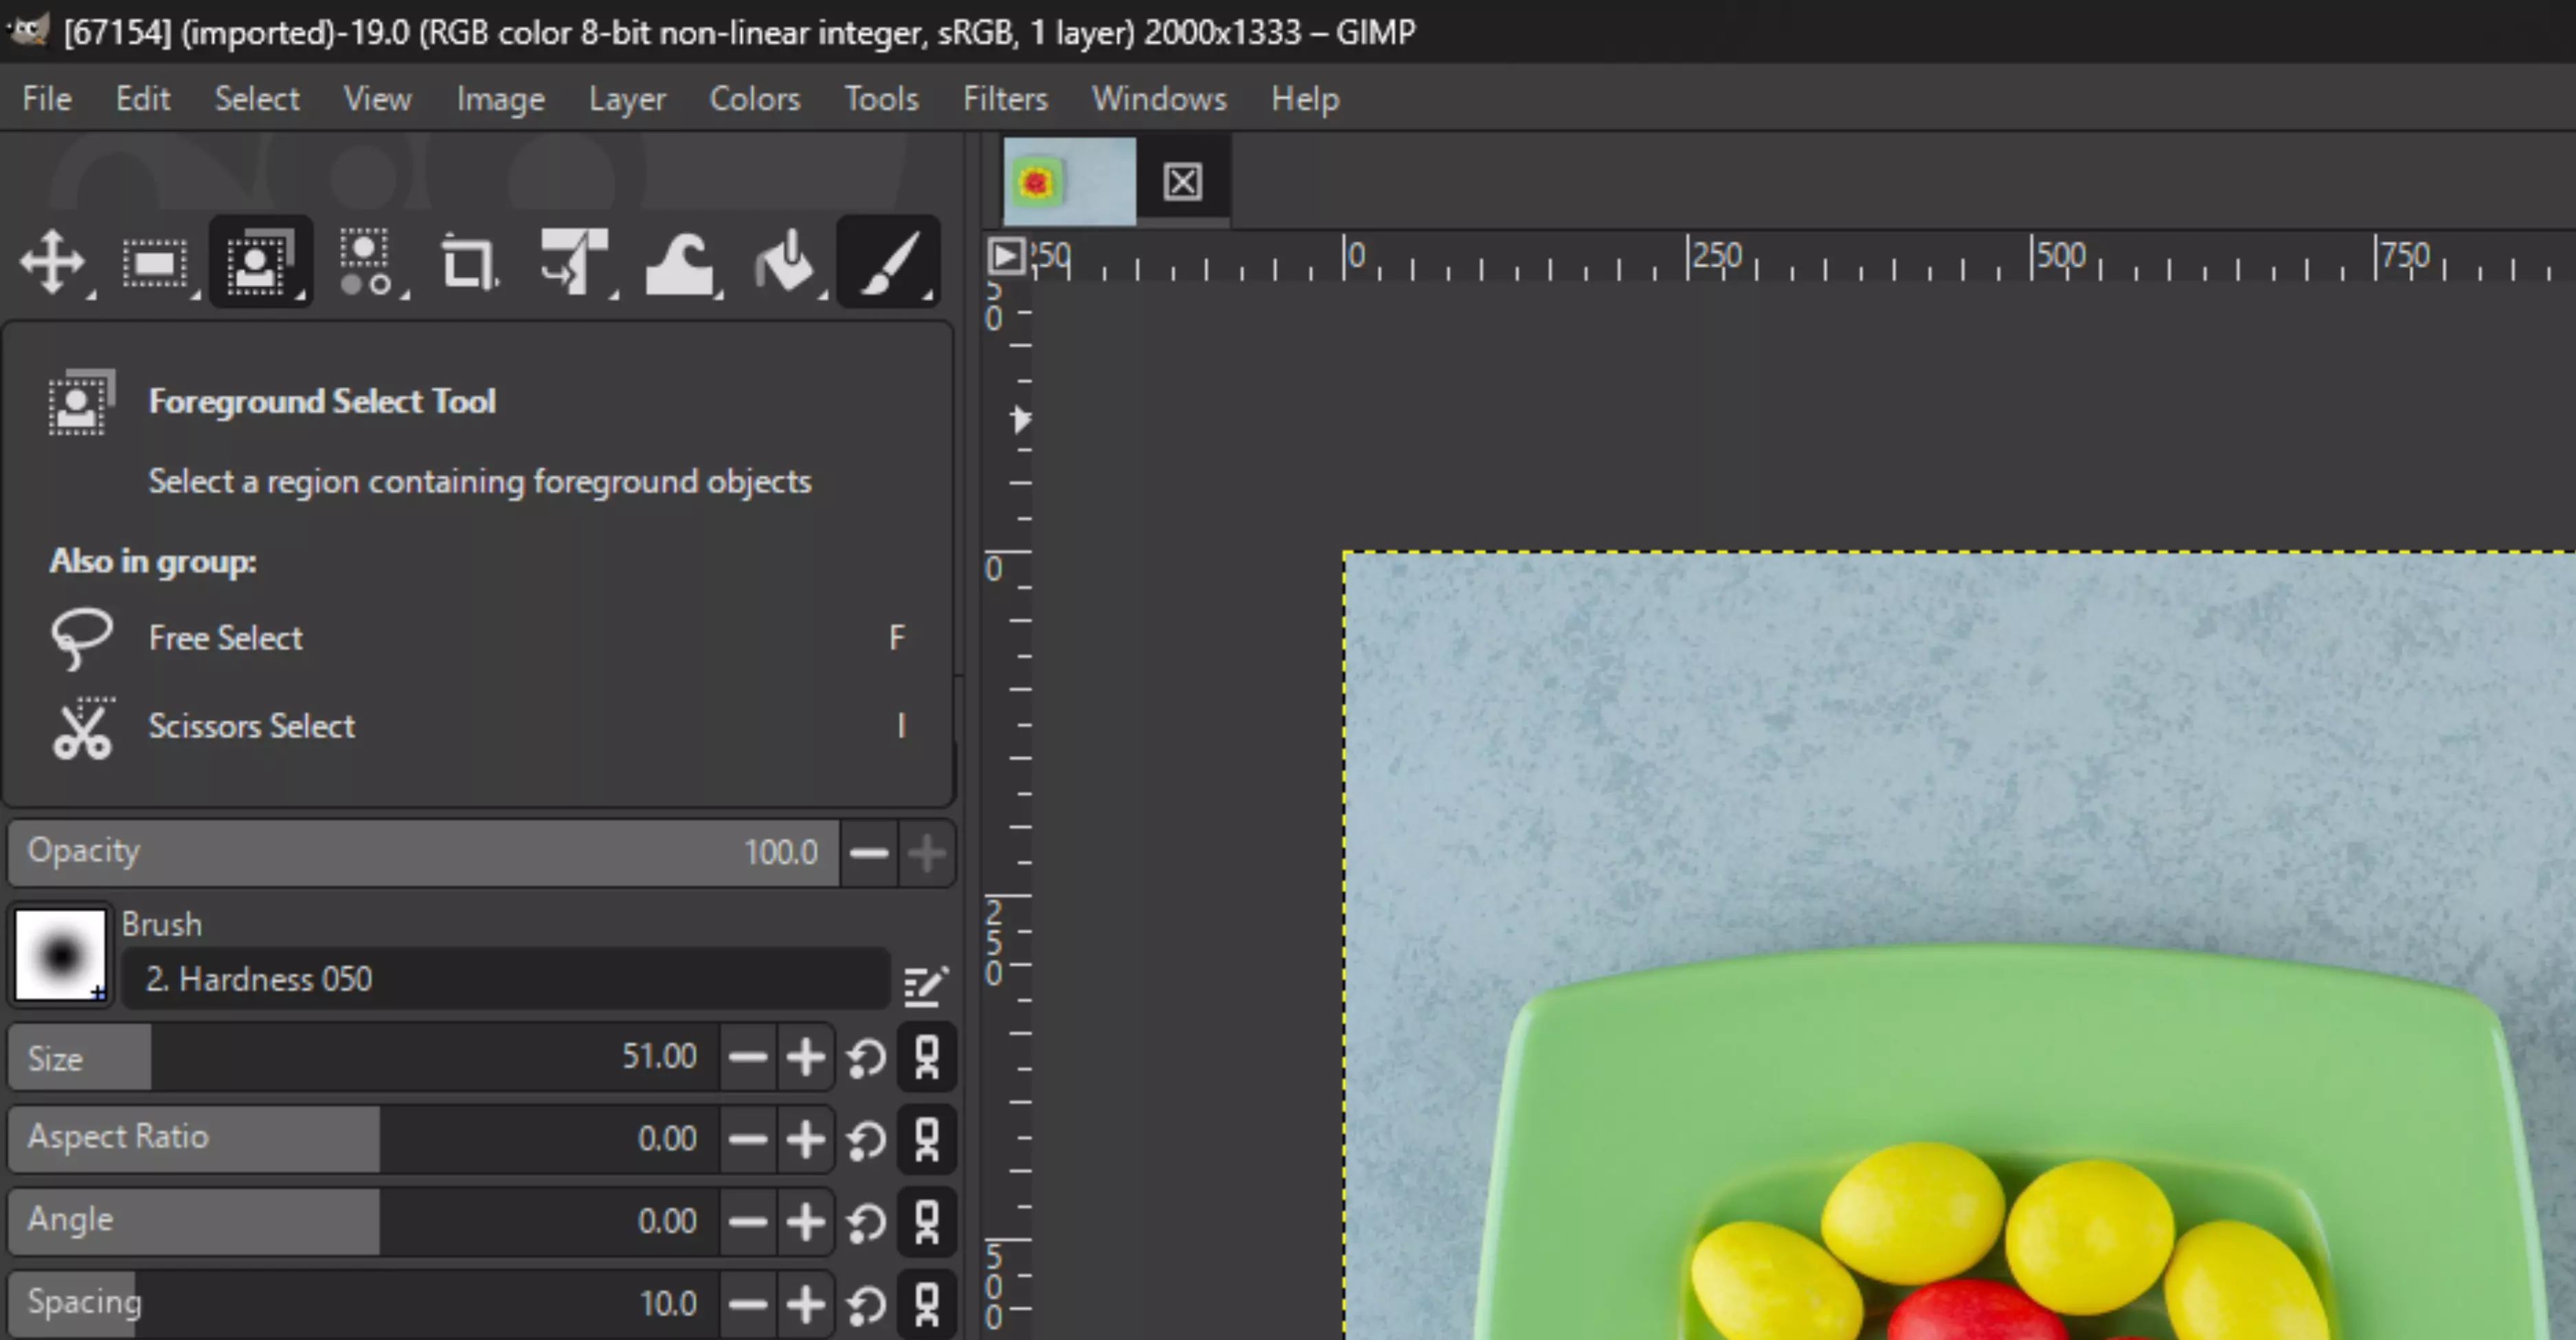
When your subject has intricate details, such as hair, fur, or foliage, the Foreground Select Tool can automatically detect edges, saving hours of manual work.
Steps to know
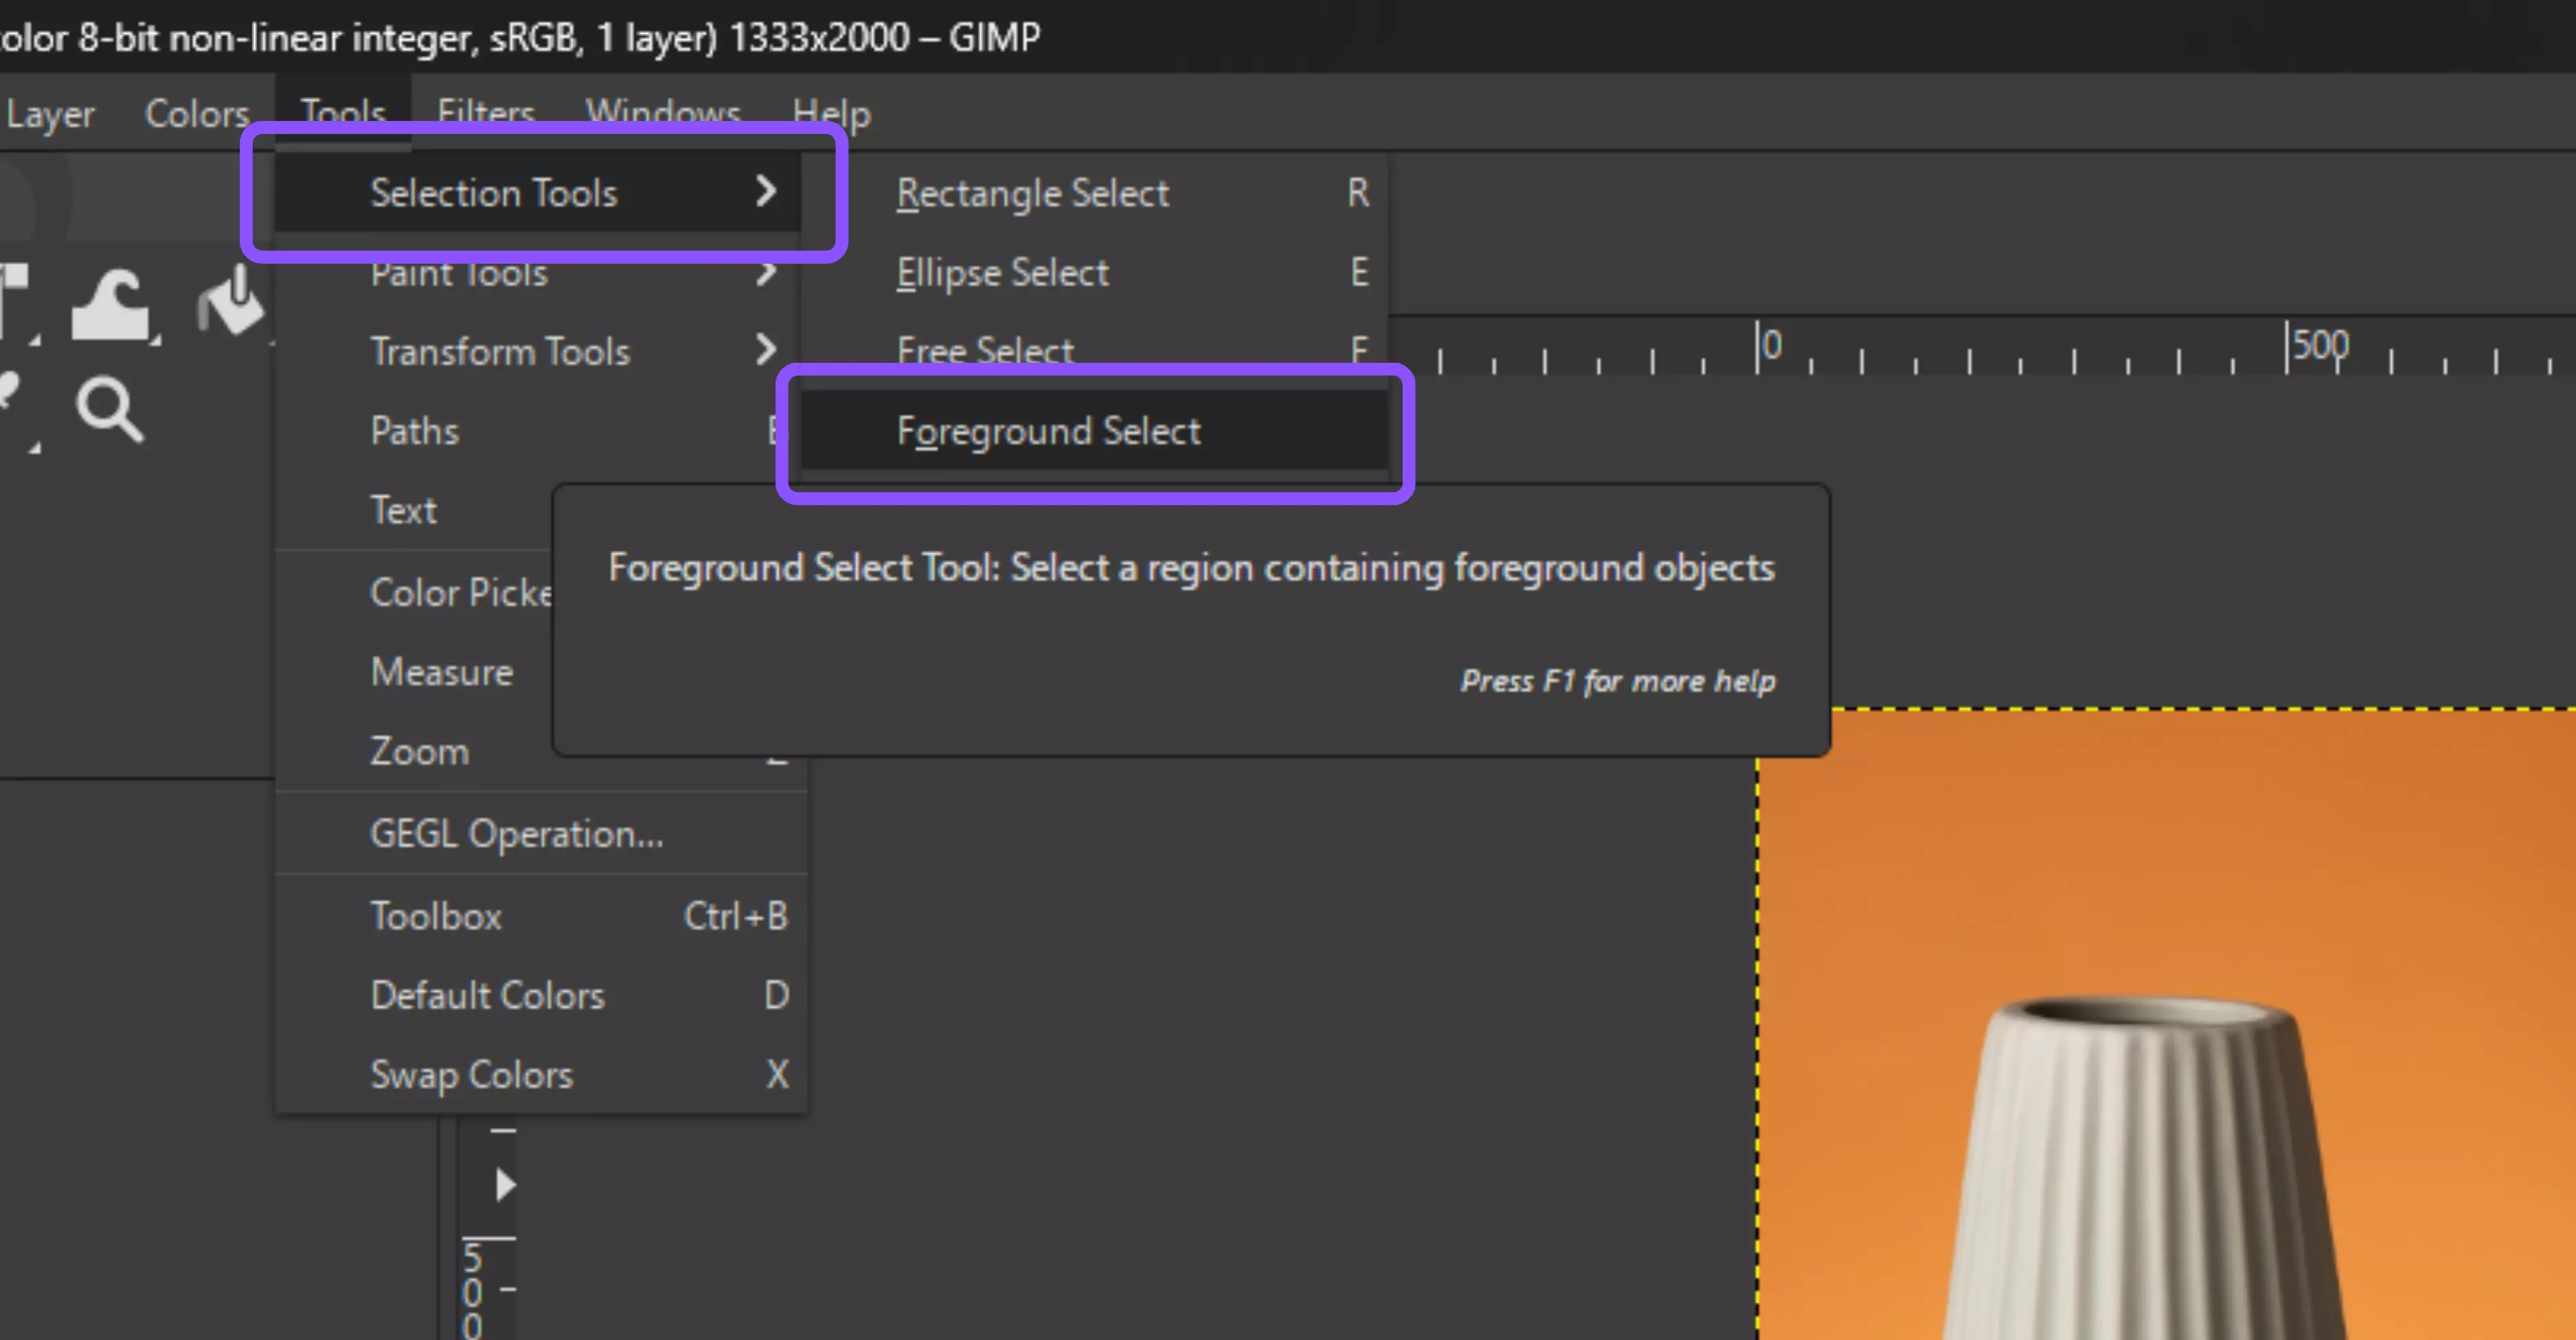
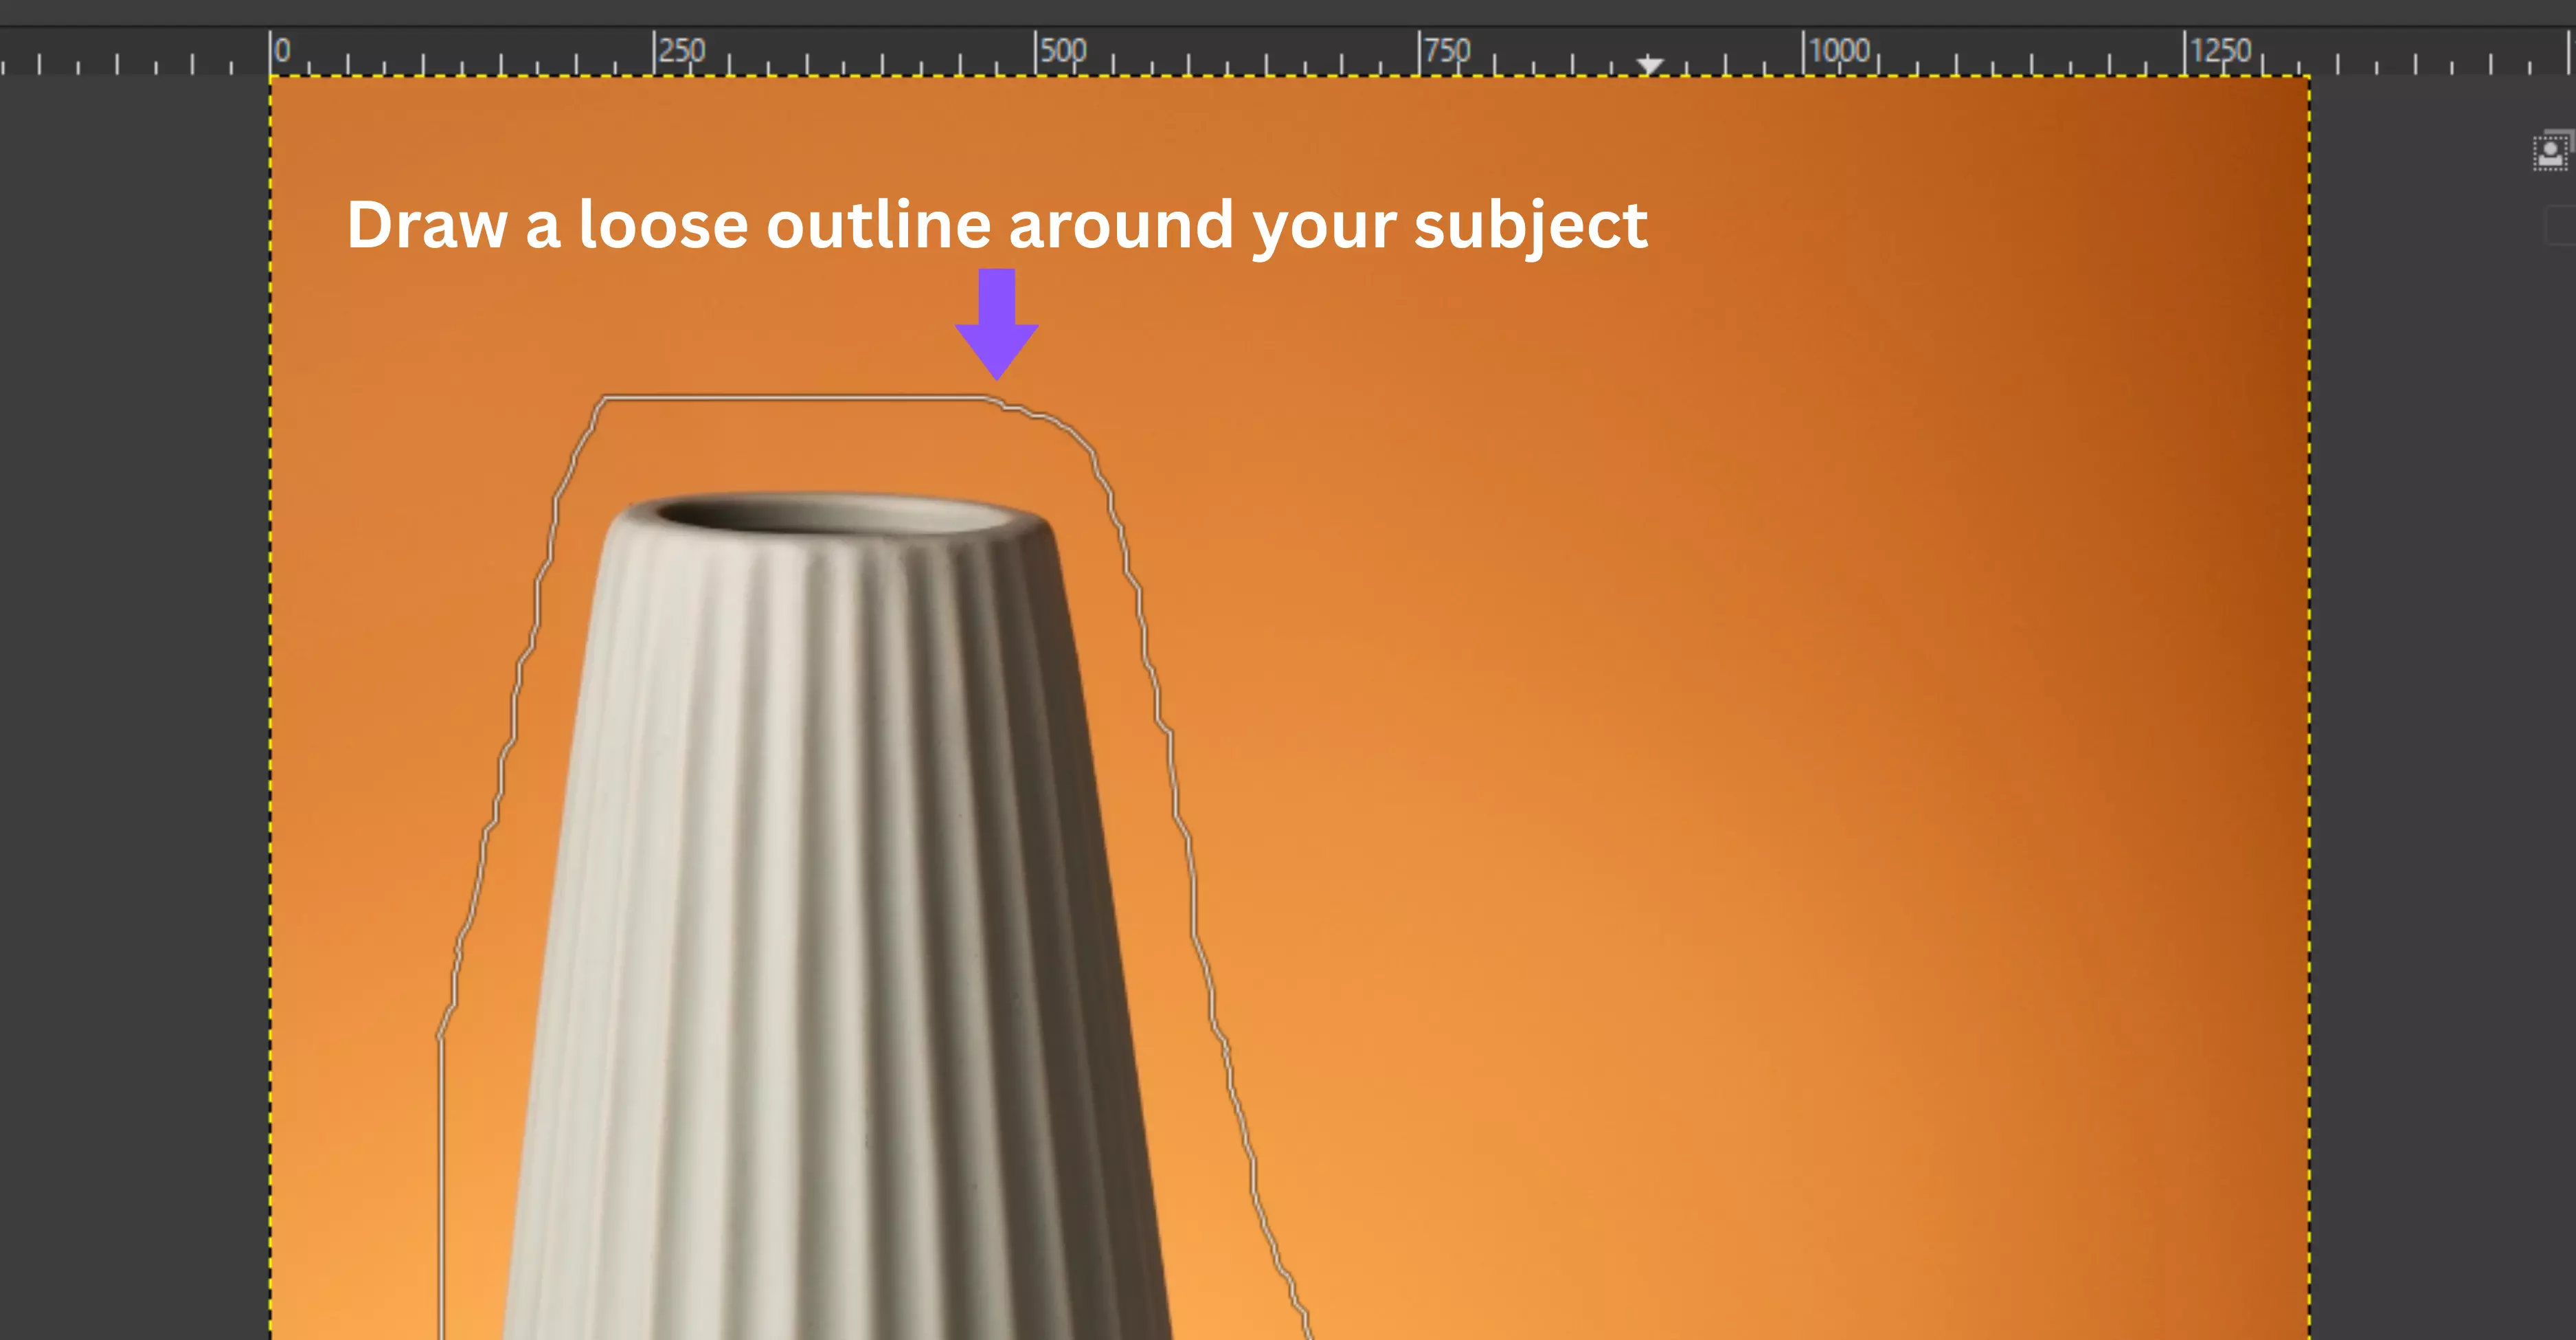
Step 1: Choose the Foreground Select Tool from the toolbox. It’s designed to separate your subject from tricky or busy backgrounds.
Step 2: Draw a loose outline around your subject—don’t worry about being precise here. Once done, press Enter to switch into mask mode.
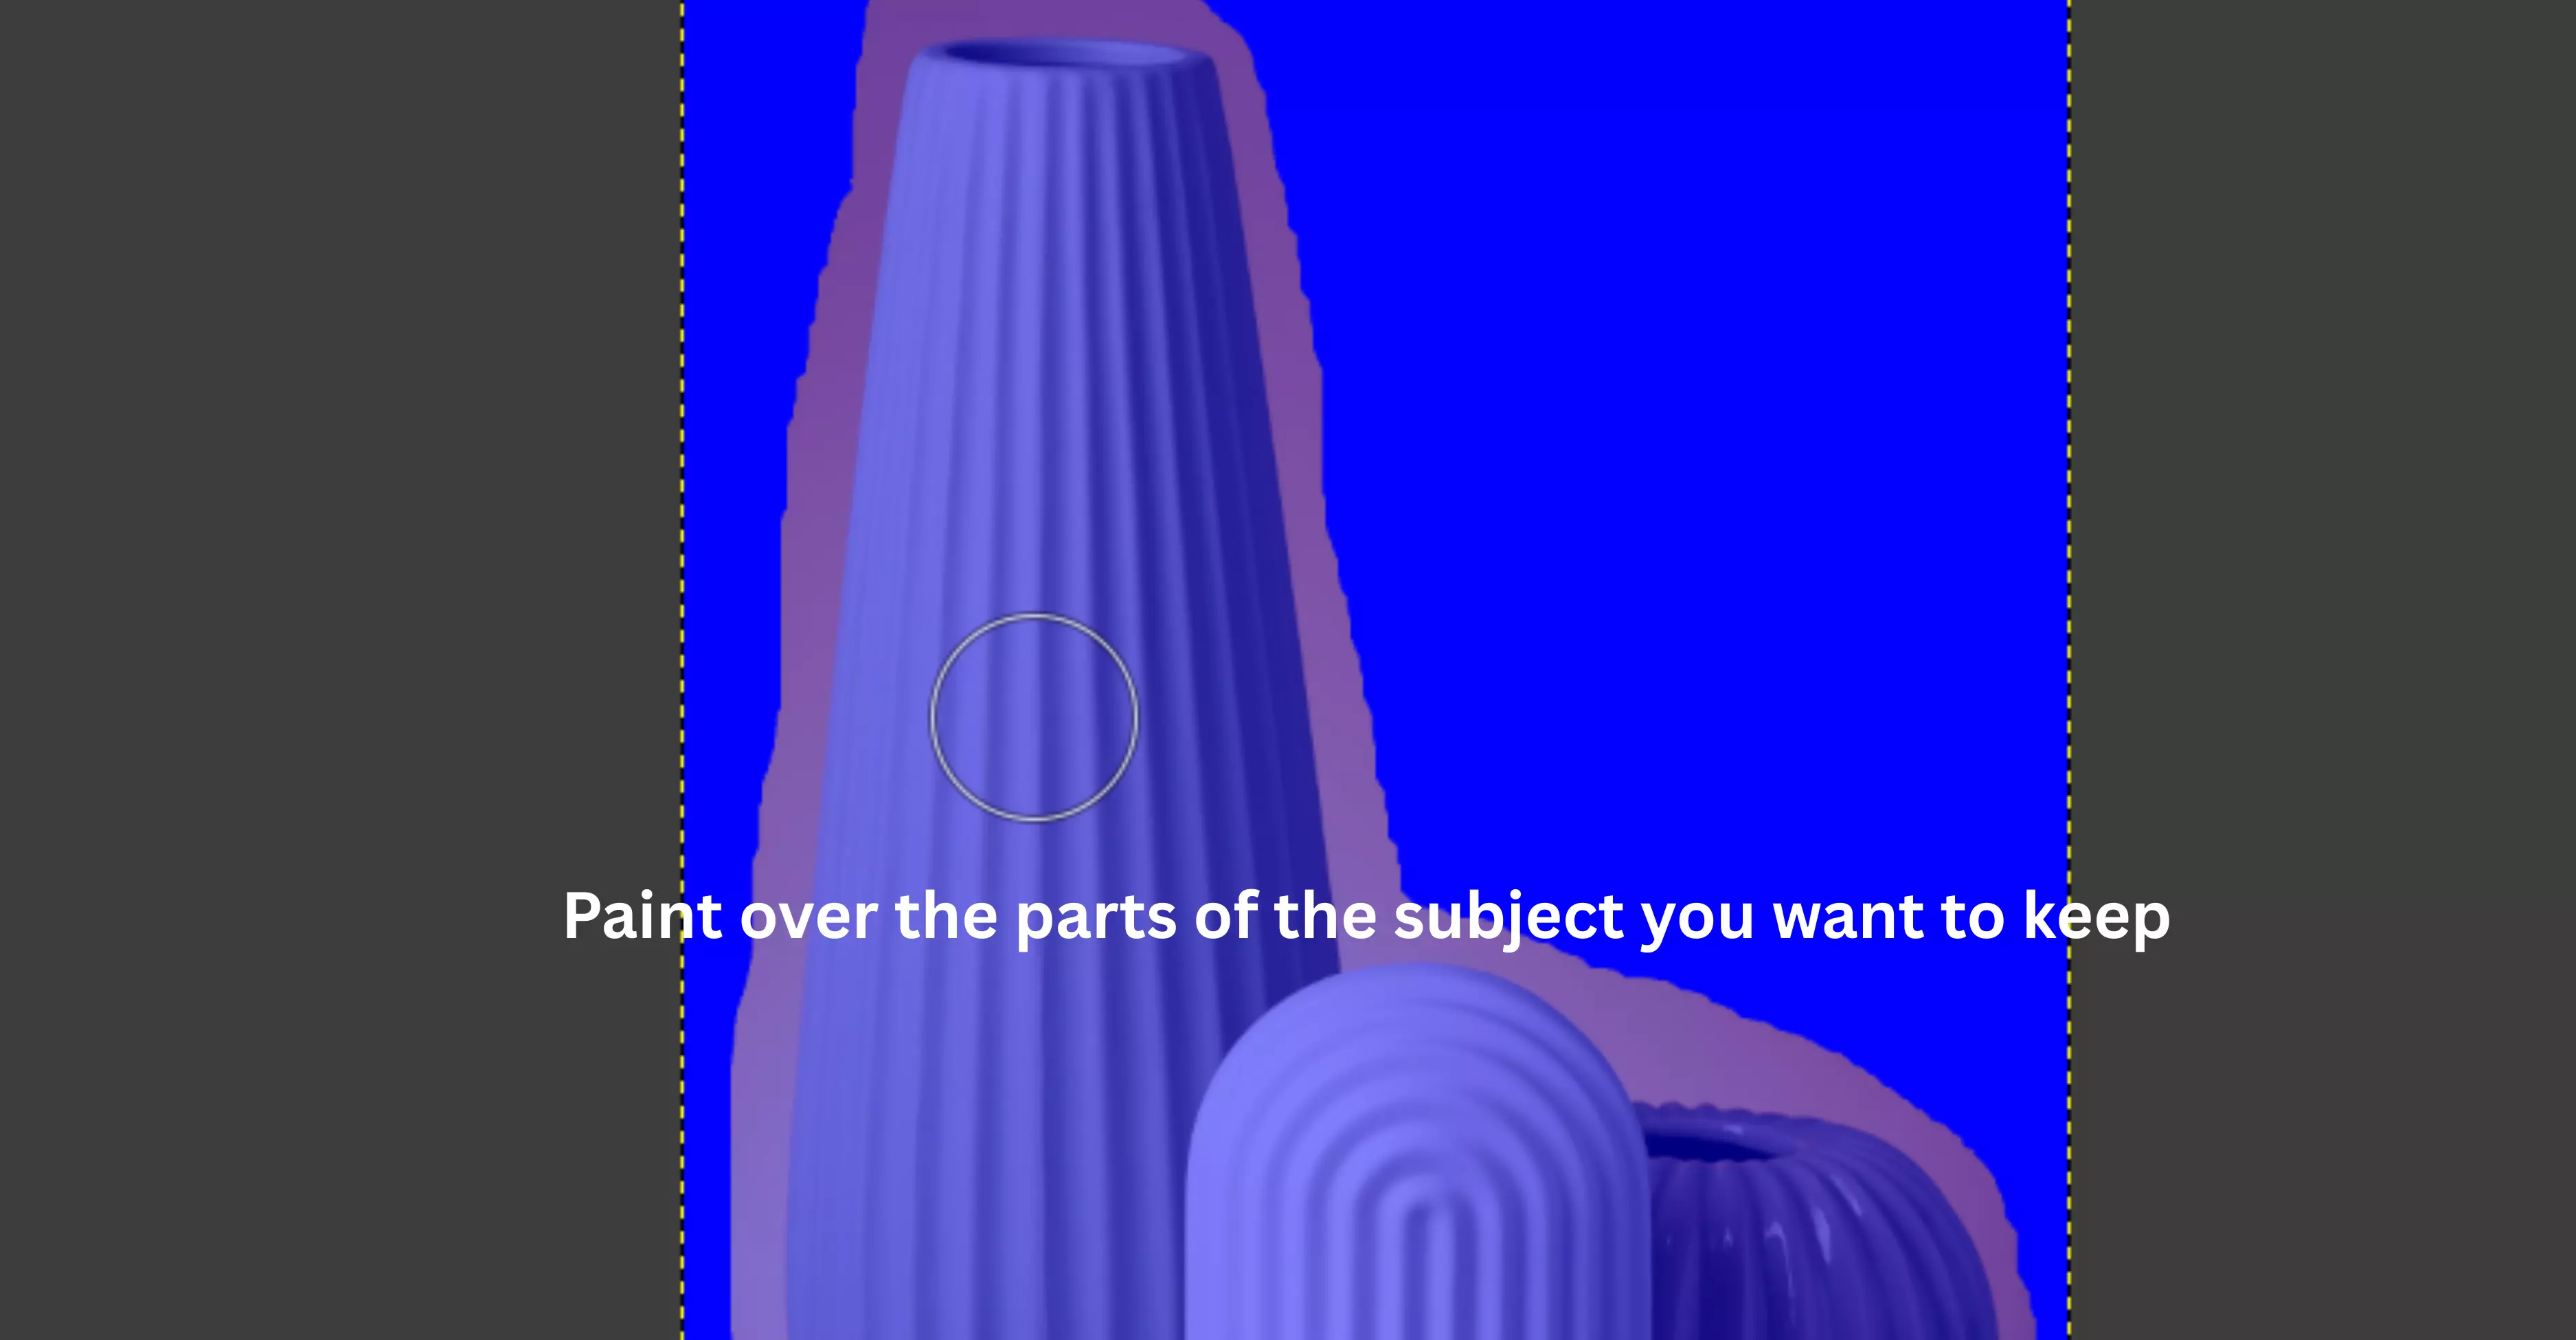
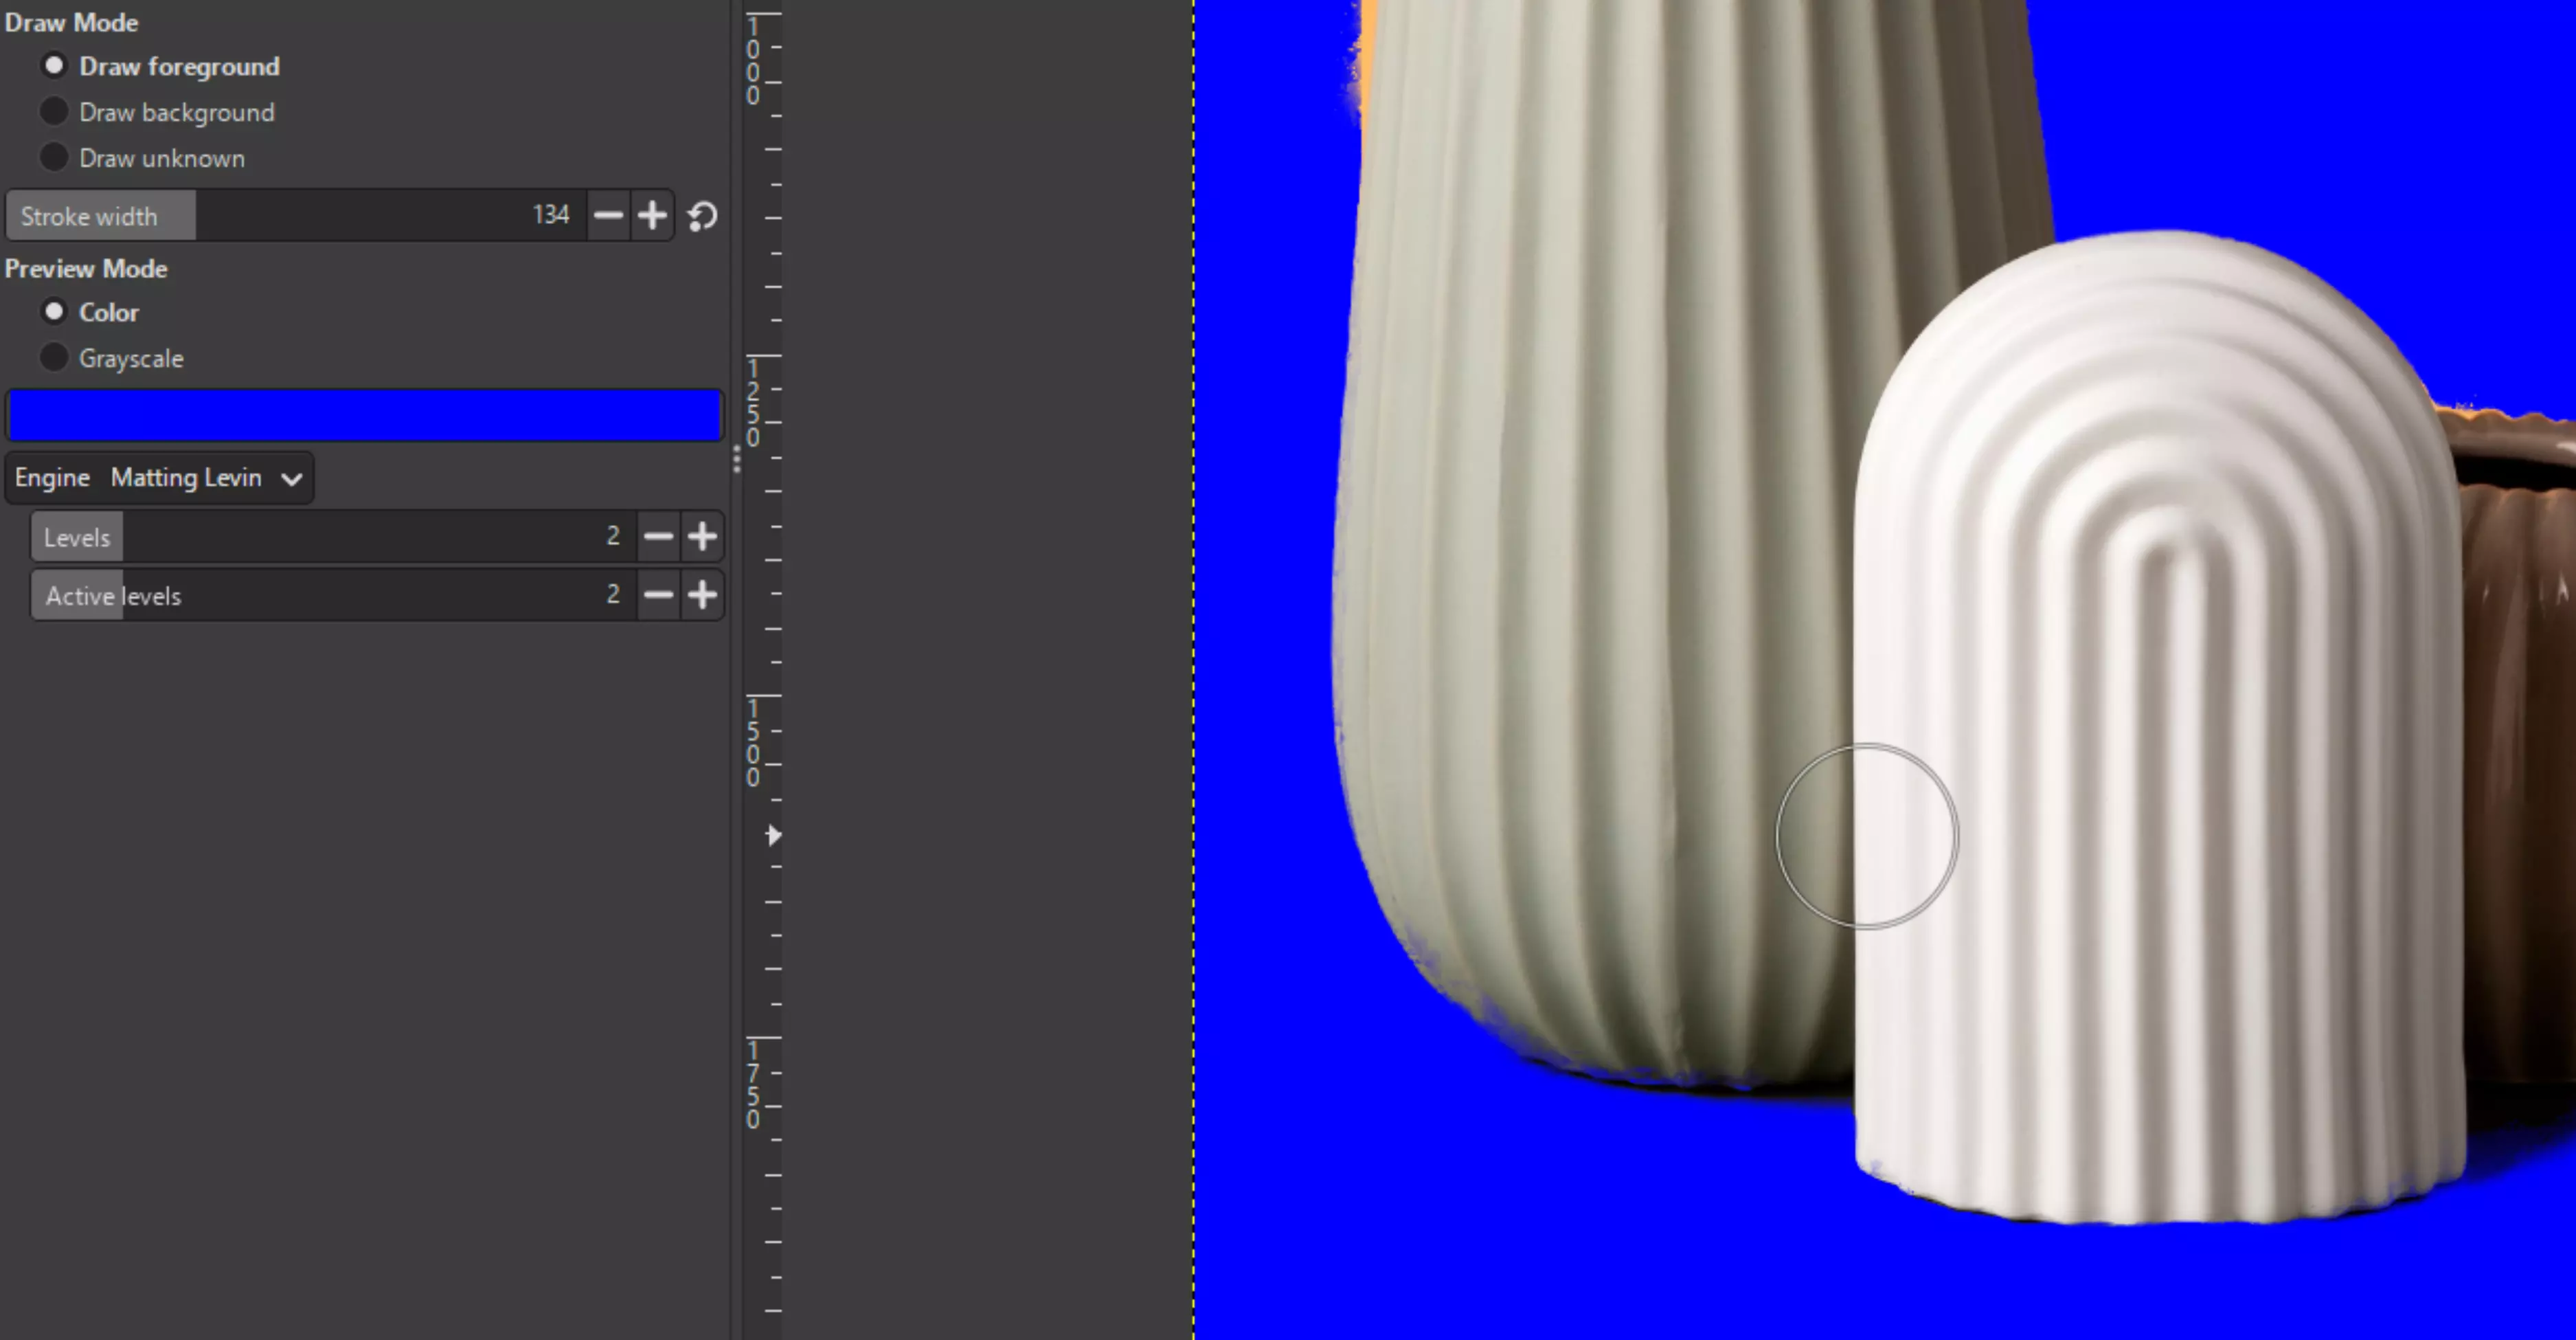
Step 3: Now, grab the brush and paint over the parts of the subject you want to keep. Stay inside the edges as much as possible; GIMP will use this to determine what’s foreground.
Step 4: When you’re satisfied, press Enter again. GIMP will process your strokes and create a selection around your subject.
Step 5: Add transparency to your layer by going to Layer → Transparency → Add Alpha Channel, then apply a Layer Mask (Layer → Mask → Add Layer Mask → Selection).
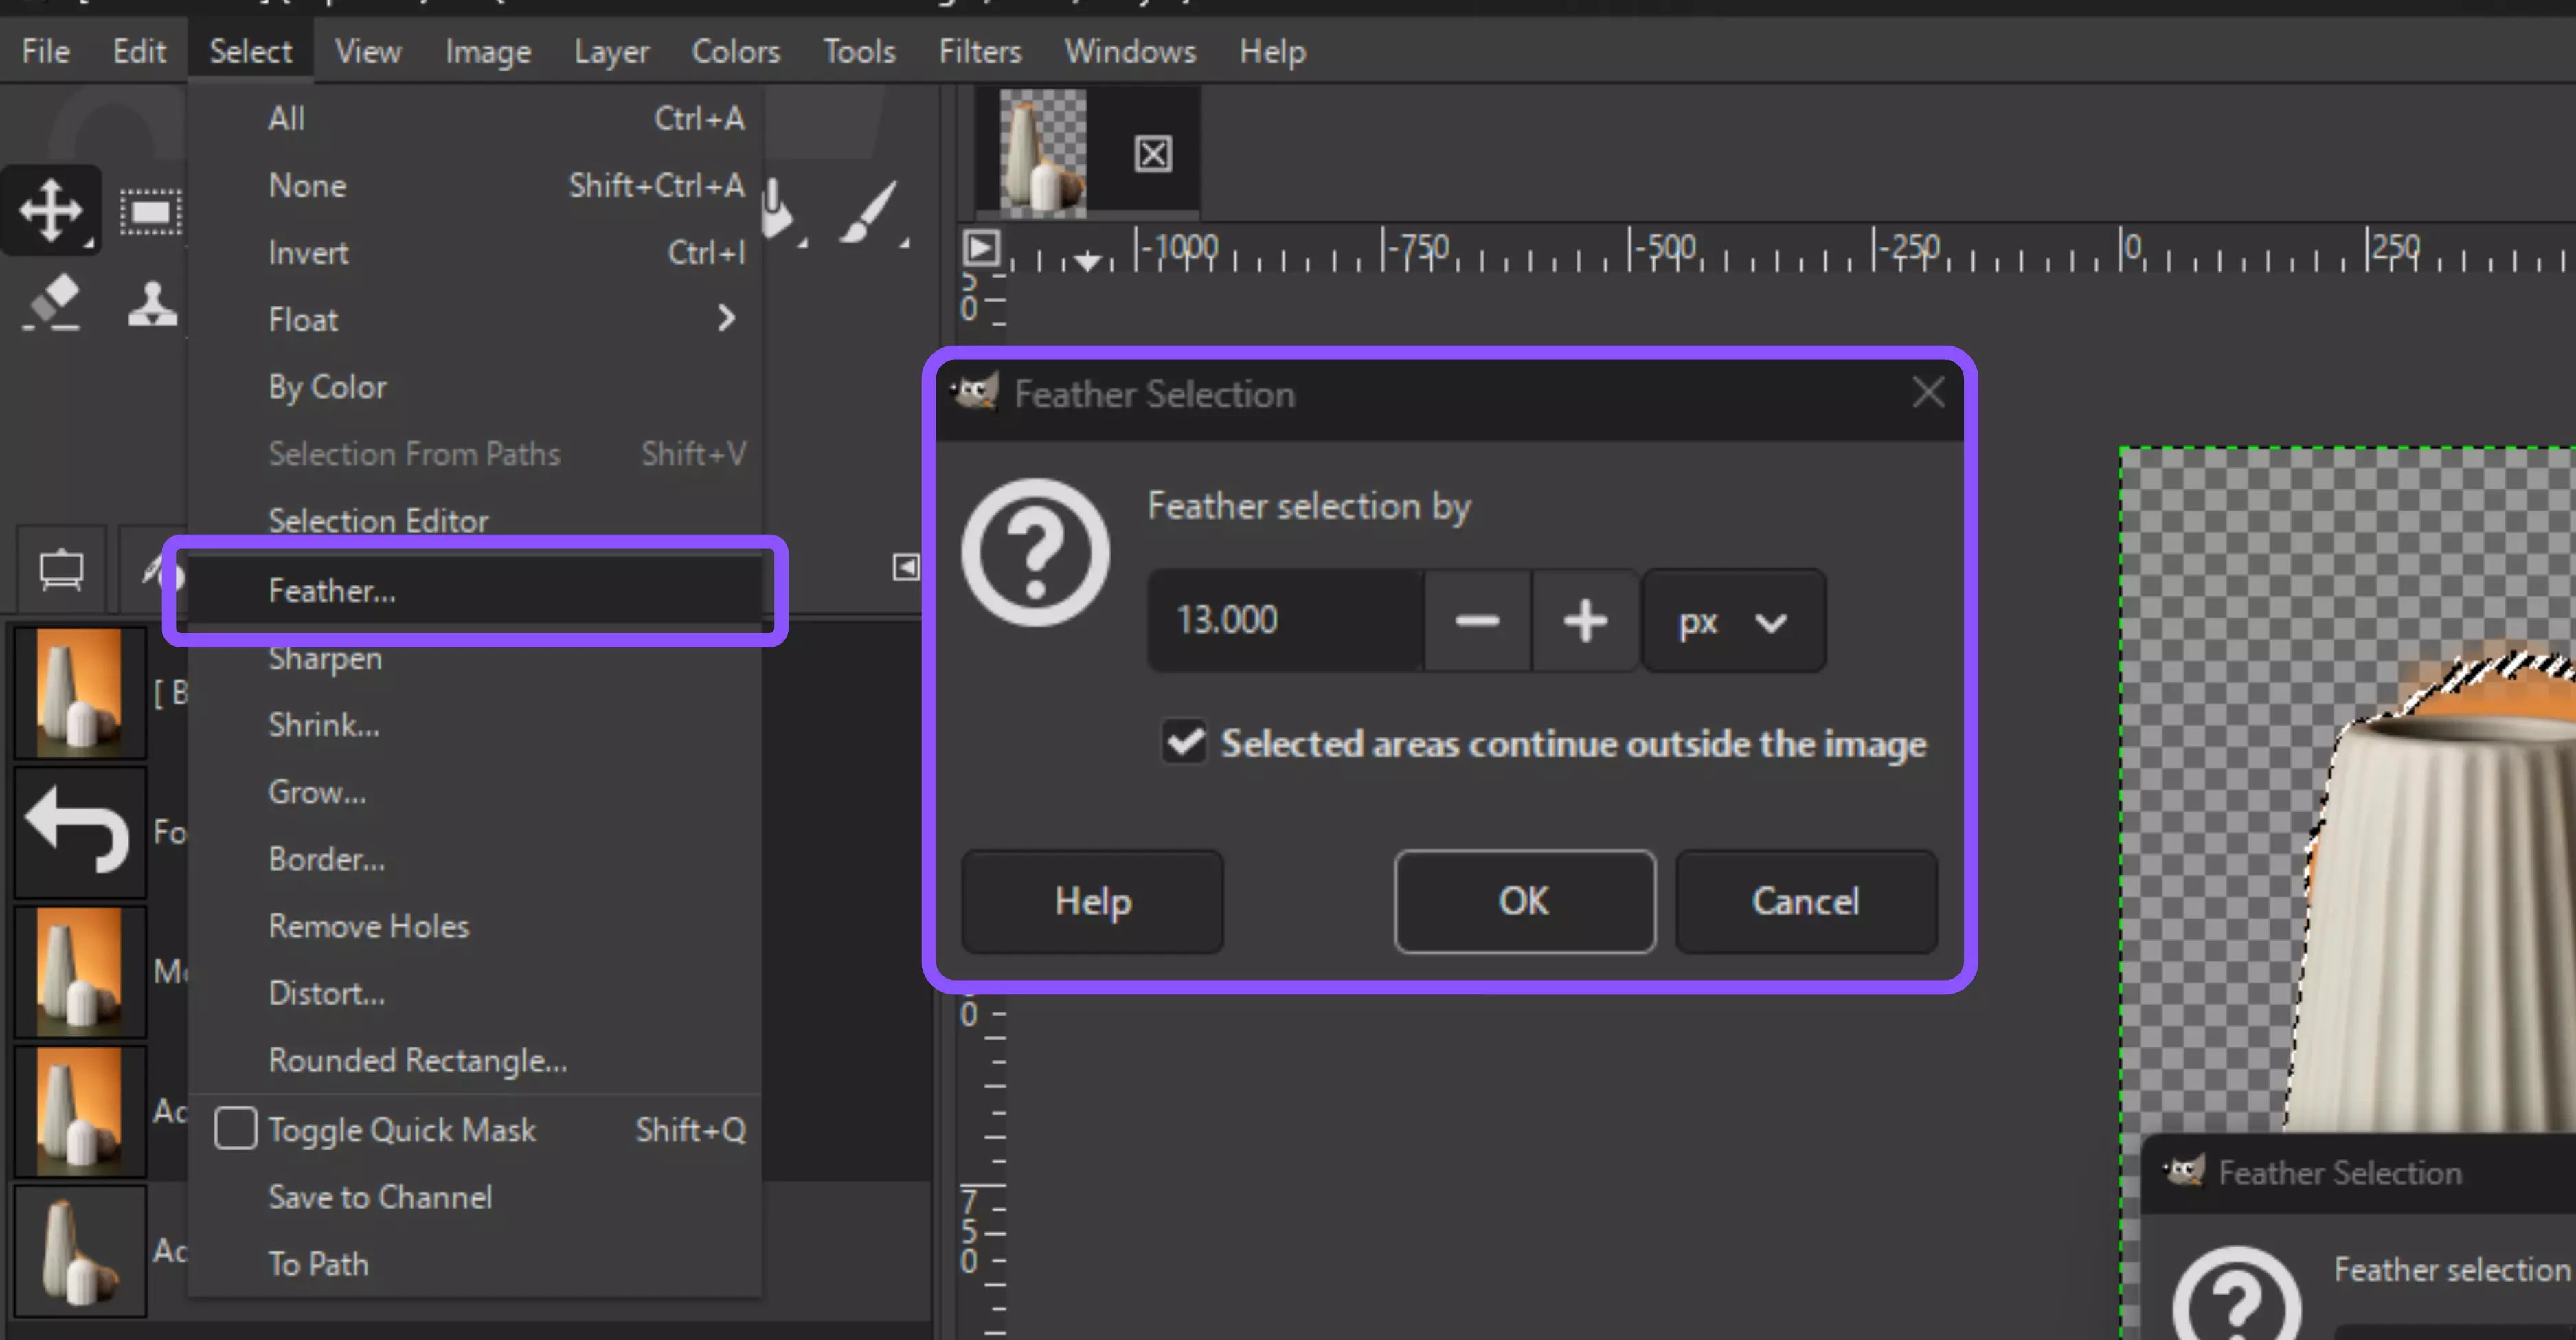
Step 6: For cleaner edges, use Select → Feather to soften them, or refine directly by painting on the mask.
Why use it?
This tool is ideal for subjects with fine details, where manual tracing can be tedious. It automatically detects edges, allowing you to focus on refining challenging areas, such as hair tips or foliage, and saving significant time.
3. Using the Fuzzy Select tool
If your image has a single-colored or high-contrast background, the Fuzzy Select Tool is the fastest way to isolate the subject.
Steps to know
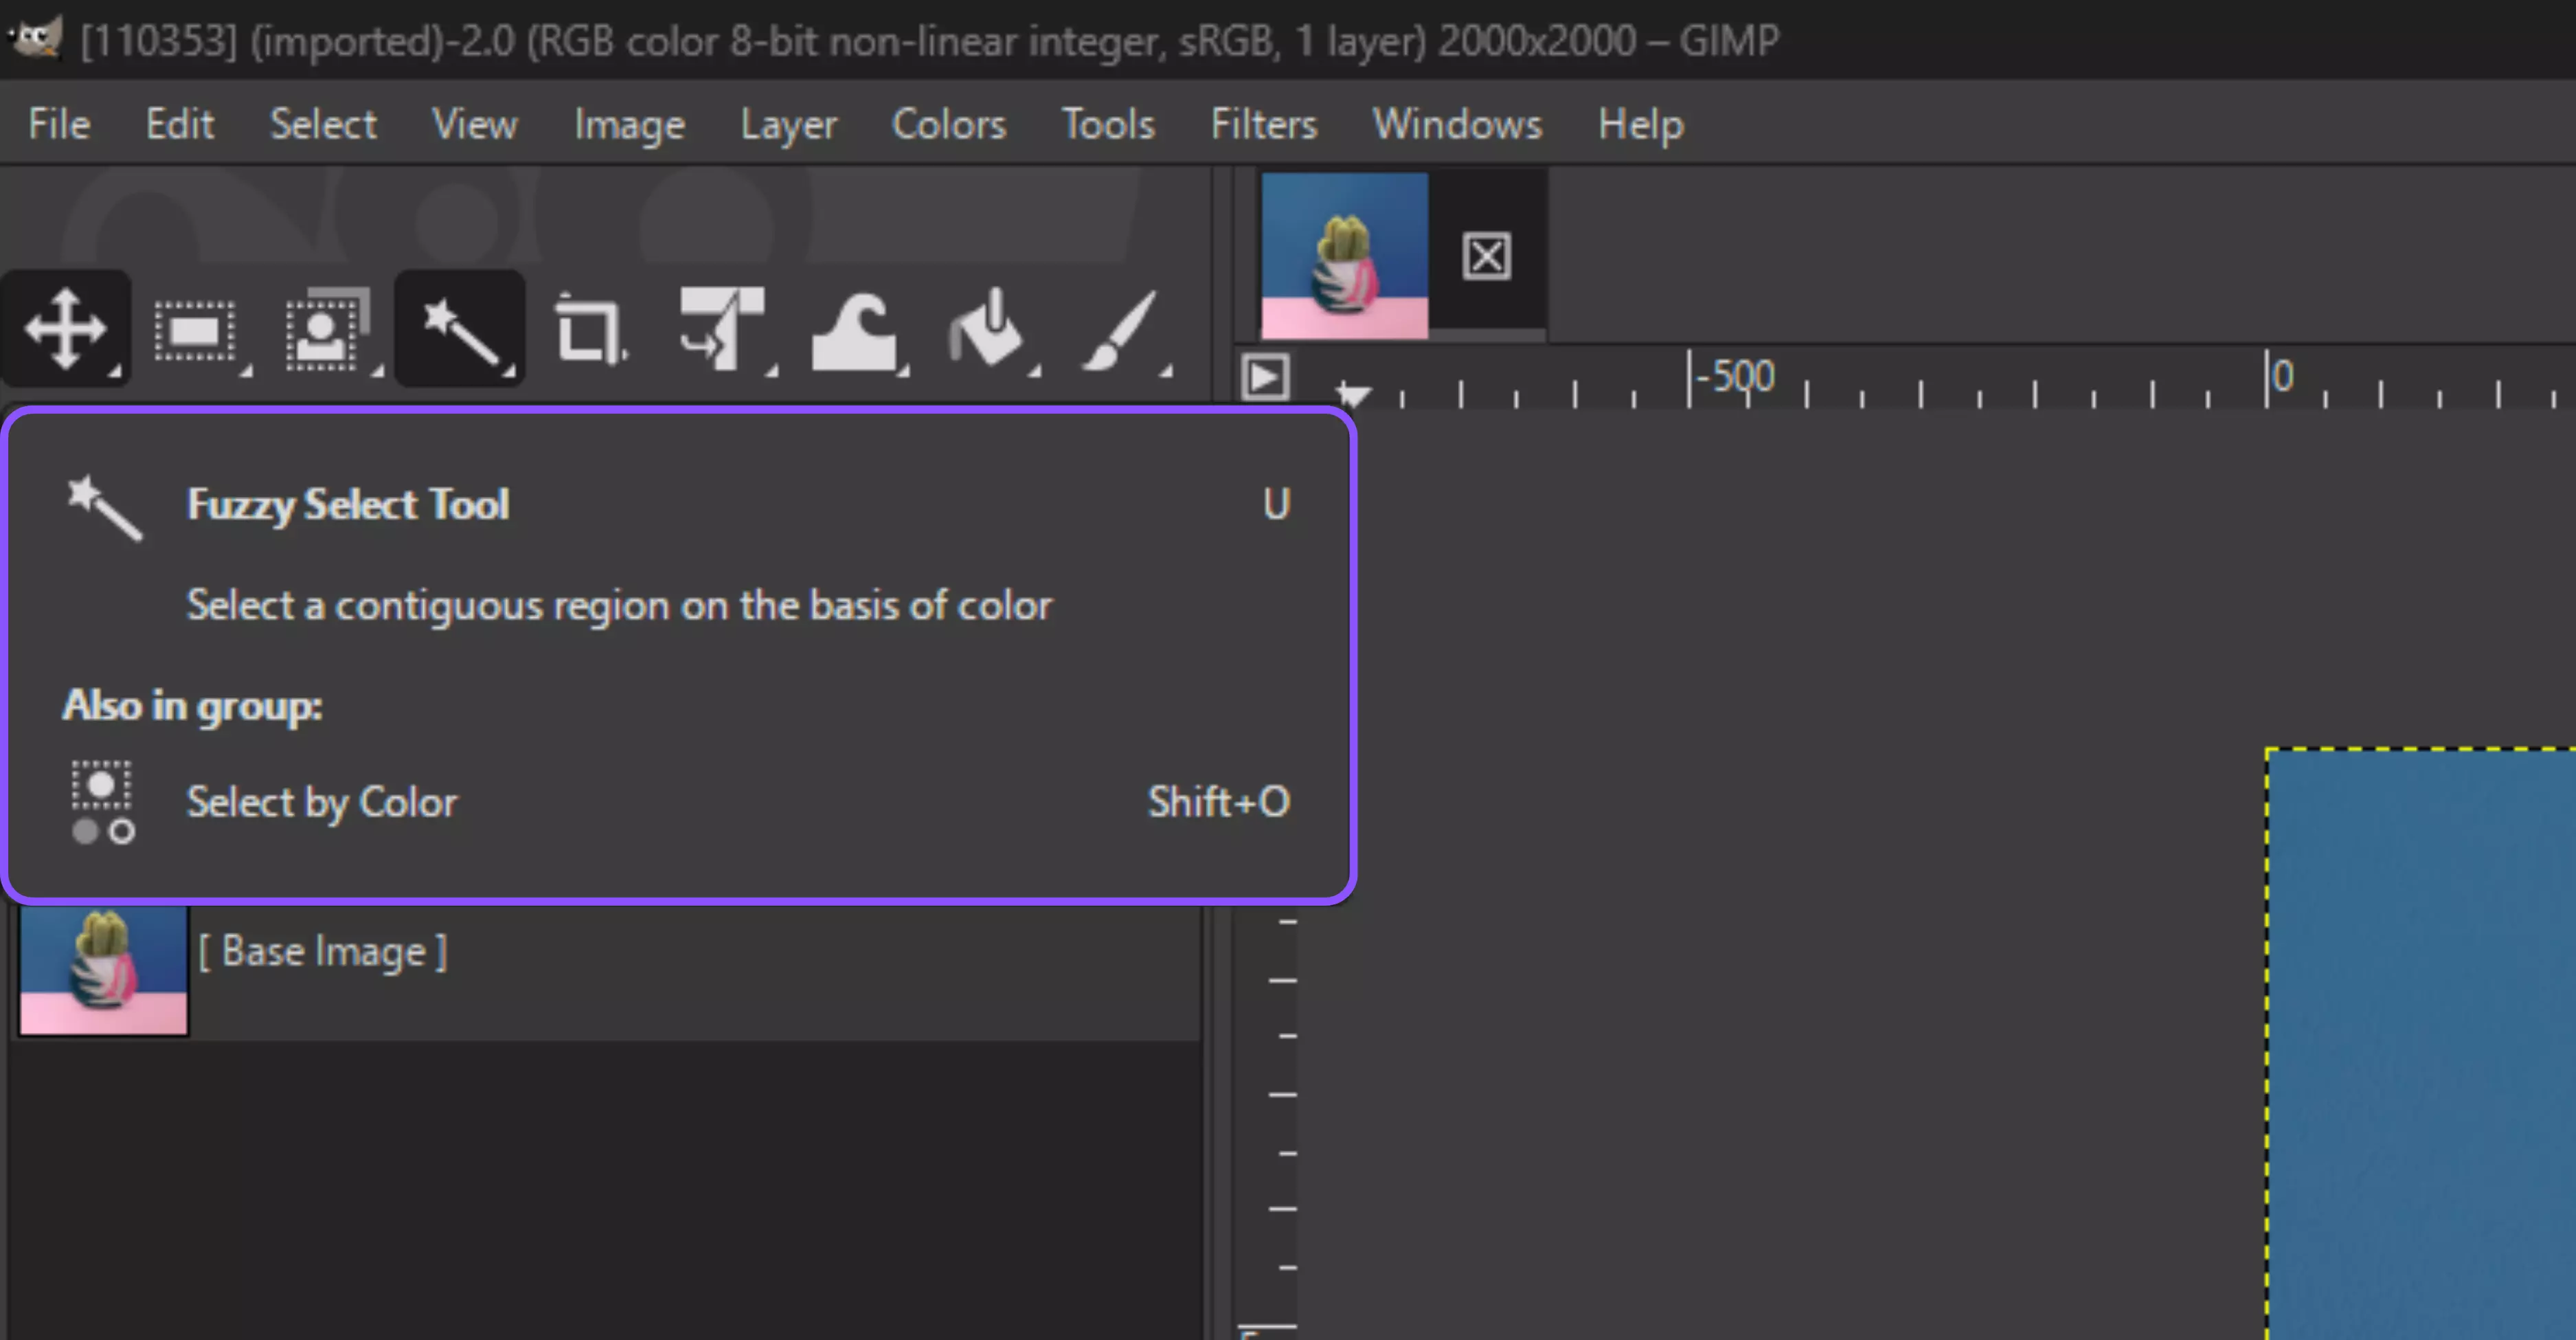
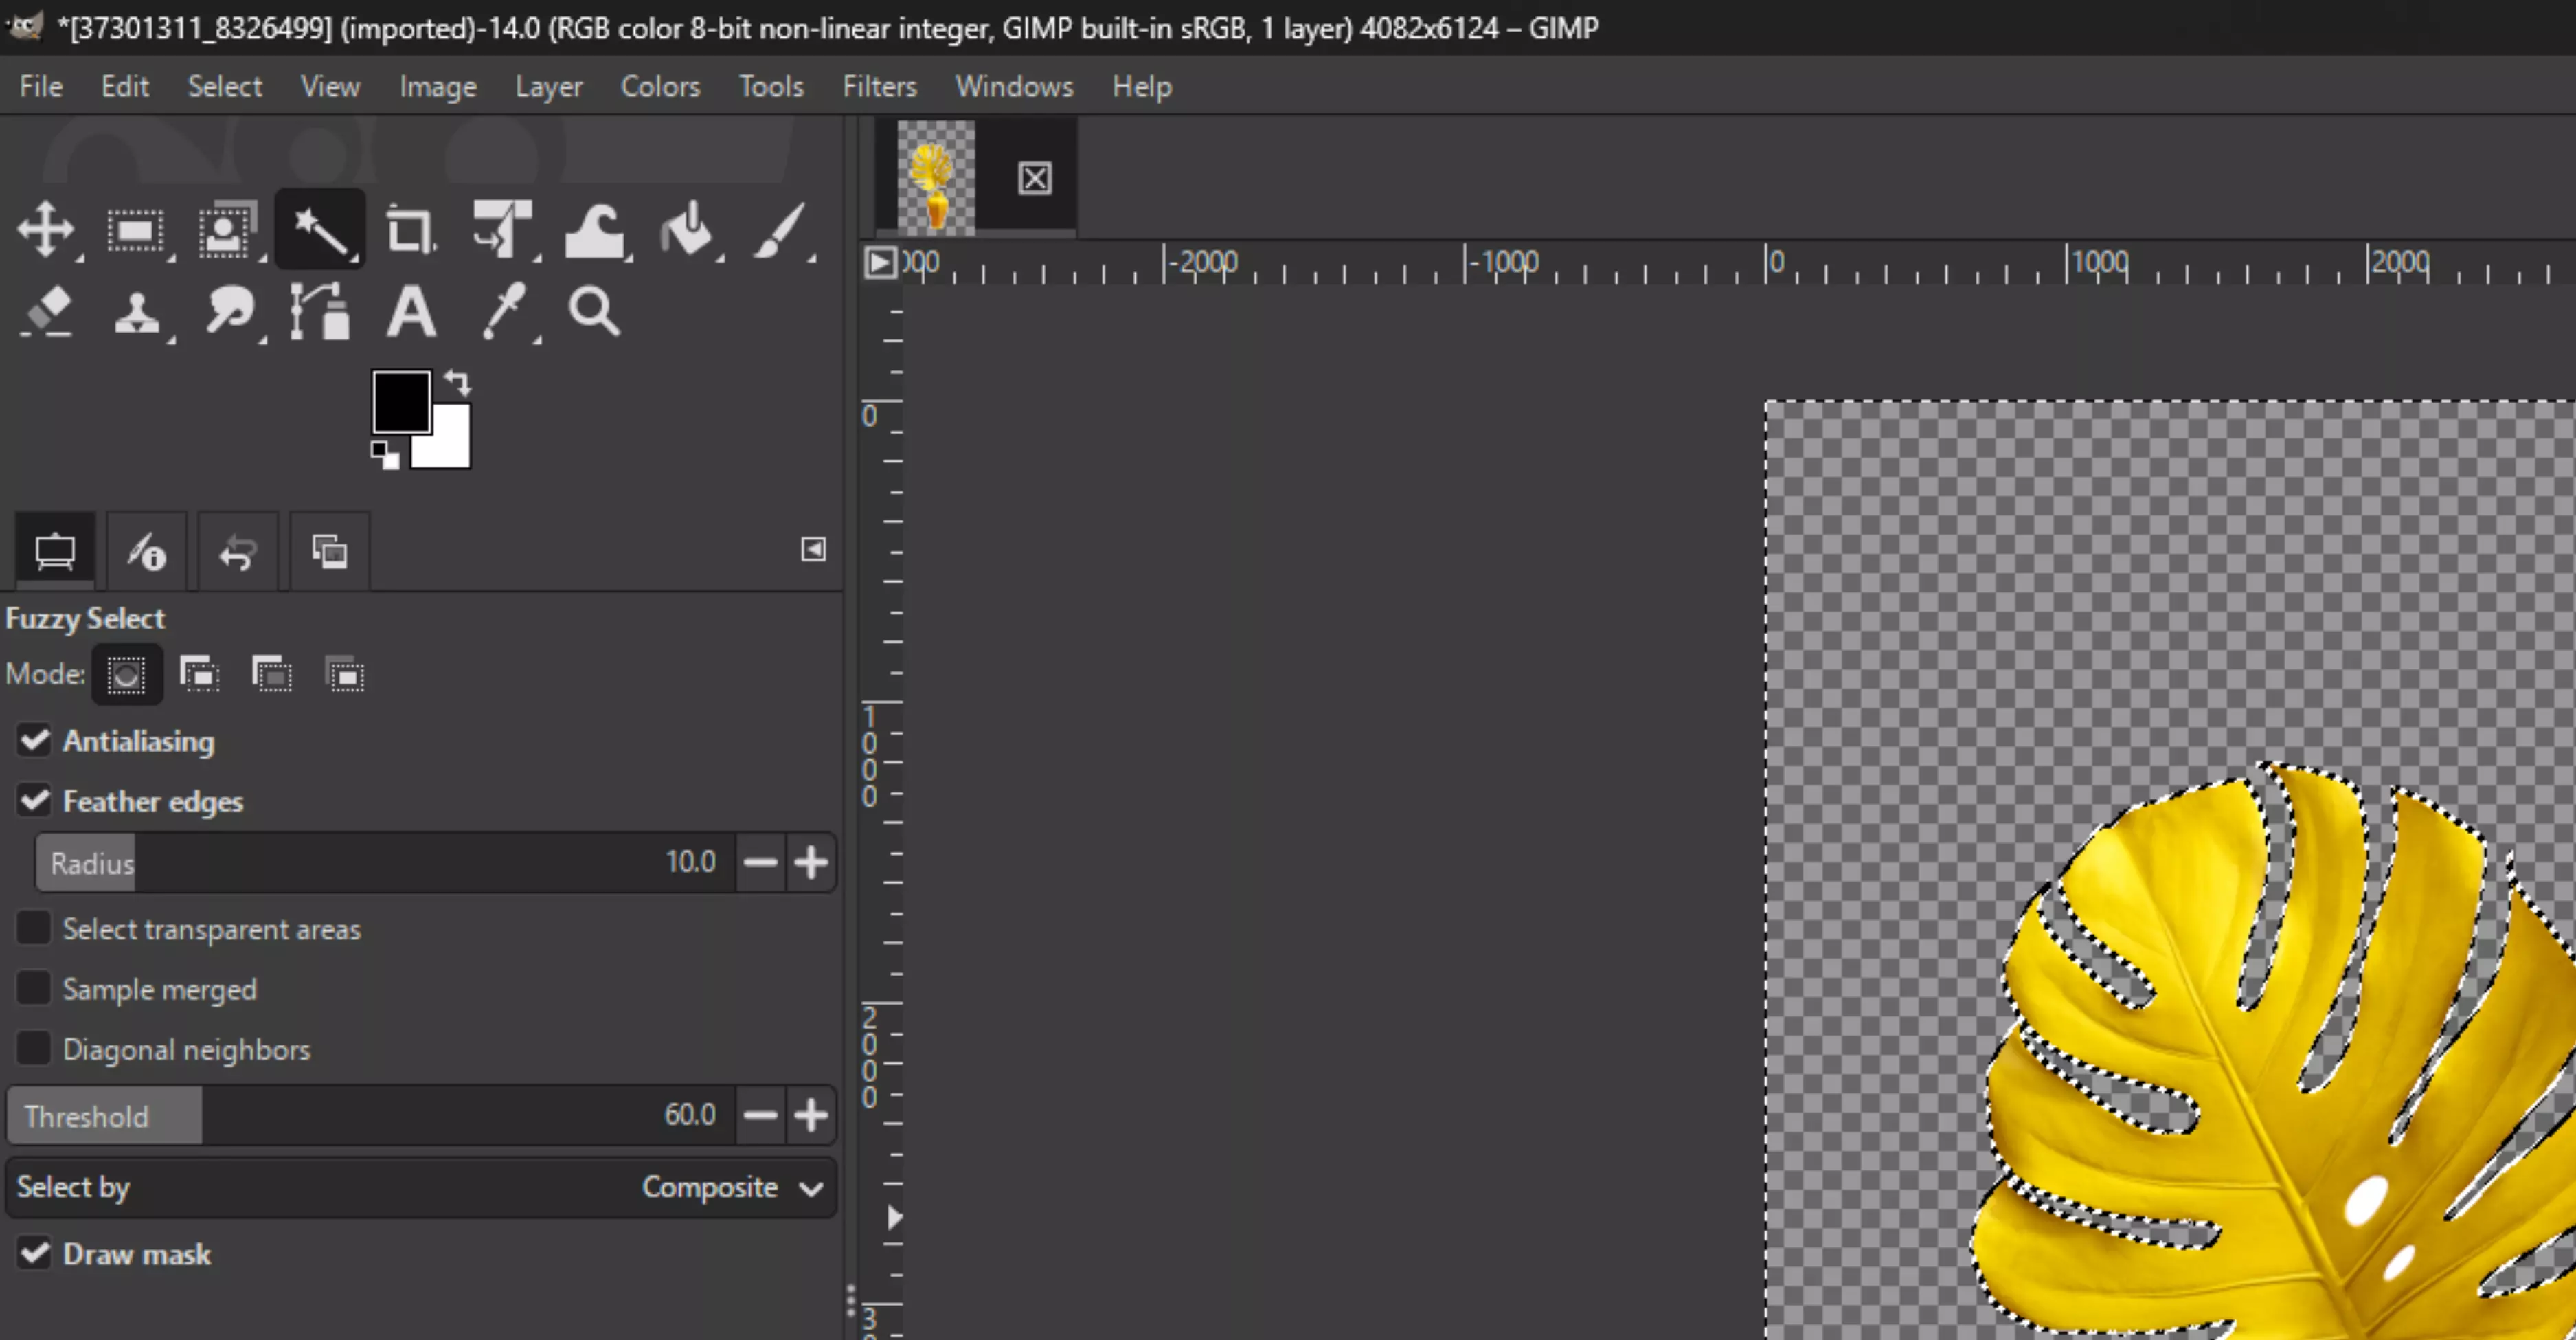
Step 1: Pick the Fuzzy Select Tool (U) from the toolbox. It’s often called the “Magic Wand” because it grabs areas of similar color in one click.
Step 2: Click anywhere on the background you want to remove. You’ll see it automatically select areas with similar tones.
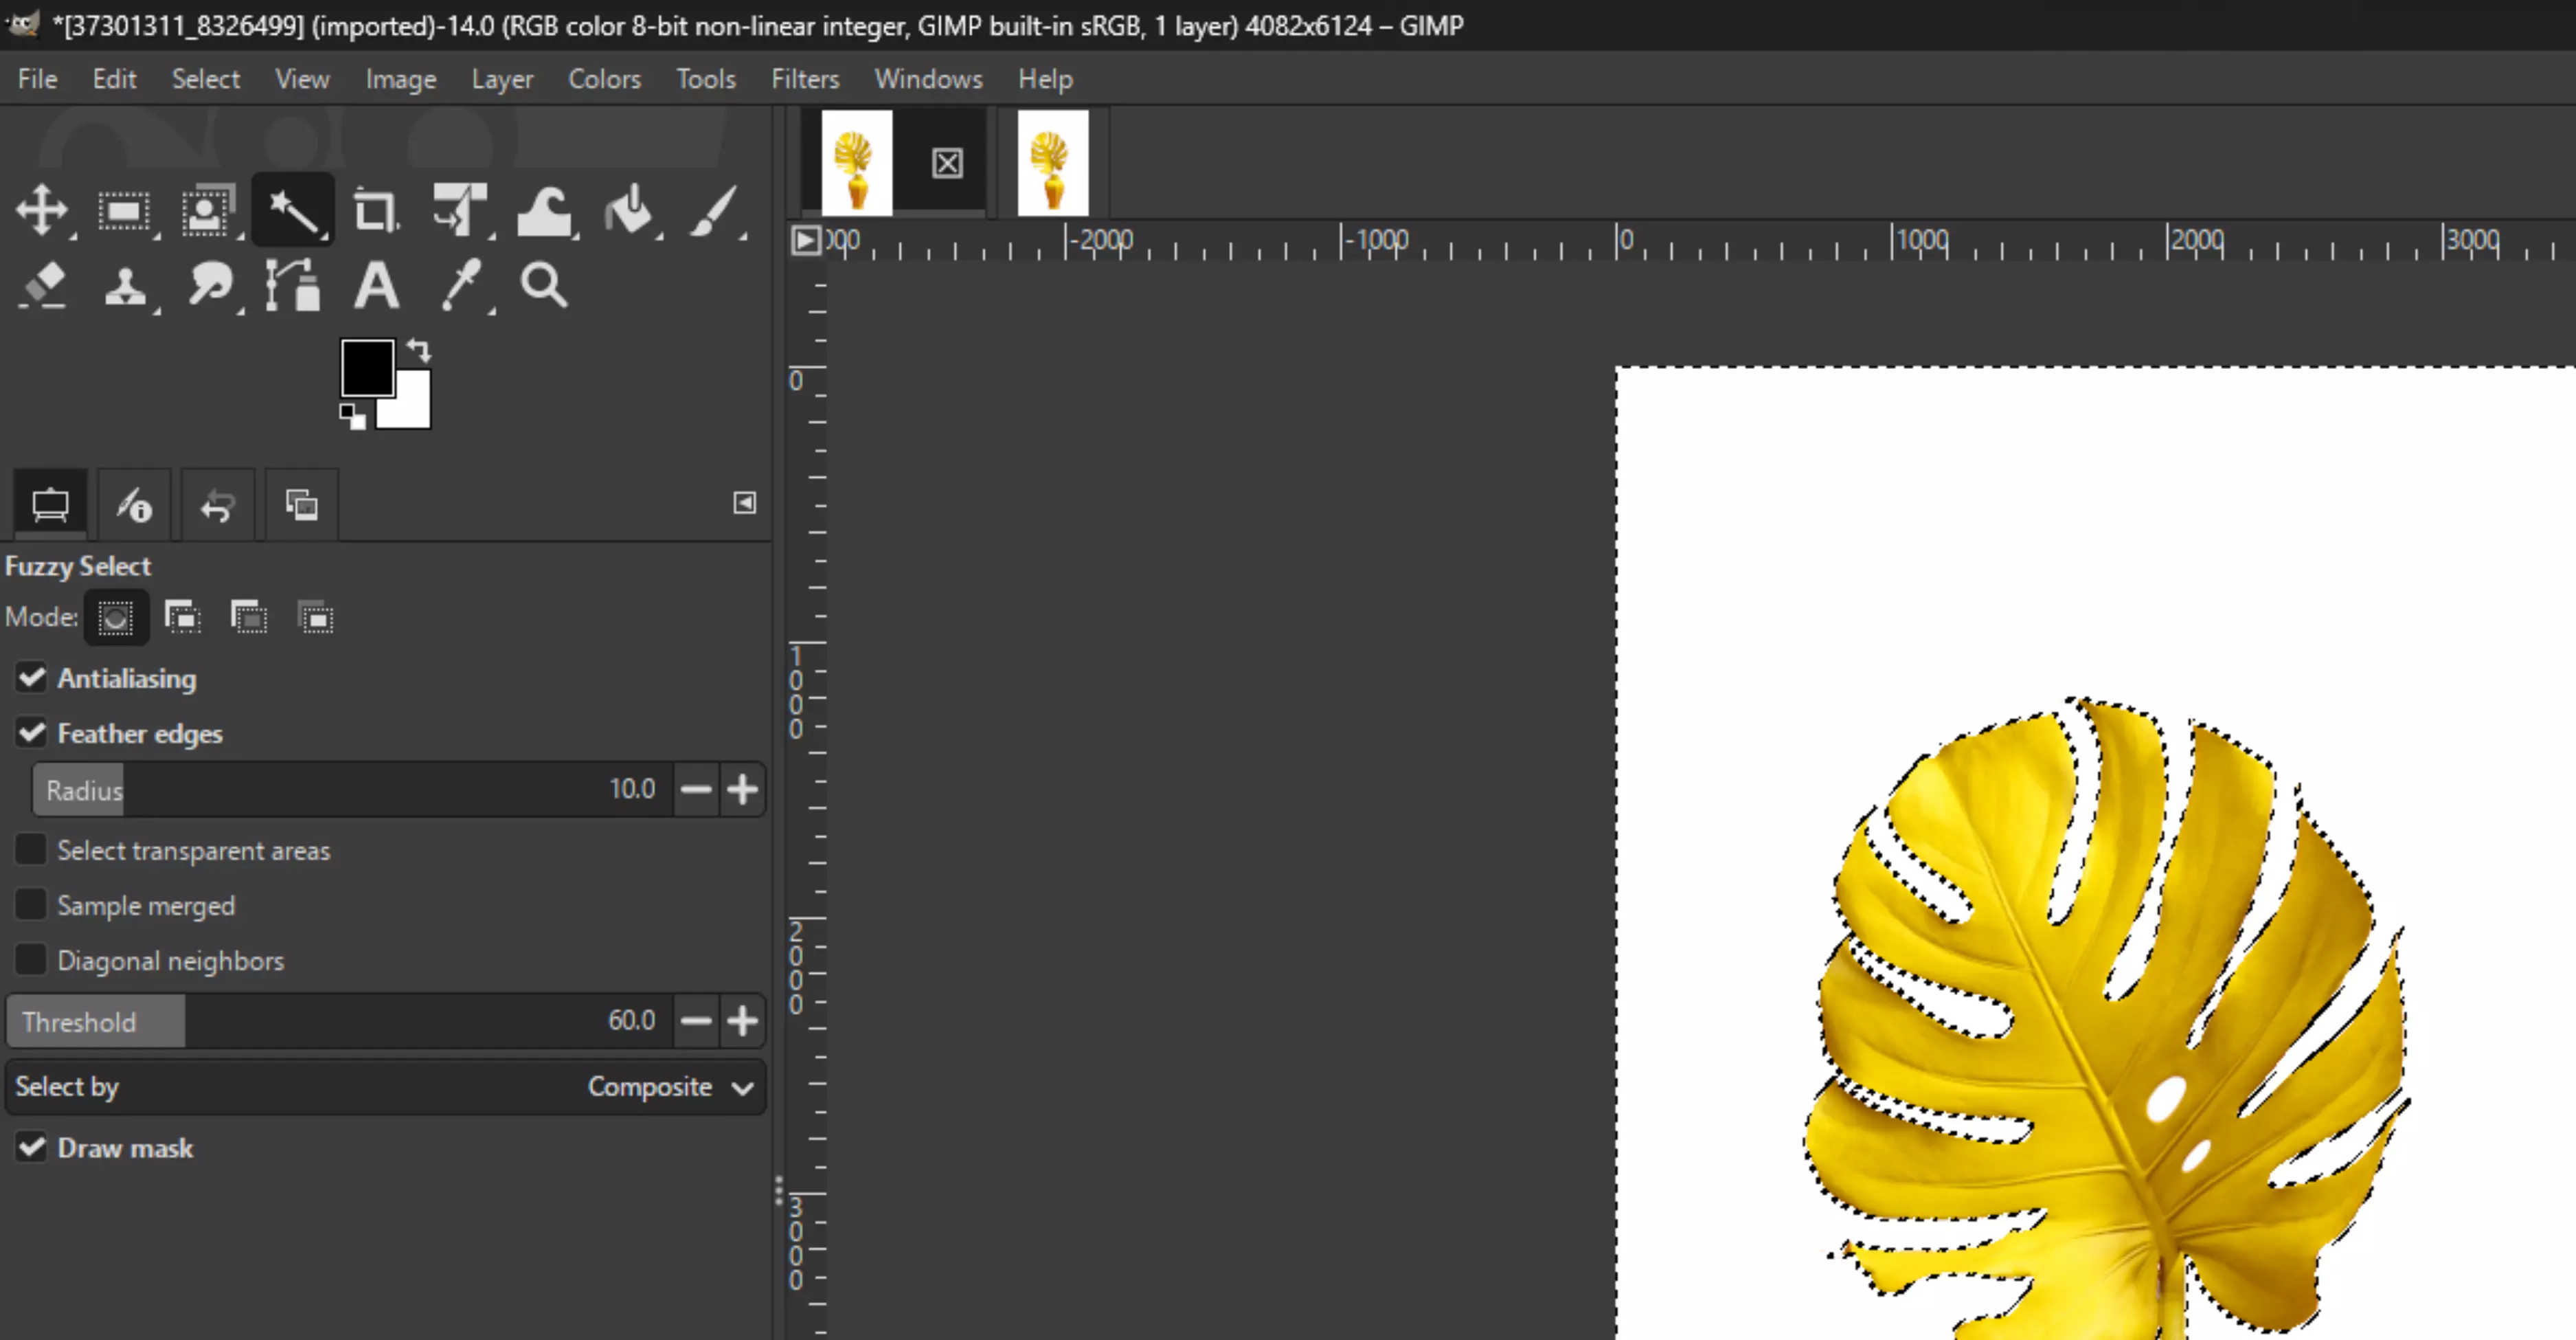
Step 3: If it’s not capturing enough (or too much), adjust the Threshold in the Tool Options until the selection appears correct.
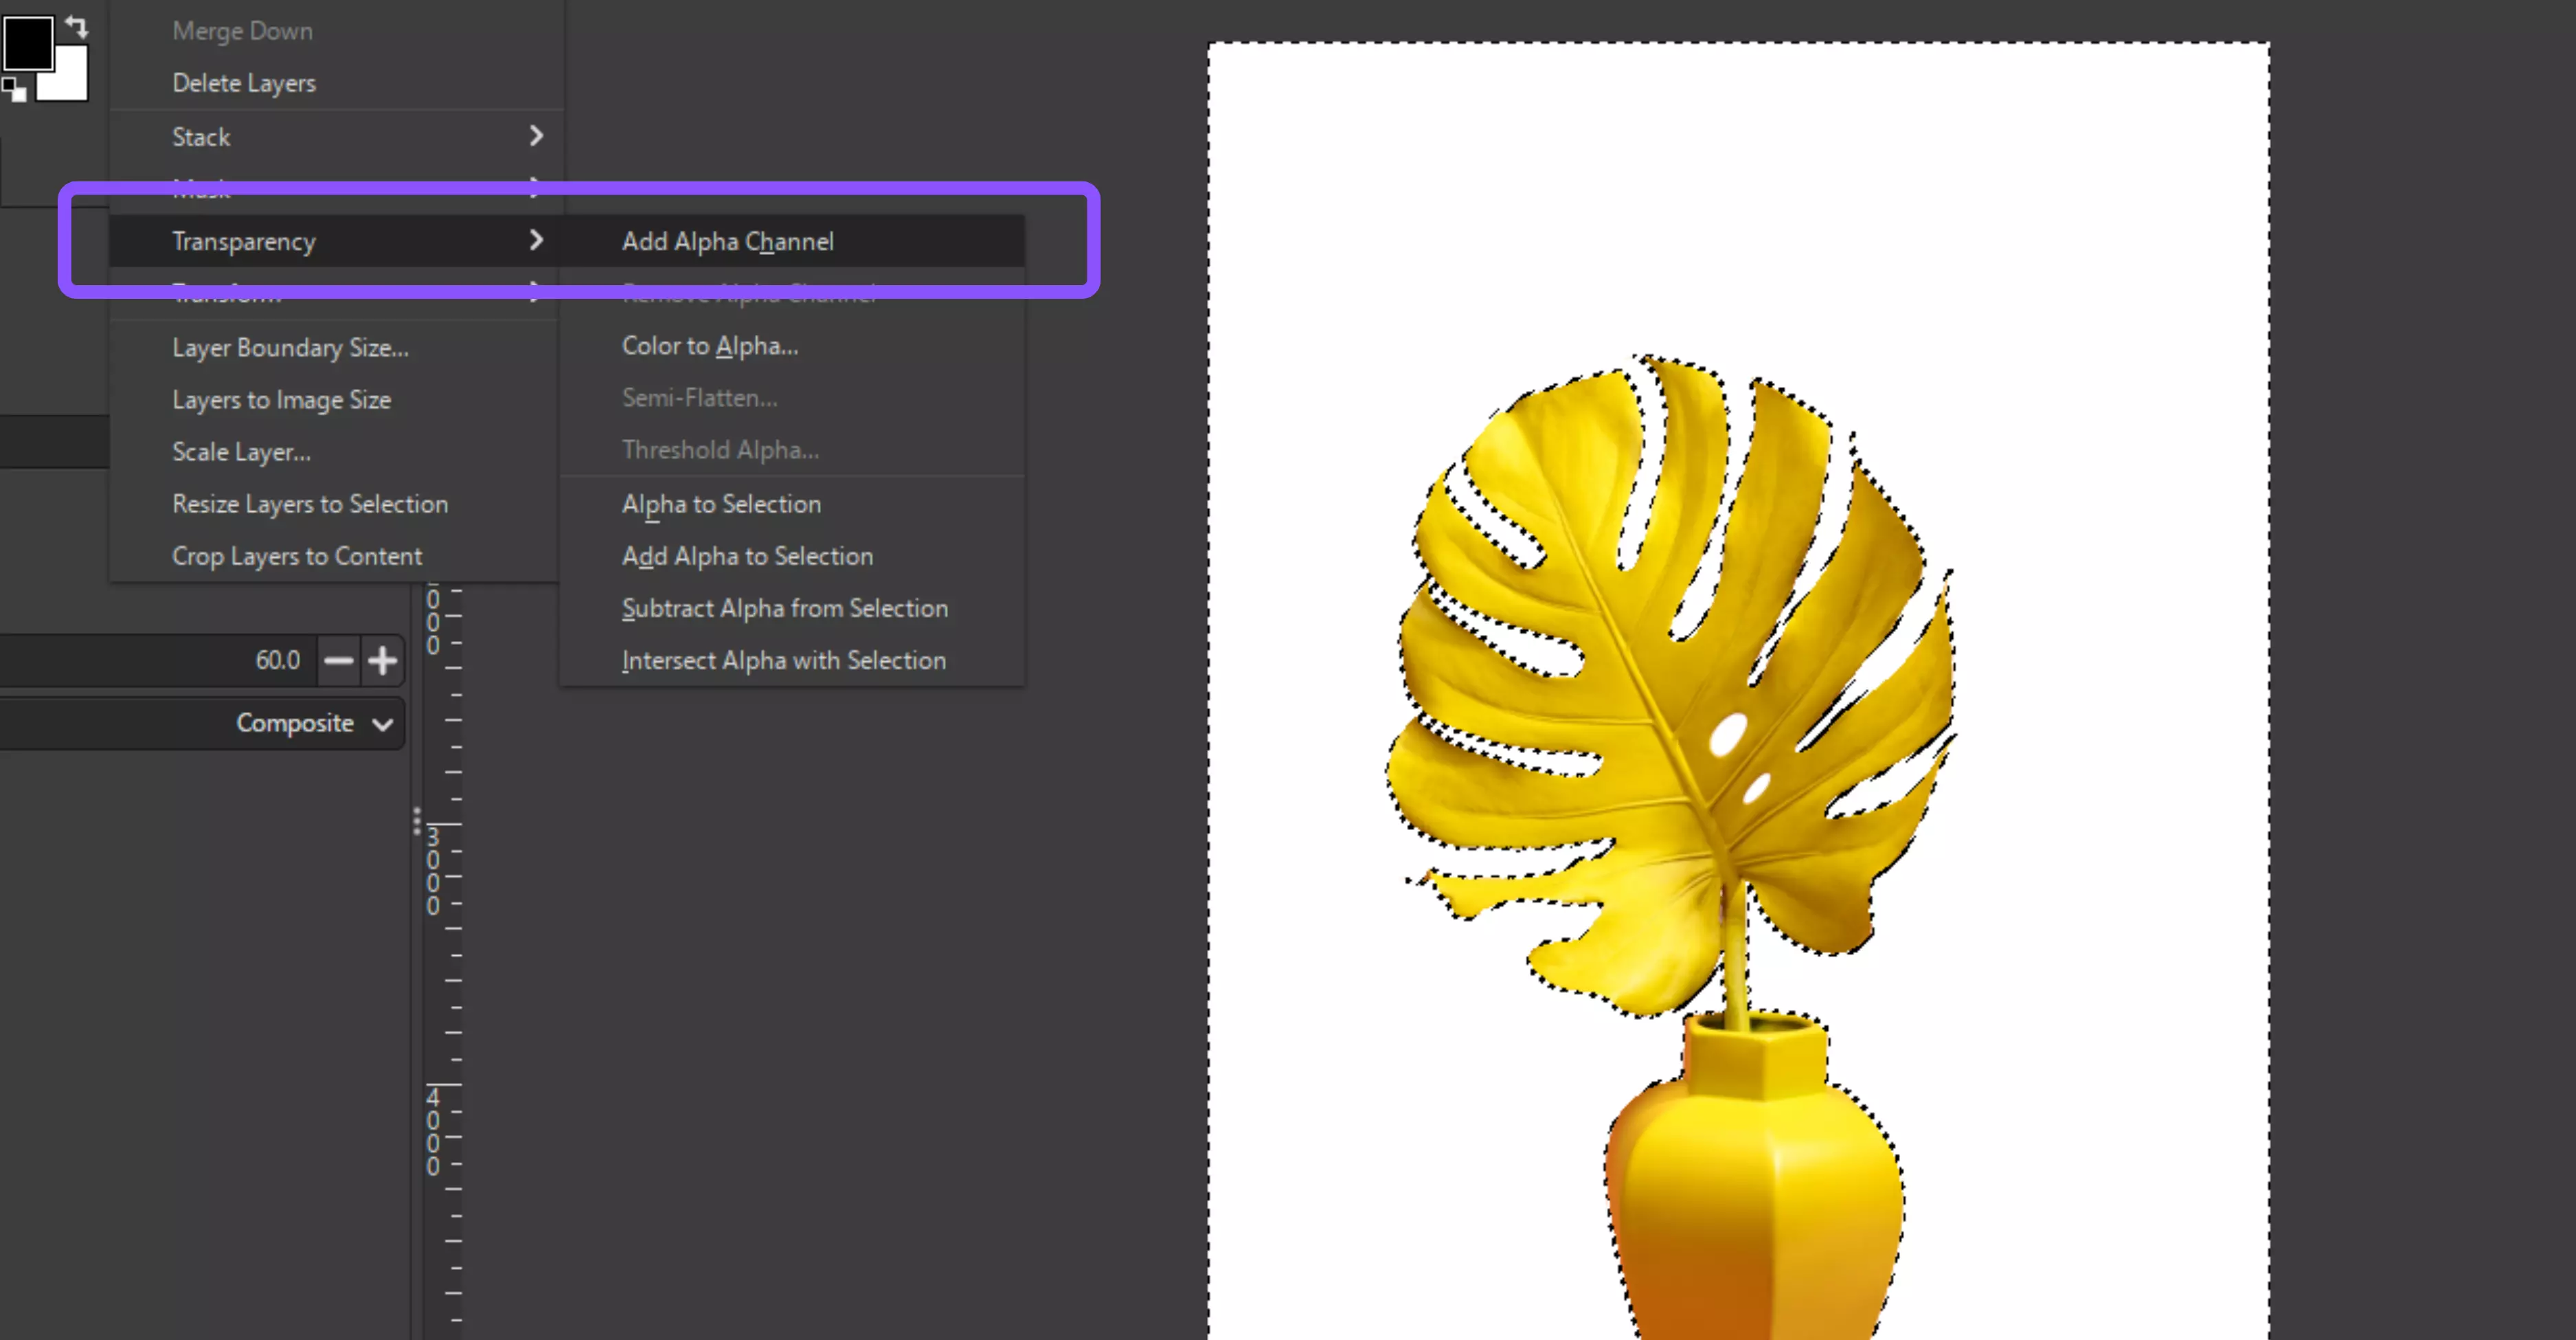
Step 4: Make sure your layer supports transparency: go to Layer → Transparency → Add Alpha Channel.
Step 5: Now, either press Delete to remove the background or, for a safe approach, add a Layer Mask (Layer → Mask → Add Layer Mask → Selection).
Step 6: If the edges look hard, smooth them out with Select → Grow/Shrink to adjust the selection slightly, then use Select → Feather to make the transition easy.

Why use it?
It's quick and efficient; this method is perfect for images with solid or plain backgrounds. While less precise than Paths or Foreground Select, it’s the fastest option for quick edits and bulk background removals.
4. Using the Select by Color tool
For backgrounds that aren’t contiguous but share the same color (like patterns or scattered areas), the Select by Color Tool is more effective than Fuzzy Select.
Steps to know
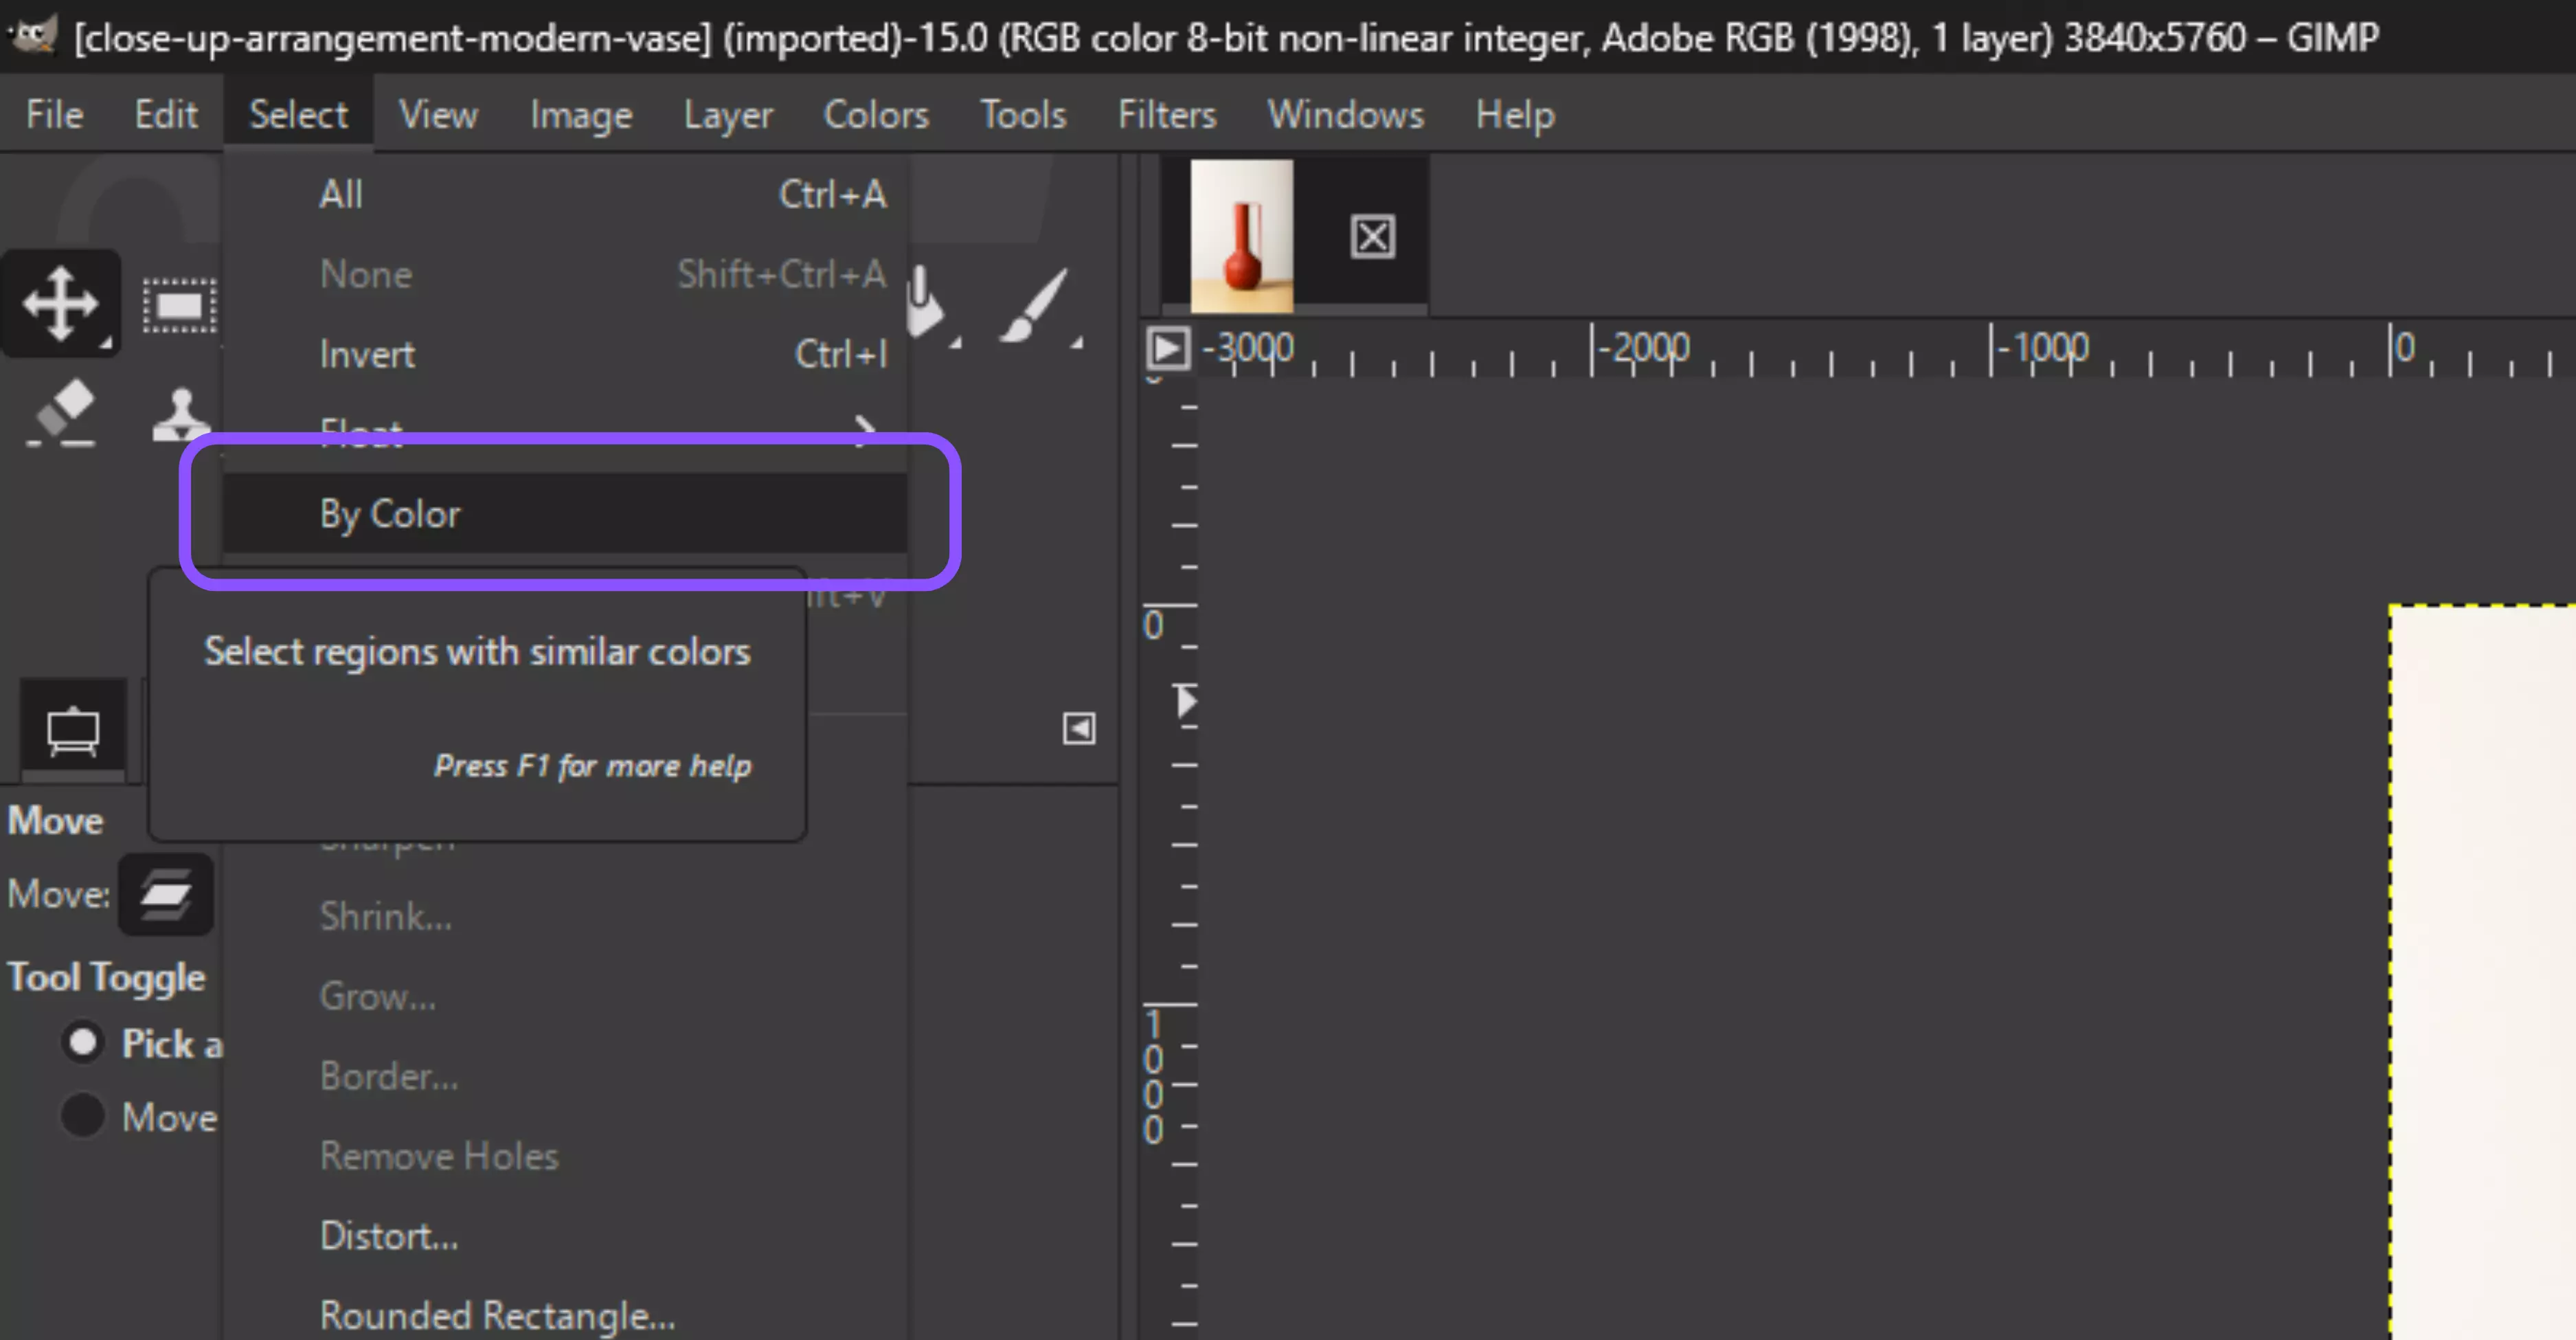
Step 1: Activate the Select by Color Tool (Shift + O) from the toolbox. This tool grabs every pixel of a specific color in your image.
Step 2: Click anywhere on the background color you want to remove.
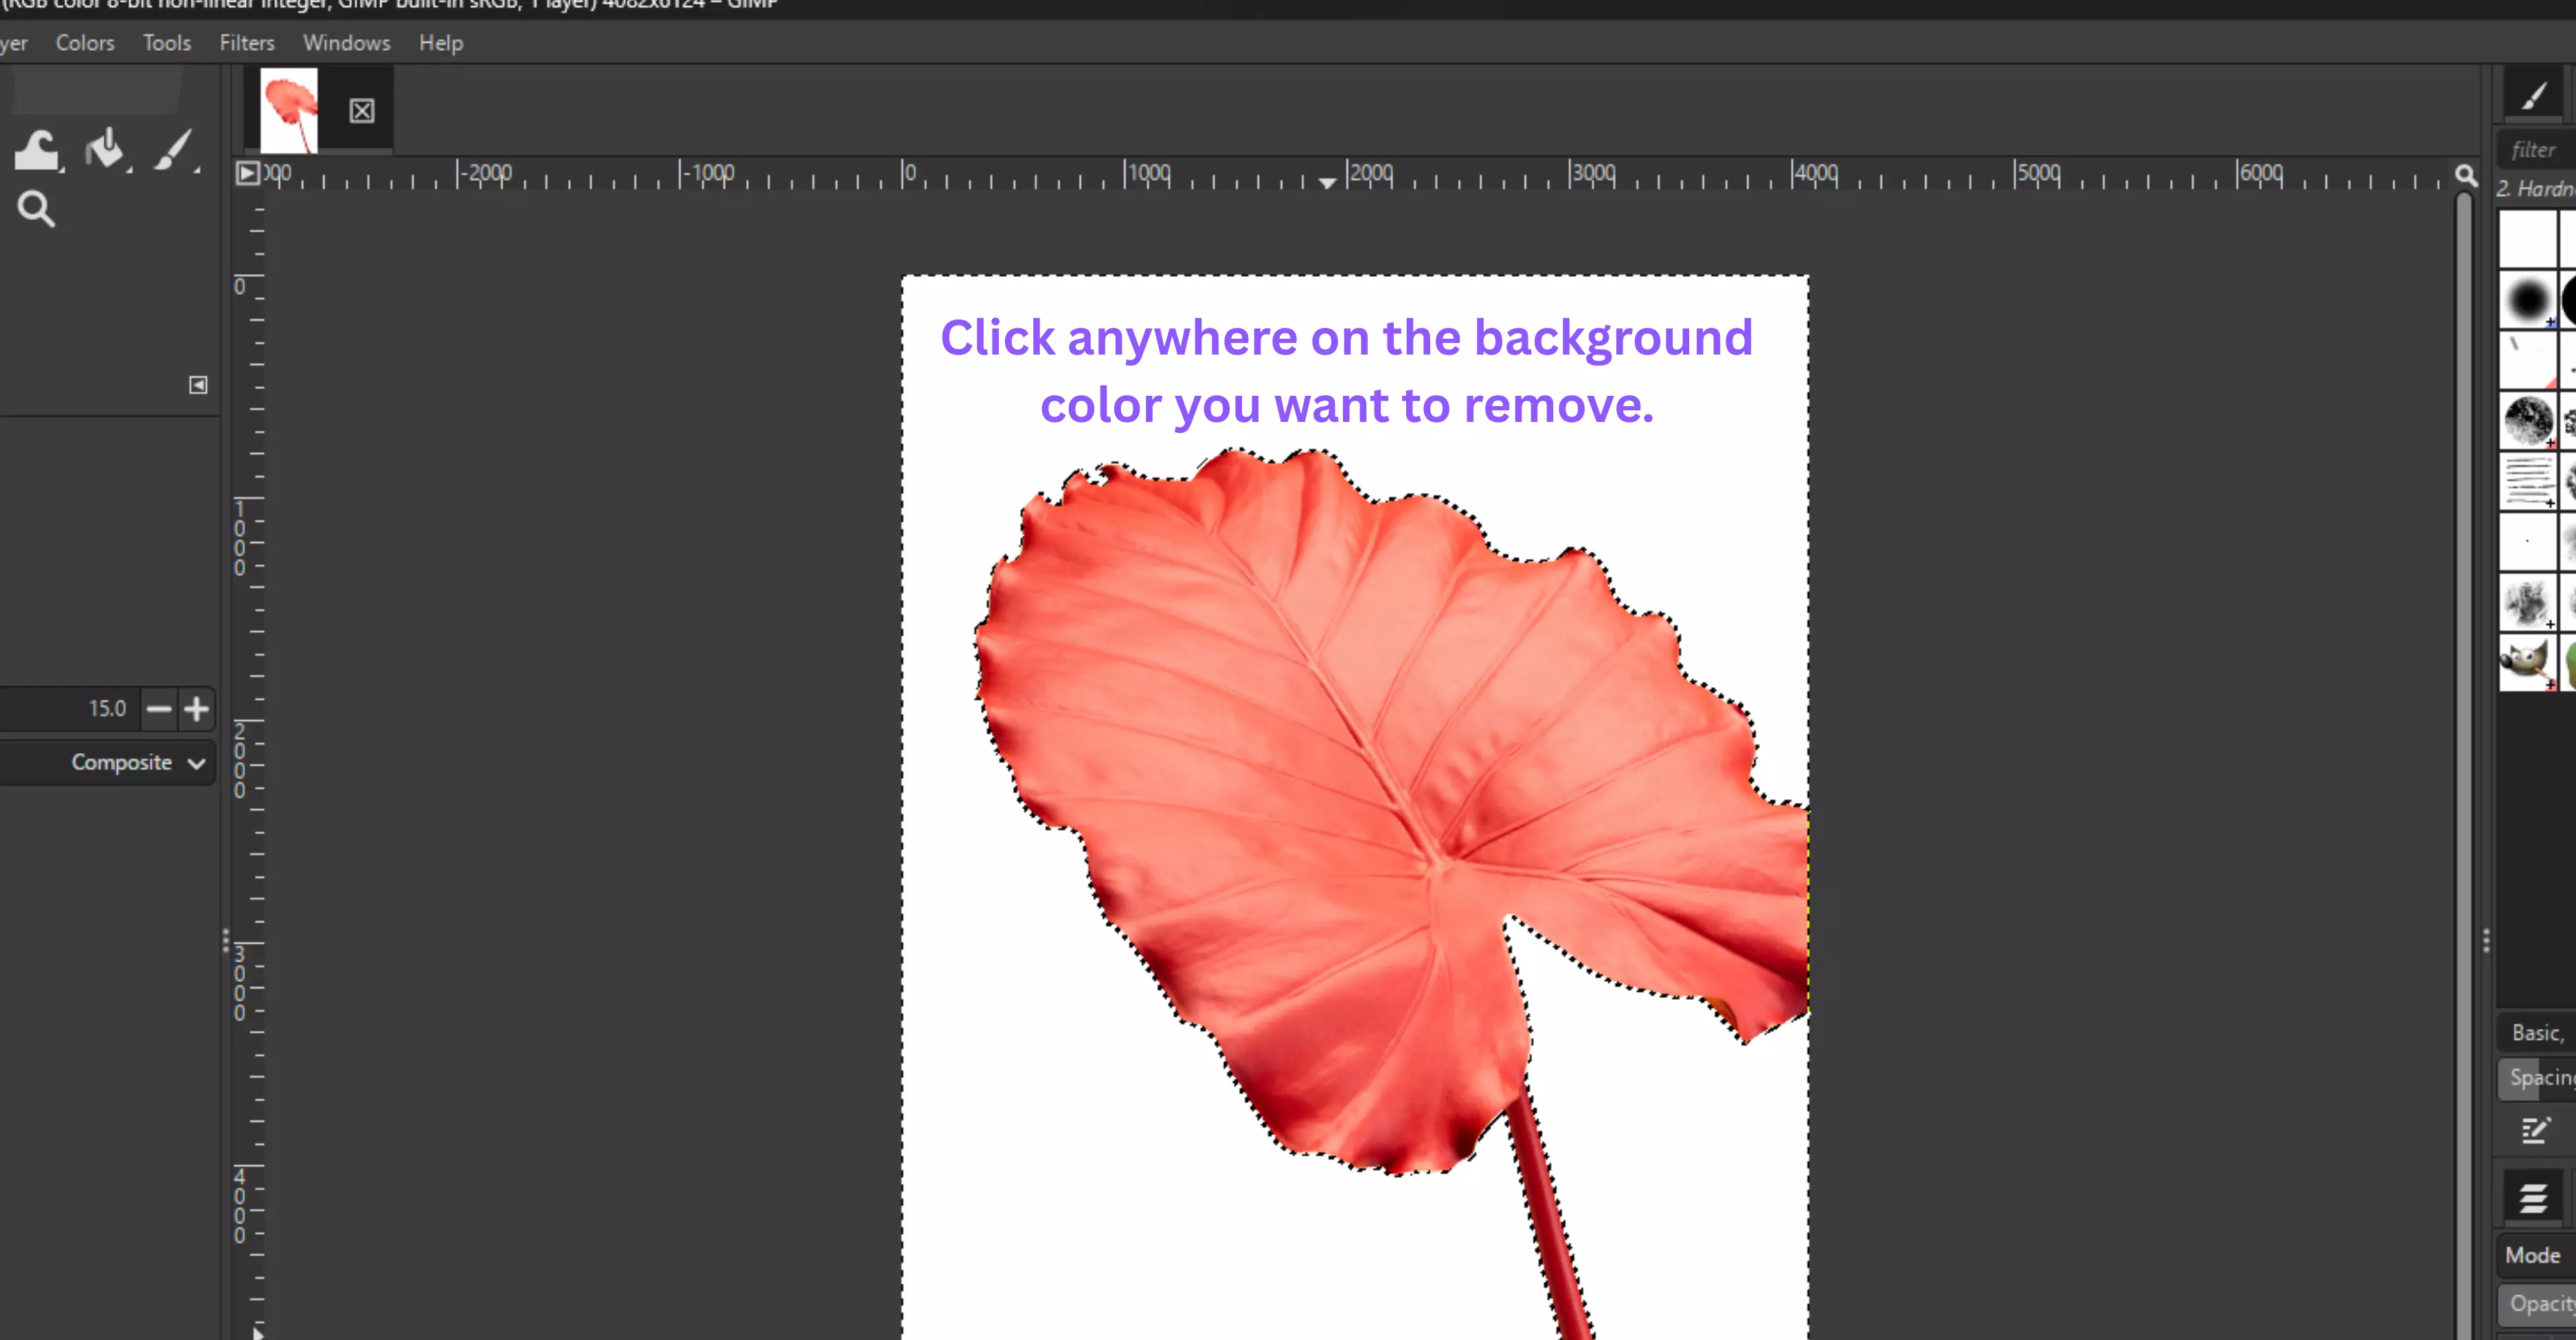
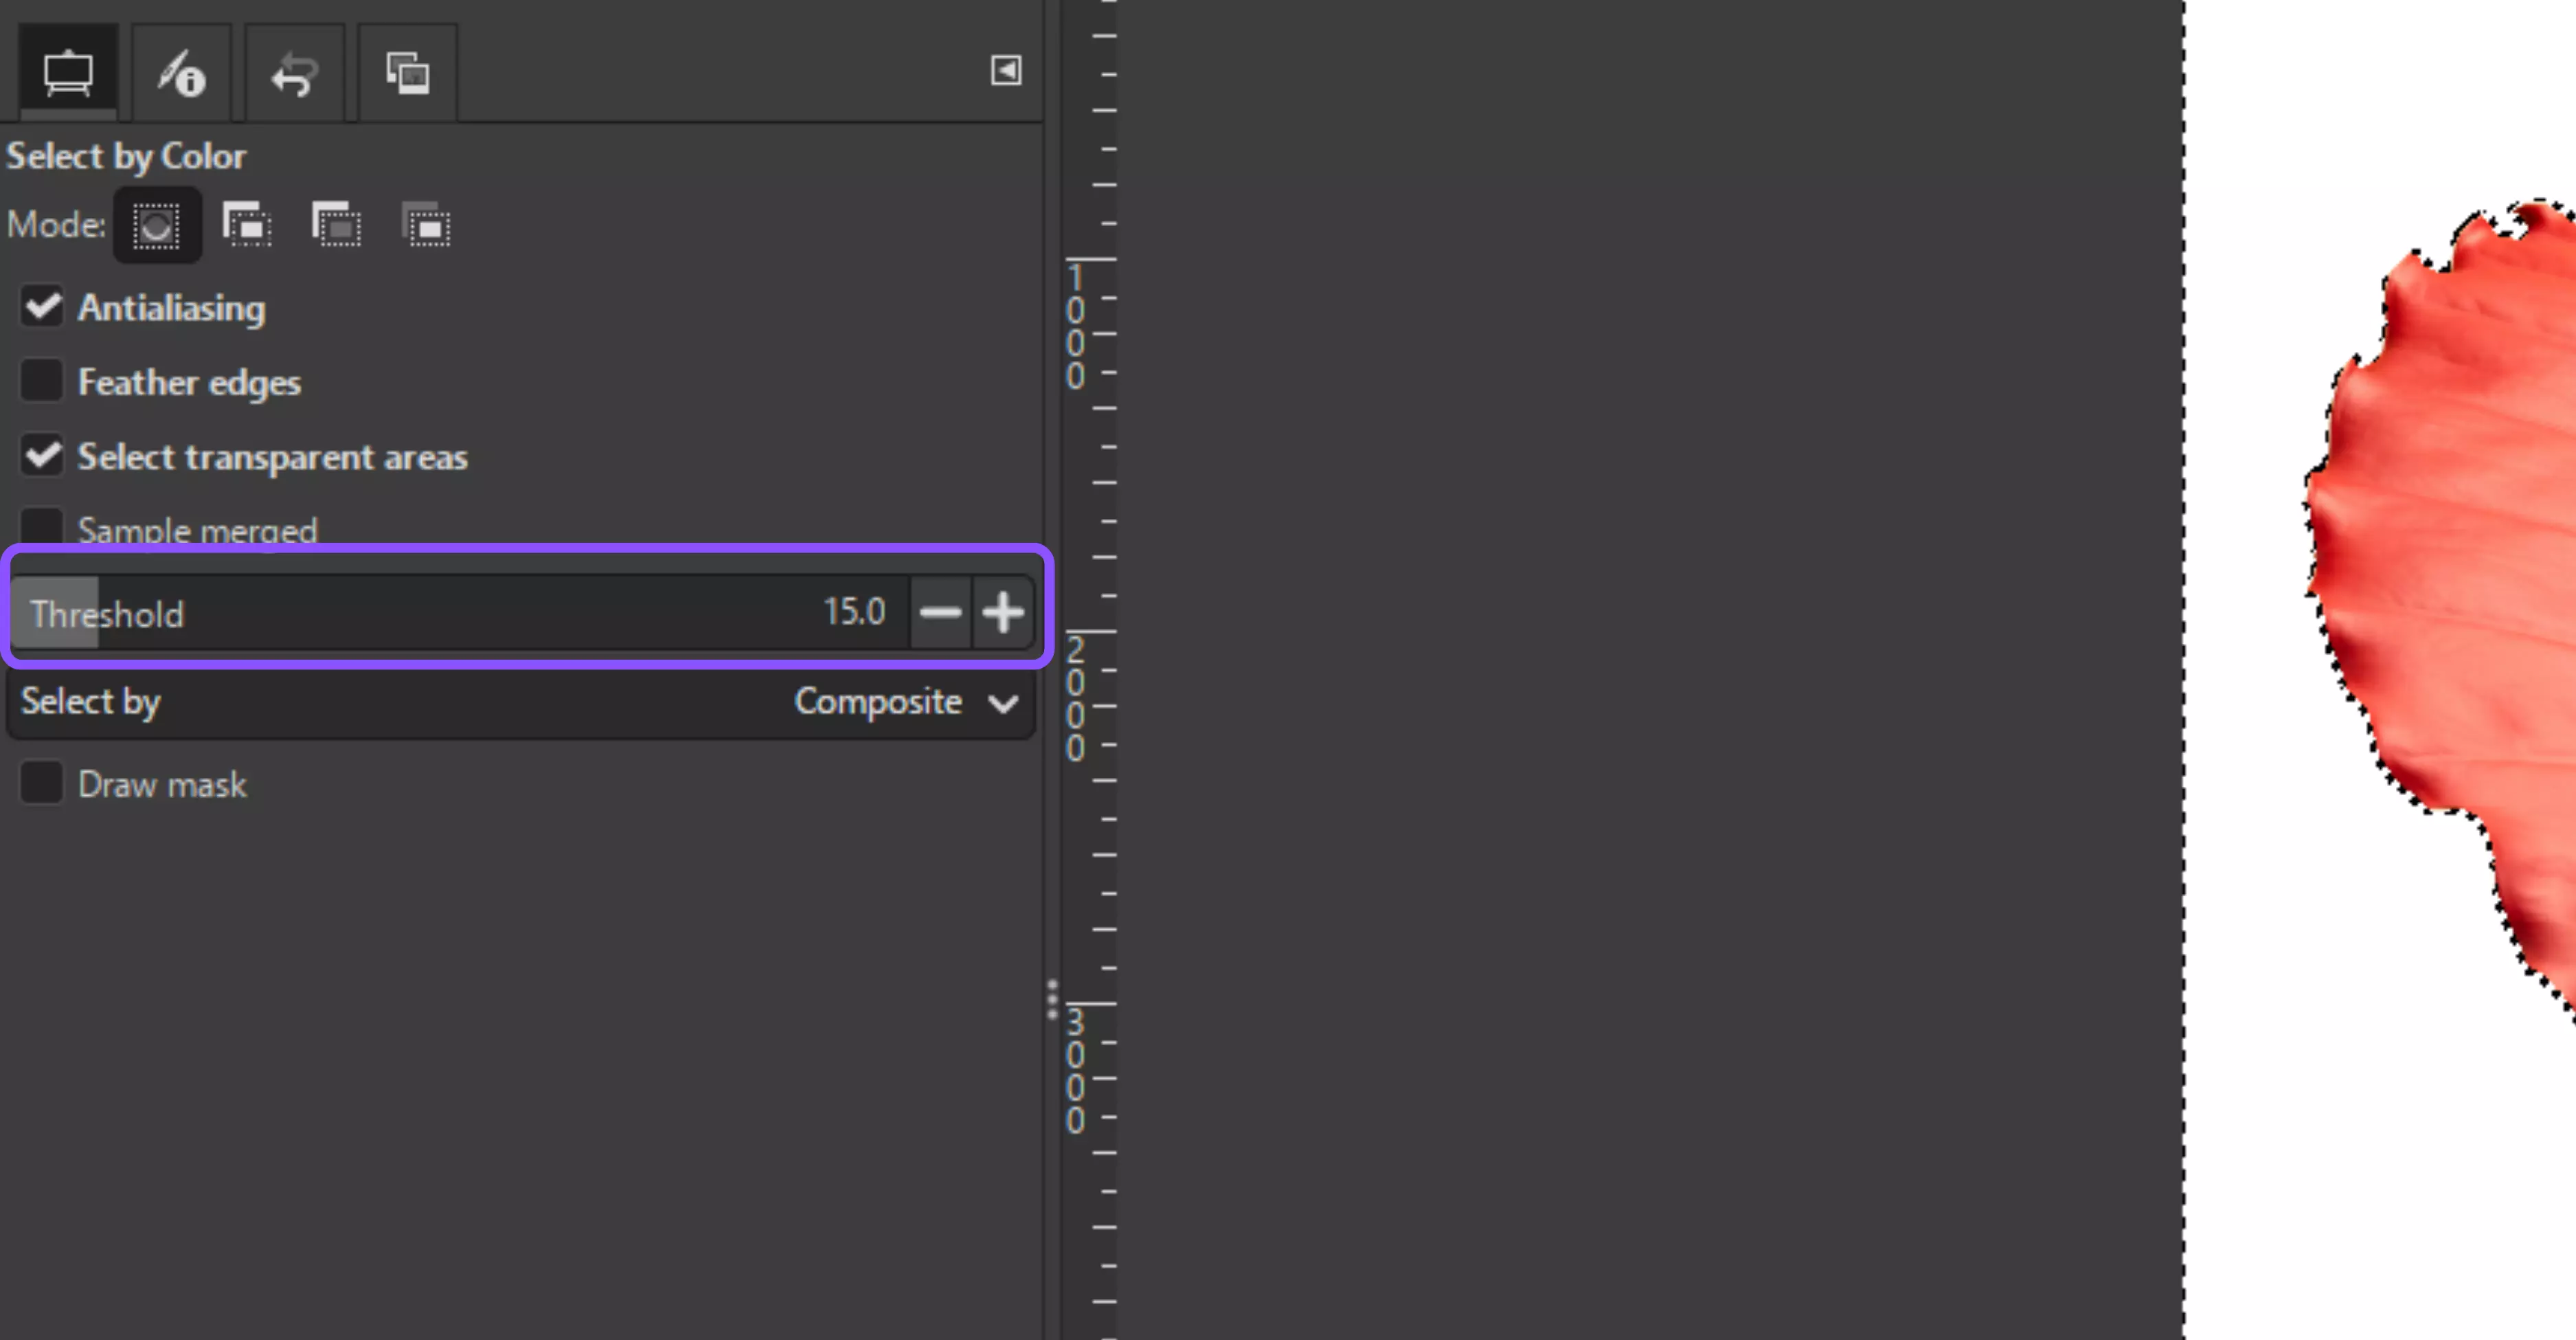
Step 3: Adjust the Threshold in the Tool Options until the entire background (and only the background) is selected.
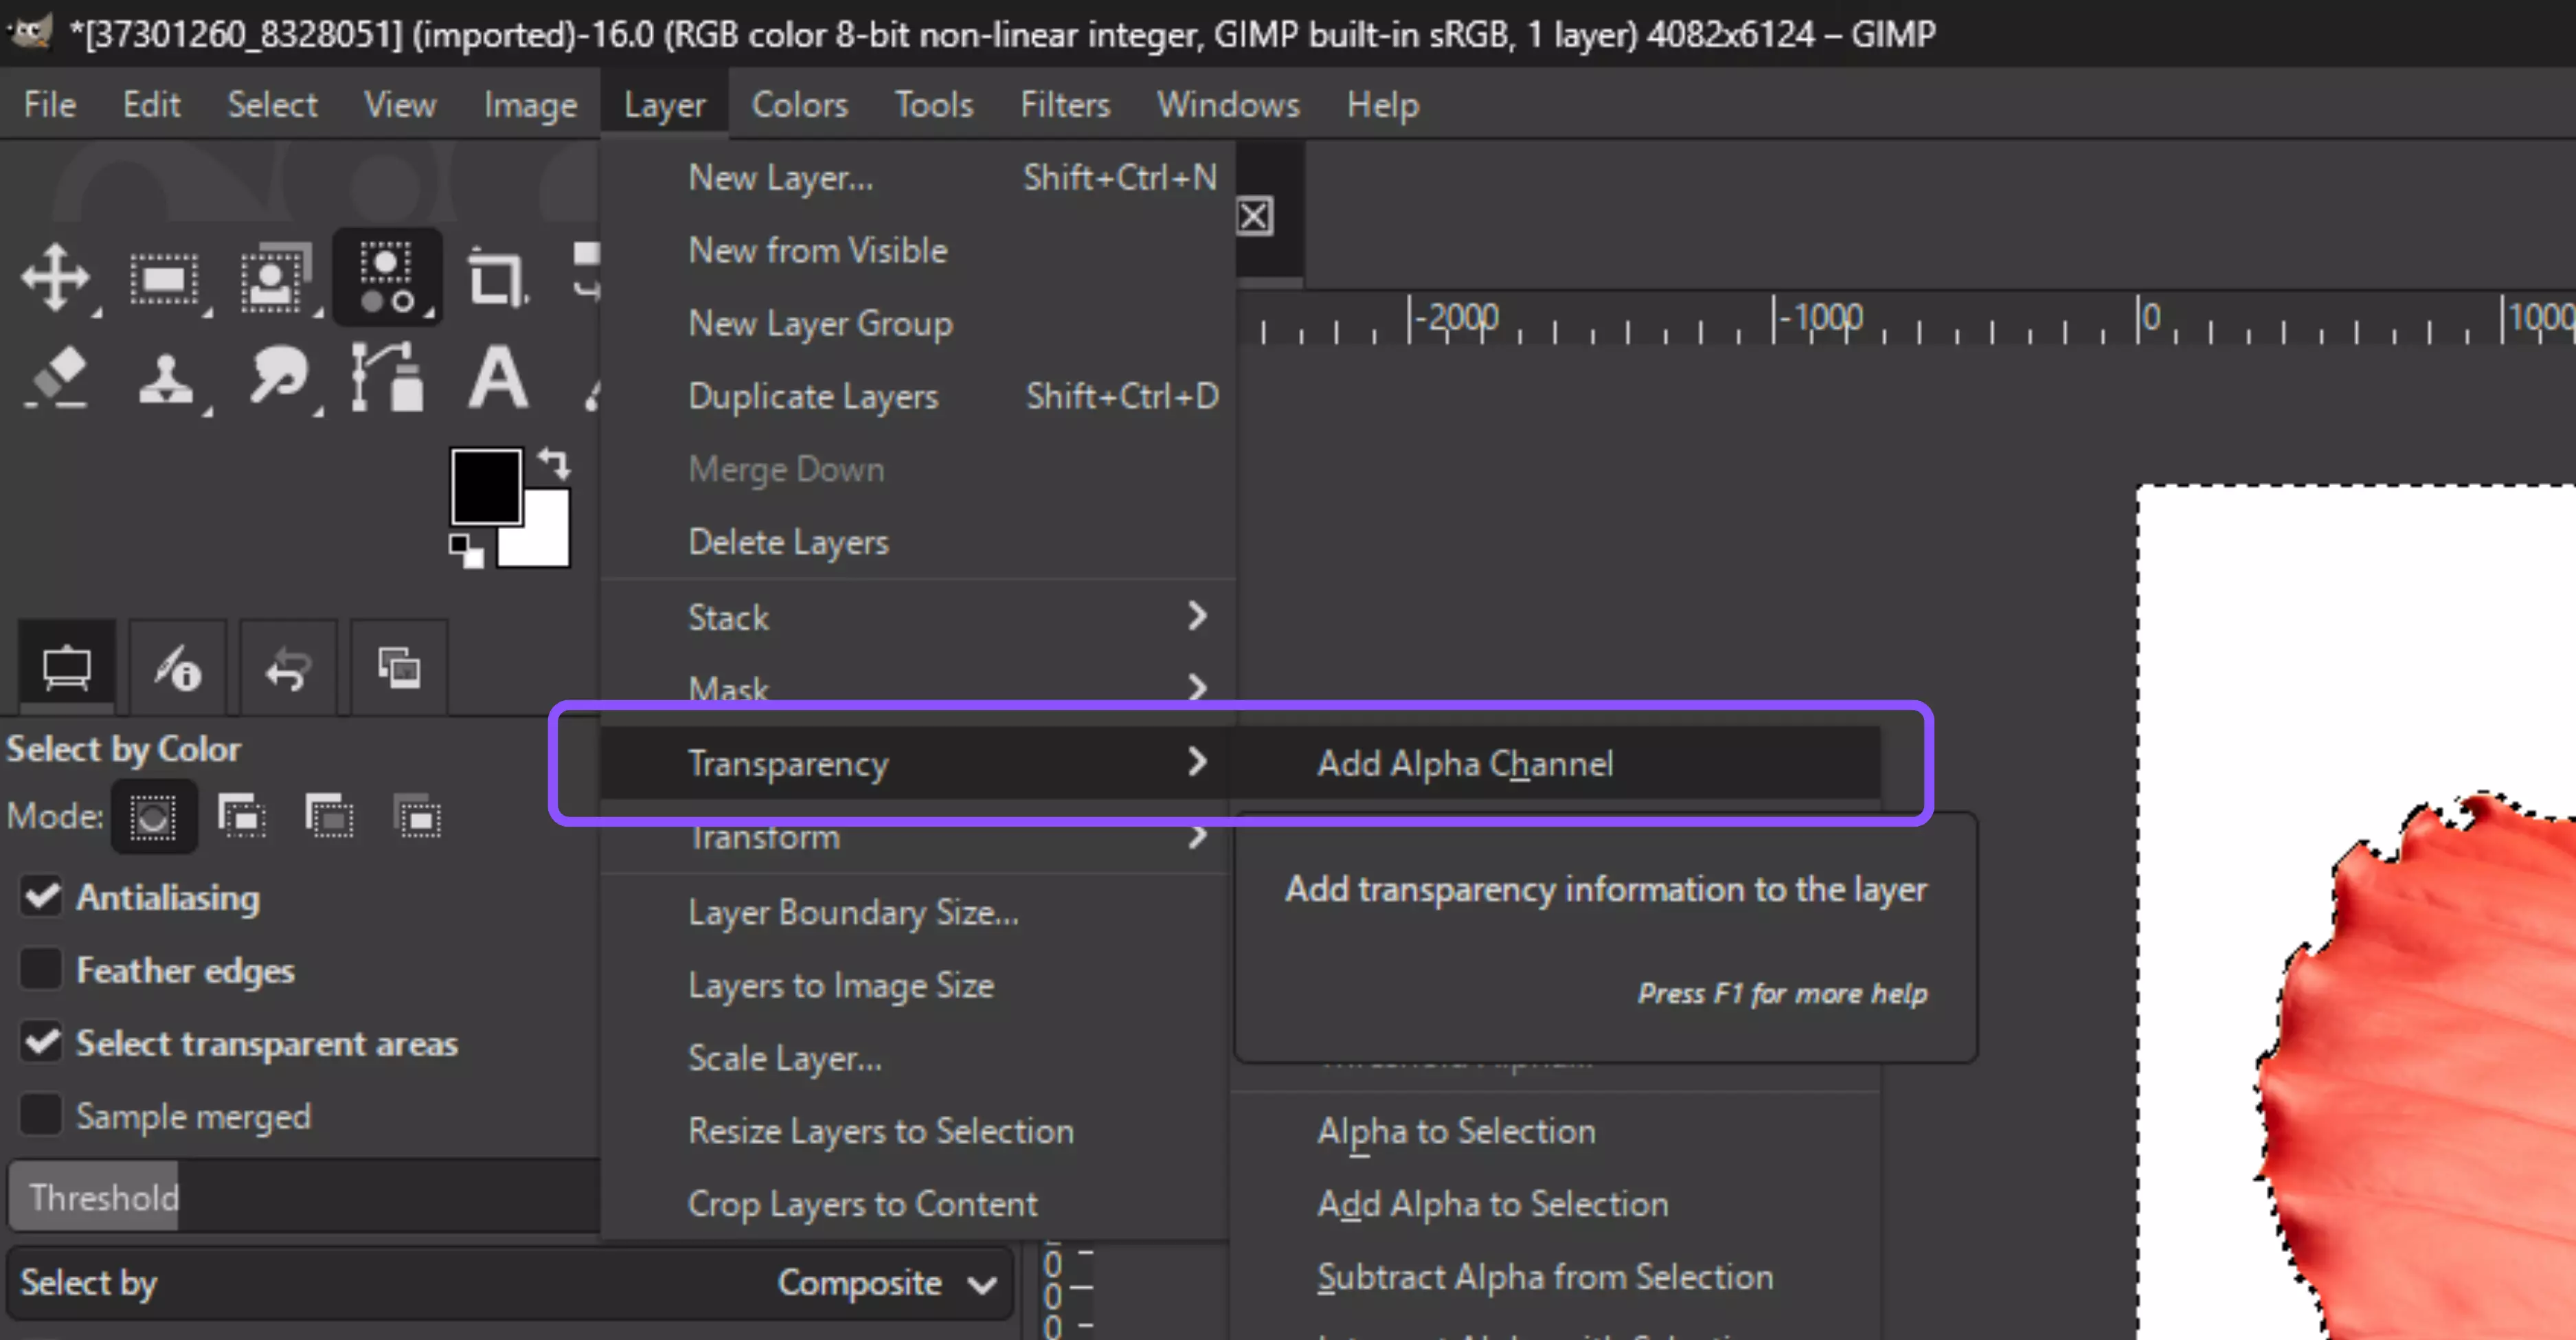
Step 4: Add transparency support: Layer → Transparency → Add Alpha Channel.
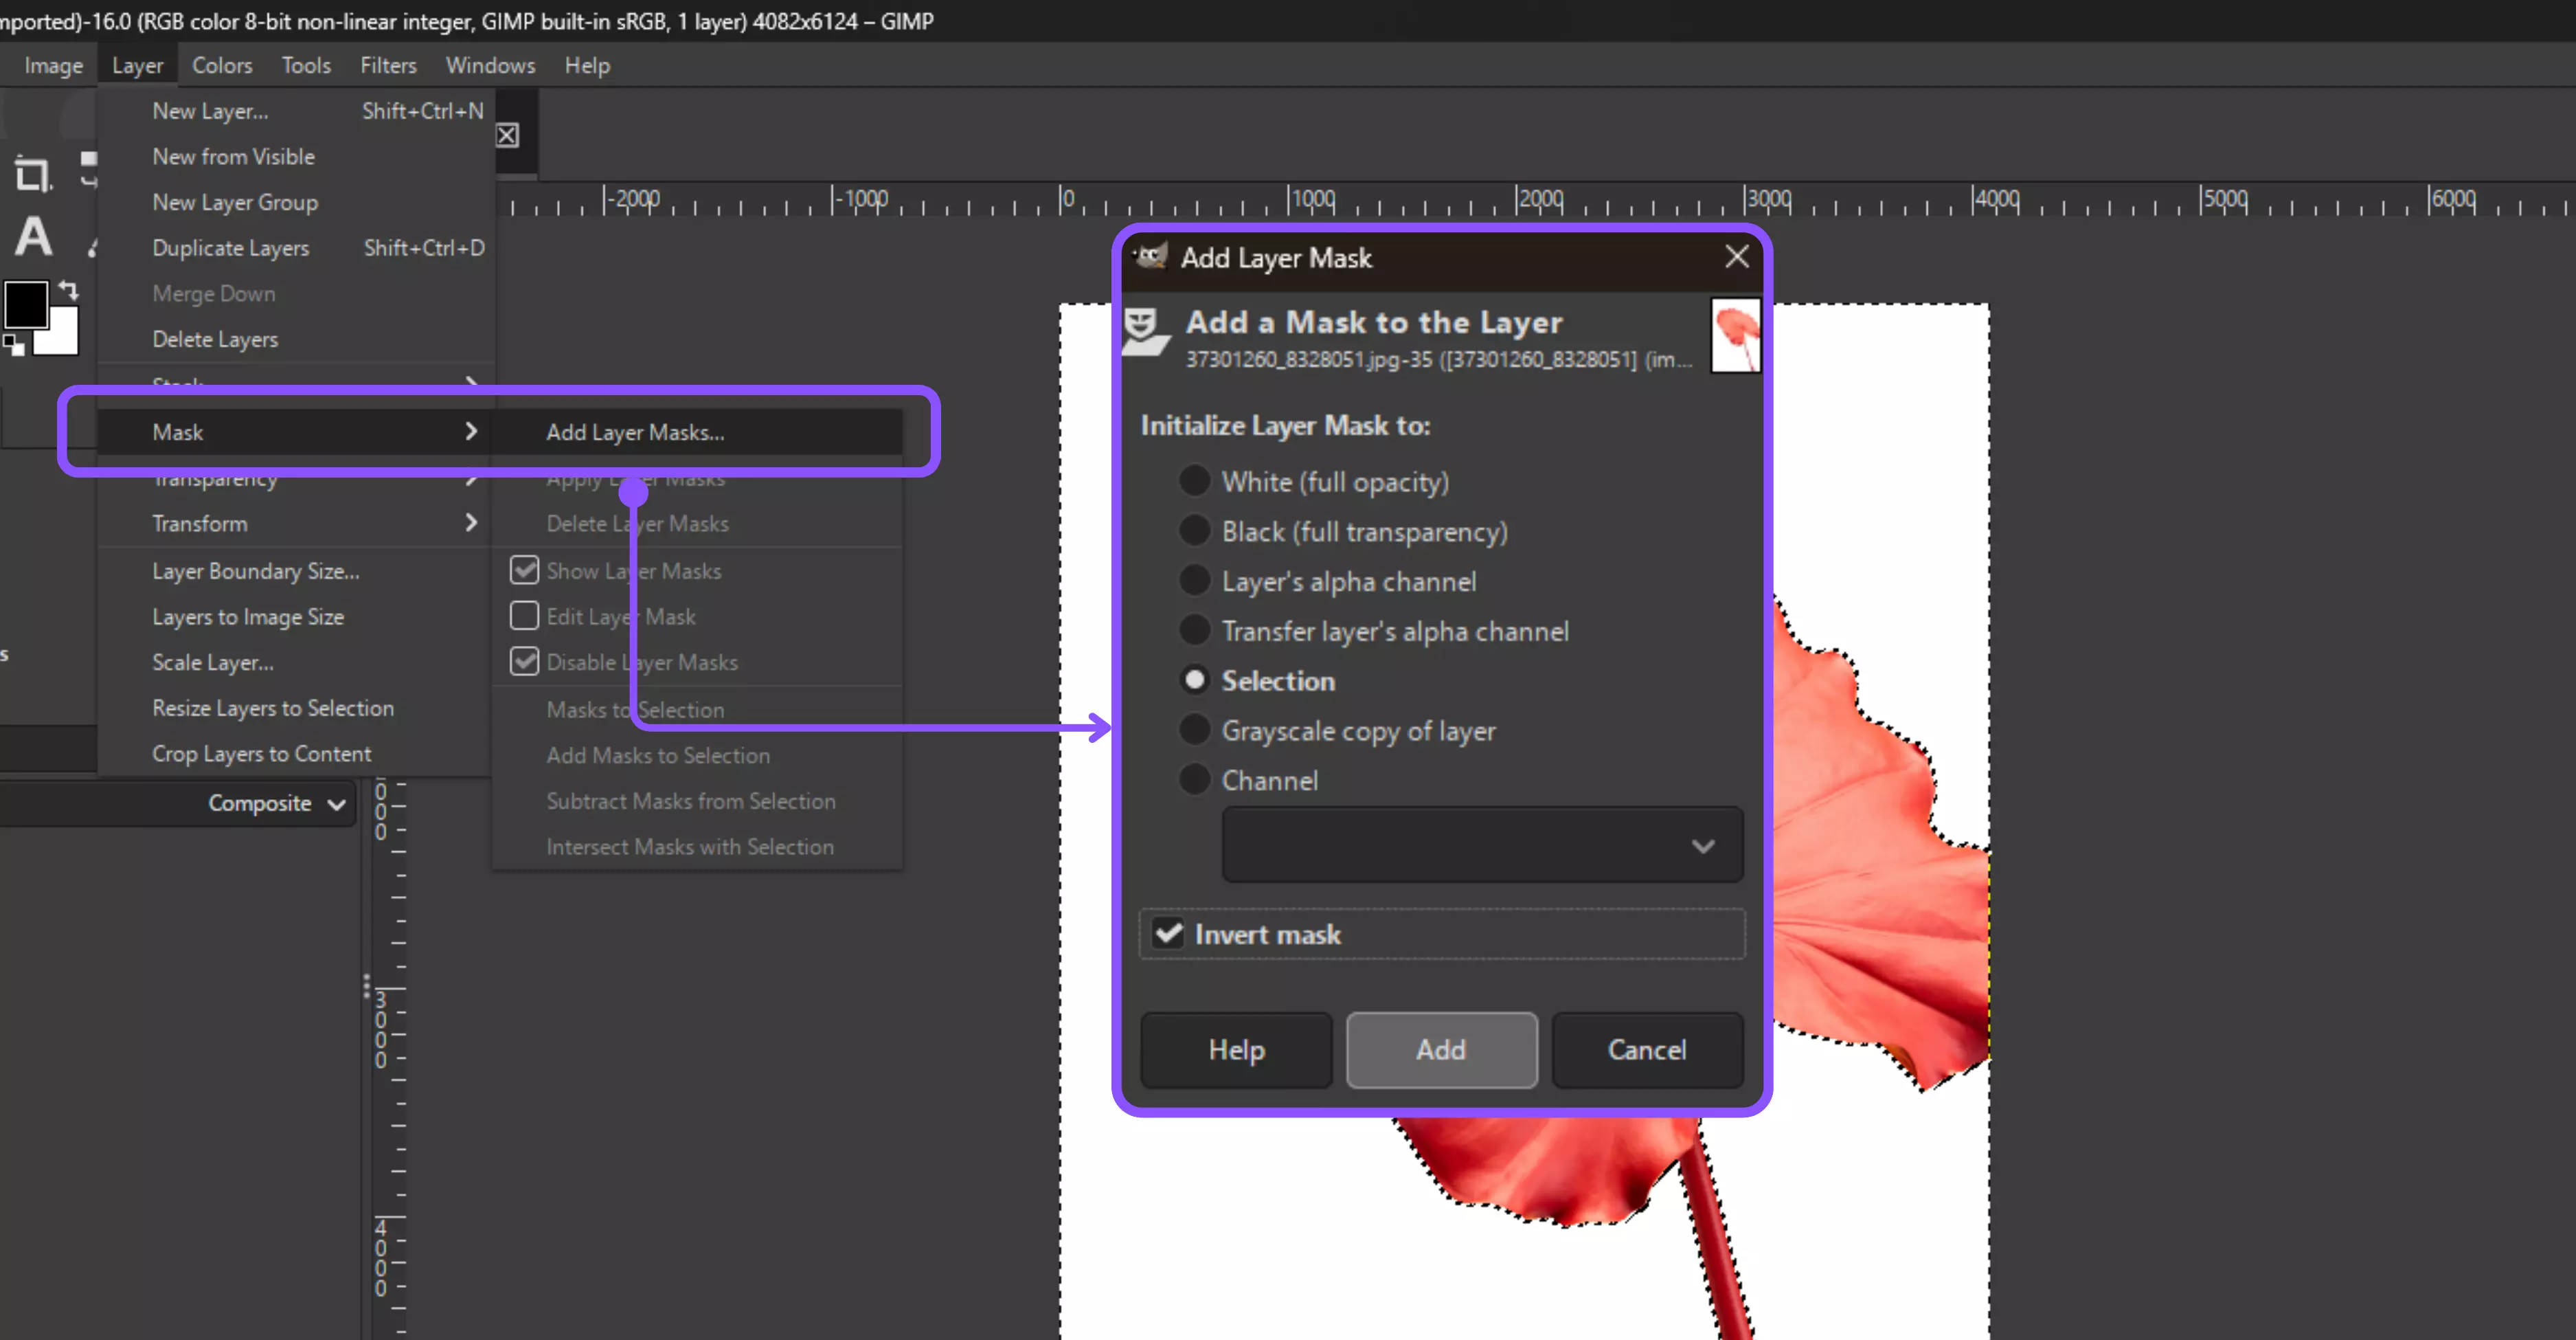
Step 5: Remove the background by either pressing Delete or, better yet, applying a Layer Mask (Layer → Mask → Add Layer Mask → Selection).
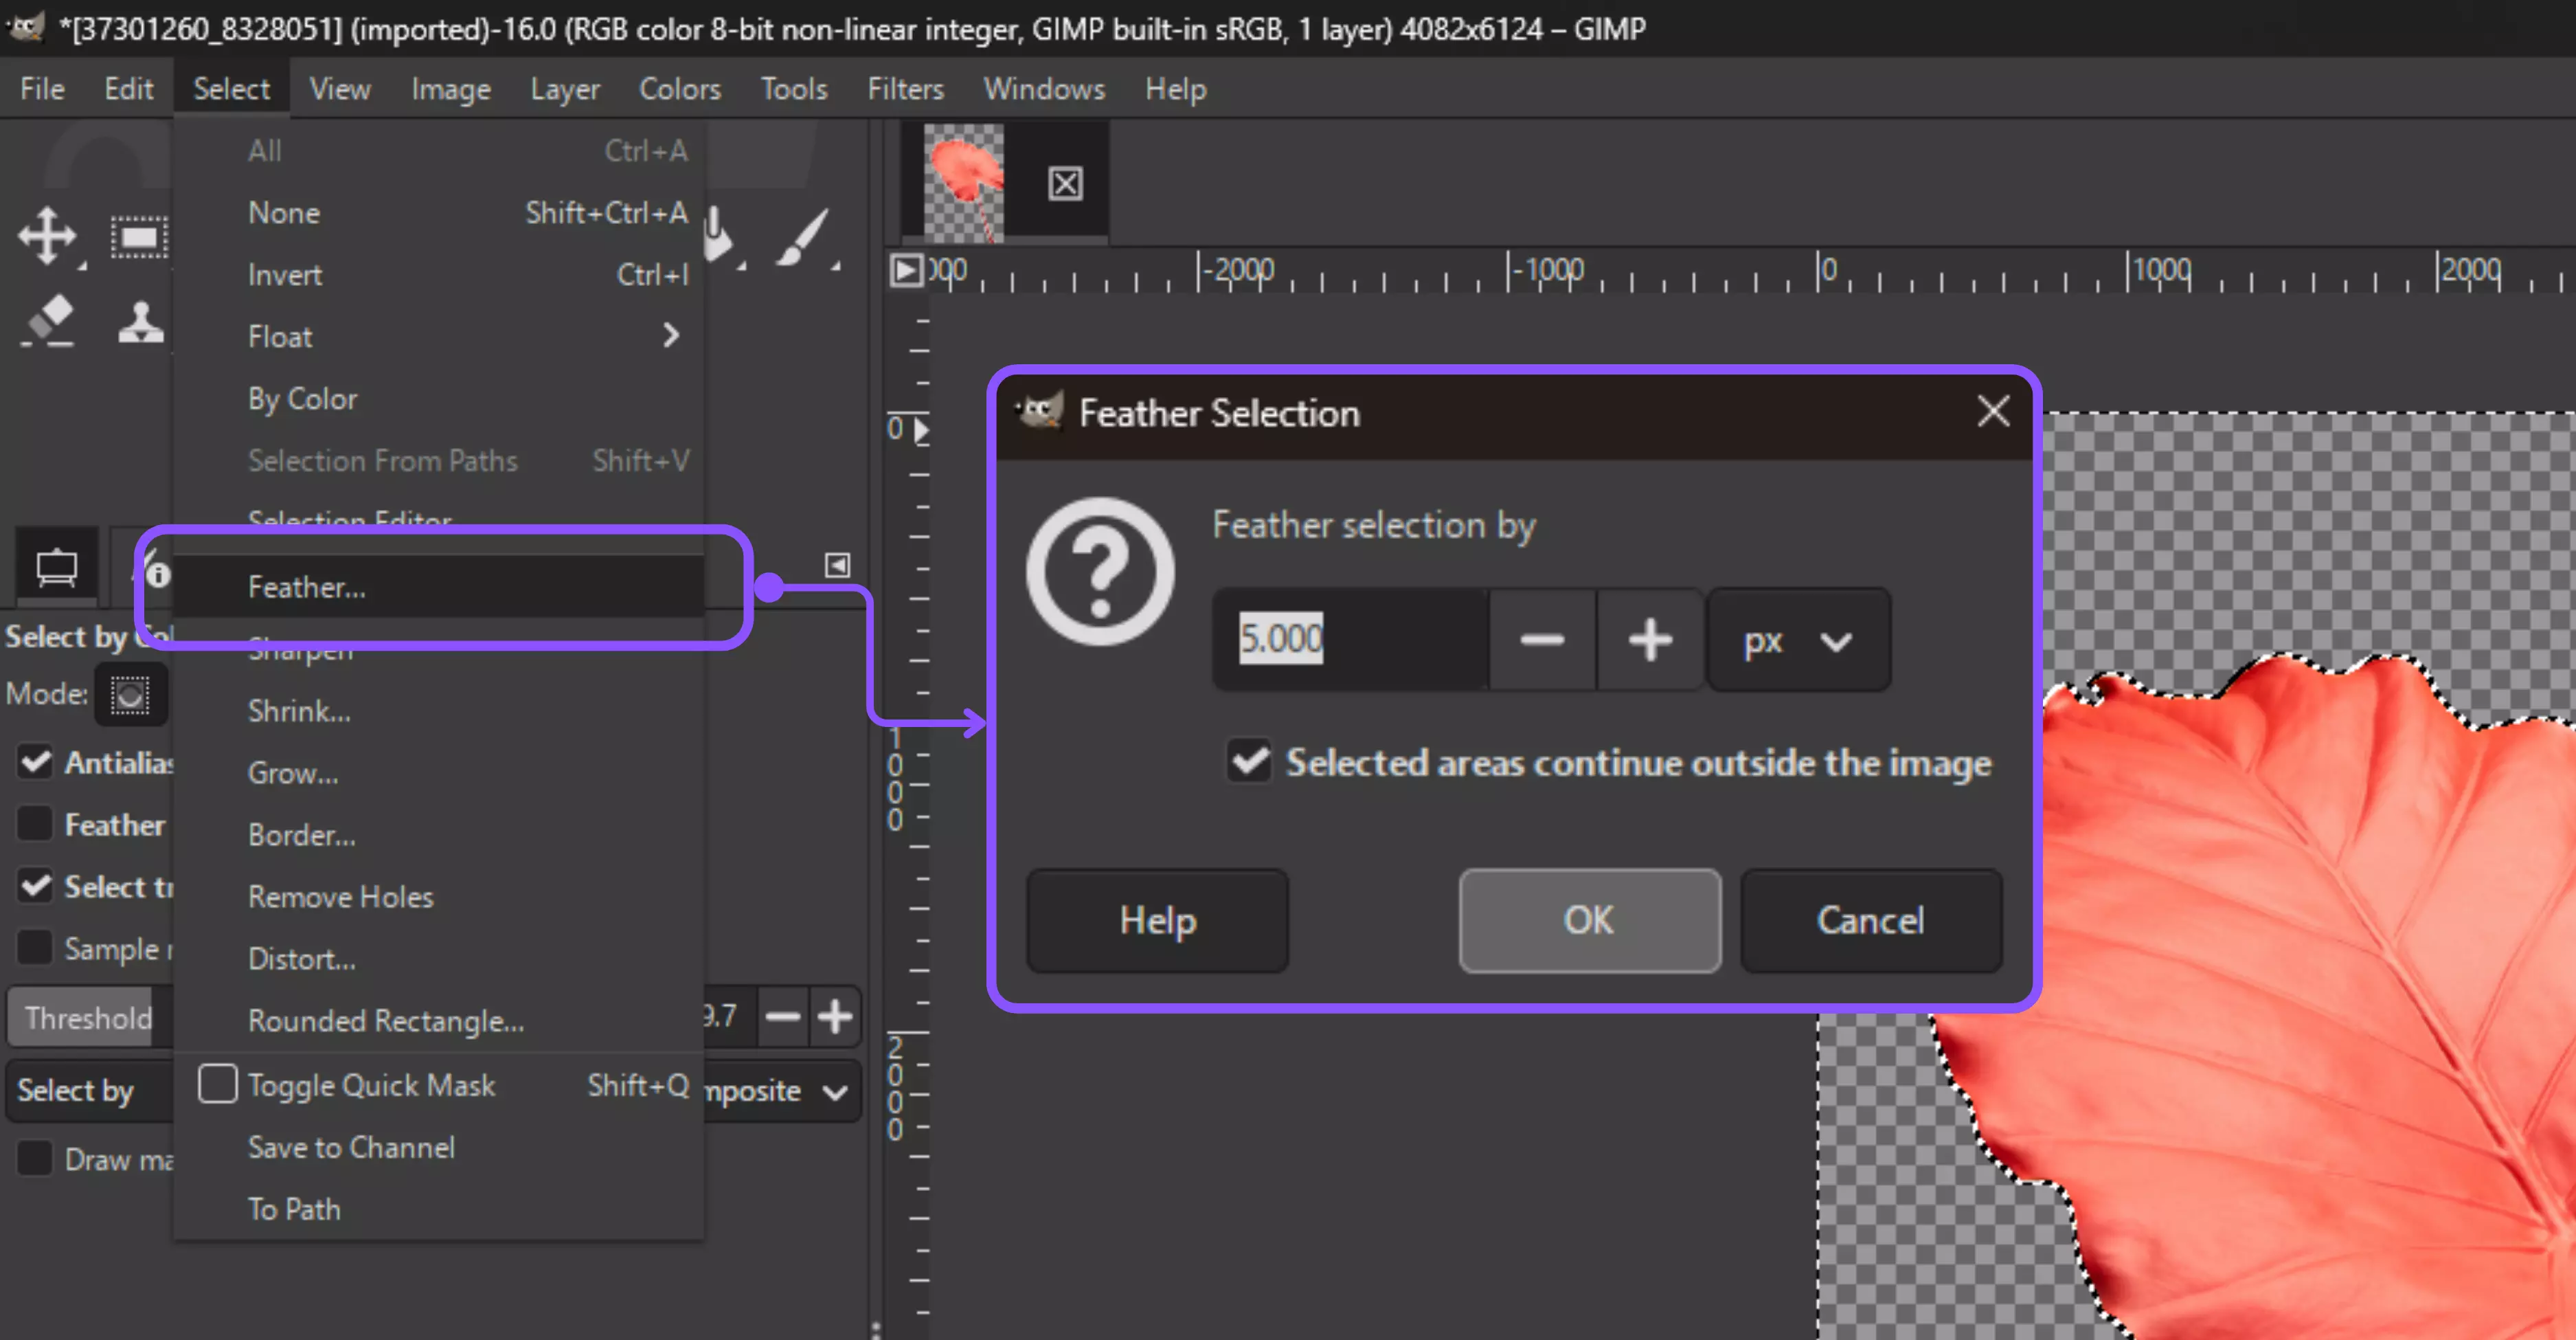
Step 6: For a more polished look, go to Select → Feather to soften the edges slightly.
Why use it?
It’s highly efficient for complex backgrounds where one color dominates. Ideal for product images with shadows or patterns, ensuring consistent removal of all unwanted areas at once.
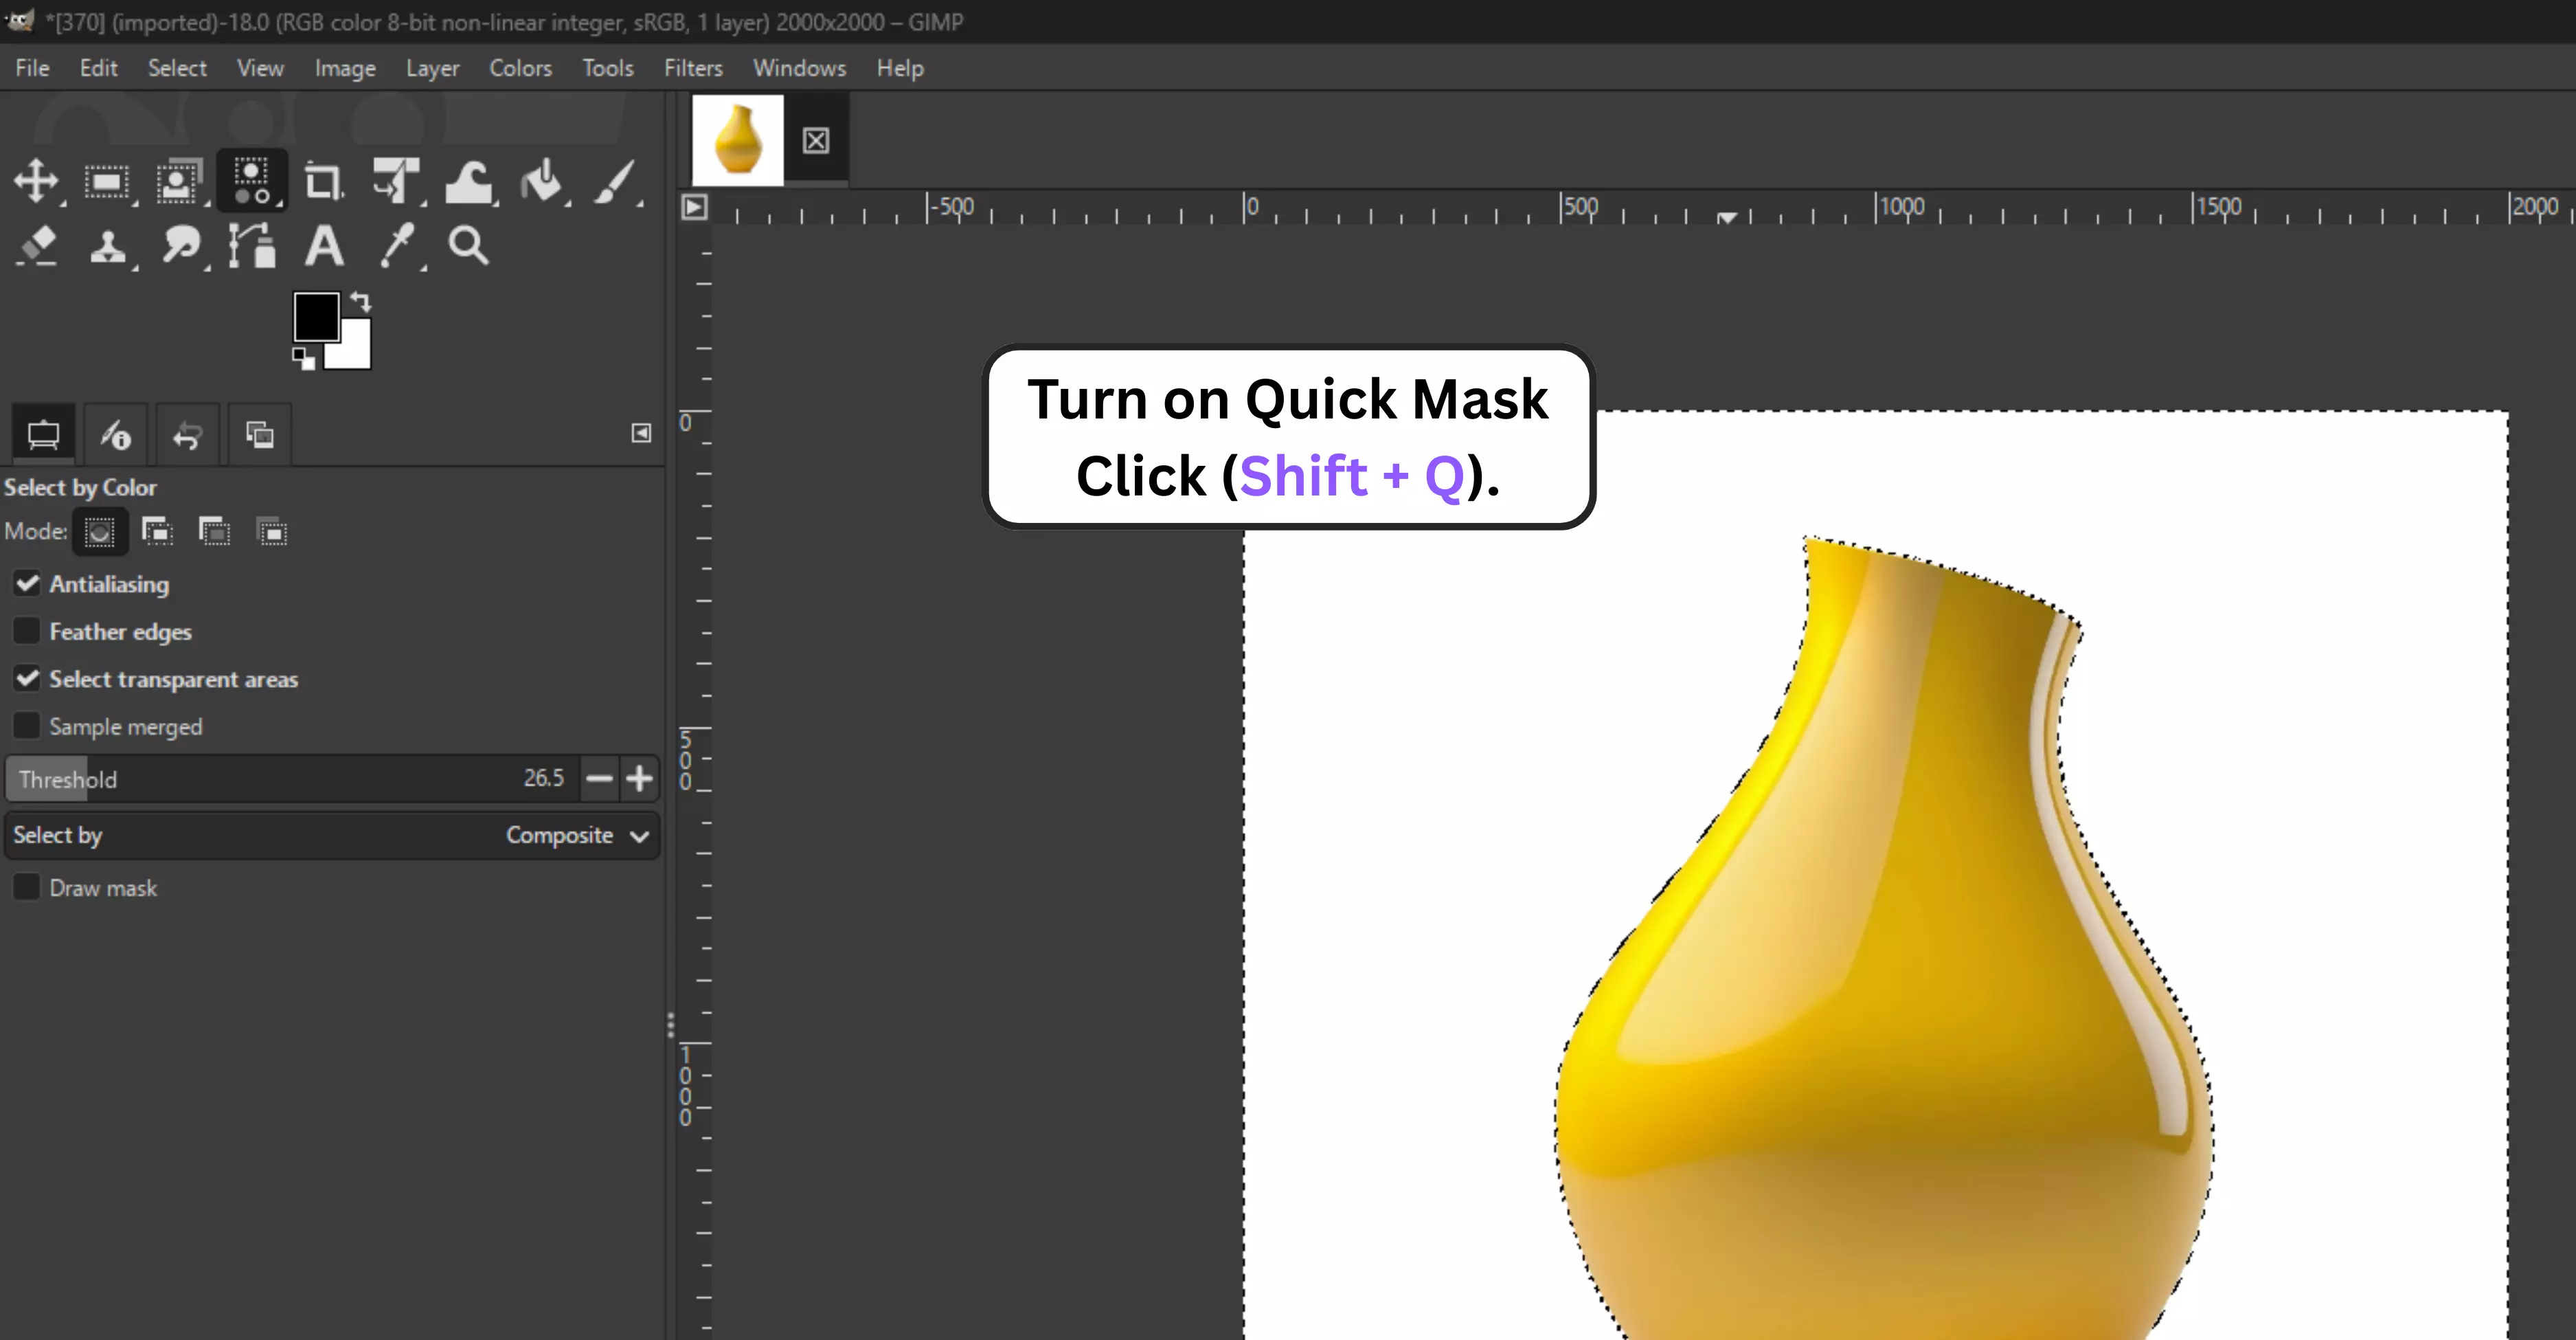
5. Using Quick Mask for manual refinement
Even after automatic selections, edges often need cleanup. Quick Mask allows you to refine the selections for a flawless result manually.
Steps to know
Step 1: Start with any selection method you like—Fuzzy Select, Paths, or Select by Color—to get a rough outline of your subject.

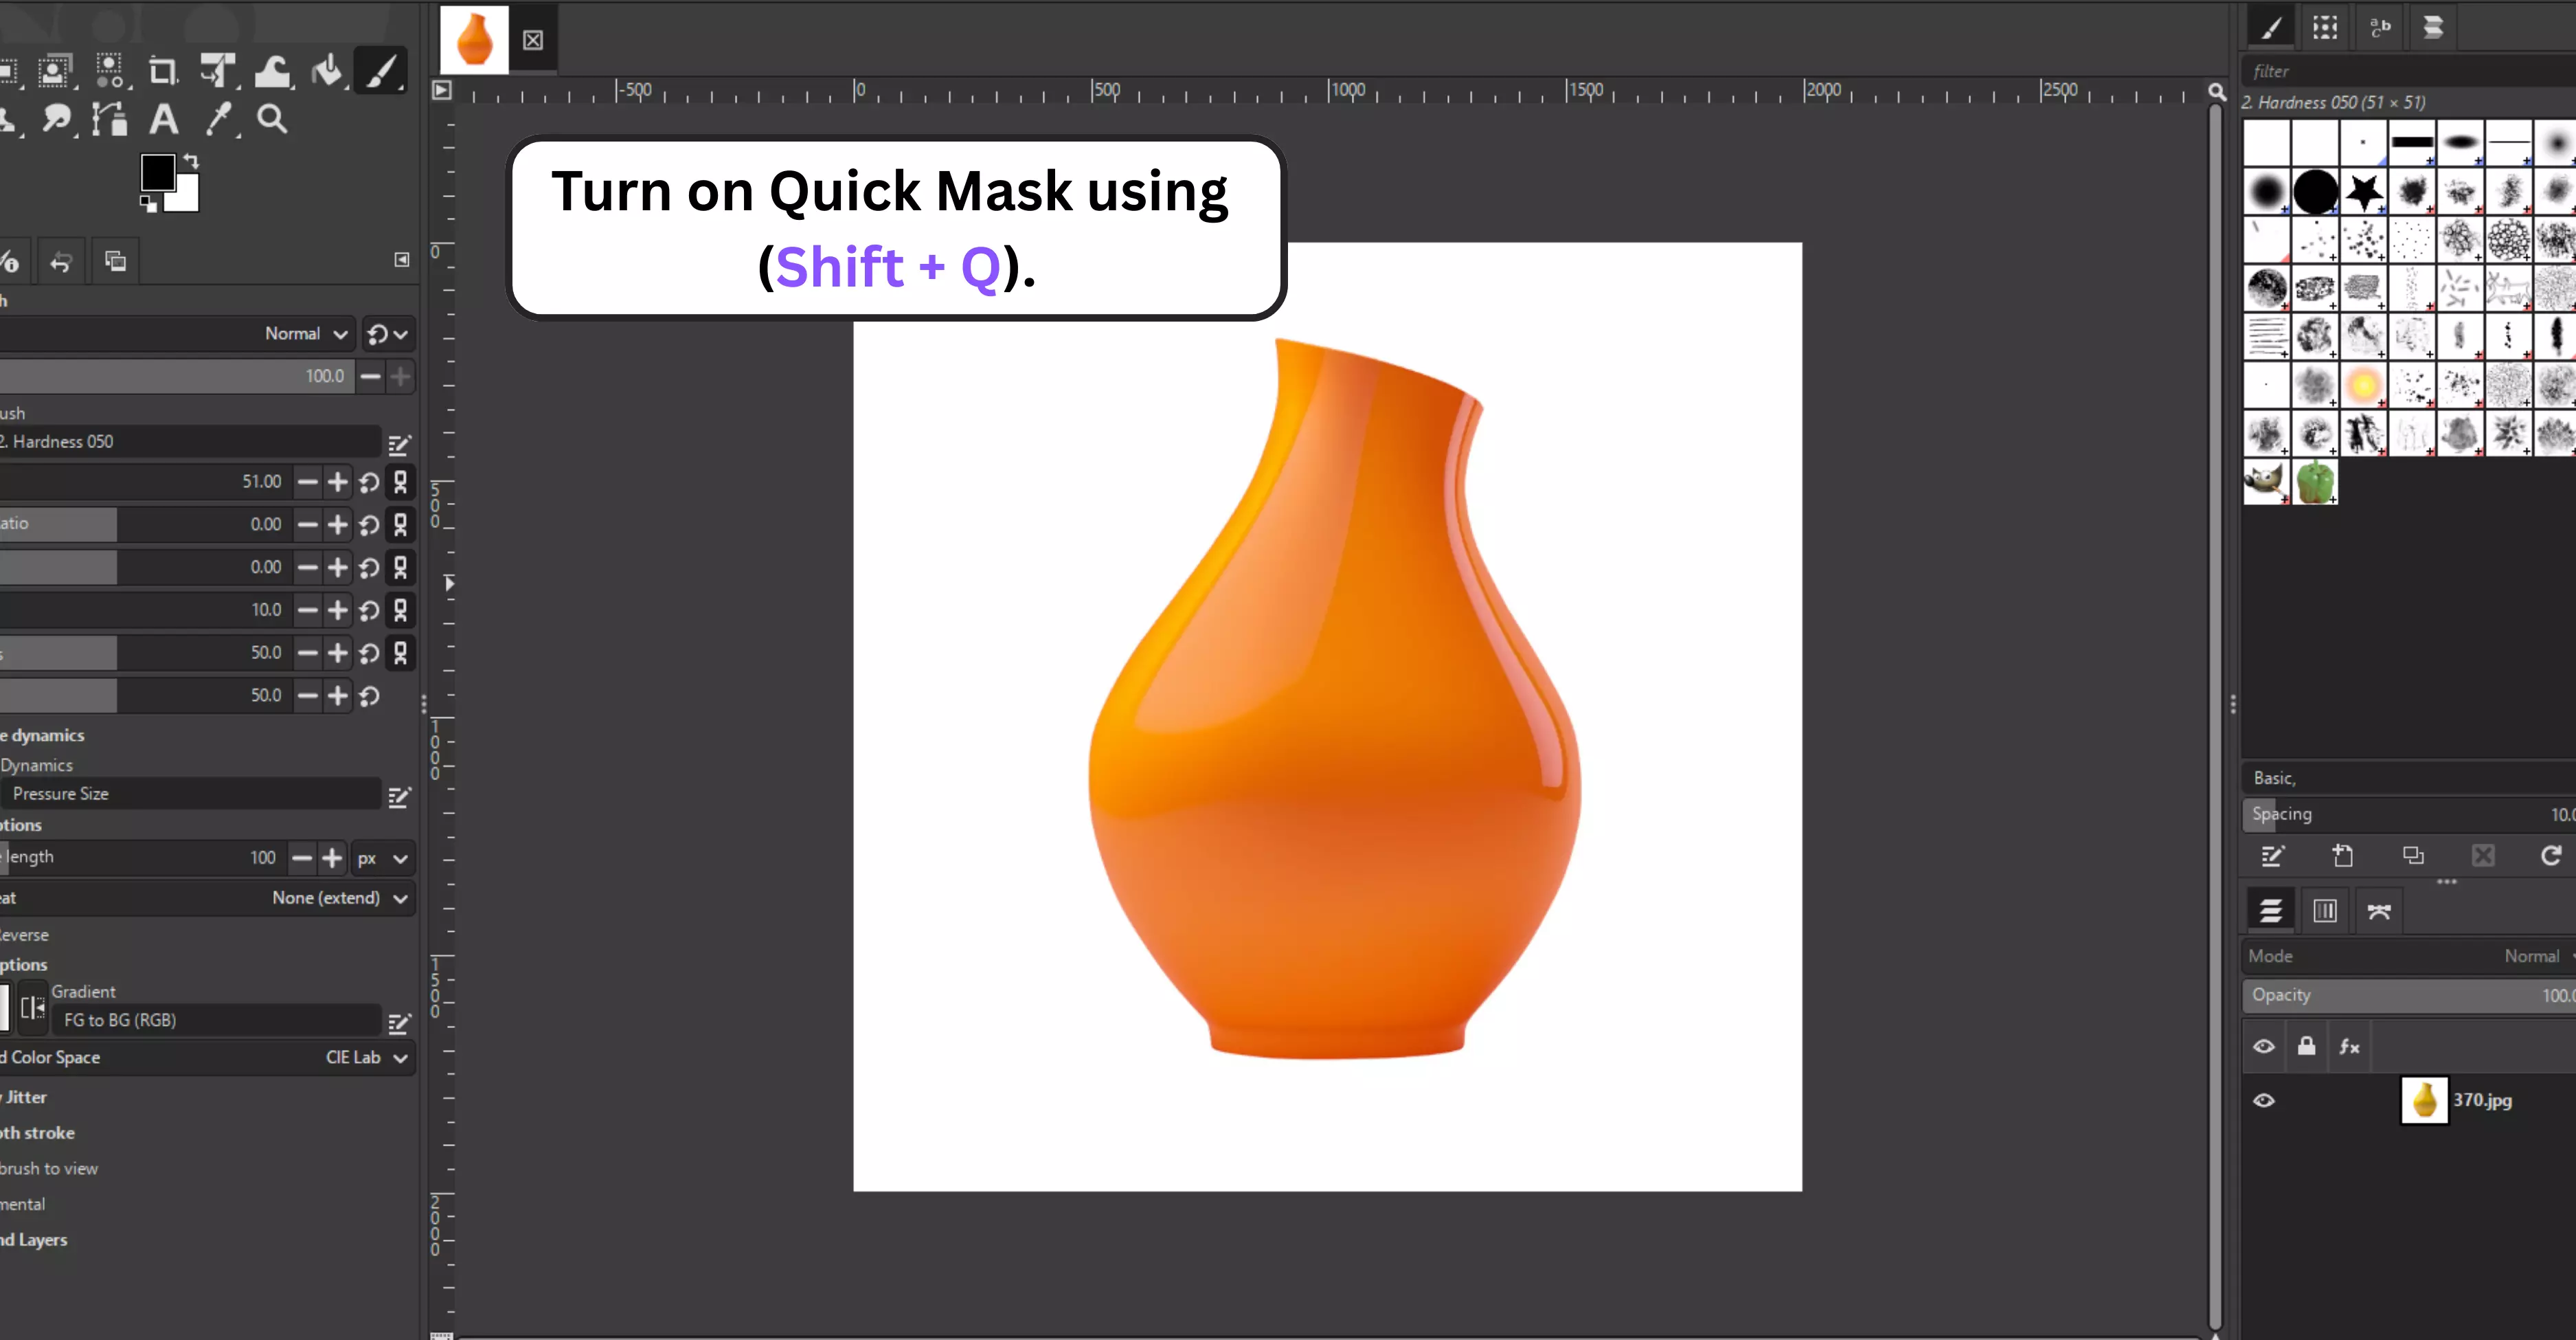
Step 2: Turn on Quick Mask (Shift + Q). Everything not selected will turn red, making it easy to see what’s included and what’s not.
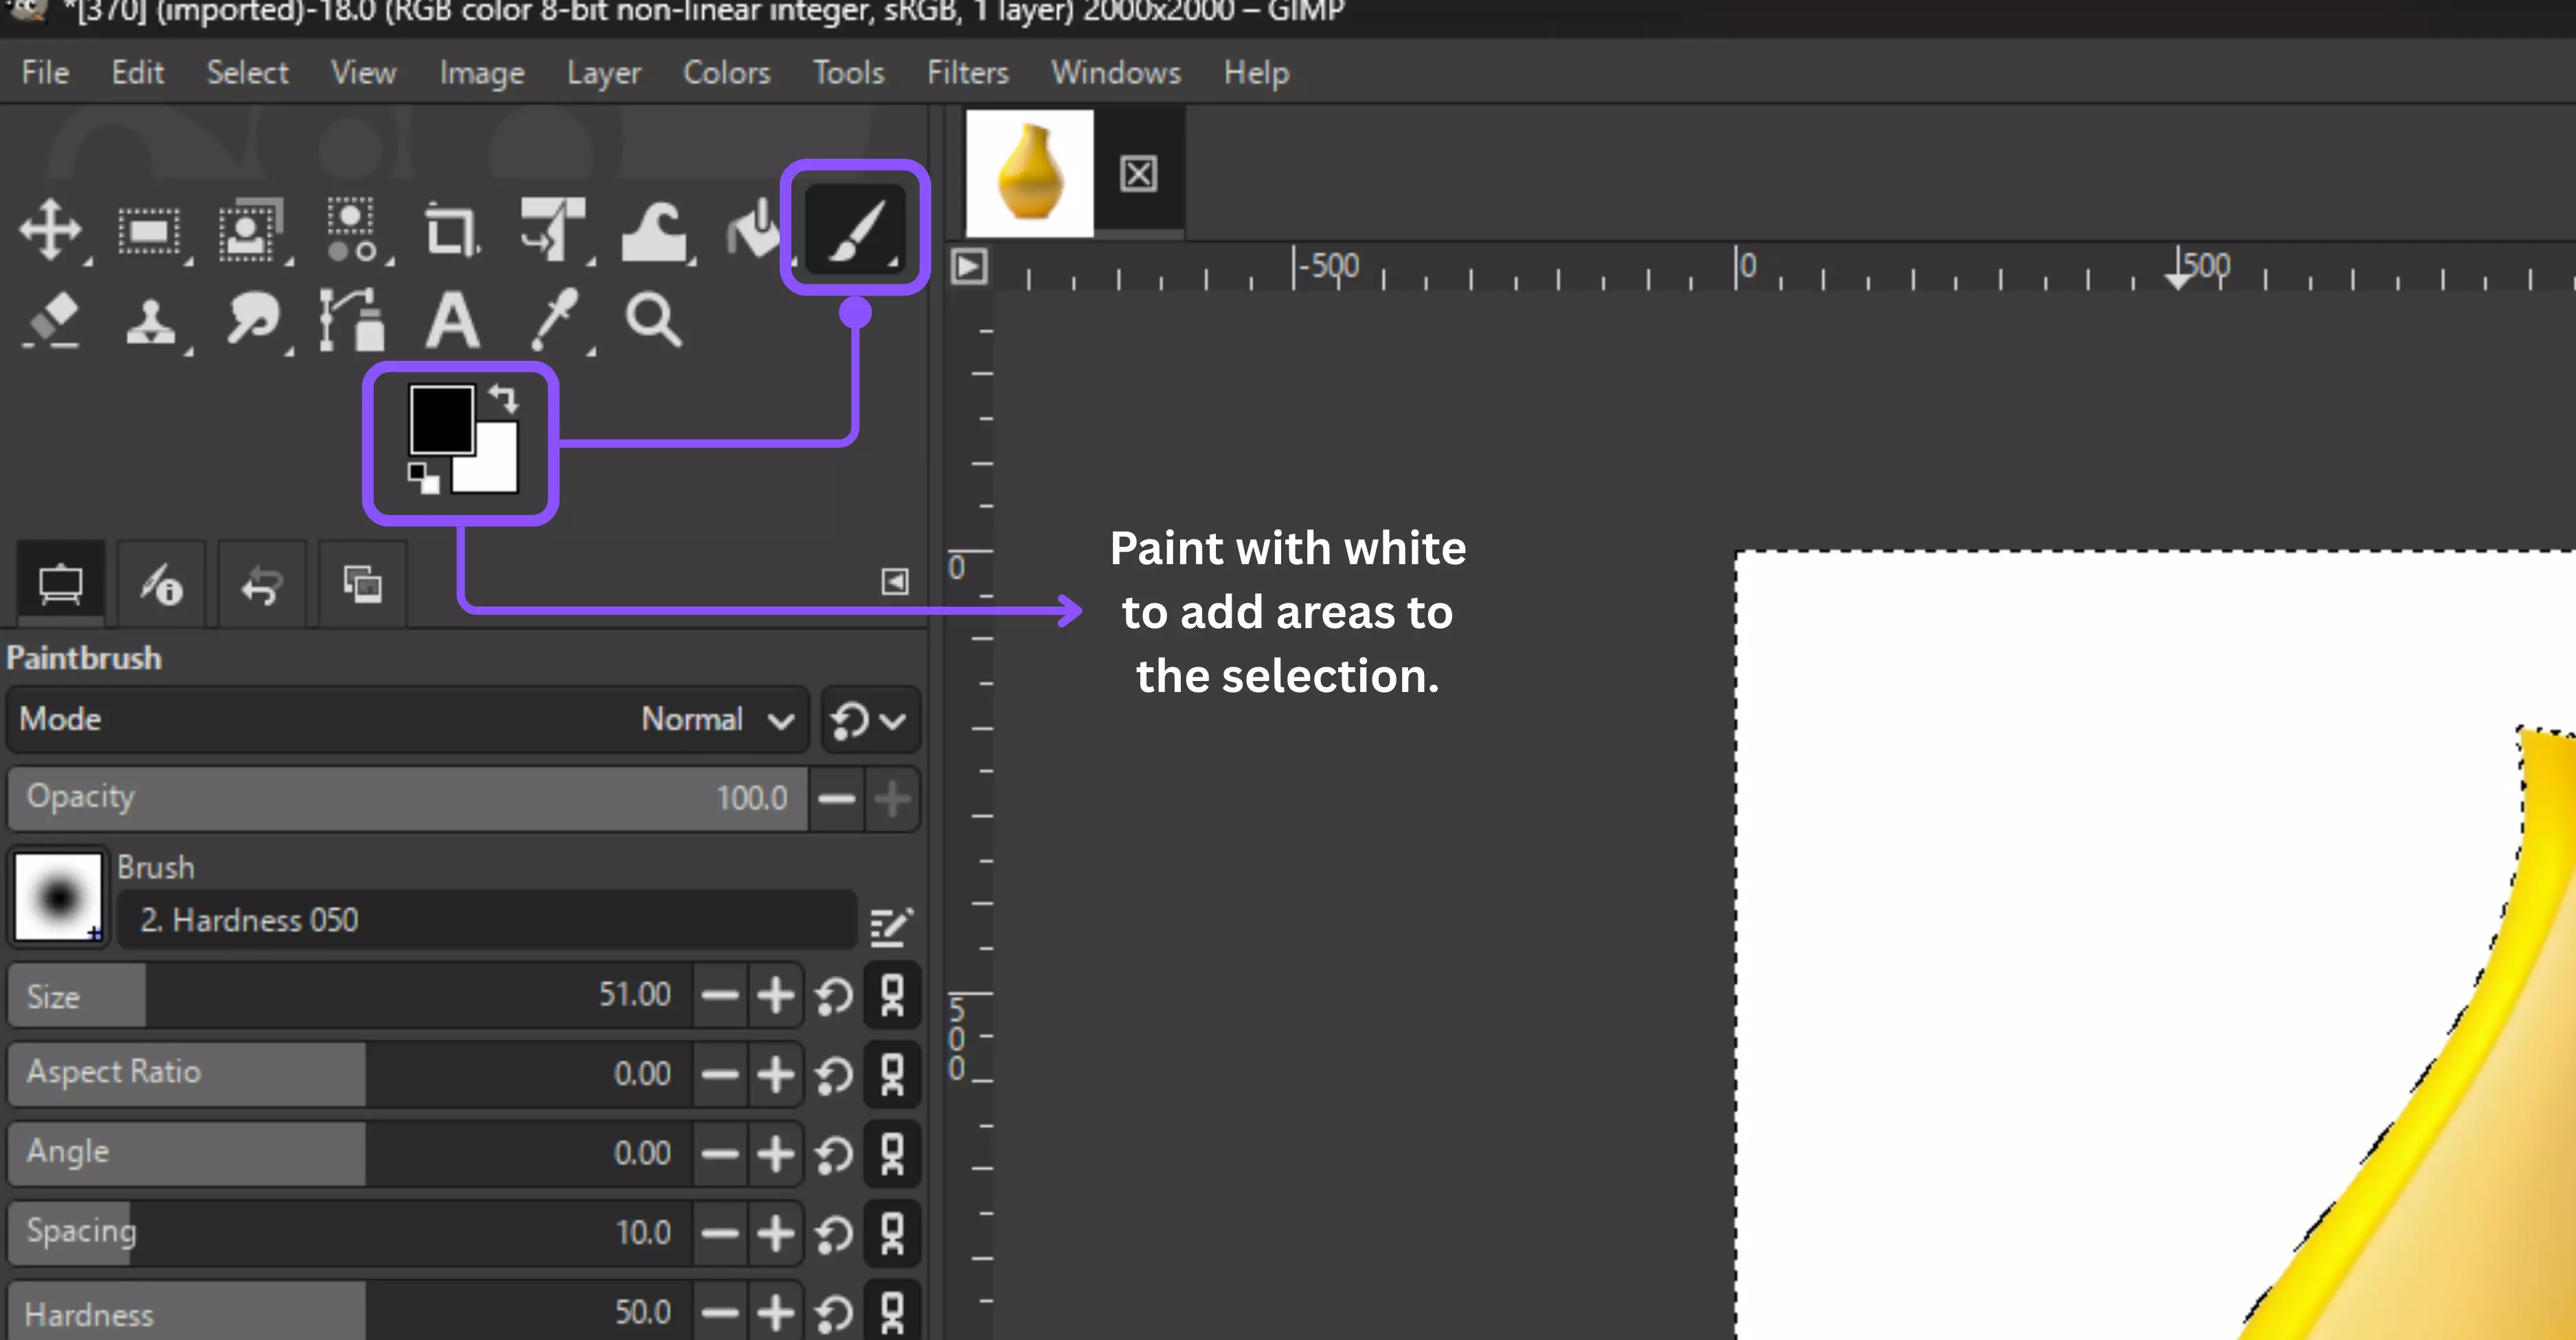
Step 3: Use the Brush Tool to paint with black to remove areas from the selection or to add them back, and paint with white to add areas to the selection.
Step 4: When you’re done with the selection, press Shift+Q again to switch back to normal mode.
Step 5: Finally, apply a Layer Mask (Layer → Mask → Add Layer Mask → Selection) to hide the background.
Why use it?
Quick Mask is the ultimate precision tool, enabling you to correct errors that other methods may miss. It’s essential for professional-quality cutouts where every edge detail matters.
6. Using the Scissors Select tool
The Scissors Select Tool is a hybrid between manual and automatic selection, snapping to edges while giving you control over anchor points.
Steps to know
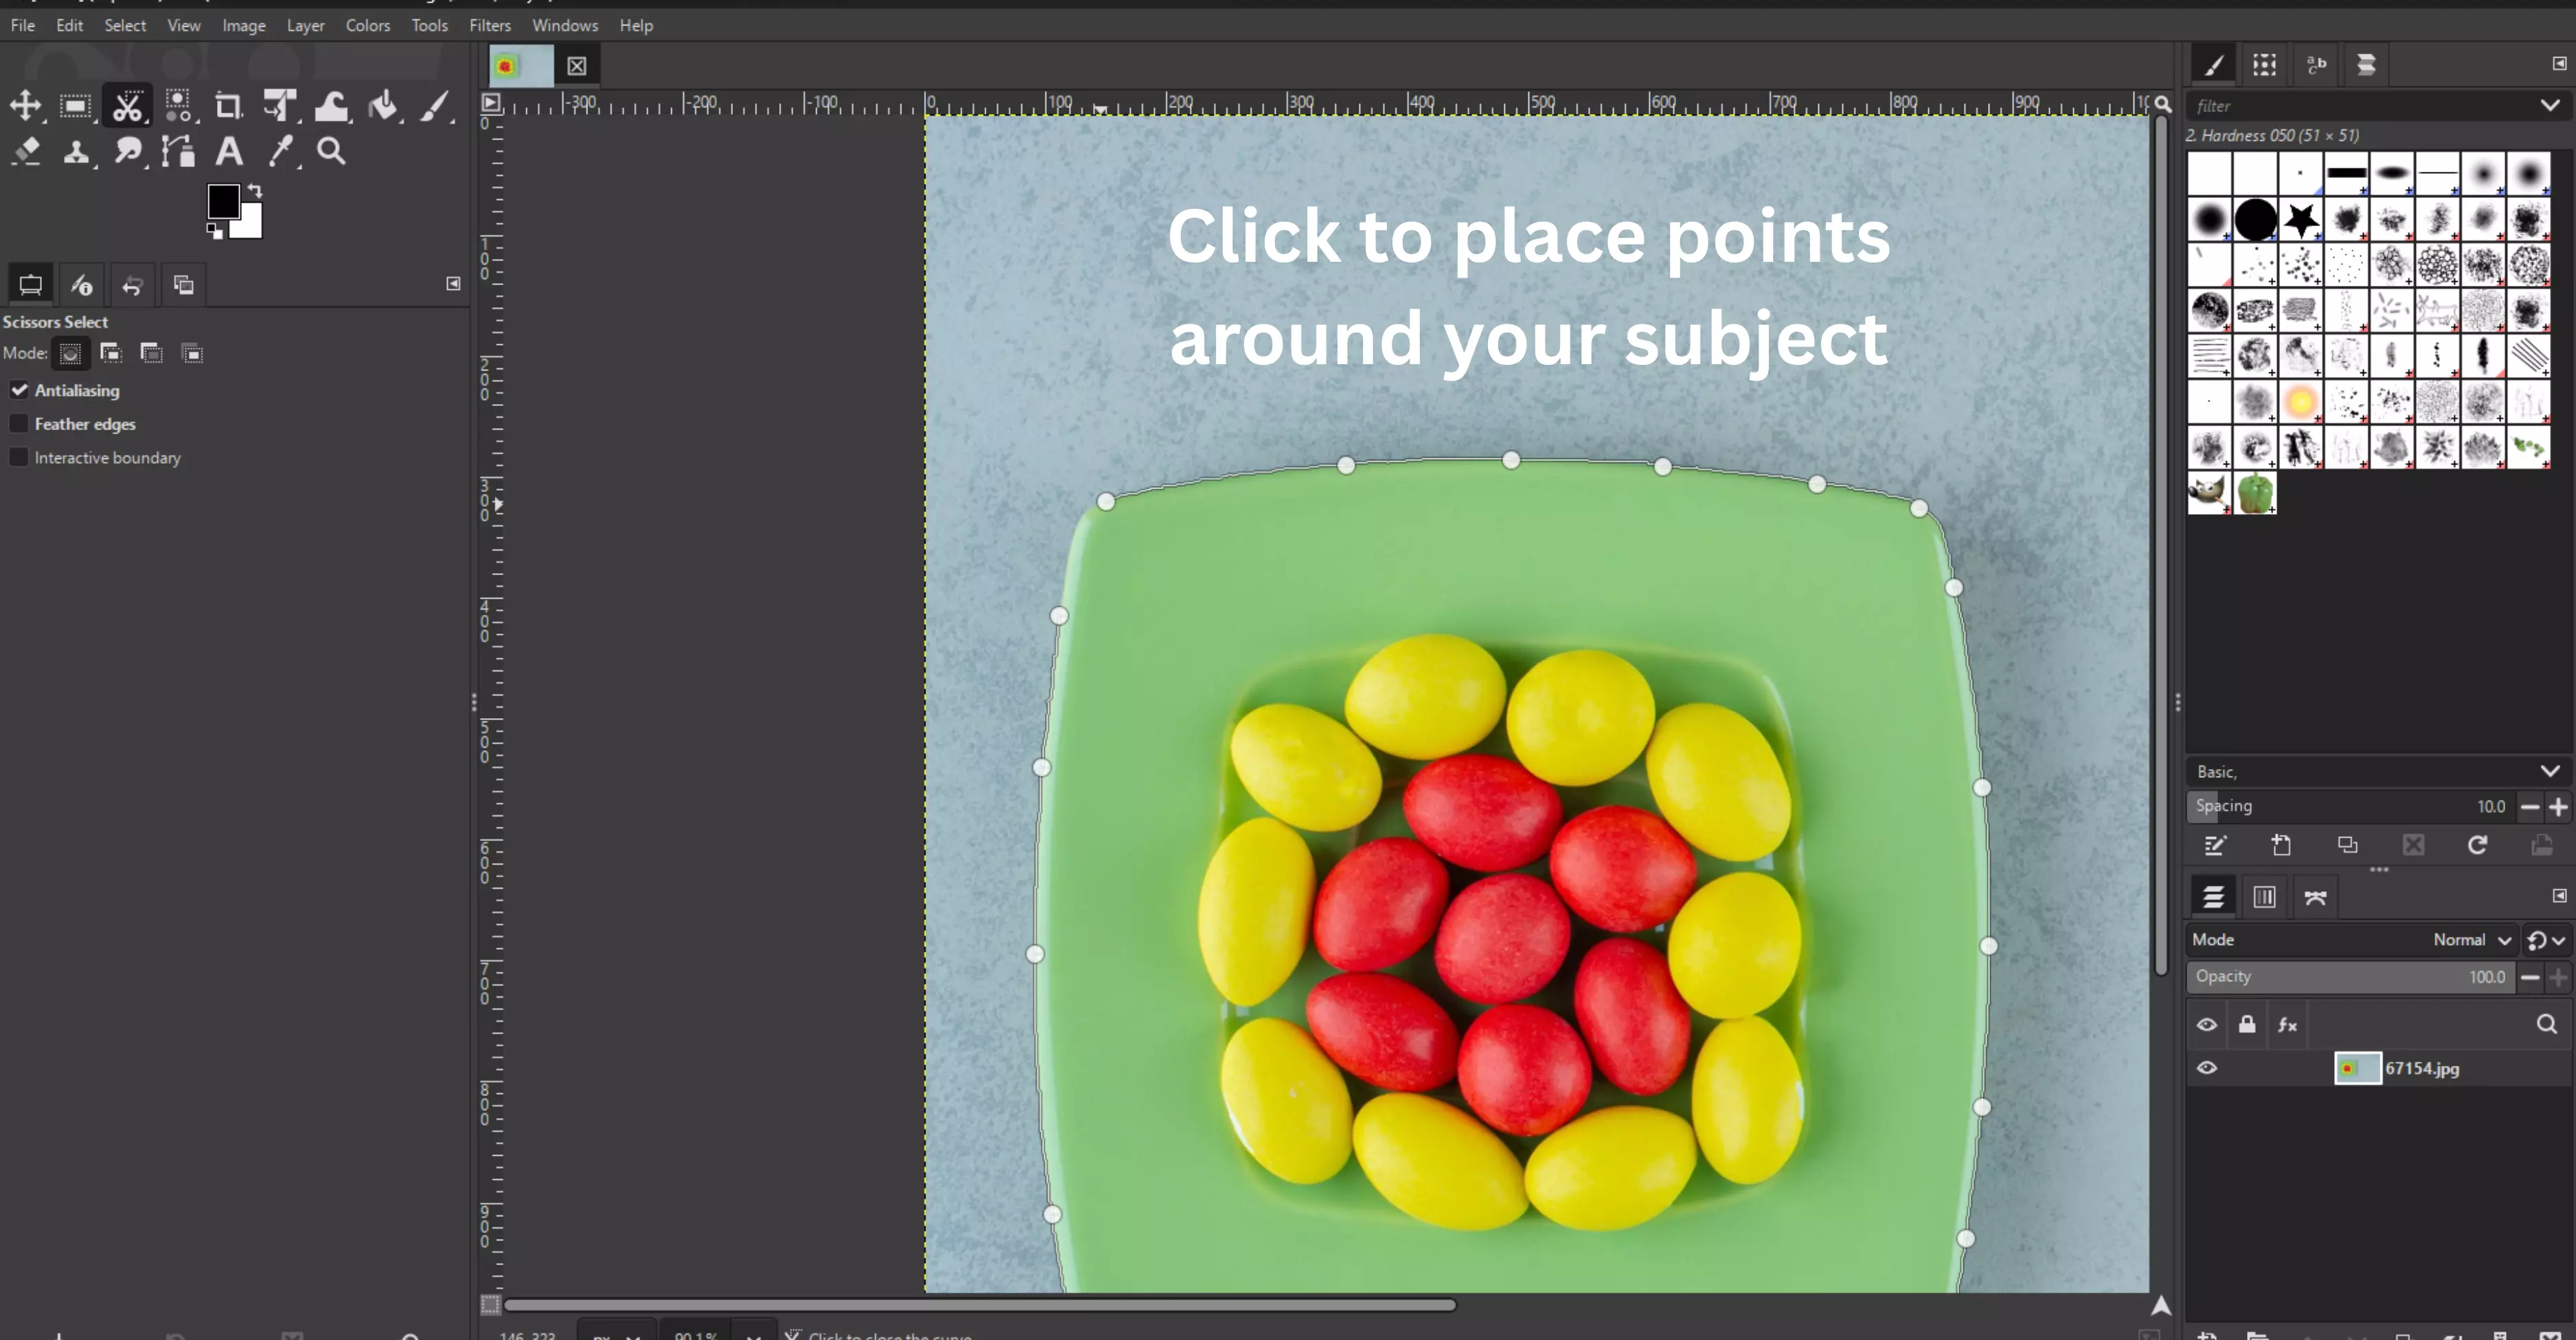
Step 1: Choose the Scissors Select Tool (I) from the toolbox. This tool automatically snaps to the edges of your subject, saving you time and effort.
Step 2: Click to place points around your subject. As you add points, GIMP will create curves.
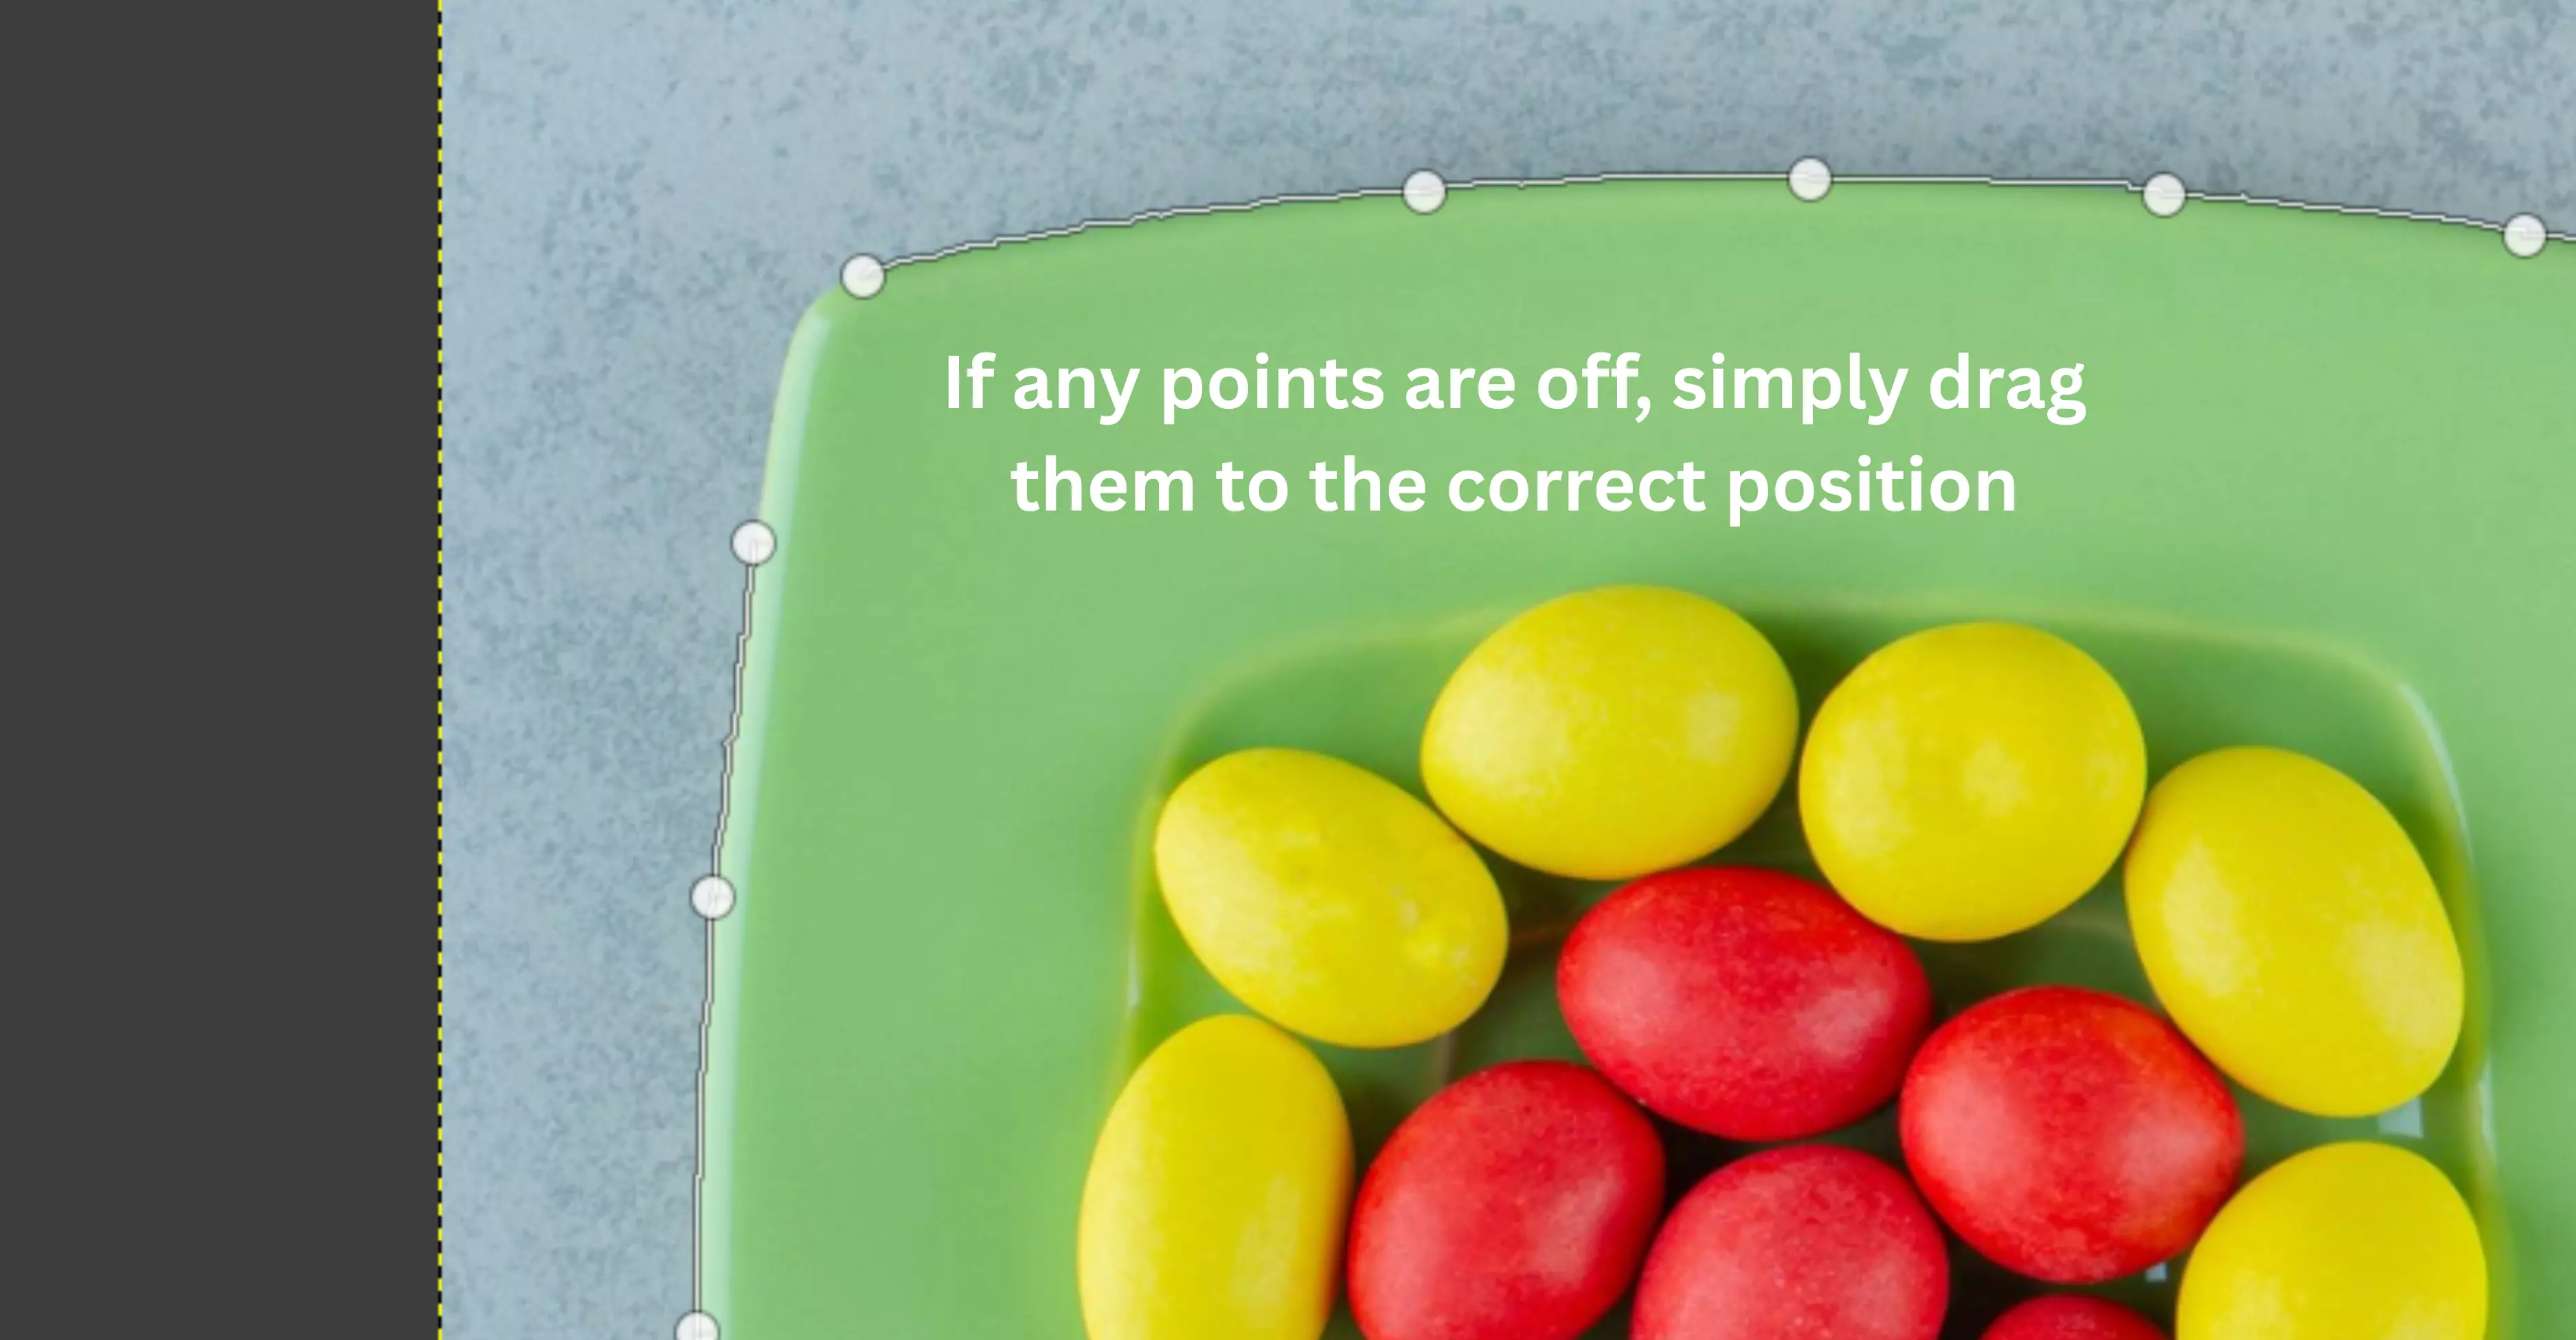
Step 3: If any points are off, simply drag them to the correct position until the outline appears correct.
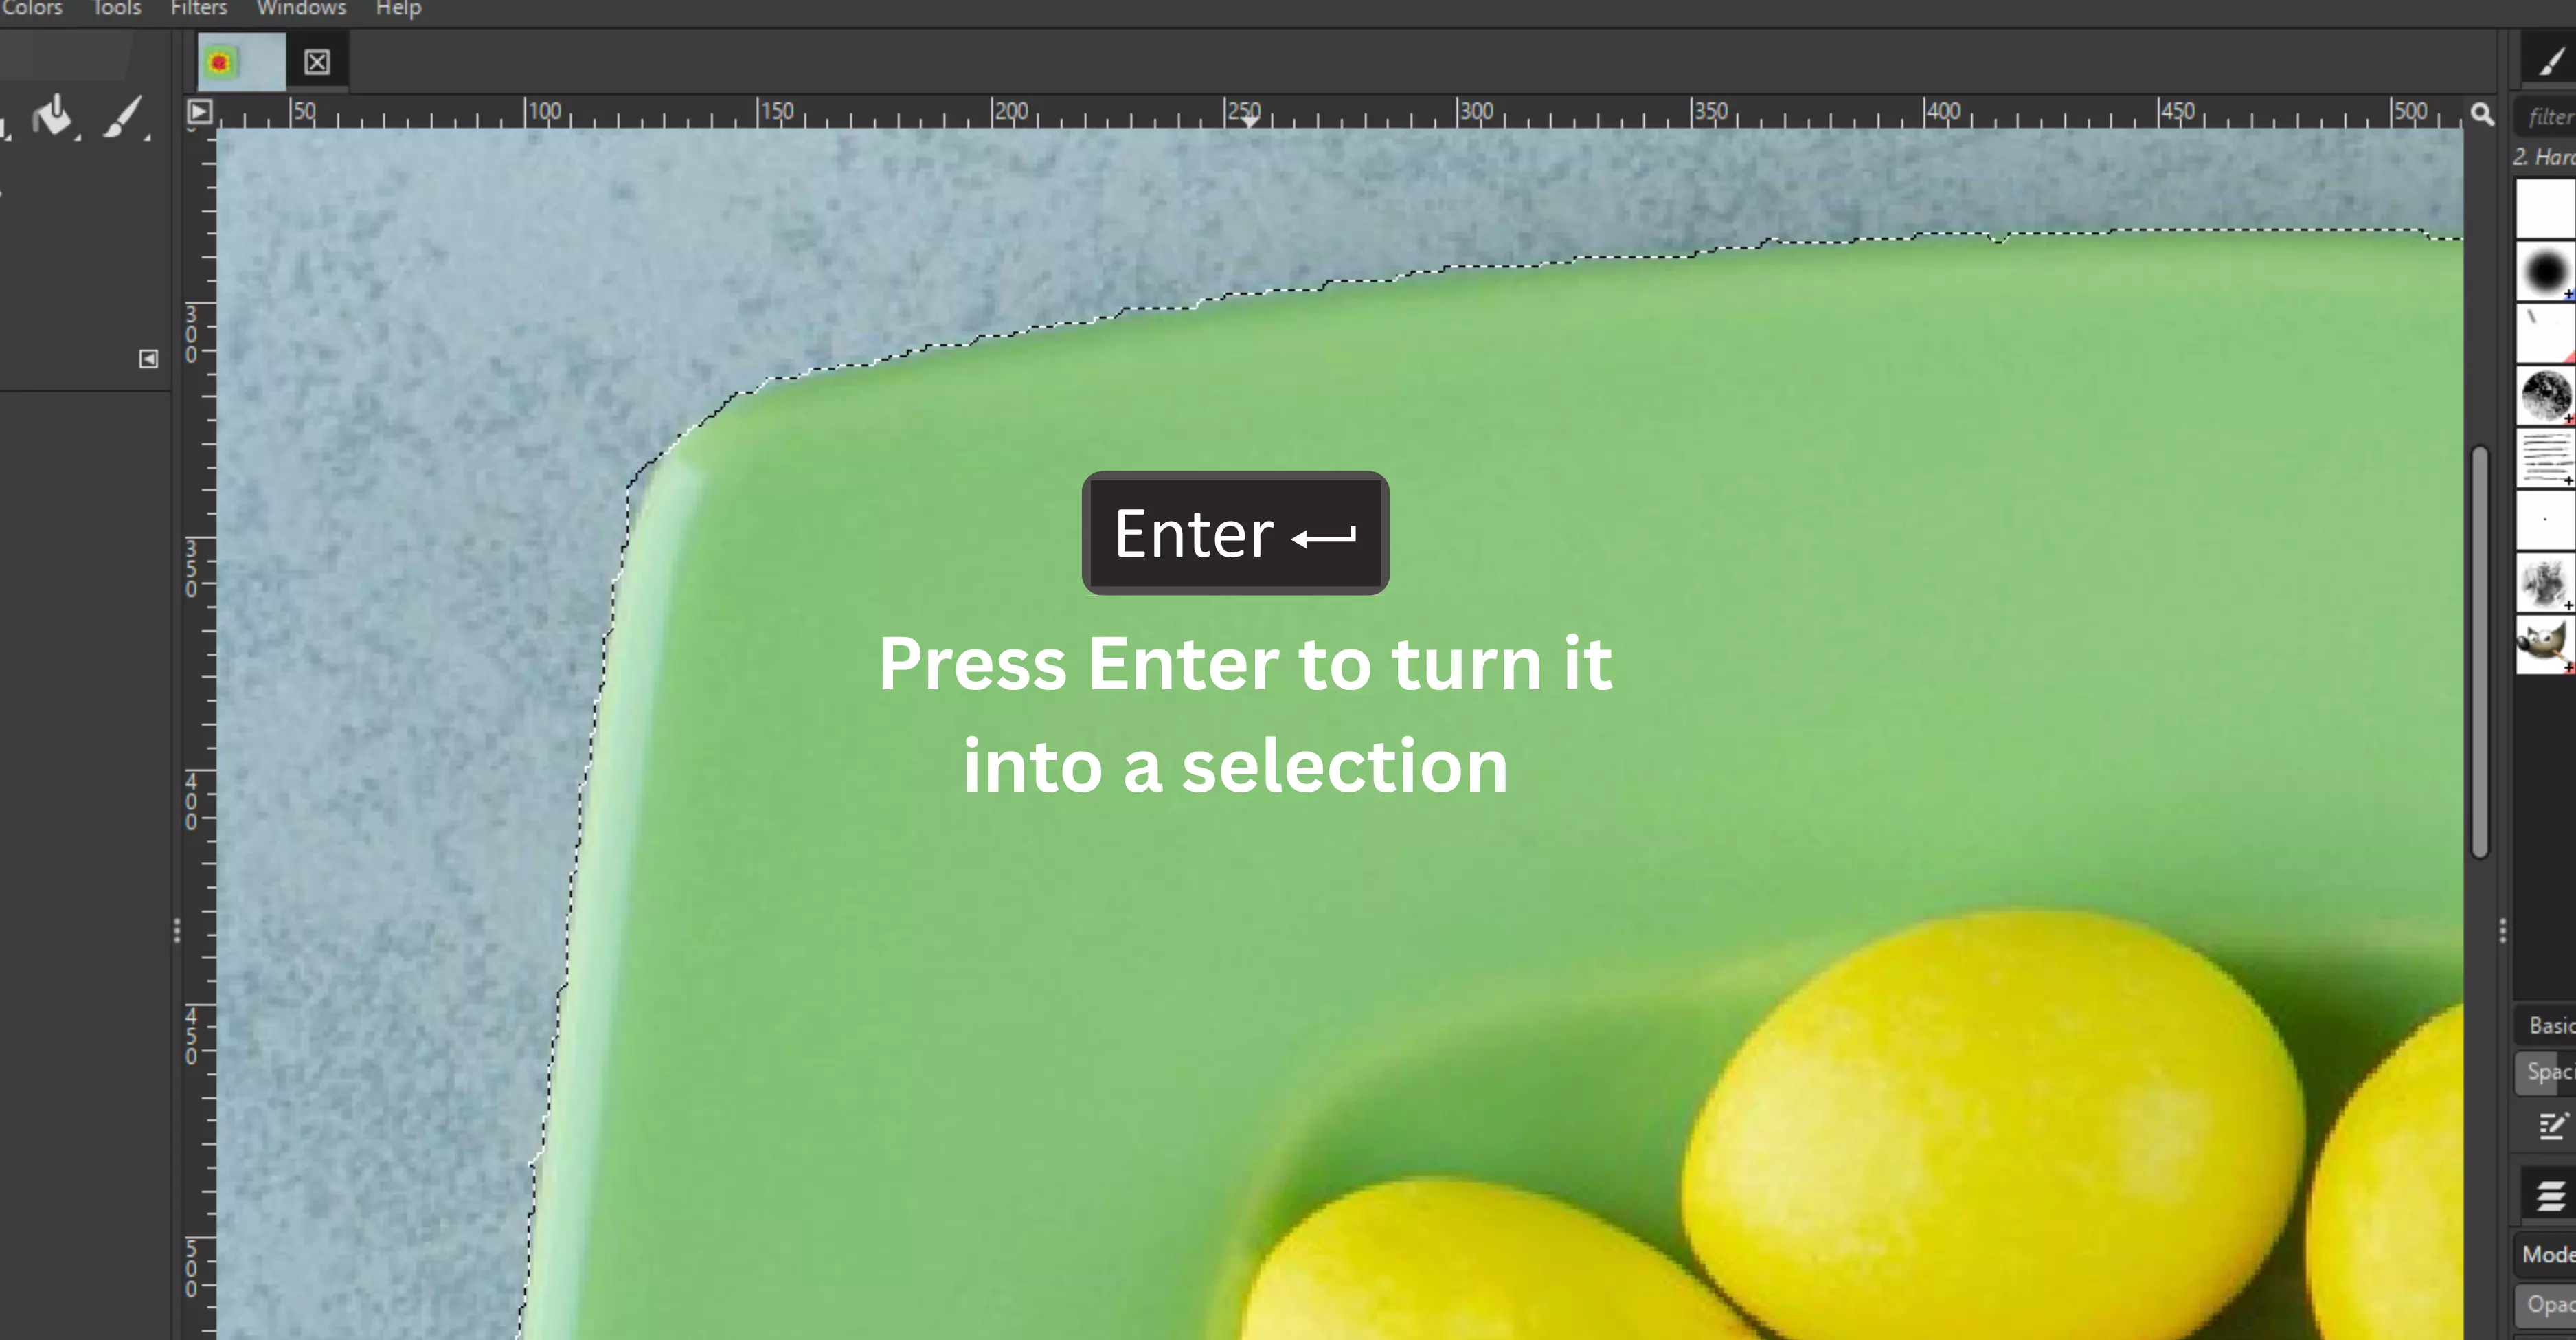
Step 4: When you’re happy with the outline, press Enter to turn it into a selection.
Step 5: Enable transparency: Layer → Transparency → Add Alpha Channel.
Step 6: Apply a Layer Mask (Layer → Mask → Add Layer Mask → Selection) to remove the background cleanly.
Why use it?
This tool strikes a balance between control and automation, making it ideal for medium-complexity subjects. It’s easier than Paths for beginners, but offers better accuracy than purely automatic tools.
How to make background transparent in GIMP (most searched across the web)
If you’ve ever tried to use an image online and ended up with an ugly white box around it, you know why a transparent background is so important.
Whether you’re editing a logo, preparing product photos, or creating website assets, transparency makes everything look clean and professional. Luckily, GIMP makes this process work easily once you know where to look.
Step 1: Open your image.
Launch GIMP and open the file you want to edit. It’s as simple as heading to File → Open and selecting your image.
Step 2: Add transparency to your layer.
By default, many images don’t support transparency. To fix that:
- Go to Layer → Transparency → Add Alpha Channel.
Step 3: Remove the background.
Now, pick the right tool for the job:
- Use the Paths Tool if you need clean edges.
- Use the Foreground Select Tool when dealing with complex layers, such as ir or fur.
- Fuzzy Select or Select by Color works perfectly for simple, solid-colored backgrounds. Once you’ve made your selection, turn it into a Layer Mask. This doesn't remove the background, meaning you can always adjust it later.
Step 4: Clean up the edges.
- Zoom in and take a closer look. If some parts look harsh, soften them with a smoother selection. Y from the menu can also be used to paint directly on the mask to fine-tune specific spots.
Step 5: Save it the right Way.
When you’re happy with the result, export it correctly:
- Go to File → Export As.
- Choose PNG or WebP—formats that keep reserve transparency.
Common mistakes to avoid when removing background in GIMP (beginner tips)
- Always add an Alpha Channel first, or your background won’t turn transparent.
- Don’t press Delete—use Layer Masks so you can edit later.
- Zoom in while working to catch small details you might miss.
- Fix rough or jagged edges using Feather or Grow/Shrink.
- Watch out for white outlines (halos) around your subject—refine your selection if needed.
- Export in PNG or WebP, not JPEG, to keep a transparent copy of the image.
How to remove background in GIMP on Mac
Open your image in GIMP
- Launch GIMP on your Mac and go to File, then Open
- Select the image you want to edit and click Open
- Make sure your image is in RGB mode before starting
Add an alpha channel first
- Go to Image, then Flatten Image to start clean
- Right-click your layer in the Layers panel and select Add Alpha Channel
- Without this step, GIMP cannot make the background transparent
Use the Fuzzy Select tool for simple backgrounds
- Press Shift and F on your keyboard to activate Fuzzy Select
- Click directly on the background area you want to remove
- Adjust the threshold slider higher for more colour range selection
Refine your selection
- Hold Shift and click to add more areas to your selection
- Hold Control and click to remove areas from your selection
- Zoom in to check the edges are clean before deleting
Delete the background
- Once satisfied with your selection, press the Delete key
- The background will turn into a transparent checkerboard pattern
- This confirms the background has been successfully removed
Export your image correctly
- Go to File, then Export As
- Save as PNG to preserve the transparent background
- JPEG does not support transparency so always choose PNG
How to remove Backgrounds using AI tools other than GIMP?
Sometimes, manual editing isn’t practical. Here are four AI tools that do the job in seconds:
1. Pixelbin’s AI background remover

Pixelbin AI background remover is one of those tools that immediately feels like a time-saver when it comes to background removal. It’s designed to handle background removal with perfect measurements, even for those small spots where removal is not possible with other tools.
Unlike many other tools, Pixelbin also supports background replacement with AI-generated designs, allowing you to customize the background according to your needs. It’s particularly useful for businesses that need good branding.
Why do I like the tool?
- Works with multiple formats, including PNG, JPG, WEBP, and HEIC.
- Supports bulk background removal and API integration for businesses and e-commerce workflows.
- Delivers high-resolution results up to 5,000 × 5,000 pixels, which is great for ads or print.
- This feature lets you replace backgrounds with solid colors, custom images, or AI-generated scenes.
- Available on mobile and integrates with tools like Figma via plugins.
2. Erase.bg
Erase.bg is ideal for individuals seeking a straightforward and efficient way to remove backgrounds from images. You simply have to upload your image, and within seconds, the background is gone—it’s as simple as that. No software downloads, no complex settings, only clean results.
Along with its simplicity, Erase.bg delivers sharp, professional cutouts suitable for a wide range of applications, from profile pictures to product images. It’s a favorite tool for beginners and professionals alike because it gets the job done without any editing skills, saving time while still producing quality results.
Why do I like the tool?
- Removes backgrounds instantly with AI in one click.
- Supports high-resolution images up to 10,000 × 10,000 px without quality loss.
- Works online—no software or sign-up needed.
- Allows you to replace backgrounds with solid colors or themes.
- Offers bulk removal and API support for businesses and developers.
3. Photoroom
Photoroom goes beyond simple background removal—it’s an all-in-one image editing platform. Designed with businesses and professionals in mind, it offers high-quality background removal, replacement, and editing capabilities. Its known for product photos, ads and social media posts where Photoroom works best as a background remover.
Its ability to handle batch processing makes it especially useful for e-commerce brands and marketing teams. The built-in templates also help you create professional designs quickly, making it a versatile choice for anyone who needs more than just background removal.
Why do I like the tool?
- Remove backgrounds instantly with AI.
- Replace with solid colors, custom images, or templates.
- 1,000+ ready-to-use templates for product photos and social media.
- Batch editing for multiple images at once.
- A mobile app is available for iOS and Android.
- High-resolution exports for ads, prints, and e-commerce.
- Pro version unlocks watermark-free editing and advanced tools.
4. Fotor background remover
Fotor is more than just a background remover—it’s like having a full editing toolkit right in your browser. Its background removal tool is one of the best, offering the right balance of detail that is both detailed enough to handle complex images and simple enough for anyone to use.
What makes Fotor stand out is what comes after. Once you’ve removed your background, you can enhance the image, adjust lighting, add text, or apply filters—all without switching apps. For creators and professionals seeking results from a single tool, it is a fantastic all-in-one solution.
Why do I like the tool?
- Remove backgrounds automatically with AI.
- Replace backgrounds with colors, patterns, or custom images.
- Built-in photo editor with filters and retouching tools.
- Create social media posts, banners, and ads with templates.
- Works online—no need to download heavy software.
- High-resolution image export for professional use.
- Available on web, Windows, Mac, iOS, and Android.
Final thoughts
GIMP is one of the most useful free tools for background removal, giving you the free hand to handle everything from simple product photos to complex subjects like hair or fur. Each method has its strengths when you need clean results.
As long as you work with an Alpha Channel and use Layer Masks instead of deleting pixels, your results will look far more polished. Of course, not everyone has the time to refine every edge manually.
That’s where tools like Pixelbin Background Remover come in handy. It delivers fast and accurate cutouts and even allows you to swap in customized backgrounds, which is especially useful for businesses that need proper branding.
FAQs
You need to add an Alpha Channel: Right-click layer → Add Alpha Channel.
Use the Foreground Select Tool or Quick Mask, then feather edges for smooth blending.
Fuzzy Select selects connected areas; Select by Color targets all pixels of a specific color.
Use Feather, Grow/Shrink, or paint directly on the Layer Mask in GIMP.
PNG for universal use, WebP for smaller file sizes, while using GIMP for background removal.
Use tools like Pixelbin, Erase.bg, or GIMP plugins from the Plugin Registry.